Robot State Publisher vs. Joint State Publisher

In this post, I will explain the difference between the Robot State Publisher and the Joint State Publisher ROS packages. 

In order to understand the difference between the packages, it is important you first understand that every robot is made up of two components:

  1. Joints
  2. Links

Links and Joints in Robotics

Links are the rigid pieces of a robot. They are the “bones”. 

Links are connected to each other by joints. Joints are the pieces of the robot that move, enabling motion between connected links.

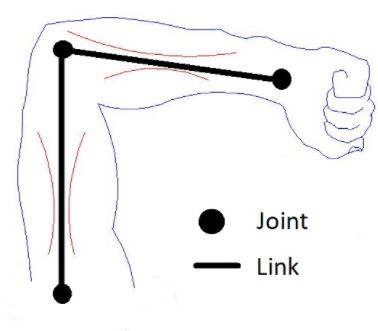
Consider the human arm below as an example. The shoulder, elbow, and wrist are joints. The upper arm, forearm and palm of the hand are links.

link_joint

For a robotic arm, links and joints look like this.

link-joint-robotic-arm

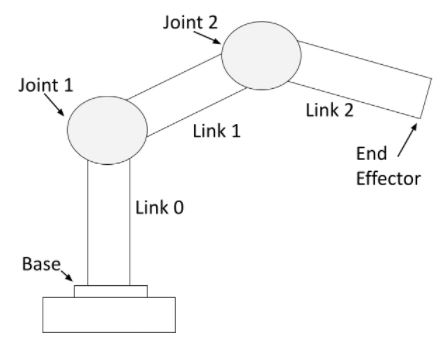
You can see that a robotic arm is made of rigid pieces (links) and non-rigid pieces (joints). Servo motors at the joints cause the links of a robotic arm to move.

For a mobile robot with LIDAR, links and joints look like this:

mobile-robot-joints-links

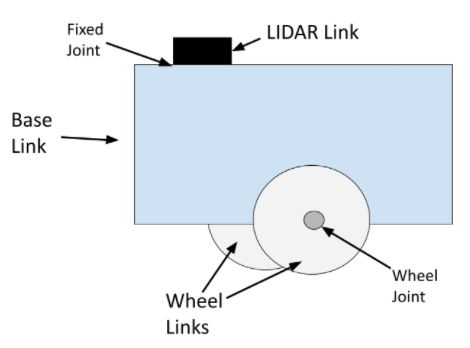
The wheel joints are revolute joints. Revolute joints cause rotational motion. The wheel joints in the photo connect the wheel link to the base link.

Fixed joints have no motion at all. You can see that the LIDAR is connected to the base of the robot via a fixed joint (i.e. this could be a simple screw that connects the LIDAR to the base of the robot).

You can also have prismatic joints. The SCARA robot in this post has a prismatic joint. Prismatic joints cause linear motion between links (as opposed to rotational motion).

Difference Between the Robot State Publisher and the Joint State Publisher

Whenever we want a robot to complete a specific task (e.g. move a certain distance in an environment, pick up an object, etc.), we have to have a way to know the position and velocity of each joint at all times. The Joint State Publisher does exactly this.

The Joint State Publisher package keeps track of the position (i.e. angle in radians for a servo motor or displacement in meters for a linear actuator) and velocity of each joint of a robot and publishes these values to the ROS system as sensor_msgs/JointState messages.

The Robot State Publisher then takes two main inputs:

  1. The sensor_msgs/JointState messages from the Joint State Publisher. 
  2. A model of the robot in URDF file format.

The Robot State Publisher takes that information, outputs the position and orientation of each coordinate frame of the robot, and publishes this data to the tf2 package

The tf2 package is responsible for keeping track of the position and orientation of all coordinate frames of a robot over time. At any given time, you can query the tf2 package to find out the position and orientation of any coordinate frame (i.e. “child frame”) relative to another coordinate frame (i.e. “parent” frame).

For example, if we are using ROS 2 and want to know the position and orientation of the LIDAR link relative to the base of the robot, we would use the following command:

ros2 run tf2_ros tf2_echo base_link lidar_link

The syntax is:

ros2 run tf2_ros tf2_echo <parent frame> <child frame>

Joint State Publisher: Simulation vs. Real World

When you are creating robots in simulation using a tool like Gazebo, you are going to want to use the joint state publisher Gazebo plugin to publish the position and orientation of the joints (i.e. publish the sensor_msgs/JointState messages).

In a real-world robotics project, you will want to write your own joint state publisher. You can find examples of how to do this here, here, and here.

How to Download a ROS Package from GitHub

Let’s say you see a ROS package on GitHub that you’d like to bring into your workspace.

For example, I would like to download the rviz_plugin_tutorials package available on this page on GitHub.

Option 1: Using the Command Line

ROS 1 Package

Open a new terminal window.

Type:

cd ~/catkin_ws/src

Clone the repository:

git clone -b <branch> <address>

For example, if you are looking to download the rviz_plugin_tutorials package available here, you would type the following command (this is a single command all on one line):

git clone -b noetic-devel https://github.com/ros-visualization/visualization_tutorials.git

You could also leave out the ROS branch specification, and type:

git clone <address>

For example:

git clone https://github.com/ros-visualization/visualization_tutorials.git

Then open up a new terminal window, and type:

cd ~/catkin_ws
catkin_make

That’s it!

ROS 2 Package

For a ROS 2 package, you would type the following (assuming the name of your ROS 2 workspace is dev_ws):

cd ~/dev_ws/src
git clone -b foxy-devel https://github.com/ros-visualization/visualization_tutorials.git

Open a new terminal window, and type:

cd ~/dev_ws

Install dependencies:

rosdep install --from-paths src --ignore-src -r -y

To build the packages, type:

colcon build --symlink-install

If that command doesn’t work, try the following command:

colcon build

Option 2: Downloading Manually from GitHub

First, you need to download the files to your computer.

Go to this page and download all the files. I like to download it to my Desktop.

Click the green “Code” button to download a ZIP file of the repository.

Open up the zip file, and go to the rviz_plugin_tutorials folder. The rviz_plugin_tutorials package is the package we need.

Right-click on that folder, and click “Extract”.

Move that folder to your catkin_ws/src folder. I just dragged the folder to my catkin_ws/src folder on my computer, just as I would drag and drop any folder on a Mac or Windows computer.

Open up a terminal window, and type:

cd ~/catkin_ws/src
dir

You should see the rviz_plugin_tutorials package (i.e. a folder) in there.

Now you need to run this command so that your ROS environment knows about the rviz_plugin_tutorials package we just added. Open a new terminal window, and type:

cd ~/catkin_ws/
catkin_make

Open a new terminal window, and type:

rospack find rviz_plugin_tutorials

You should see the path of your new ROS package.

50-path-of-new-ros-packageJPG

To see if our package depends on other packages, type these commands. Ignore any error messages you see in the terminal:

rosdep update
rosdep check rviz_plugin_tutorials

You should see a message that says “All system dependencies have been satisfied.”

51-all-dependencies-satisfiedJPG

How to Set Up and Control a Robotic Arm Using MoveIt and ROS

In this tutorial, I will show you how to set up and control a robotic arm using MoveIt and ROS. MoveIt is a motion planning software for robotic arms. Here is the output:

Real-World Applications

This project has a number of real-world applications: 

  • Indoor and Outdoor Delivery Robots
  • Room Service Robots
  • Robot Vacuums
  • Order Fulfillment
  • Manufacturing
  • Factories

Our robot will exist in a world that contains a post office and three houses. The use case for this simulated robot would be picking up packages at a post office and delivering them to houses in a neighborhood. 

Let’s get started!

Prerequisites

  • You have completed this tutorial where you learned how to create a simulated mobile manipulator.
  • You have completed this tutorial where you set up and configured the ROS Navigation Stack for your robot.

All the code you need is located at this link.

Install MoveIt

Let’s install MoveIt

Open a new terminal window, and type the following commands:

sudo apt install ros-noetic-moveit
sudo apt-get install ros-noetic-moveit-setup-assistant
sudo apt-get install ros-noetic-moveit-simple-controller-manager
sudo apt-get install ros-noetic-moveit-fake-controller-manager

Configure the Robotic Arm

Let’s use the MoveIt Setup Assistant to configure our robotic arm.

Open a new terminal window, and type the following command.

roslaunch moveit_setup_assistant setup_assistant.launch
17-launch-moveit-setup-assistant

Click Create New MoveIt Configuration Package.

Load the mobile_manipulator.urdf file. Click Load Files.

18-load-mobile-manipulator

If the URDF file loads properly, you will see a success message.

19-success-message

Click the Self-Collisions tab on the left-hand side.

Click Generate Collision Matrix.

20-click-generate-collision-matrix

If you wish, you can manually enable pairs of links for which you want MoveIt to check for collisions during the motion planning process. I will leave the defaults as-is.

Let’s skip the Virtual Joints tab. We won’t have any virtual joints for our mobile manipulator.

Click the Planning Groups tab.

21-five-joints-robotic-arm

Click Add Group.

Let’s call the group arm.

In the Kinematic Solver dropdown box, select the kdl_kinematics_plugin/KDLKinematicsPlugin.

Keep the resolution and timeout as the default values.

Choose RRTstar as the Group Default Planner.

Add the five joints of the robotic arm.

Click the Robot Poses tab.

22-home-position

Click Add Pose.

Let’s add a pose for the home position.

Pose Name: home_position

  • arm_base_joint: 0.0
  • shoulder_joint: 0.0
  • bottom_wrist_joint: 0.0
  • elbow_joint: 0.0
  • top_wrist_joint: 0.0

Click Save.

Click Add Pose.

Pose Name: goal_position

  • arm_base_joint: 1.5794
  • shoulder_joint: -0.9893
  • bottom_wrist_joint: -0.9893
  • elbow_joint: 0.0
  • top_wrist_joint: -0.6769

Click Save.

23-goal-position

We don’t have a gripper or suction cup on the end of our robotic arm, so we can skip the End Effectors tab.

Click the Passive Joints tab. Here is what my setup assistant looks like. I have added all the wheel joints to the passive joints list.

24-passive-joints

Click the ROS Control tab.

Click the Auto Add FollowJointsTrajectory Controllers For Each Planning Group button.

Click the Author Information tab.

Add your name and email address.

25-name-email-address

Click the Configuration Files tab.

26-generate-configuration-file

Select the destination where you want to save the configuration files. I will choose my ~catkin_ws/src/ folder. The name of the folder will be mobile_manipulator_moveit_config.

Click Generate Package.

27-generate-package

Click Exit Setup Assistant.

Control the Robotic Arm Manually

Let’s install a couple more packages before we get started. Open a terminal window, and type the following commands.

sudo apt-get update
sudo apt install ros-noetic-moveit-resources-prbt-moveit-config
sudo apt install ros-noetic-pilz-industrial-motion-planner

Open your mobile_manipulator_moveit_controller_manager.launch.xml file.

cd ~/catkin_ws/src/mobile_manipulator_moveit_config/launch
gedit mobile_manipulator_moveit_controller_manager.launch.xml

Add this line in the line below the opening <launch> tag:

<arg name="execution_type" default="unused" />

Save the file, and close it.

Now, launch the robotic arm in Gazebo by opening a new terminal window, and typing:

roslaunch mobile_manipulator mobile_manipulator_gazebo.launch

Open a new terminal window, and launch MoveIt.

Launch the move_group.launch file by opening a terminal window, and typing:

roslaunch mobile_manipulator_moveit_config move_group.launch
28-launch-moveit

Open another terminal window, and launch RViz. This command below is a single command.

roslaunch mobile_manipulator mobile_manipulator_move_base.launch
34-moveit-motion-planning-1

Click Add in the bottom left, and add the Motion Planning plugin under moveit_ros_visualization. If you don’t have the Add button, be sure to go to Panels -> Display on the upper menu to make sure it appears.

29-click-add
30-motion-planning-plugin

Click the Planning tab.

31-open-rviz

For Goal State, choose goal_position.

32-goal-position

Click Plan & Execute.

33-click-plan-and-execute

The robotic arm will move to the goal position.

35-trajectory-succeeded

Next Steps

Now you know how to move the robotic arm manually using MoveIt’s RViz interface. If you want to control the robotic arm using code, you can follow this tutorial for C++ or this tutorial for Python.

That’s it! Keep building!