
In this post, we will learn how to create a publisher node, subscriber node, and a publishing subscriber node in ROS 2 Foxy Fitzroy using C++. You can think of a node as a small single-purpose program within a larger robotic system. Publisher nodes publish data to topic(s), subscriber nodes receive data from topic(s), and a publishing subscriber node can do both receive data from topic(s) and publish data to topic(s).
A good analogy is YouTube. YouTubers (publisher nodes) publish videos (messages) to a channel (topic), and you (subscriber node) can subscribe to that channel (topic) so that you receive all the videos (messages) on that channel (topic).
Robotic systems (mobile robots, robotic arms, and aeriel robots) pass a lot of data around, which is why the ROS 2 framework for developing robots is so useful and popular.
The official tutorial is located in the ROS 2 Foxy documentation, but we’ll run through the entire process step-by-step below.
You Will Need
In order to complete this tutorial, you will need:
Prerequisites
You have already created a workspace.
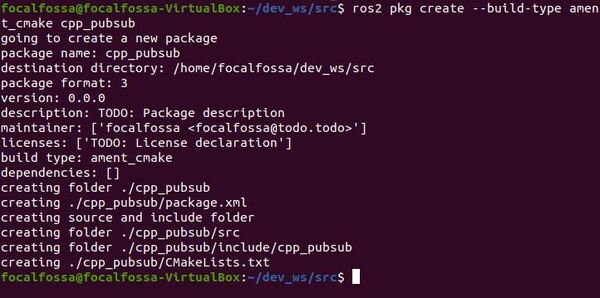
Create a Package
Open a new terminal window, and navigate to the src directory of your workspace:
cd ~/dev_ws/src
Now let’s create a package named cpp_pubsub.
Type this command:
ros2 pkg create --build-type ament_cmake cpp_pubsub
Your package named cpp_pubsub has now been created.
Write a Publisher Node
Move to the /dev_ws/src/cpp_pubsub/src folder
cd cpp_pubsub/src
This folder is where our source code (i.e. publisher and subscriber nodes) will reside.
Make sure you have a text editor installed. I like to use gedit.
sudo apt-get install gedit
Create a blank C++ file called my_publisher_node.cpp.
gedit my_publisher_node.cpp
Write the following code. Don’t be intimidated. C++ code can look kind of scary. Just go one line at a time, and read the comments to understand what each line does.
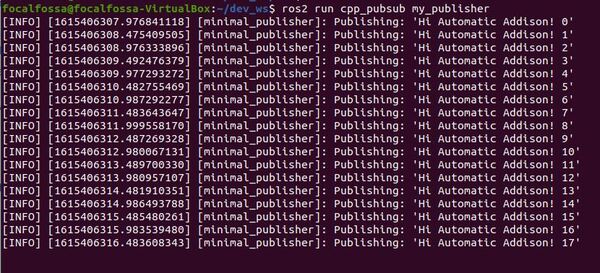
This publisher node publishes the message “Hi Automatic Addison!” every 500 milliseconds (i.e. two times per second) to a topic named addison.
Note that in this tutorial, we are publishing a string to a topic. In a real robotics project, you’ll typically be publishing numerical values. We’re just using strings in this example as a demonstration.
// Include important C++ header files that provide class
// templates for useful operations.
#include <chrono> // Date and time
#include <functional> // Arithmetic, comparisons, and logical operations
#include <memory> // Dynamic memory management
#include <string> // String functions

// ROS Client Library for C++
// Allows use of the most common elements of ROS 2
#include "rclcpp/rclcpp.hpp"

// Built-in message type that will be used to publish data
#include "std_msgs/msg/string.hpp"

// chrono_literals handles user-defined time durations (e.g. 500ms)
using namespace std::chrono_literals;

// Create the node class named MinimalPublisher which inherits the attributes
// and methods of the rclcpp::Node class.
class MinimalPublisher : public rclcpp::Node
{
  public:
    // Constructor creates a node named minimal_publisher.
    // The published message count is initialized to 0.
    MinimalPublisher()
    : Node("minimal_publisher"), count_(0)
    {
      // Publisher publishes String messages to a topic named "addison".
      // The size of the queue is 10 messages.
      publisher_ = this->create_publisher<std_msgs::msg::String>("addison",10);

      // Initialize the timer. The timer_callback function will execute every
      // 500 milliseconds.
      timer_ = this->create_wall_timer(
      500ms, std::bind(&MinimalPublisher::timer_callback, this));
    }

  private:
    // This method executes every 500 milliseconds
    void timer_callback()
    {
      // Create a new message of type String
      auto message = std_msgs::msg::String();

      // Set our message's data attribute and increment the message count by 1
      message.data = "Hi Automatic Addison! " + std::to_string(count_++);

      // Print every message to the terminal window
      RCLCPP_INFO(this->get_logger(),"Publishing: '%s'", message.data.c_str());

      // Publish the message to the topic named "addison"
      publisher_->publish(message);
    }

    // Declaration of the timer_ attribute
    rclcpp::TimerBase::SharedPtr timer_;

    // Declaration of the publisher_ attribute
    rclcpp::Publisher<std_msgs::msg::String>::SharedPtr publisher_;

    // Declaration of the count_ attribute
    size_t count_;
};

// Node execution starts here
int main(int argc, char * argv[])
{
  // Initialize ROS 2
  rclcpp::init(argc, argv);

  // Start processing data from the node as well as the callbacks and the timer
  rclcpp::spin(std::make_shared<MinimalPublisher>());

  // Shutdown the node when finished
  rclcpp::shutdown();
  return 0;
}
Add Dependencies
Now that we’ve written our publisher node, we need to let our system know what libraries our node needs in order to execute properly. These libraries are our node’s dependencies.
Go to the dev_ws/src/cpp_pubsub folder, and see what files are in there.
cd ~/dev_ws/src/cpp_pubsub
dir

You should see that this folder contains a file named package.xml and a file named CMakeLists.txt.
The package.xml file contains key information about the cpp_pubsub package. CMakeLists.txt contains important information needed to compile the C++ source code you wrote in the previous section of this tutorial.
Open the package.xml file.
gedit package.xml
Fill in the description of the cpp_pubsub package, your email address and name on the maintainer line, and the license you desire (e.g. Apache License 2.0).
<description>A minimal publisher/subscriber that uses the ROS C++ Client Library</description>
<maintainer email="automaticaddison@todo.todo">automaticaddison</maintainer>
<license>Apache License 2.0</license>
Now, after the <build_type>ament_cmake</build_type> line, add the two dependencies your node needs in order to compile. These properties were included at the top of the C++ code of your publisher node (the other dependencies are part of the C++ Standard Library, so they don’t need to be added here).
<depend>rclcpp</depend>
<depend>std_msgs</depend>
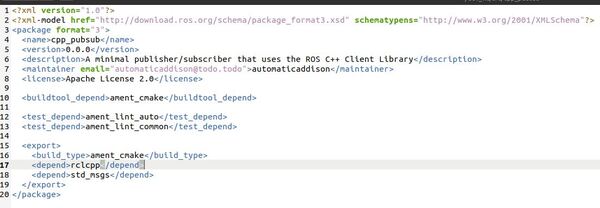
Save the file and close it to return to the terminal window.
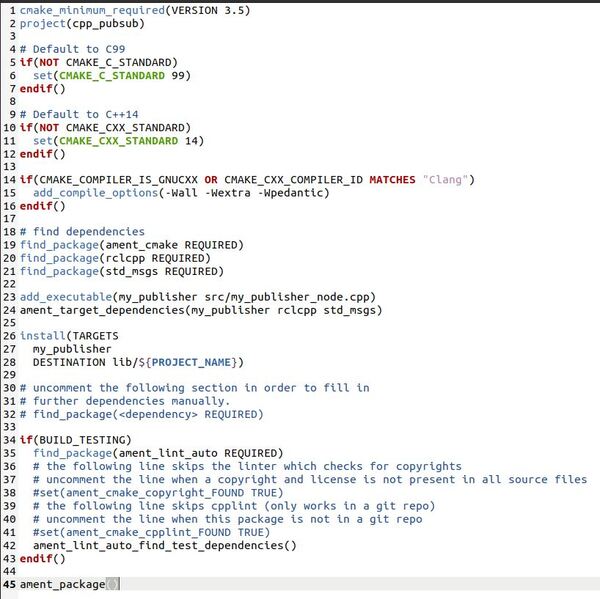
Modify CMakeLists.txt
Open CMakeLists.txt.
gedit CMakeLists.txt
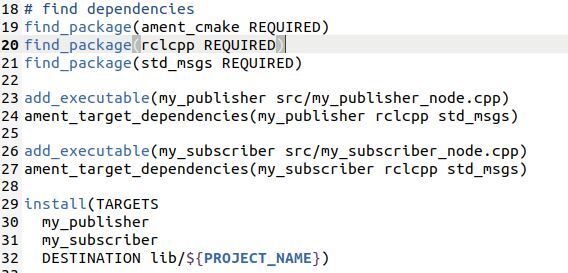
Under this line (find_package(ament_cmake REQUIRED)), add the dependencies:
find_package(rclcpp REQUIRED)
find_package(std_msgs REQUIRED)
Below that, add the executable. We will name it my_publisher.
add_executable(my_publisher src/my_publisher_node.cpp)
ament_target_dependencies(my_publisher rclcpp std_msgs)
Below that, add the install section so that ROS 2 will be able to find the executable.
install(TARGETS
  my_publisher
  DESTINATION lib/${PROJECT_NAME})
Save the file and close it.
Write a Subscriber Node
Now let’s write a subscriber node. This node will subscribe to String messages that are published by the publisher node to the addison topic.
Navigate to the dev_ws/src/cpp_pubsub/src directory.
cd ~/dev_ws/src/cpp_pubsub/src
Create a blank C++ file called my_subscriber_node.cpp.
gedit my_subscriber_node.cpp
Write the following code.
// Include the C++ standard library headers
#include <memory> // Dynamic memory management

// Dependencies
#include "rclcpp/rclcpp.hpp" // ROS Clienty Library for C++
#include "std_msgs/msg/string.hpp" // Handles String messages in ROS 2
using std::placeholders::_1;

class MinimalSubscriber : public rclcpp::Node
{
  public:
    // Constructor
    // The name of the node is minimal_subscriber
    MinimalSubscriber()
    : Node("minimal_subscriber")
    {
      // Create the subscription.
      // The topic_callback function executes whenever data is published
      // to the 'addison' topic.
      subscription_ = this->create_subscription<std_msgs::msg::String>(
      "addison", 10, std::bind(&MinimalSubscriber::topic_callback, this, _1));
    }

  private:
    // Receives the String message that is published over the topic
    void topic_callback(const std_msgs::msg::String::SharedPtr msg) const
    {
      // Write the message that was received on the console window
      RCLCPP_INFO(this->get_logger(), "I heard: '%s'", msg->data.c_str());
    }
    // Declare the subscription attribute
    rclcpp::Subscription<std_msgs::msg::String>::SharedPtr subscription_;
};

int main(int argc, char * argv[])
{
  // Launch ROS 2
  rclcpp::init(argc, argv);

  // Prepare to receive messages that arrive on the topic
  rclcpp::spin(std::make_shared<MinimalSubscriber>());

  // Shutdown routine for ROS2
  rclcpp::shutdown();
  return 0;
}
Save the file, and close it.
Add Dependencies
We don’t need to add anything to our package.xml file since the dependencies are the same as the publisher node’s dependencies.
Modify CMakeLists.txt
Go to the dev_ws/src/cpp_pubsub folder, and see what files are in there.
cd ~/dev_ws/src/cpp_pubsub
Open CMakeLists.txt.
gedit CMakeLists.txt
Under this line (ament_target_dependencies(my_publisher rclcpp std_msgs)), add the executable path and the dependencies for the subscriber node you just created. We will name the executable my_subscriber
add_executable(my_subscriber src/my_subscriber_node.cpp)
ament_target_dependencies(my_subscriber rclcpp std_msgs)
Now add this after my_publisher inside the install section
my_subscriber
Save the file, and close it.
Build the Package
Return to the root of your workspace:
cd ~/dev_ws/
We need to double check that all the dependencies needed (rclcpp and std_msgs) are already installed.
rosdep install -i --from-path src --rosdistro foxy -y

Open your bash file, and make sure these two lines are at the bottom of your file.

Build all packages in the workspace.
colcon build
Alternatively, if you only want to build cpp_pubsub and no other package in the workspace, you can type:
colcon build --packages-select cpp_pubsub
The build was successful.

The executable is located inside the dev_ws/install/cpp_pubsub/lib/cpp_pubsub folder.
Run the Nodes
To run the nodes, open a new terminal window.
Make sure you are in the root of your workspace:
cd ~/dev_ws/
Run the publisher node. If you recall, its name is my_publisher.
ros2 run cpp_pubsub my_publisher
You will see a message published every 500 milliseconds.
Open a new terminal, and run the subscriber node.
ros2 run cpp_pubsub my_subscriber

Let’s see what topics are currently active. Open a new terminal, and type:
ros2 topic list -t

Let’s listen to the addison topic.
ros2 topic echo /addison

Press CTRL + C
Now let’s see the node graph.
rqt_graph
You can see the relationship between the nodes.
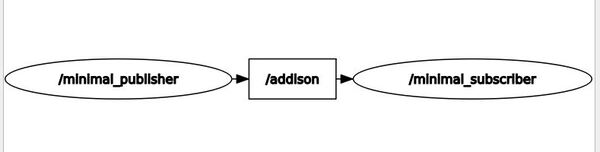
minimal_publisher publishes data to the /addison topic. minimal_subscriber subscribes to data published on that topic.
Press CTRL + C in all terminals to shutdown the programs.
Create a Launch File
Now let’s create a ROS 2 launch file. This launch file will enable us to launch the publisher and subscriber nodes simultaneously with a single command.
Go to the following directory
cd ~/dev_ws/src/cpp_pubsub/
Type the following command to create a new folder:
mkdir launch
Move inside that folder.
cd launch
Open up a new launch file.
gedit cpp_pubsub_launch.py
Write the following code inside the launch file.
from launch import LaunchDescription
from launch_ros.actions import Node

def generate_launch_description():
    return LaunchDescription([
       Node(
         package='cpp_pubsub',
         namespace='ns1', # Make sure this matches the subscriber's namespace
         executable='my_publisher', # Name of the executable
         name='minimal_publisher' # Any name is fine
       ),
       Node(
         package='cpp_pubsub',
         namespace='ns1', # Make sure this matches the publisher's namespace
         executable='my_subscriber', # Name of the executable
         name='minimal_subscriber' # Any name is fine
       )
    ])
Click Save and close the file to return to the terminal.
Launch the Launch File
To launch the launch file, open a new terminal window, and move to the launch folder.
cd ~/dev_ws/src/cpp_pubsub/launch
Type:
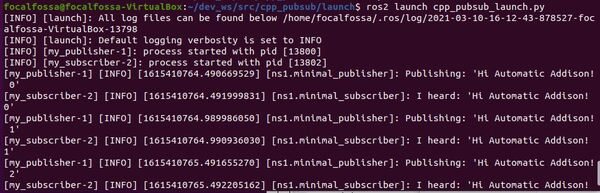
ros2 launch cpp_pubsub_launch.py
Here was my output:
Click Save and close the file to return to the terminal.
Create a Publishing Subscriber Node
Finally, let’s create a publishing subscriber node. This kind of node subscribes to a topic and publishes to another topic.
A publishing subscriber node is common in robotics. Consider a robotic arm for example. You might have a node that reads camera data (i.e. subscribes), does some calculations, and then publishes servo motor angles to a topic.
Move to the /dev_ws/src/cpp_pubsub/src folder
cd ~/dev_ws/src/cpp_pubsub/src
Create a blank C++ file called pubsub_node.cpp.
gedit pubsub_node.cpp
Write the following code.
This node subscribes to the addison topic and then publishes messages to the addison2 topic.
// Include important C++ header files that provide class
// templates for useful operations.
#include <functional> // Arithmetic, comparisons, and logical operations
#include <memory> // Dynamic memory management
#include <string> // String functions

// ROS Client Library for C++
// Allows use of the most common elements of ROS 2
#include "rclcpp/rclcpp.hpp"

// Built-in message type that will be used to publish data
#include "std_msgs/msg/string.hpp"

using std::placeholders::_1;

// Create the node class named PublishingSubscriber which inherits the attributes
// and methods of the rclcpp::Node class.
class PublishingSubscriber : public rclcpp::Node
{
  public:
    // Constructor creates a node named publishing_subscriber.
    // The published message count is initialized to 0.
    PublishingSubscriber()
    : Node("publishing_subscriber")
    {
      // Create the subscription.
      // The topic_callback function executes whenever data is published
      // to the 'addison' topic.
      subscription_ = this->create_subscription<std_msgs::msg::String>(
      "addison", 10, std::bind(&PublishingSubscriber::topic_callback, this, _1));

      // Publisher publishes String messages to a topic named "addison2".
      // The size of the queue is 10 messages.
      publisher_ = this->create_publisher<std_msgs::msg::String>("addison2",10);

    }

  private:
    // Receives the String message that is published over the topic
    void topic_callback(const std_msgs::msg::String::SharedPtr msg) const
    {
      // Create a new message of type String
      auto message = std_msgs::msg::String();

      // Set our message's data attribute
      message.data = "I heard " + msg->data;

      // Publish the message to the topic named "addison2"
      publisher_->publish(message);
    }
    // Declare the subscription attribute
    rclcpp::Subscription<std_msgs::msg::String>::SharedPtr subscription_;

    // Declaration of the publisher_ attribute
    rclcpp::Publisher<std_msgs::msg::String>::SharedPtr publisher_;

};

// Node execution starts here
int main(int argc, char * argv[])
{
  // Initialize ROS 2
  rclcpp::init(argc, argv);

  // Start processing data from the node as well as the callbacks
  rclcpp::spin(std::make_shared<PublishingSubscriber>());

  // Shutdown the node when finished
  rclcpp::shutdown();
  return 0;
}
Go to the dev_ws/src/cpp_pubsub folder.
cd ~/dev_ws/src/cpp_pubsub
Open CMakeLists.txt.
gedit CMakeLists.txt
Add the executable path underneath the ament_target_dependencies(my_subscriber…) line.
add_executable(pubsub_node src/pubsub_node.cpp)
ament_target_dependencies(pubsub_node rclcpp std_msgs)
Now add this after my_subscriber inside the install section
pubsub_node
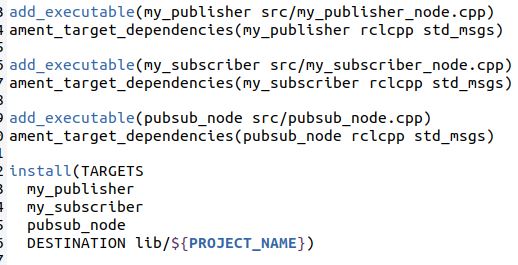
Save the file, and close it.
Return to the root of your workspace:
cd ~/dev_ws/
We need to double check that all the dependencies needed (rclcpp and std_msgs) are already installed.
rosdep install -i --from-path src --rosdistro foxy -y
Build all packages in the workspace.
colcon build
The build was successful.
Open a new terminal window.
Make sure you are in the root of your workspace:
cd ~/dev_ws/
Run the publisher node.
ros2 run cpp_pubsub my_publisher
Open a new terminal, and run the publishing subscriber node.
ros2 run cpp_pubsub pubsub_node
You will not see any output from running this node, but we can see it if we look at the addison2 topic.
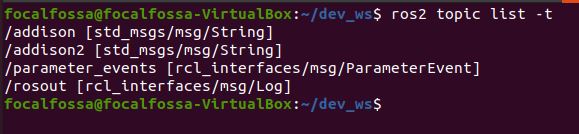
Let’s see what topics are currently active. Open a new terminal, and type:
ros2 topic list -t
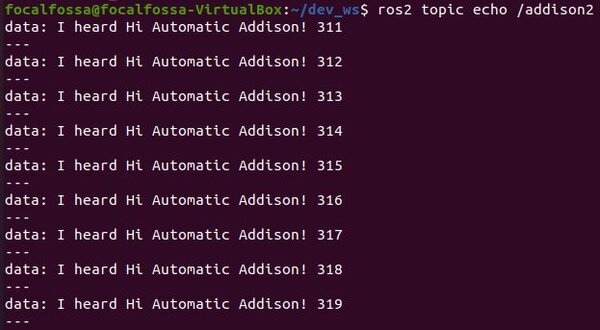
Let’s listen to the addison2 topic.
ros2 topic echo /addison2
Press CTRL + C in all terminals to shutdown the programs.
Zip the Package for Distribution
If you ever want to zip the package and send it to someone, open a new terminal window.
Move to the directory containing your package.
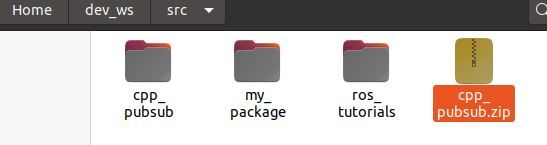
cd ~/dev_ws/src
zip -r cpp_pubsub.zip cpp_pubsub
The syntax is:
zip -r <filename.zip> <foldername>
Final Words
Creating C++ publishers and subscribers is a lot more tedious than creating Python publishers and subscribers. But while C++ publishers and subscribers are more complex to get up and running, they tend to have much faster execution time compared to their Python counterparts.
In the next post, we’ll take a look at how to create a basic publisher and subscriber for ROS 2 using Python.