In this tutorial, we’ll explore parameters in ROS 2 using C++. Parameters are important for creating flexible and dynamic robot software.
You’ll learn how to define, access, and use parameters within your nodes, enabling you to customize your robot’s behavior without altering its code.
Join me as we dive into the essentials of parameters, setting the foundation for more complex robotics applications.
Real-World Applications
Here are some real-world examples of how ROS 2 parameters can be used in robotic arm applications:
- Joint Limits and Velocities: Parameters can be used to define the safe operating range (minimum and maximum) for each joint of the arm in terms of angles or positions. Additionally, they can set the maximum allowed speed for each joint during movement. This ensures safe and controlled operation, preventing damage to the robot or its surroundings.
- Payload Capacity: This parameter specifies the maximum weight the arm can safely carry while maintaining stability and avoiding damage to its motors or gears. This parameter is important for tasks like picking and placing objects or performing assembly operations.
- Path Planning Parameters: These parameters influence how the arm plans its trajectory to reach a target point. They can include factors like joint acceleration/deceleration rates, smoothness of the path, and collision avoidance settings.
- End-effector Calibration: Parameters can store calibration data for the gripper or any tool attached to the end of the arm. This data can include offsets, transformations, or specific configurations for different tools, ensuring accurate tool positioning during tasks.
As you can see, pretty much any variable that applies to your robot can be declared as a parameter in ROS 2. Parameters are used to configure nodes at startup (and during runtime), without changing the code.
Remember, a ROS 2 node is a mini-program (written in either Python or C++) that performs a specific task within a robot system.
Prerequisites
Here is the GitHub repository that contains the code we will develop in this tutorial.
Write the Code
Let’s start by creating a ROS 2 node that declares two parameters (a floating-point value and a string) and includes a function that executes anytime one of the parameters changes.
Open a terminal, and type these commands to open VS Code.
cd ~/ros2_ws
code .
Right-click on src/cobot_arm_examples/src folder, and create a new file called “minimal_cpp_parameters.cpp”.
Type the following code inside minimal_cpp_parameters.cpp:
/**
* @file minimal_cpp_parameters.cpp
* @brief Demonstrates the basics of declaring parameters in ROS 2.
*
* Description: Demonstrates the basics of declaring parameters in ROS 2.
*
* -------
* Subscription Topics:
* None
* -------
* Publishing Topics:
* String message
* /topic_cpp - std_msgs/String
* -------
* @author Addison Sears-Collins
* @date 2024-03-06
*/
#include <memory> // Include for smart pointer utilities
#include <rclcpp/rclcpp.hpp> // ROS 2 C++ client library
#include <rcl_interfaces/msg/parameter_descriptor.hpp> // Enables parameters' metadata such as their names and types.
#include <rclcpp/parameter.hpp> // Include for manipulating parameters within a node.
/**
* @class MinimalParameter
* @brief Defines a minimal ROS 2 node that declares parameters.
*
* This class inherits from rclcpp::Node and demonstrates the process of declaring
* parameters within a ROS 2 node. It showcases how to declare parameters with
* default values and descriptions, and how to handle parameter change requests
* via a callback mechanism.
*/
class MinimalParameter : public rclcpp::Node
{
public:
/**
* @brief Constructs a MinimalParameter node.
*
* Initializes the node, declares two parameters (`velocity_limit` and `robot_name`)
* with default values and descriptions, and registers a callback for handling
* parameter change requests.
*/
MinimalParameter() : Node("minimal_parameter_cpp_node")
{
// Describe parameters
rcl_interfaces::msg::ParameterDescriptor velocity_limit_descriptor;
velocity_limit_descriptor.description = "Maximum allowed angular velocity in radians per second (ignored for fixed joints)";
rcl_interfaces::msg::ParameterDescriptor robot_name_descriptor;
robot_name_descriptor.description = "The name of the robot";
// Declare parameters
this->declare_parameter("velocity_limit", 2.792527, velocity_limit_descriptor);
this->declare_parameter("robot_name", "Automatic Addison Bot", robot_name_descriptor);
// Register a callback function that will be called whenever there is an attempt
// to change one or more parameters of the node.
parameter_callback_handle = this->add_on_set_parameters_callback(
std::bind(&MinimalParameter::parameter_change_callback, this, std::placeholders::_1));
}
private:
/**
* @brief Callback function for handling parameter change requests.
*
* This method is invoked automatically whenever there is an attempt to change
* one or more of the node's parameters. It checks each parameter change request,
* logs the new value of recognized parameters, and validates the change.
*
* @param params A vector containing the parameters attempted to be changed.
* @return An instance of rcl_interfaces::msg::SetParametersResult indicating
* whether the parameter changes were successful or not.
*/
// Member variable to store the callback handle
rclcpp::node_interfaces::OnSetParametersCallbackHandle::SharedPtr parameter_callback_handle;
rcl_interfaces::msg::SetParametersResult parameter_change_callback(const std::vector<rclcpp::Parameter> ¶ms)
{
// Create a result object to report the outcome of parameter changes.
auto result = rcl_interfaces::msg::SetParametersResult();
// Assume success unless an unsupported parameter is encountered.
result.successful = true;
// Iterate through each parameter in the change request.
for (const auto ¶m : params)
{
// Check if the changed parameter is 'velocity_limit' and of type double.
if (param.get_name() == "velocity_limit" && param.get_type() == rclcpp::ParameterType::PARAMETER_DOUBLE)
{
RCLCPP_INFO(this->get_logger(), "Parameter velocity_limit has changed. The new value is: %f", param.as_double());
}
// Check if the changed parameter is 'robot_name' and of type string.
else if (param.get_name() == "robot_name" && param.get_type() == rclcpp::ParameterType::PARAMETER_STRING)
{
RCLCPP_INFO(this->get_logger(), "Parameter robot_name has changed. The new value is: %s", param.as_string().c_str());
}
// Handle any unsupported parameters.
else
{
// Mark the result as unsuccessful and provide a reason.
result.successful = false;
result.reason = "Unsupported parameter";
}
}
// Return the result object, indicating whether the parameter change(s) were successful or not.
return result;
}
};
/**
* @brief Main function.
*
* This function initializes the ROS 2 system, creates and runs an instance of the
* MinimalParameter node. It keeps the node running until it is manually terminated,
* ensuring that the node can react to parameter changes or perform its intended
* functions during its lifecycle. Finally, it shuts down the ROS 2 system before
* terminating the program.
*
* @param argc The number of command-line arguments.
* @param argv The array of command-line arguments.
* @return int Returns 0 upon successful completion of the program.
*/
int main(int argc, char * argv[])
{
// Initialize ROS 2.
rclcpp::init(argc, argv);
// Create an instance of the MinimalParameter node and keep it running.
auto minimal_parameter_cpp_node = std::make_shared<MinimalParameter>();
rclcpp::spin(minimal_parameter_cpp_node);
// Shutdown ROS 2 upon node termination.
rclcpp::shutdown();
// End of program.
return 0;
}
Modify the CMakeLists.txt File
Now let’s configure the CMakeLists.txt file. Here is what it should look like:
cmake_minimum_required(VERSION 3.8)
project(cobot_arm_examples)

# Check if the compiler being used is GNU's C++ compiler (g++) or Clang.
# Add compiler flags for all targets that will be defined later in the
# CMakeLists file. These flags enable extra warnings to help catch
# potential issues in the code.
# Add options to the compilation process
if(CMAKE_COMPILER_IS_GNUCXX OR CMAKE_CXX_COMPILER_ID MATCHES "Clang")
  add_compile_options(-Wall -Wextra -Wpedantic)
endif()

# Locate and configure packages required by the project.
find_package(ament_cmake REQUIRED)
find_package(ament_cmake_python REQUIRED)
find_package(rclcpp REQUIRED)
find_package(rclpy REQUIRED)
find_package(rcl_interfaces REQUIRED)
find_package(std_msgs REQUIRED)

# Define a CMake variable named dependencies that lists all
# ROS 2 packages and other dependencies the project requires.
set(dependencies
  rclcpp
  rcl_interfaces
  std_msgs
)

# Add the specified directories to the list of paths that the compiler
# uses to search for header files. This is important for C++
# projects where you have custom header files that are not located
# in the standard system include paths.
include_directories(
  include
)

# Tells CMake to create an executable target named minimal_cpp_publisher
# from the source file src/minimal_cpp_publisher.cpp. Also make sure CMake
# knows about the program's dependencies.
add_executable(minimal_cpp_publisher src/minimal_cpp_publisher.cpp)
ament_target_dependencies(minimal_cpp_publisher ${dependencies})

add_executable(minimal_cpp_subscriber src/minimal_cpp_subscriber.cpp)
ament_target_dependencies(minimal_cpp_subscriber ${dependencies})

add_executable(minimal_cpp_parameters src/minimal_cpp_parameters.cpp)
ament_target_dependencies(minimal_cpp_parameters ${dependencies})

# Copy necessary files to designated locations in the project
install (
  DIRECTORY cobot_arm_examples scripts
  DESTINATION share/${PROJECT_NAME}
)

install(
  DIRECTORY include/
  DESTINATION include
)

# Install cpp executables
install(
  TARGETS
  minimal_cpp_publisher
  minimal_cpp_subscriber
  minimal_cpp_parameters
  DESTINATION lib/${PROJECT_NAME}
)

# Install Python modules for import
ament_python_install_package(${PROJECT_NAME})

# Install Python executables
install(
  PROGRAMS
  scripts/minimal_py_publisher.py
  scripts/minimal_py_subscriber.py
  scripts/minimal_py_parameters.py
  #scripts/example3.py
  #scripts/example4.py
  #scripts/example5.py
  #scripts/example6.py
  #scripts/example7.py
  DESTINATION lib/${PROJECT_NAME}
)

# Automates the process of setting up linting for the package, which
# is the process of running tools that analyze the code for potential
# errors, style issues, and other discrepancies that do not adhere to
# specified coding standards or best practices.
if(BUILD_TESTING)
  find_package(ament_lint_auto REQUIRED)
  # the following line skips the linter which checks for copyrights
  # comment the line when a copyright and license is added to all source files
  set(ament_cmake_copyright_FOUND TRUE)
  # the following line skips cpplint (only works in a git repo)
  # comment the line when this package is in a git repo and when
  # a copyright and license is added to all source files
  set(ament_cmake_cpplint_FOUND TRUE)
  ament_lint_auto_find_test_dependencies()
endif()

# Used to export include directories of a package so that they can be easily
# included by other packages that depend on this package.
ament_export_include_directories(include)

# Generate and install all the necessary CMake and environment hooks that
# allow other packages to find and use this package.
ament_package()
Modify the package.xml File
Add the rcl_interfaces dependency to package.xml:
<?xml version="1.0"?>
<?xml-model href="http://download.ros.org/schema/package_format3.xsd" schematypens="http://www.w3.org/2001/XMLSchema"?>
<package format="3">
  <name>cobot_arm_examples</name>
  <version>0.0.0</version>
  <description>Basic examples demonstrating ROS 2</description>
  <maintainer email="automaticaddison@example.com">Addison Sears-Collins</maintainer>
  <license>Apache-2.0</license>

  <!--Specify build tools that are needed to compile the package-->
  <buildtool_depend>ament_cmake</buildtool_depend>
  <buildtool_depend>ament_cmake_python</buildtool_depend>

  <!--Declares package dependencies that are required for building the package-->
  <depend>rclcpp</depend>
  <depend>rclpy</depend>
  <depend>std_msgs</depend>
  <depend>rcl_interfaces</depend>

  <!--Specifies dependencies that are only needed for testing the package-->
  <test_depend>ament_lint_auto</test_depend>
  <test_depend>ament_lint_common</test_depend>

  <export>
    <build_type>ament_cmake</build_type>
  </export>
</package>
Build the Workspace
Open a new terminal window, and type the following commands:
cd ~/ros2_ws/
colcon build
source ~/.bashrc
Run the Node
In this section, we will finally run our node. Open a terminal window, and type:
ros2 run cobot_arm_examples minimal_cpp_parameters
Now, press Enter.
Open a new terminal window.
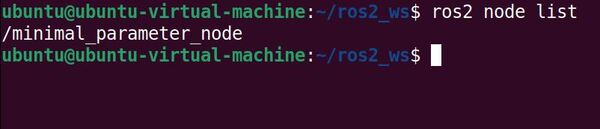
What are the currently active nodes?
ros2 node list
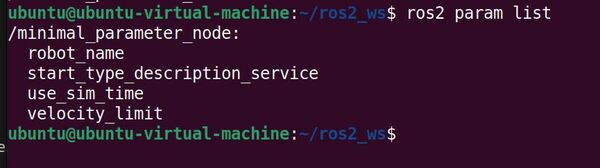
List all the parameters for all nodes in the ROS2 system.
ros2 param list
Retrieve the value of a specific parameter for a node.
ros2 param get /minimal_parameter_cpp_node robot_name
ros2 param get /minimal_parameter_cpp_node velocity_limit
Set the value of a specific parameter for a specified node.
ros2 param set /minimal_parameter_cpp_node robot_name '!!str New Automatic Addison Bot'
You should see “Set parameter successful”.
Double check the new value:
ros2 param get /minimal_parameter_cpp_node robot_name
ros2 param set /minimal_parameter_cpp_node velocity_limit 1.0
Now go back to the terminals where your scripts are running and press CTRL + C to stop the execution.
To clear the terminal window, type:
clear
That’s it! Keep building!