
In this tutorial, I will show you how to set up the robot_localization ROS 2 package on a simulated mobile robot. We will use the robot_localization package to fuse odometry data from the /wheel/odometry topic with IMU data from the /imu/data topic to provide locally accurate, smooth odometry estimates. Wheels can slip, so using the robot_localization package can help correct for this.
This tutorial is the third tutorial in my Ultimate Guide to the ROS 2 Navigation Stack (also known as Nav2).
You can get the entire code for this project here.
If you are using ROS Galactic or newer, you can get the code here.
Let’s get started!
Prerequisites
You have completed the first two tutorials of this series:
- How to Create a Simulated Mobile Robot in ROS 2 Using URDF
- Set Up the Odometry for a Simulated Mobile Robot in ROS 2
About the Robot Localization Package
We will configure the robot_localization package to use an Extended Kalman Filter (ekf_node) to fuse the data from sensor inputs. These sensor inputs come from the IMU Gazebo plugin and the differential drive Gazebo plugin that are defined in our SDF file.
In a real robotics project, instead of simulated IMU and odometry data, we would use data from an IMU sensor like the BNO055 and wheel encoders, respectively.
The ekf_node will subscribe to the following topics (ROS message types are in parentheses):
- /wheel/odometry : Position and velocity estimate based on the information from the differential drive Gazebo plugin (in a real robotics project this would be information drawn from wheel encoder tick counts). The orientation is in quaternion format. (nav_msgs/Odometry)
- /imu/data : Data from the Inertial Measurement Unit (IMU) sensor Gazebo plugin (sensor_msgs/Imu.msg)
This node will publish data to the following topics:
- /odometry/filtered : The smoothed odometry information (nav_msgs/Odometry)
- /tf : Coordinate transform from the odom frame (parent) to the base_footprint frame (child). To learn about coordinate frames in ROS, check out this post.
Install the Robot Localization Package
Let’s begin by installing the robot_localization package. Open a new terminal window, and type the following command:
sudo apt install ros-foxy-robot-localizationIf you are using a newer version of ROS 2 like ROS 2 Humble, type the following:
sudo apt install ros-humble-robot-localization Instead of the commands above, you can also type the following command directly into the terminal. It will automatically detect your ROS 2 distribution:
sudo apt install ros-$ROS_DISTRO-robot-localizationIf you are using ROS 2 Galactic and want to build from the source instead of using the off-the-shelf packages above, you will need to download the robot_localization package to your workspace.
cd ~/dev_ws/src
git clone -b fix/galactic/load_parameters https://github.com/nobleo/robot_localization.git
The reason you need to download that package above is because the Navigation Stack might throw the following exception if you don’t:
[ekf_node-1] terminate called after throwing an instance of ‘rclcpp::ParameterTypeException’ [ekf_node-1] what(): expected [string] got [not set]
cd ..
colcon build
Set the Configuration Parameters
We now need to specify the configuration parameters of the ekf_node by creating a YAML file.
Open a new terminal window, and type:
colcon_cd basic_mobile_robot
cd config
gedit ekf.yaml
Copy and paste this code inside the YAML file.
Save and close the file.
You can get a complete description of all the parameters on this page. Also you can check out this link on GitHub for a sample ekf.yaml file.
Create a Launch File
Now go to your launch folder. Open a new terminal window, and type:
colcon_cd basic_mobile_robot
cd launch
gedit basic_mobile_bot_v3.launch.py
Copy and paste this code into the file.
If you are using ROS 2 Galactic or newer, your code is here.
Save the file, and close it.
Move to the package.
colcon_cd basic_mobile_robot
Open the package.xml file.
gedit package.xml file.
Copy and paste this code into the file.
Save the file, and close it.
Open the CMakeLists.txt file.
gedit CMakeLists.txt
Copy and paste this code into the file.
Save the file, and close it.
Build the Package
Now build the package by opening a terminal window, and typing the following command:
cd ~/dev_ws
colcon build
Launch the Robot
Open a new terminal, and launch the robot.
cd ~/dev_ws/
ros2 launch basic_mobile_robot basic_mobile_bot_v3.launch.py
It might take a while for Gazebo and RViz to load, so be patient.
To see the active topics, open a terminal window, and type:
ros2 topic list
To see more information about the topics, execute:
ros2 topic info /imu/data
ros2 topic info /wheel/odometry
You should see an output similar to below:
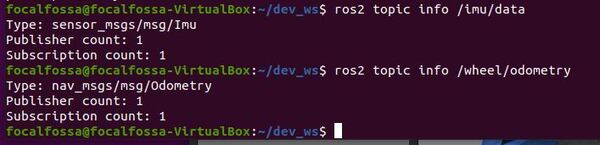
Both topics have 1 publisher and 1 subscriber.
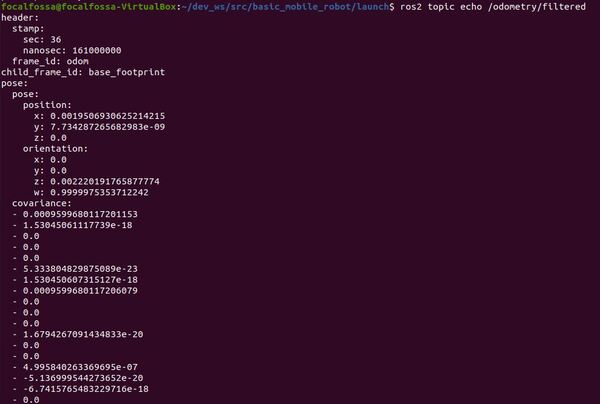
To see the output of the robot localization package (i.e. the Extended Kalman Filter (EKF)), type:
ros2 topic echo /odometry/filtered
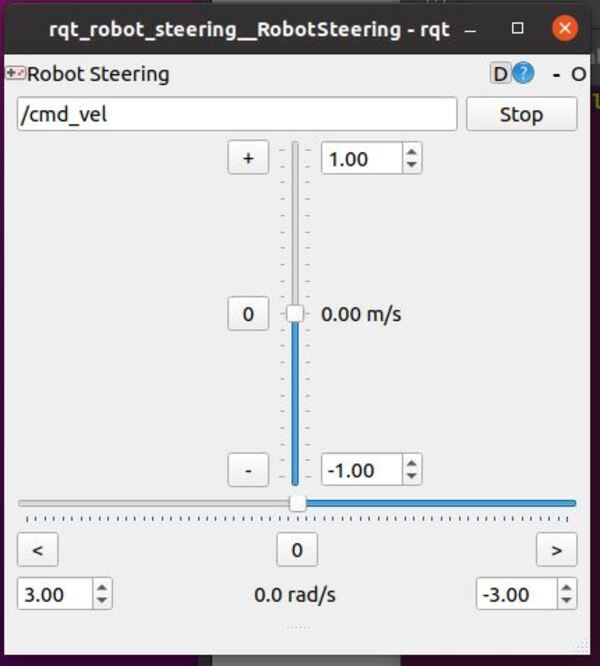
I will move my robot in the reverse direction using the rqt_robot_steering GUI. Open a new terminal window, and type:
rqt_robot_steering
If you are using ROS 2 Galactic or newer, type:
sudo apt-get install ros-galactic-rqt-robot-steering
Where the syntax is:
sudo apt-get install ros-<ros-distribution>-rqt-robot-steering
Then type:
ros2 run rqt_robot_steering rqt_robot_steering --force-discover
Move the sliders to move the robot.
We can see the output of the odom -> base_footprint transform by typing the following command:
ros2 run tf2_ros tf2_echo odom base_footprint
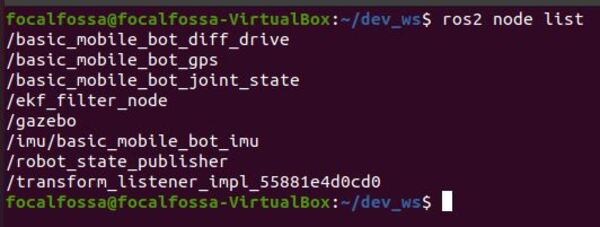
Let’s see the active nodes.
ros2 node list
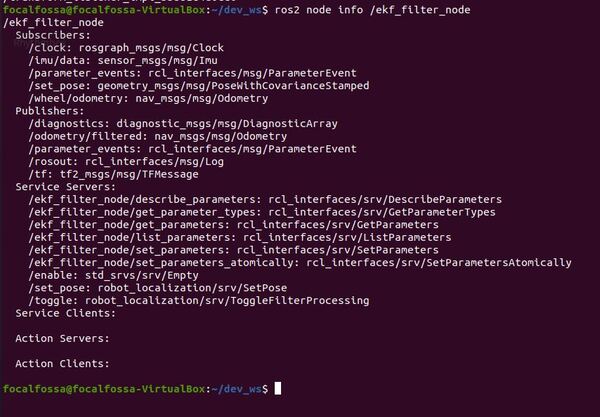
Let’s check out the ekf_node (named ekf_filter_node).
ros2 node info /ekf_filter_node
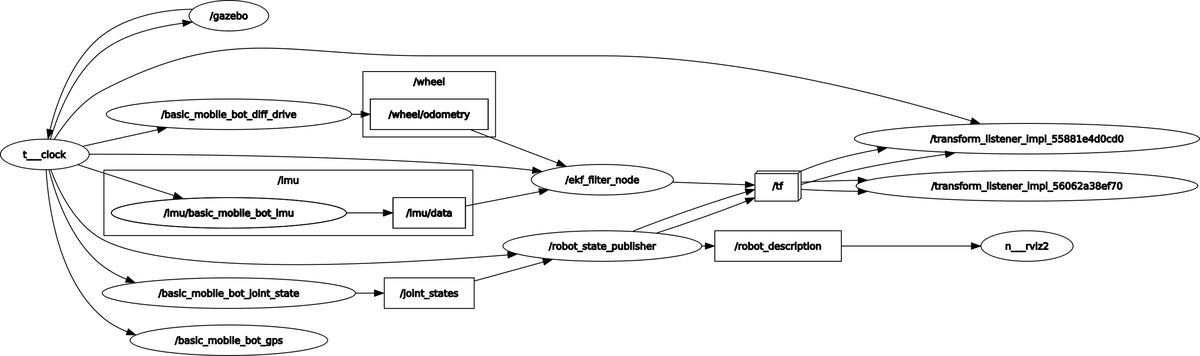
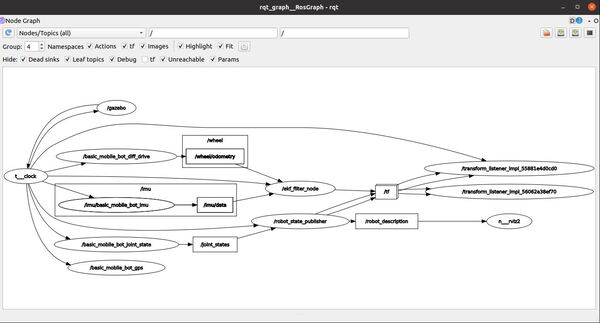
Let’s check out the ROS node graph.
rqt_graph
Click the blue circular arrow in the upper left to refresh the node graph. Also select “Nodes/Topics (all)”.
To see the coordinate frames, type the following command in a terminal window.
ros2 run tf2_tools view_frames.py
If you are using ROS 2 Galactic or newer, type:
ros2 run tf2_tools view_frames
In the current working directory, you will have a file called frames.pdf. Open that file.
evince frames.pdf
Here is what my coordinate transform (i.e. tf) tree looks like:

You can see that the parent frame is the odom frame. The odom frame is the initial position and orientation of the robot. Every other frame below that is a child of the odom frame.
Later, we will add a map frame. The map frame will be the parent frame of the odom frame.
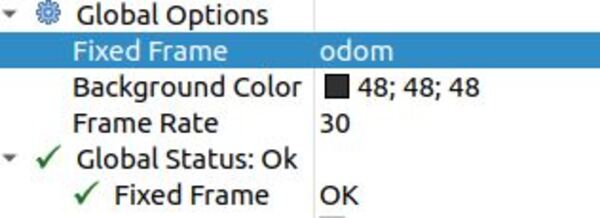
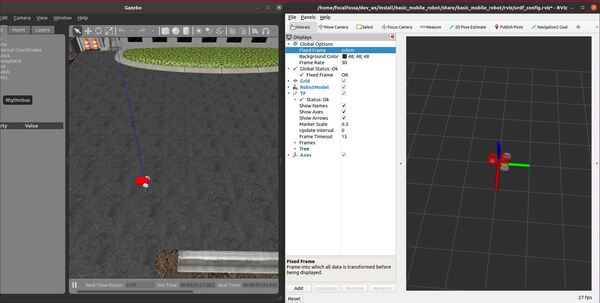
Finally, in RViz, under Global Options, change Fixed Frame to odom.
Open the steering tool again.
rqt_robot_steering
If you move the robot around using the sliders, you will see the robot move in both RViz and Gazebo.
That’s it!
In the next tutorial, I will show you how to add LIDAR to your robot so that you can map the environment and detect obstacles.