In this post, I will walk you through the k-nearest neighbors algorithm (k-NN classification and k-NN regression), step-by-step. We will develop the code for the algorithm from scratch using Python. We will then run the algorithm on a real-world data set, the image segmentation data set from the UCI Machine Learning Repository. The purpose of the data set is to classify the instances into seven different outdoor images (e.g. sky, foliage, cement, window, path, grass, etc.) based on pixel data. This data set gives a taste of computer vision mixed with machine learning.
Without further ado, let’s get started!
Table of Contents
What is the K-Nearest Neighbors Algorithm?
The K-Nearest Neighbors Algorithm is a supervised learning algorithm (the target variable we want to predict is available) that is used for both classification and regression problems. Let’s see how it works for both types of problems.
K-Nearest Neighbors Classification
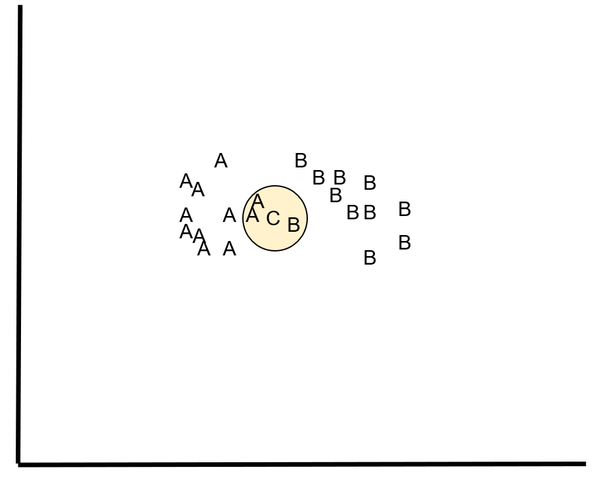
For the k-NN classification algorithm, we have N training instances. Let us suppose that these training instances fall into one of two classes, A and B.
We want to
classify a new instance C. We do this by identifying the k nearest neighbors of
C and classifying C based on the class that had the most nearest neighbors to C
(out of a total of k nearest neighbors).
For example,
let k = 3. The three nearest neighbors of C are A, A, and B. Since A had the
most nearest neighbors, C belongs to class A.
How do we
select k?
A common
method for choosing k is to take the square root of N, the number of instances
and subtract 1 if that number is odd. However, in this project, we will tune
the value for k and record the results to see which value for k achieved
optimal performance as measured by either classification accuracy or mean
squared error.
How do we
determine the k nearest neighbors?
A common method for measuring distance is to use the Euclidean distance formula. That is, given points p =(p1,p2,…,pn) and q = (q1,q2,…,qn), the distance d between p and q is:
d(p,q) = √((q1 – p1)2
+ (q2-p2)2 + …+(qn – pn)2)
This is a
version of the Pythagorean Theorem.
In short, the algorithm for k-NN classification is as follows. For each test instance, we:
- Compute the distance to every training instance
- Select the k closest instances and their class
- Output the class that occurs most frequently among the k closest instances
Special notes on k-NN classification:
- Select an odd value for k for two-class problems
in order to avoid ties.
- Complexity of the algorithm depends on finding
the nearest neighbor for each training instance.
- k-NN needs labeled data sets.
k-NN is known as a lazy learning algorithm because a model is not built until the time a test instance arrives. Thus, there is no prior training on the training data as would be the case with an eager learning algorithm.
Also k-NN is a non-parametric algorithm because it does not assume any particular form of the data set (unlike algorithms like linear regression, logistic regression, etc.). The only assumption is that Euclidean distance can be consistently calculated between points.
K-Nearest Neighbors Regression
k-NN regression is a minor modification of k-NN classification. In k-NN regression, we are trying to predict a real number instead of a class. Instead of classifying a test instance based on the most frequently occurring class among the k nearest neighbors, we take the average of the target variable of the k nearest neighbors.
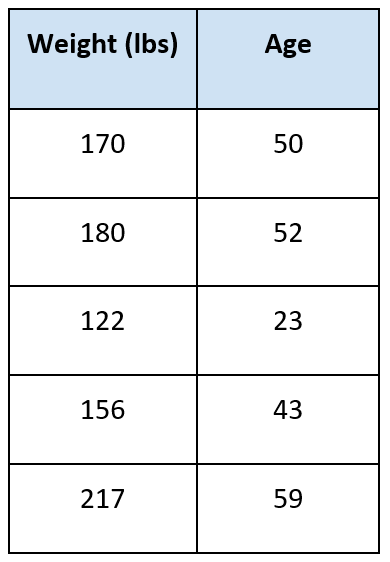
For example,
let’s suppose we wanted to predict the age of someone given their weight. We
have the following data:
The question
is: how old is someone given they weigh 175 pounds?
Suppose k =
3. We find the three nearest neighbors to 175. They are:
We take the
average of the target variable:
Average =
(50 + 52 + 43) / 3 = 48.3
This is our
answer.
In short,
the algorithm for k-NN regression is as follows. For each test instance, we:
- Compute the distance to every training instance
- Select the k closest instances and the values of their target variables
- Output the mean of the values of the target variables
Return to Table of Contents
K-Nearest Neighbors Algorithm Design
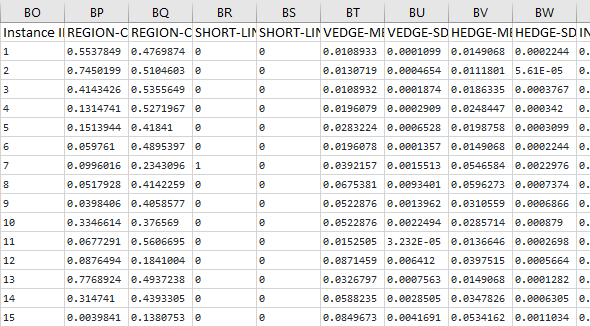
The first thing we need to do is preprocess the image segmentation data set so that it meets the input requirements of both algorithms. Below is the required data format. I downloaded the data into Microsoft Excel and then made sure I had the following columns:
Columns (0 through N)
- 0: Instance ID
- 1: Attribute 1
- 2: Attribute 2
- 3: Attribute 3
- …
- N: Actual Class
Modification of Attribute Values
The image segmentation data set contains 19 attributes, 210 instances, and 7 classes. This data set was created from a database of seven outdoor images. Below are some of the modifications I made.
Classes were made numerical:
- BRICKFACE = 1.0
- SKY = 2.0
- FOLIAGE = 3.0
- CEMENT = 4.0
- WINDOW = 5.0
- PATH = 6.0
- GRASS = 7.0
Region-pixel-count was removed since it was 9 for all instances.
I also normalized the attributes so that they are all between 0
and 1.
Here is what the first few columns of your data set should look like after all that preprocessing:
Save the file as a csv file (comma-delimited), and load it into the program below (Python).
Here is a link to the final data set I used.
Return to Table of Contents
K-Nearest Neighbors Algorithm in Python, Coded From Scratch
Here is the full code for the k-nearest neighbors algorithm (Note that I used five-fold stratified cross-validation to produce the final classification accuracy statistics). You might want to copy and paste it into a document since it is pretty large and hard to see on a single web page. Don’t be scared at how long this code is. I include a lot of comments so that you know what is going on at each step:
import numpy as np # Import Numpy library

# File name: knn.py
# Author: Addison Sears-Collins
# Date created: 6/20/2019
# Python version: 3.7
# Description: Implementation of the k-nearest neighbors algorithm (k-NN)
# from scratch

# Required Data Set Format for Classification Problems:
# Must be all numerical
# Columns (0 through N)
# 0: Instance ID
# 1: Attribute 1
# 2: Attribute 2
# 3: Attribute 3
# ...
# N: Actual Class

# Required Data Set Format for Regression Problems:
# Must be all numerical
# Columns (0 through N)
# 0: Instance ID
# 1: Attribute 1
# 2: Attribute 2
# 3: Attribute 3
# ...
# N: Actual Class
# N + 1: Stratification Bin

class Knn:

    # Constructor
    #   Parameters:
    #     k: k value for k-NN
    #     problem_type: ('r' for regression or 'c' for classification)
    def __init__(self, k, problem_type):
        self.__k = k
        self.__problem_type = problem_type

    # Parameters:
    #   training_set: The folds used for training (2d numpy array)
    #   test_instance: The test instance we need to find the neighbors for
    #                  (numpy array)
    # Returns:
    #   The k most similar neighbors from the training set for a given
    #   test instance. It will be a 2D numpy array where the first column
    #   will hold the Actual class value of the training instance and the
    #   second column will store the distance to the test instance...
    #   (actual class value, distance).
    def get_neighbors(self, training_set, test_instance):

        # Record the number of training instances in the training set
        no_of_training_instances = np.size(training_set,0)

        # Record the number of columns in the training set
        no_of_training_columns = np.size(training_set,1)

        # Record the column index of the actual class of the training_set
        actual_class_column = None
        # If classification problem
        if self.__problem_type == "c":
            actual_class_column = no_of_training_columns - 1
        # If regression problem
        else:
            actual_class_column = no_of_training_columns - 2

        # Create an empty 2D array called actual_class_and_distance. This
        # array should be the same length as the number of training instances.
        # The first column will hold the Actual Class value of the training
        # instance, and the second column will store the distance to the
        # test instance...(actual class value, distance).
        actual_class_and_distance = np.zeros((no_of_training_instances, 2))

        neighbors = None

        # For each row (training instance) in the training set
        for row in range(0, no_of_training_instances):

            # Record the actual class value in the
            # actual_class_and_distance array (column 0)
            actual_class_and_distance[row,0] = training_set[
                row,actual_class_column]

            # Initialize a temporary training instance copied from this
            # training instance
            temp_training_instance = np.copy(training_set[row,:])

            # Initialize a temporary test instance copied from this
            # test_instance
            temp_test_instance = np.copy(test_instance)

            # If this is a classification problem
            if self.__problem_type == "c":

                # Update temporary training instance with Instance ID
                # and the Actual Class pieces removed
                temp_training_instance = np.delete(temp_training_instance,[
                    0,actual_class_column])

                # Update temporary test instance with the Instance ID
                # and the Actual Class pieces removed
                temp_test_instance = np.delete(temp_test_instance,[
                    0,actual_class_column])

            # If this is a regression problem
            else:

                # Update temporary training instance with Instance ID, Actual
                # Class, and Stratification Bin pieces removed
                temp_training_instance = np.delete(temp_training_instance,[
                    0,actual_class_column,actual_class_column+1])

                # Update temporary test instance with the Instance ID, Actual
                # Class, and Stratification Bin pieces removed
                temp_test_instance = np.delete(temp_test_instance,[
                    0,actual_class_column,actual_class_column+1])

            # Calculate the euclidean distance from the temporary test
            # instance to the temporary training instance
            distance = np.linalg.norm(
                temp_test_instance - temp_training_instance)

            # Record the distance in the actual_class_and_distance
            # array (column 1)
            actual_class_and_distance[row,1] = distance

        # Sort the actual_class_and_distance 2D array by the
        # distance column (column 1) in ascending order.
        actual_class_and_distance = actual_class_and_distance[
                actual_class_and_distance[:,1].argsort()]

        k = self.__k

        # Extract the first k rows of the actual_class_and_distance array
        neighbors = actual_class_and_distance[:k,:]

        return neighbors

    # Generate a prediction based on the most frequent class or averaged
    # target variable value of the neighbors
    # Parameters:
    #   neighbors - 1D array (actual_class_value)
    # Returns:
    #   predicted_class_value
    def make_prediction(self, neighbors):

        prediction = None

        # If this is a classification problem
        if self.__problem_type == "c":

            #  Prediction is the most frequent value in column 0 of
            #  the neighbors array
            neighborsint = neighbors.astype(int)
            prediction = np.bincount(neighborsint).argmax()

        # If this is a regression problem
        else:

            # Prediction is the average of the neighbors array
            prediction = np.mean(neighbors)

        return prediction

    # Parameters:
    #   actual_class_array
    #   predicted_class_array
    # Returns:
    #   accuracy: Either classification accuracy (for
    #   classification problems) or
    #   mean squared error (for regression problems)
    def get_accuracy(self, actual_class_array, predicted_class_array):

        # Initialize accuracy variable
        accuracy = None

        # Initialize decision variable
        decision = None

        counter = None

        actual_class_array_size = actual_class_array.size

        # If this is a classification problem
        if self.__problem_type == "c":

            counter = 0

            # For each element in the actual class array
            for row in range(0,actual_class_array_size):

                # If actual class value is equal to value in predicted
                # class array
                if actual_class_array[row] == predicted_class_array[row]:
                    decision = "correct"
                    counter += 1
                else:
                    decision = "incorrect"

            classification_accuracy = counter / (actual_class_array_size)

            accuracy = classification_accuracy

        # If this is a regression problem
        else:

            # Initialize an empty squared error array.
            # Needs to be same length as number of test instances
            squared_error_array = np.empty(actual_class_array_size)

            squared_error = None

            # For each element in the actual class array
            for row in range(0,actual_class_array_size):

                # Calculate the squared error
                squared_error = (abs((actual_class_array[
                        row] - predicted_class_array[row])))
                squared_error *= squared_error
                squared_error_array[row] = squared_error

            mean_squared_error = np.mean(squared_error_array)

            accuracy = mean_squared_error

        return accuracy
Here is the driver program that calls and executes the code above:
import pandas as pd # Import Pandas library
import numpy as np # Import Numpy library
from five_fold_stratified_cv import FiveFoldStratCv
from knn import Knn

# File name: knn_driver.py
# Author: Addison Sears-Collins
# Date created: 6/20/2019
# Python version: 3.7
# Description: Driver for the knn.py program
# (K-Nearest Neighbors)

# Required Data Set Format for Classification Problems:
# Must be all numerical
# Columns (0 through N)
# 0: Instance ID
# 1: Attribute 1
# 2: Attribute 2
# 3: Attribute 3
# ...
# N: Actual Class

# Required Data Set Format for Regression Problems:
# Must be all numerical
# Columns (0 through N)
# 0: Instance ID
# 1: Attribute 1
# 2: Attribute 2
# 3: Attribute 3
# ...
# N: Actual Class
# N + 1: Stratification Bin

################# INPUT YOUR OWN VALUES IN THIS SECTION ######################
ALGORITHM_NAME = "K-Nearest Neighbor"
SEPARATOR = ","  # Separator for the data set (e.g. "\t" for tab data)
##############################################################################

def main():

    print("Welcome to the " +  ALGORITHM_NAME + " program!")
    print()
    print("Running " + ALGORITHM_NAME + ". Please wait...")
    print()

    # k value that will be tuned
    k = eval(input("Enter a value for k: ") )

    # "c" for classification or "r" for regression
    problem = input("Press  \"c\" for classification or \"r\" for regression: ")

    # Directory where data set is located
    data_path = input("Enter the path to your input file: ")

    # Read the full text file and store records in a Pandas dataframe
    pd_data_set = pd.read_csv(data_path, sep=SEPARATOR)

    # Convert dataframe into a Numpy array
    np_data_set = pd_data_set.to_numpy(copy=True)

    # Show functioning of the program
    trace_runs_file = input("Enter the name of your trace runs file: ")

    # Open a new file to save trace runs
    outfile_tr = open(trace_runs_file,"w")

    # Testing statistics
    test_stats_file = input("Enter the name of your test statistics file: ")

    # Open a test_stats_file
    outfile_ts = open(test_stats_file,"w")

    # Create an object of class FiveFoldStratCv
    fivefolds1 = FiveFoldStratCv(np_data_set,problem)

    # The number of folds in the cross-validation
    NO_OF_FOLDS = 5

    # Create an object of class Knn
    knn1 = Knn(k,problem)

    # Generate the five stratified folds
    fold0, fold1, fold2, fold3, fold4 = fivefolds1.get_five_folds()

    training_dataset = None
    test_dataset = None

    # Create an empty array of length 5 to store the accuracy_statistics
    # (classification accuracy for classification problems or mean squared
    # error for regression problems)
    accuracy_statistics = np.zeros(NO_OF_FOLDS)

    # Run k-NN the designated number of times as indicated by the number of folds
    for experiment in range(0, NO_OF_FOLDS):

        print()
        print("Running Experiment " + str(experiment + 1) + " ...")
        print()
        outfile_tr.write("Running Experiment " + str(experiment + 1) + " ...\n")
        outfile_tr.write("\n")

        # Each fold will have a chance to be the test data set
        if experiment == 0:
            test_dataset = fold0
            training_dataset = np.concatenate((
                fold1, fold2, fold3, fold4), axis=0)
        elif experiment == 1:
            test_dataset = fold1
            training_dataset = np.concatenate((
                fold0, fold2, fold3, fold4), axis=0)
        elif experiment == 2:
            test_dataset = fold2
            training_dataset = np.concatenate((
                fold0, fold1, fold3, fold4), axis=0)
        elif experiment == 3:
            test_dataset = fold3
            training_dataset = np.concatenate((
                fold0, fold1, fold2, fold4), axis=0)
        else:
            test_dataset = fold4
            training_dataset = np.concatenate((
                fold0, fold1, fold2, fold3), axis=0)

        # Actual class column index of the test dataset
        actual_class_column = None

        # If classification problem
        if problem == "c":
            actual_class_column = np.size(test_dataset,1) - 1
        # If regression problem
        else:
            actual_class_column = np.size(test_dataset,1) - 2

        # Create an array of the actual_class_values of the test instances
        actual_class_values = test_dataset[:,actual_class_column]

        no_of_test_instances = np.size(test_dataset,0)

        # Make an empty array called predicted_class_values which will
        # store the predicted class values. It should be the same length
        # as the number of test instances
        predicted_class_values = np.zeros(no_of_test_instances)

        # For each row in the test data set
        for row in range(0, no_of_test_instances):

            # Neighbor array is a 2D array containing the neighbors
            # (actual class value, distance)
            # Get the k nearest neighbors for each test instance
            this_instance = test_dataset[row,:]
            neighbor_array = knn1.get_neighbors(training_dataset,this_instance)

            # Extract the actual class values
            neighbors_arr = neighbor_array[:,0]

            # Predicted class value stored in the variable prediction
            prediction = knn1.make_prediction(neighbors_arr)

            # Record the prediction in the predicted_class_values array
            predicted_class_values[row] = prediction

        # Calculate the classification accuracy of the predictions
        # (k-NN classification) or the mean squared error (k-NN regression)
        accuracy = knn1.get_accuracy(actual_class_values,predicted_class_values)

        # Store the accuracy in the accuracy_statistics array
        accuracy_statistics[experiment] = accuracy

        # If classification problem
        if problem == "c":
            temp_acc = accuracy * 100
            outfile_tr.write("Classification Accuracy: " + str(temp_acc) + "%\n")
            outfile_tr.write("\n")
            print("Classification Accuracy: " + str(temp_acc) + "%\n")
        # If regression problem
        else:
            outfile_tr.write("Mean Squared Error: " + str(accuracy) + "\n")
            outfile_tr.write("\n")
            print("Mean Squared Error: " + str(accuracy) + "\n")

    outfile_tr.write("Experiments Completed.\n")
    print("Experiments Completed.")
    print()

    # Write to a file
    outfile_ts.write("----------------------------------------------------------\n")
    outfile_ts.write(ALGORITHM_NAME + " Summary Statistics\n")
    outfile_ts.write("----------------------------------------------------------\n")
    outfile_ts.write("Data Set : " + data_path + "\n")
    outfile_ts.write("\n")
    outfile_ts.write("Accuracy Statistics for All 5 Experiments:")
    outfile_ts.write(np.array2string(
        accuracy_statistics, precision=2, separator=',',
        suppress_small=True))
    outfile_ts.write("\n")

    # Write the relevant stats to a file
    outfile_ts.write("\n")

    if problem == "c":
        outfile_ts.write("Problem Type : Classification" + "\n")
    else:
        outfile_ts.write("Problem Type : Regression" + "\n")

    outfile_ts.write("\n")
    outfile_ts.write("Value for k : " + str(k) + "\n")
    outfile_ts.write("\n")

    accuracy = np.mean(accuracy_statistics)

    if problem == "c":
        accuracy *= 100
        outfile_ts.write("Classification Accuracy : " + str(accuracy) + "%\n")
    else:
        outfile_ts.write("Mean Squared Error : " + str(accuracy) + "\n")

    # Print to the console
    print()
    print("----------------------------------------------------------")
    print(ALGORITHM_NAME + " Summary Statistics")
    print("----------------------------------------------------------")
    print("Data Set : " + data_path)
    print()
    print()
    print("Accuracy Statistics for All 5 Experiments:")
    print(accuracy_statistics)
    print()
    # Write the relevant stats to a file
    print()

    if problem == "c":
        print("Problem Type : Classification")
    else:
        print("Problem Type : Regression")

    print()
    print("Value for k : " + str(k))
    print()
    if problem == "c":
        print("Classification Accuracy : " + str(accuracy) + "%")
    else:
        print("Mean Squared Error : " + str(accuracy))

    print()

    # Close the files
    outfile_tr.close()
    outfile_ts.close()

main()
Return to Table of Contents
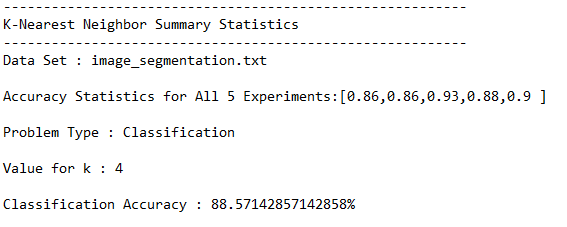
Output Statistics of the K-Nearest Neighbors Algorithm on the Image Segmentation Data Set
This section shows the results for the runs of the k-nearest neighbors algorithm on the image segmentation data set. I used a k-value of 4, but you can feel free to change this and see what accuracy value you get.
Test Statistics
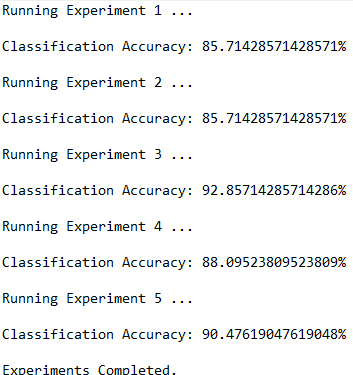
Trace Runs
Here are the trace runs of the algorithm:
Return to Table of Contents
Condensed K-Nearest Neighbors Algorithm
The time and space complexity of the regular k-nearest neighbors algorithm described above is directly proportional to the number of instances in the training set. This could potentially present a problem with massively large data sets. This is where the condensed k-nearest neighbors algorithm (ck-NN) comes in handy.
The idea behind ck-NN is to
reduce the size of the training set by selecting the smallest subset of the
training data set that results in no loss of classification accuracy. By
systematically removing ineffective instances, we reduce the computation time
as well as the storage requirement.
Here is how condensed k-NN works:
We start with an empty bin called STORE.
1.
Place the first instance in STORE
2.
Check whether the second instance can be classified correctly by 1-nearest
neighbor using the instance in STORE as the reference.
3.
Repeat step 2 for all other instances in the data set.
4.
Repeat step 2 on the data set, doing continuous passes over the data set until
either
OR
5.
Use the instances in STORE as the input for the k-NN classification algorithm.
Here is the code in Python for ck-NN:
import numpy as np # Import Numpy library
from knn import Knn

# File name: cknn.py
# Author: Addison Sears-Collins
# Date created: 6/21/2019
# Python version: 3.7
# Description: Implementation of the condensed k-nearest neighbors
# algorithm (k-NN) from scratch

# Required Data Set Format for Classification Problems:
# Must be all numerical
# Columns (0 through N)
# 0: Instance ID
# 1: Attribute 1
# 2: Attribute 2
# 3: Attribute 3
# ...
# N: Actual Class

class CondensedKnn:

    # Constructor
    #   Parameters:
    #     training_set: The training set that we need to prune
    #     problem_type: ('c' for classification)
    def __init__(self, training_set, problem_type="c"):
        self.__training_set = training_set
        self.__problem_type = problem_type

    # Parameters:
    #   None.
    # Returns:
    #   A training set that has irrelevant instances removed
    def get_trainingset(self):

        # Initialize a condensed training set. Copy it from the actual
        # training set
        condensed_training_set = np.copy(self.__training_set)

        # Record the number of instances in the condensed training_set
        no_of_training_instances = np.size(condensed_training_set,0)

        # Record the number of columns in the condensed training set
        no_of_training_columns = np.size(condensed_training_set,1)

        # Print the initial number of instances in the condensed training set
        print("\nBefore condensing: " + str(
            no_of_training_instances) + " training instances\n")

        # Record the column index of the actual class of the training_set
        actual_class_column = no_of_training_columns - 1

        # Initialize an array named store with the first instance of the
        # condensed training_set
        store = np.copy(condensed_training_set[0,:])

        # Create a 2D array
        new_row = np.copy(condensed_training_set[0,:])
        store = np.vstack([store,new_row])

        # For the second instance to the last instance in the condensed
        # training_set
        row = 1
        while row < no_of_training_instances:

            # Record the actual class value
            actual_class_value = condensed_training_set[
                row,actual_class_column]

            # Create an object of class Knn
            knn1 = Knn(1,self.__problem_type)

            # Neighbor array is a 2D array containing the neighbors
            # (actual class value, distance)
            # Get the nearest neighbor for each instance
            this_instance = condensed_training_set[row,:]
            neighbor_array = knn1.get_neighbors(store,this_instance)

            # Extract the actual class values
            neighbors_arr = neighbor_array[:,0]

            # Predicted class value stored in the variable prediction
            prediction = knn1.make_prediction(neighbors_arr)

            # If actual class value is not equal to the prediction
            # Append that instance to the store array
            # Remove this instance from the condensed training_set
            if actual_class_value != prediction:
                new_row = np.copy(this_instance)
                store = np.vstack([store,new_row])

                condensed_training_set = np.delete(
                    condensed_training_set, row, 0)
                no_of_training_instances -= 1

            row += 1

        # Declare the stopping criteria. We stop when either one complete
        # pass is made through the condensed training set with no more
        # transfers of instances to store or there are no more instances
        # remaining in the condensed training data set

        no_more_transfers_to_store = False
        no_more_instances_left = None

        # Update the number of instances in the condensed training_set
        no_of_training_instances = np.size(condensed_training_set,0)

        if no_of_training_instances > 0:
            no_more_instances_left = False
        else:
            no_more_instances_left = True

        while not(no_more_transfers_to_store) and not(no_more_instances_left):
            # Reset the number of transfers_made to 0
            transfers_made = 0

            # For the second instance to the last instance in the condensed
            # training_set
            row = 0
            while row < no_of_training_instances:

                # Record the actual class value
                actual_class_value = condensed_training_set[
                    row,actual_class_column]

                # Create an object of class Knn
                knn1 = Knn(1,self.__problem_type)

                # Neighbor array is a 2D array containing the neighbors
                # (actual class value, distance)
                # Get the nearest neighbor for each instance
                this_instance = condensed_training_set[row,:]
                neighbor_array = knn1.get_neighbors(store,this_instance)

                # Extract the actual class values
                neighbors_arr = neighbor_array[:,0]

                # Predicted class value stored in the variable prediction
                prediction = knn1.make_prediction(neighbors_arr)

                # If actual class value is not equal to the prediction
                # Append that instance to the store array
                # Remove this instance from the condensed training_set
                if actual_class_value != prediction:
                    new_row = np.copy(this_instance)
                    store = np.vstack([store,new_row])

                    condensed_training_set = np.delete(
                        condensed_training_set, row, 0)
                    no_of_training_instances -= 1
                    transfers_made += 1

                row += 1

            # Update the number of instances in the condensed training_set
            no_of_training_instances = np.size(condensed_training_set,0)

            if no_of_training_instances > 0:
                no_more_instances_left = False
            else:
                no_more_instances_left = True

            if transfers_made > 0:
                no_more_transfers_to_store = False
            else:
                no_more_transfers_to_store = True

        # Delete row 0 from the store
        store = np.delete(store,0,0)

        # Print the final number of instances in the store
        print("After condensing: " + str(
            np.size(store,0)) + " training instances\n")
        return store
Here is the code (Python) for the driver that executes the program above. It uses the regular k-NN code I presented earlier in this post as well as the five-fold stratified cross-validation code:
import pandas as pd # Import Pandas library
import numpy as np # Import Numpy library
from five_fold_stratified_cv import FiveFoldStratCv
from knn import Knn
from cknn import CondensedKnn

# File name: cknn_driver.py
# Author: Addison Sears-Collins
# Date created: 6/21/2019
# Python version: 3.7
# Description: Driver for the cknn.py program
# (Condensed K-Nearest Neighbors)

# Required Data Set Format for Classification Problems:
# Must be all numerical
# Columns (0 through N)
# 0: Instance ID
# 1: Attribute 1
# 2: Attribute 2
# 3: Attribute 3
# ...
# N: Actual Class

################# INPUT YOUR OWN VALUES IN THIS SECTION ######################
ALGORITHM_NAME = "Condensed K-Nearest Neighbor"
SEPARATOR = ","  # Separator for the data set (e.g. "\t" for tab data)
##############################################################################

def main():

    print("Welcome to the " +  ALGORITHM_NAME + " program!")
    print()
    print("Running " + ALGORITHM_NAME + ". Please wait...")
    print()

    # k value that will be tuned
    k = eval(input("Enter a value for k: ") )

    # "c" for classification
    problem = input("Press  \"c\" for classification: ")

    # Directory where data set is located
    data_path = input("Enter the path to your input file: ")

    # Read the full text file and store records in a Pandas dataframe
    pd_data_set = pd.read_csv(data_path, sep=SEPARATOR)

    # Convert dataframe into a Numpy array
    np_data_set = pd_data_set.to_numpy(copy=True)

    # Show functioning of the program
    trace_runs_file = input("Enter the name of your trace runs file: ")

    # Open a new file to save trace runs
    outfile_tr = open(trace_runs_file,"w")

    # Testing statistics
    test_stats_file = input("Enter the name of your test statistics file: ")

    # Open a test_stats_file
    outfile_ts = open(test_stats_file,"w")

    # Create an object of class FiveFoldStratCv
    fivefolds1 = FiveFoldStratCv(np_data_set,problem)

    # The number of folds in the cross-validation
    NO_OF_FOLDS = 5

    # Create an object of class Knn
    knn1 = Knn(k,problem)

    # Generate the five stratified folds
    fold0, fold1, fold2, fold3, fold4 = fivefolds1.get_five_folds()

    training_dataset = None
    test_dataset = None

    # Create an empty array of length 5 to store the accuracy_statistics
    # (classification accuracy for classification problems or mean squared
    # error for regression problems)
    accuracy_statistics = np.zeros(NO_OF_FOLDS)

    # Run k-NN the designated number of times as indicated by the number of folds
    for experiment in range(0, NO_OF_FOLDS):

        print()
        print("Running Experiment " + str(experiment + 1) + " ...")
        print()
        outfile_tr.write("Running Experiment " + str(experiment + 1) + " ...\n")
        outfile_tr.write("\n")

        # Each fold will have a chance to be the test data set
        if experiment == 0:
            test_dataset = fold0
            training_dataset = np.concatenate((
                fold1, fold2, fold3, fold4), axis=0)
        elif experiment == 1:
            test_dataset = fold1
            training_dataset = np.concatenate((
                fold0, fold2, fold3, fold4), axis=0)
        elif experiment == 2:
            test_dataset = fold2
            training_dataset = np.concatenate((
                fold0, fold1, fold3, fold4), axis=0)
        elif experiment == 3:
            test_dataset = fold3
            training_dataset = np.concatenate((
                fold0, fold1, fold2, fold4), axis=0)
        else:
            test_dataset = fold4
            training_dataset = np.concatenate((
                fold0, fold1, fold2, fold3), axis=0)

        # Create an object of class CondensedKnn
        cknn1 = CondensedKnn(training_dataset,problem)

        # Get a new, smaller training set with fewer instances
        training_dataset = cknn1.get_trainingset()

        # Actual class column index of the test dataset
        actual_class_column = np.size(test_dataset,1) - 1

        # Create an array of the actual_class_values of the test instances
        actual_class_values = test_dataset[:,actual_class_column]

        no_of_test_instances = np.size(test_dataset,0)

        # Make an empty array called predicted_class_values which will
        # store the predicted class values. It should be the same length
        # as the number of test instances
        predicted_class_values = np.zeros(no_of_test_instances)

        # For each row in the test data set
        for row in range(0, no_of_test_instances):

            # Neighbor array is a 2D array containing the neighbors
            # (actual class value, distance)
            # Get the k nearest neighbors for each test instance
            this_instance = test_dataset[row,:]
            neighbor_array = knn1.get_neighbors(training_dataset,this_instance)

            # Extract the actual class values
            neighbors_arr = neighbor_array[:,0]

            # Predicted class value stored in the variable prediction
            prediction = knn1.make_prediction(neighbors_arr)

            # Record the prediction in the predicted_class_values array
            predicted_class_values[row] = prediction

        # Calculate the classification accuracy of the predictions
        # (k-NN classification) or the mean squared error (k-NN regression)
        accuracy = knn1.get_accuracy(actual_class_values,predicted_class_values)

        # Store the accuracy in the accuracy_statistics array
        accuracy_statistics[experiment] = accuracy

        # Stats
        temp_acc = accuracy * 100
        outfile_tr.write("Classification Accuracy: " + str(temp_acc) + "%\n")
        outfile_tr.write("\n")
        print("Classification Accuracy: " + str(temp_acc) + "%\n")


    outfile_tr.write("Experiments Completed.\n")
    print("Experiments Completed.")
    print()

    # Write to a file
    outfile_ts.write("----------------------------------------------------------\n")
    outfile_ts.write(ALGORITHM_NAME + " Summary Statistics\n")
    outfile_ts.write("----------------------------------------------------------\n")
    outfile_ts.write("Data Set : " + data_path + "\n")
    outfile_ts.write("\n")
    outfile_ts.write("Accuracy Statistics for All 5 Experiments:")
    outfile_ts.write(np.array2string(
        accuracy_statistics, precision=2, separator=',',
        suppress_small=True))
    outfile_ts.write("\n")

    # Write the relevant stats to a file
    outfile_ts.write("\n")

    outfile_ts.write("Problem Type : Classification" + "\n")

    outfile_ts.write("\n")
    outfile_ts.write("Value for k : " + str(k) + "\n")
    outfile_ts.write("\n")

    accuracy = np.mean(accuracy_statistics)

    accuracy *= 100
    outfile_ts.write("Classification Accuracy : " + str(accuracy) + "%\n")

    # Print to the console
    print()
    print("----------------------------------------------------------")
    print(ALGORITHM_NAME + " Summary Statistics")
    print("----------------------------------------------------------")
    print("Data Set : " + data_path)
    print()
    print()
    print("Accuracy Statistics for All 5 Experiments:")
    print(accuracy_statistics)
    print()
    # Write the relevant stats to a file
    print()

    print("Problem Type : Classification")
    print()
    print("Value for k : " + str(k))
    print()
    print("Classification Accuracy : " + str(accuracy) + "%")
    print()

    # Close the files
    outfile_tr.close()
    outfile_ts.close()

main()
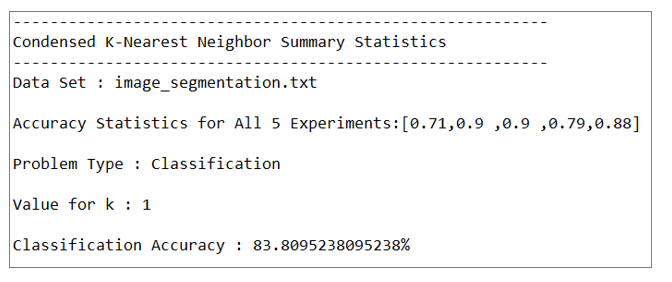
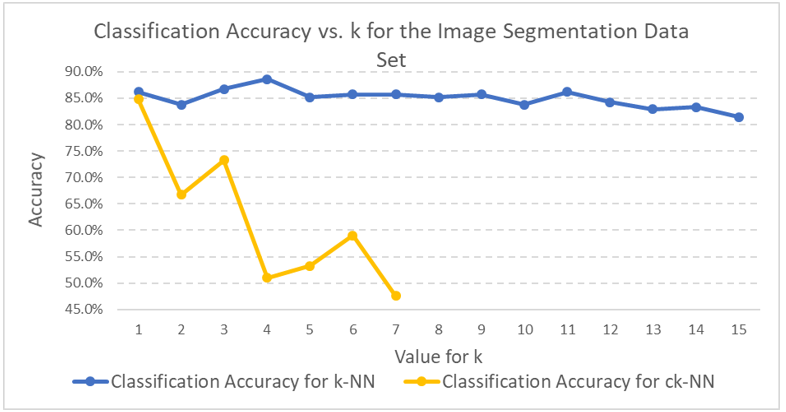
Here are the results for those runs as well as a comparison to regular k-NN:
Classification accuracy was greater than 80% for both the k-NN and ck-NN runs. The classification accuracy for the k-NN runs was about 4 percentage points greater than ck-NN. However, the variability of the classification accuracy for the five experiments in the ck-NN runs was greater than for the k-NN runs.
In a real-world setting for
classification, I would select the k-NN algorithm over ck-NN because its
performance is more consistent. In addition, while ck-NN might result in
improved run times for the actual k-NN runs, there is still the prior overhead
associated with having to prune the training set of irrelevant instances.
Return to Table of Contents