
In this tutorial, I will show you how to give your wheeled robot the ability to follow a colored ball. You will get your first taste of computer vision and image processing.
Special shout out to Matt Timmons-Brown for this project idea. He is the author of a really good book on Raspberry Pi robotics: (Learn Robotics with Raspberry Pi). Go check it out!
Video
Here is a video of what we will build in this tutorial.
Requirements
Here are the requirements:
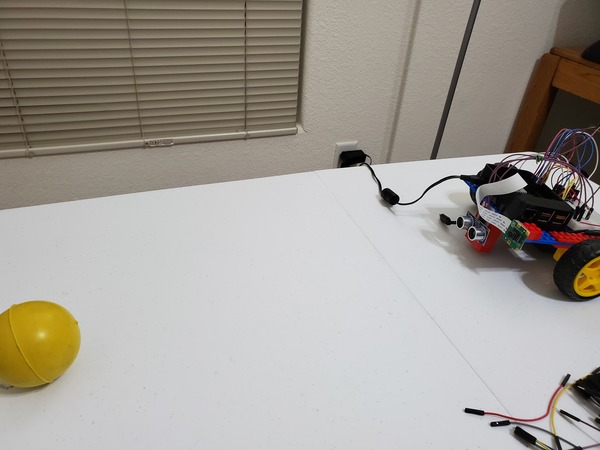
- Build a wheeled robot powered by Raspberry Pi that must identify and follow a yellow rubber ball using OpenCV, a library of programming functions for real-time computer vision and image processing.
You Will Need
The following components are used in this project. You will need:
- Wheeled Robot
- Yellow Rubber Ball (available from eBay)
- Raspberry Pi Camera Module V2-8 (Standard)
- 2×2 Lego Brick (available from eBay)
- VELCRO Brand Thin Clear Fasteners
Directions
Connecting the Raspberry Pi Camera Module
Make sure the Raspberry Pi is turned OFF.
Open the Camera Serial Interface on the Raspberry Pi. It is located next to the 3.5mm audio jack. Pull it upwards delicately from either side.
Insert the ribbon of the camera module into the Camera Serial Interface. Make sure the silver contacts face away from the 3.5mm audio jack.
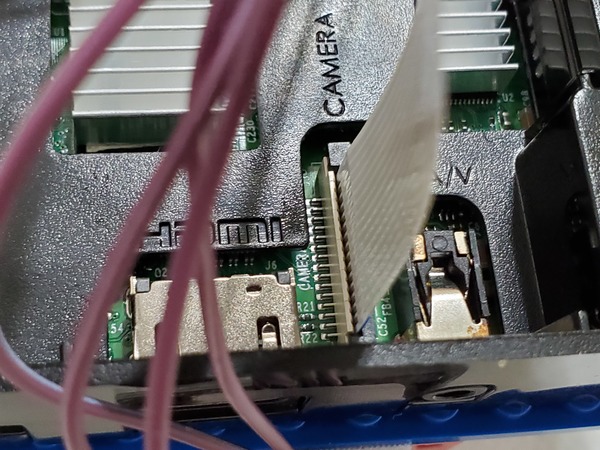
Hold the ribbon in place while pushing down on the Camera Serial Interface port. Make sure it is closed.
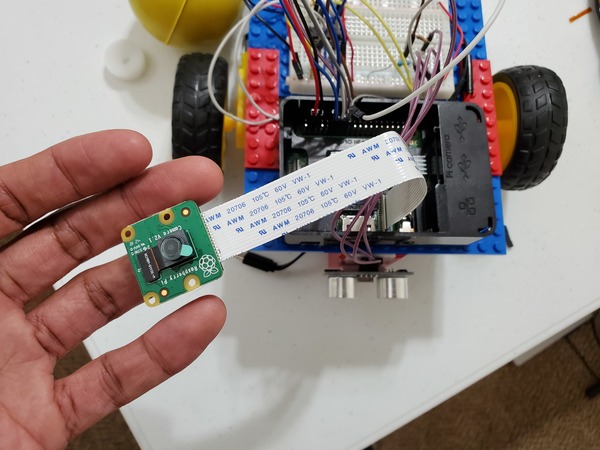
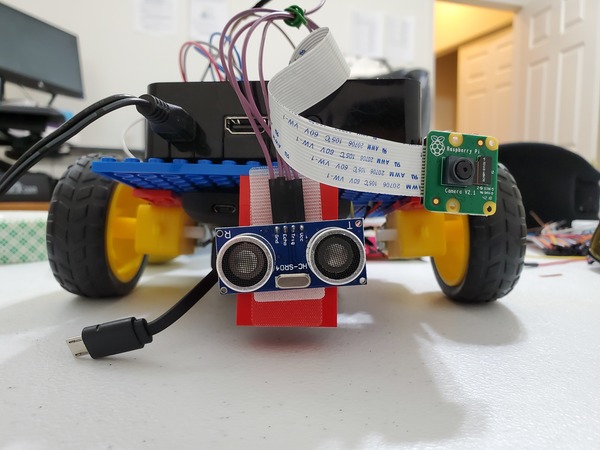
Mount the camera to the front of the robot.
Power up Raspberry Pi.
Open up a configuration window:
sudo raspi-config
Interfacing Options –> ENTER –> Camera –> ENTER –> Yes
The camera is enabled.
Now, we need to set the resolution.
Advanced Options –> Resolution –> DMT Mode 82 1920×1080 60Hz 16: 9 –> ENTER –> Finish
Restart the Raspberry Pi by typing the following in a terminal window.
sudo reboot
Testing the Raspberry Pi Camera Module.
We need to take a test photo with our newly installed camera module.
Open a terminal window. Type the following command:
raspistill -o test_photo.jpg
Go to your home directory to see if the test photo is there. Here is the photo that mine took (back of my head).

Setting Up Object Tracking
Now, we need to configure our system so the robot can track a yellow rubber ball.
Download the dependencies for OpenCV, a library of programming functions for real-time computer vision and image processing.
Type the following command into a terminal window:
sudo apt-get update
sudo apt-get install libblas-dev libatlas-base-dev libjasper-dev libqtgui4 libqt4-test
Y –> ENTER.
Wait a few moments while everything installs.
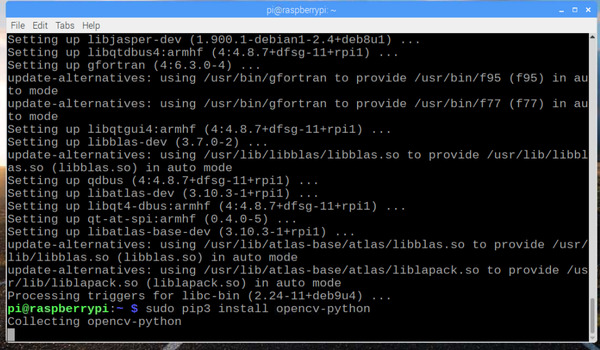
Install OpenCV using pip.
sudo pip3 install opencv-python
Install the PiCamera library.
sudo apt-get install python3-picamera
Determining the HSV Value of the Yellow Ball
We need to select an appropriate HSV (hue, saturation, value) value for the yellow ball. HSV is an alternative color representation that is frequently used instead of the RGB (Red Green Blue) color model I covered in my light and sound wheeled robot post.
Here is the HSV table.

Since the ball is yellow, I’ll choose 60 as my starting number.
Open IDLE in your Raspberry Pi, and create a new file in your robot directory. Name it color_tester.py.
Here is the code for the program:
# Code source (Matt-Timmons Brown): https://github.com/the-raspberry-pi-guy/raspirobots
# import the necessary packages
from picamera.array import PiRGBArray
from picamera import PiCamera
import time
import cv2
import numpy as np


# initialize the camera and grab a reference to the raw camera capture
camera = PiCamera()
camera.resolution = (640, 480)
camera.framerate = 32
rawCapture = PiRGBArray(camera, size=(640, 480))

while True:
	while True:
		try:
			hue_value = int(input("Hue value between 10 and 245: "))
			if (hue_value < 10) or (hue_value > 245):
				raise ValueError
		except ValueError:
			print("That isn't an integer between 10 and 245, try again")
		else:
			break

	lower_red = np.array([hue_value-10,100,100])
	upper_red = np.array([hue_value+10, 255, 255])

	for frame in camera.capture_continuous(rawCapture, format="bgr", use_video_port=True):
		image = frame.array

		hsv = cv2.cvtColor(image, cv2.COLOR_BGR2HSV)

		color_mask = cv2.inRange(hsv, lower_red, upper_red)

		result = cv2.bitwise_and(image, image, mask= color_mask)

		cv2.imshow("Camera Output", image)
		cv2.imshow("HSV", hsv)
		cv2.imshow("Color Mask", color_mask)
		cv2.imshow("Final Result", result)

		rawCapture.truncate(0)

		k = cv2.waitKey(5) #& 0xFF
		if "q" == chr(k & 255):
			break
Place your ball about a yard in front of the camera.
Run the newly created program.
python3 color_tester.py
Choose 60.
You will see four windows.
- Window 1. RGB representation
- Window 2: HSV representation
- Window 3: Show the portions of the frame that match a hue value of 60.
- Window 4: Entire frame minus all portions that do NOT have a 60 hue value.
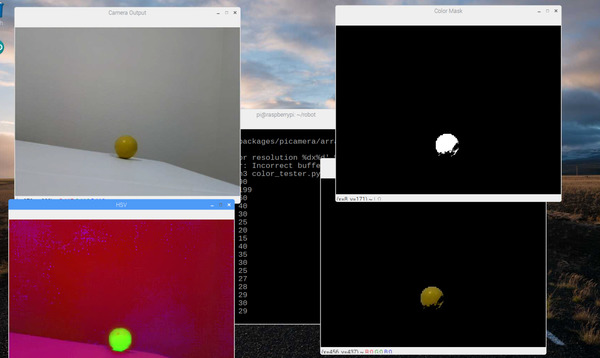
To try a different hue value, select any of the four windows above. Press Q to halt the output of the video.
Go to the terminal window, and try a new hue valve. I’ll try 29 this time. It worked!
You keep trying different numbers until Window 4 shows mostly your ball and nothing else. Be patient and try LOTS of numbers.
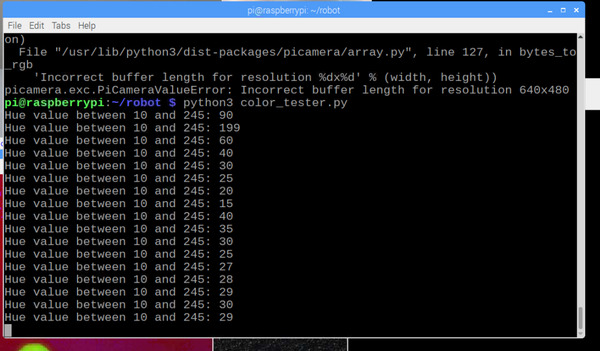
Write down the hue value you ended up with on a sheet of paper.
Press CTRL-C in the terminal window to stop running color_tester.py.
Coding the Ball-Following Program
Open IDLE. Create a new file in your robot directory named:
ball_following_yellow. py
Here is the code (Credit to Matt Timmons-Brown, the author of a really good book on Raspberry Pi robotics: (Learn Robotics with Raspberry Pi):
# Code source (Matt-Timmons Brown): https://github.com/the-raspberry-pi-guy/raspirobots
from picamera.array import PiRGBArray
from picamera import PiCamera
import cv2
import numpy as np
import gpiozero

camera = PiCamera()
image_width = 640
image_height = 480
camera.resolution = (image_width, image_height)
camera.framerate = 32
rawCapture = PiRGBArray(camera, size=(image_width, image_height))
center_image_x = image_width / 2
center_image_y = image_height / 2
minimum_area = 250
maximum_area = 100000

robot = gpiozero.Robot(left=(22,27), right=(17,18))
forward_speed = 1.0
turn_speed = 0.8

HUE_VAL = 29

lower_color = np.array([HUE_VAL-10,100,100])
upper_color = np.array([HUE_VAL+10, 255, 255])

for frame in camera.capture_continuous(rawCapture, format="bgr", use_video_port=True):
	image = frame.array

	hsv = cv2.cvtColor(image, cv2.COLOR_BGR2HSV)

	color_mask = cv2.inRange(hsv, lower_color, upper_color)

	image2, countours, hierarchy = cv2.findContours(color_mask, cv2.RETR_LIST, cv2.CHAIN_APPROX_SIMPLE)

	object_area = 0
	object_x = 0
	object_y = 0

	for contour in countours:
		x, y, width, height = cv2.boundingRect(contour)
		found_area = width * height
		center_x = x + (width / 2)
		center_y = y + (height / 2)
		if object_area < found_area:
			object_area = found_area
			object_x = center_x
			object_y = center_y
	if object_area > 0:
		ball_location = [object_area, object_x, object_y]
	else:
		ball_location = None

	if ball_location:
		if (ball_location[0] > minimum_area) and (ball_location[0] < maximum_area):
			if ball_location[1] > (center_image_x + (image_width/3)):
				robot.right(turn_speed)
				print("Turning right")
			elif ball_location[1] < (center_image_x - (image_width/3)):
				robot.left(turn_speed)
				print("Turning left")
			else:
				robot.forward(forward_speed)
				print("Forward")
		elif (ball_location[0] < minimum_area):
			robot.left(turn_speed)
			print("Target isn't large enough, searching")
		else:
			robot.stop()
			print("Target large enough, stopping")
	else:
		robot.left(turn_speed)
		print("Target not found, searching")

	rawCapture.truncate(0)
Running the Ball – Following Program
Place your robot in an open space on the floor with the yellow rubber ball.
Run the program.
python3 ball_following_yellow.py
Whenever you want to stop the program, type CTRL-C.