
In this tutorial, I will show you how to program a Raspberry Pi-controlled wheeled robot so that it can detect and avoid obstacles autonomously (fancy word for “all by itself”). I have already done this for an Arduino-controlled robot, now let’s do it for our Raspberry Pi-controlled robot.
Special shout out to Matt Timmons-Brown for this project idea. He is the author of a really good book on Raspberry Pi robotics: (Learn Robotics with Raspberry Pi). Go check it out!
Real-world applications of obstacle avoidance in robotics can be seen in devices such as iRobot’s autonomous vacuum cleaner.

Video
Here is a video of what we will build in this tutorial.
Requirements
Here are the requirements:
- Configure a wheeled robot so that it can detect and avoid obstacles autonomously.
You Will Need
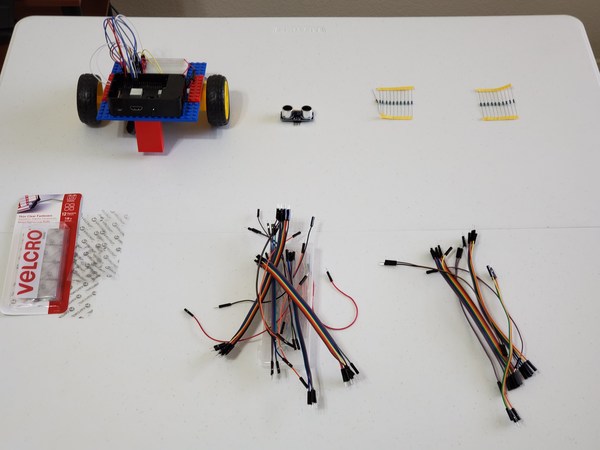
The following components are used in this project. You will need:
- Wheeled Robot Powered by Raspberry Pi
- HC-SR04 Ultrasonic Sensor
- 1 kΩ Resistor
- 2 kΩ Resistor
- VELCRO Brand – Thin Clear Fasteners 7/8 in Squares
- Scotch Permanent Mounting Tape
- Male-to-male Jumper Wires
- Female-to-male Jumper Wires
- Female-to-female Jumper Wires
Directions
How Distance to an Object is Calculated
In order to give our robot the ability to “see” obstacles in front of it, we need to connect it up to a sensor. We will use the HC-SR04 ultrasonic sensor, a popular sensor in the do-it-yourself robotics world.
The HC-SR04 has a transmitter and a receiver. The transmitter sends out a 10 microsecond sound wave that is beyond the range of what humans are able to hear. The receiver waits for that sound wave to reflect back. The distance to the object is calculated based on the duration of the echoed sound wave, which is directly proportional to the duration the sound wave traveled (from transmitter to object to receiver).

Image Source: Random Nerd Tutorials
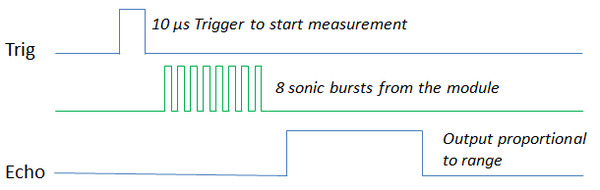
Image Source: MCU on Eclipse
The distance is calculated based on our knowledge of the speed of sound in dry air at 20°C, which is 343 meters per second (1 mile in 4.7 seconds).
Distance in meters = Speed in meters per second x [(Time in seconds) / 2]
We divide the time by 2 because the sound wave traveled from the HC-SR04 sensor to the object and then back to the sensor. We only want to know the one-way distance from the sensor to the object, not the roundtrip distance. Therefore, in our distance calculation, time is divided by 2.
Determining What Resistors You Need
The Raspberry Pi’s GPIO pins have a working voltage of 3.3V. The HC-SR04 operates on 5V logic. If you connect the HC-SR04 directly to the Raspberry Pi, you might break your Raspberry Pi. This is because when the Echo pin (the receiver) of the HC-SR04 receives the sound wave that was originally emitted by the Trigger pin (the transmitter), the Echo pin will go from LOW (0V) to HIGH (5V). This HIGH signal is then sent to one of the GPIO pins on the Raspberry Pi. But since the GPIO pins can only handle 3.3V, you will overload the Raspberry Pi with voltage.
We must reduce the voltage produced by the ECHO pin (5V) to a level that the Raspberry Pi can handle (3.3V). In order to transform a larger voltage into a smaller voltage, we need to make a circuit known as a voltage divider. The output voltage of a voltage divider is a fraction of the input voltage.
A voltage divider uses two resistors to divide a single voltage into two smaller voltages. The voltage drop across a resistor in a series circuit is directly proportional to the size of the resistor because of a famous law, known as Ohm’s Law (V = IR; Voltage = Current x Resistance).
So, what do we need in order to build a voltage divider? All that is needed are two resistors connected in series (one right after the other) from the input voltage (the voltage you want to reduce) to the ground. You also need a jumper wire to insert in between the two resistors. This jumper wire is the output (target) voltage of the voltage divider and connects to the GPIO pin of the Raspberry Pi.
Here is a diagram of a voltage divider:

Image Source: Ohms Law Calculator
The output voltage (which we want to be 3.3V) is related to the input voltage (5V in our case) via the following mathematical expression:
VoltageOut = VoltageIn x [(Resistor 2)/(Resistor 1 + Resistor 2)]
Notice that the output voltage is the proportion of the input voltage that drops across Resistor 2.
Let’s work with some actual numbers.
- VoltageOut = Vout = 3.3V (This is the target voltage; the voltage we desire.)
- VoltageIn = Vin = 5V (This is the voltage emitted by the ECHO pin; the voltage we need to reduce)
- Resistor 1 = R1 = 1000 Ω (I picked this number; you can choose any reasonable number)
- Resistor 2 = R2 = ? (This is what we need to solve for)
Plug these number into the equation. You can work out the algebra with me by hand on a scratch piece of paper. I’ll show my work, step-by-step.
3.3 = 5 x [(R2)/(1000 + R2)]
3.3/5 = R2/(1000 + R2) Divide both sides by 5
(3.3/5)(1000 + R2) = R2 Multiply (1000 + R2) on both sides
(3.3/5)(1000) + (3.3/5)R2 = R2 Distributive Property
(3.3/5)(1000) = [1 - (3.3/5)]R2 Gather similar terms
[(3.3/5)(1000)]/[1 - (3.3/5)] = R2 Divide by [1 - (3.3/5)]
1941.176 Ω = R2
1941 Ω resistors don’t exist, but we do have a 2000 Ω (2kΩ) resistor. Let’s see what the output voltage is in this case:
- R1 = 1000 Ω
- R2 = 2000 Ω
- Vin = 5V
- Vout = ?
Remember the voltage divider equation:
Let’s solve for Vout
Vout = 5 x [2000/(1000 + 2000)]
Vout = 5 x [2000/3000]
Vout = 3.3333... which is close enough to our target voltage
What would have happened if we used a 3000 Ω resistor instead?
Vout = 5 x [3000/(1000 + 3000)]
Vout = 5 x (3000/4000)
Vout = 3.75V which is >3.3V and will break the Raspberry Pi
Therefore, it is always good to use a resistor for R2 that has a little bit less resistance than what you calculate mathematically. That way you protect your Raspberry Pi from damage.
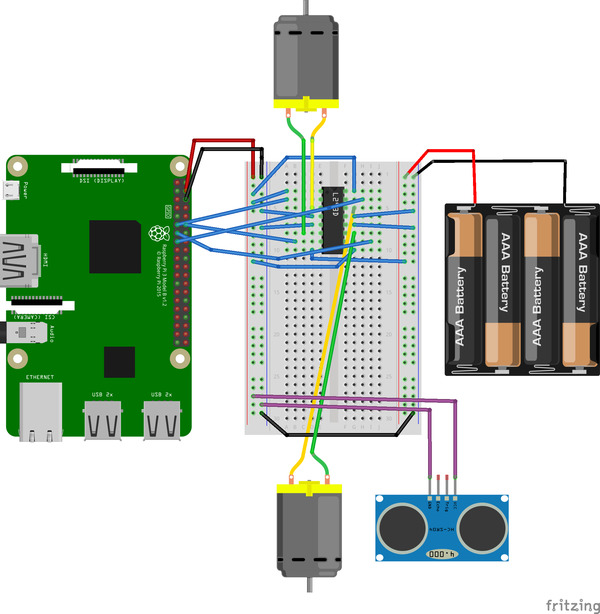
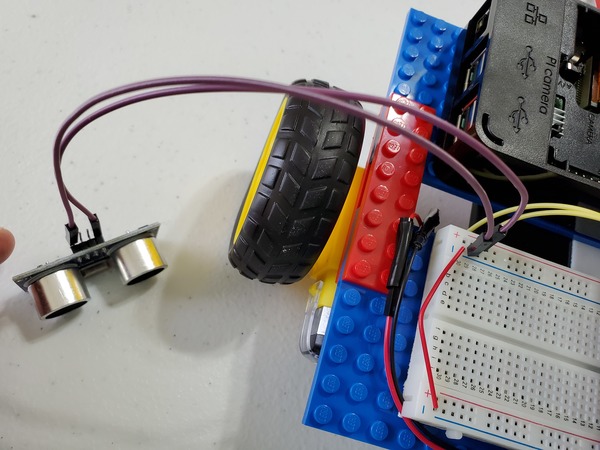
Connect the HC-SR04
Make sure the Raspberry Pi is turned OFF.
Grab two long female-to-male jumper wires.
Connect the VCC pin of the HC-SR04 to the red (positive) rail of the solderless breadboard (the one connected to the Raspberry Pi).

Connect the GND pin of the HC-SR04 to the blue (negative) rail of the solderless breadboard (the one connected to your Raspberry Pi).
Here is the Raspberry Pi pin diagram:
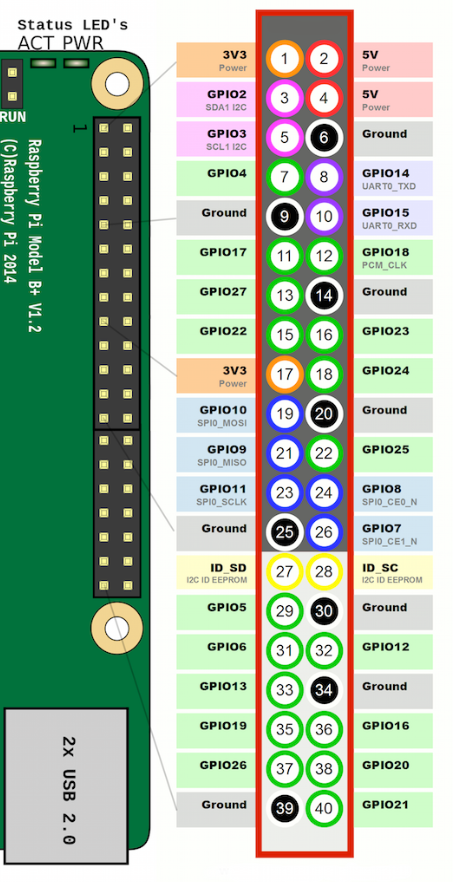
Using a female-to-female jumper wire, connect the Trigger (labeled Trig) pin of the HC-SR04 to pin 16 (GPIO 23) of the Raspberry Pi.
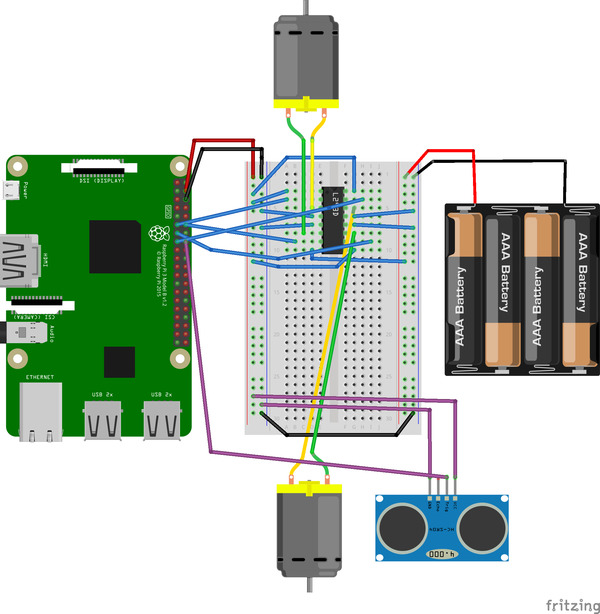
Connect the Echo pin of the HC-SR04 to an empty row on the solderless breadboard. I connected it to e26.

Connect a 1 kΩ resistor from a hole on the same row as the jumper wire (connected to the Echo pin) to an empty row on the solderless breadboard. I connected it from d26 to d22.
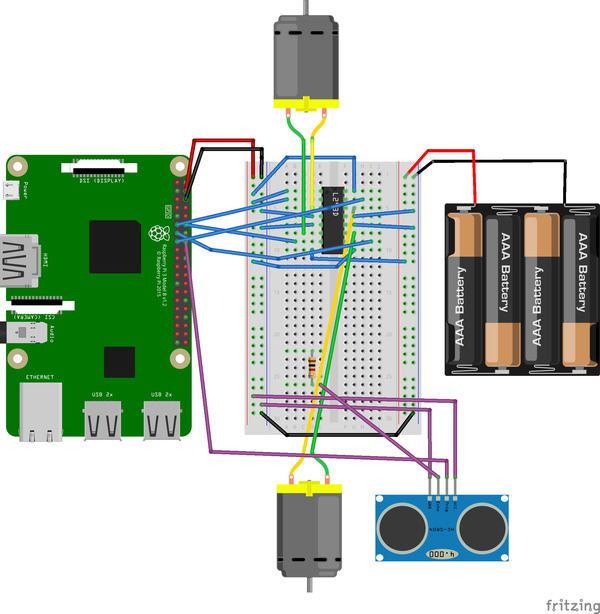
Connect a jumper wire from the 1 kΩ resistor to pin 18 (GPIO 24) of the Raspberry Pi. I connected it to c22.
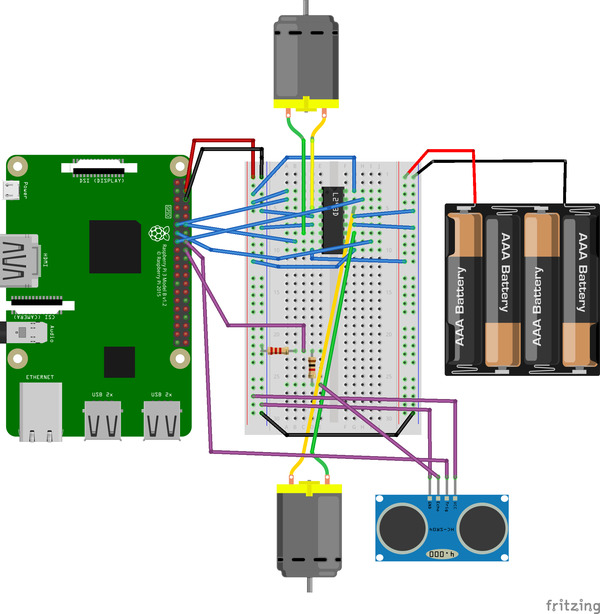
Connect a 2 kΩ resistor from the same row as the pin 18 jumper wire (you just inserted) to the blue (negative) ground rail of the solderless breadboard. I put the resistor in cell b22 of the breadboard.
Write the Python Program
Now we need to write some code so that the Raspberry Pi can use the HC-SR04 sensor.
Power up the Raspberry Pi.
Open a terminal window.
Navigate to the robot directory
cd robot
Create a new program in the Nano Text Editor, We will name it test_ultrasonic_sensor.py.
nano test_ultrasonic_sensor.py
Here is the code.
import gpiozero  # GPIO Zero library
import time  # Time library

# File name: test_ultrasonic_sensor.py
# Code source (Matt-Timmons Brown): https://github.com/the-raspberry-pi-guy/raspirobots
# Date created: 5/28/2019
# Python version: 3.5.3
# Description: Test the HC-SR04 ultrasonic
# distance sensor

# Assign the GPIO pin number to these variables.
TRIG = 23
ECHO = 24

# This sends out the signal to the object
trigger = gpiozero.OutputDevice(TRIG)

# This variable is an input that receives
# the signal reflected by the object
echo = gpiozero.DigitalInputDevice(ECHO)

# Send out a 10 microsecond pulse (ping)
# from the trasmitter (TRIG)
trigger.on()
time.sleep(0.00001)
trigger.off()

# Start timer as soon as the reflected sound
# wave is "heard" by the receiver (echo)
while echo.is_active == False:
	pulse_start = time.time() # Time of last LOW reading

# Stop the timer one the reflected sound wave
# is done pushing through the receiver (ECHO)
# Wave duration is proportional to duration of travel
# of the original pulse.
while echo.is_active == True:
	pulse_end = time.time() # Time of last HIGH reading

pulse_duration = pulse_end - pulse_start

# 34300 cm/s is the speed of sound
distance = 34300 * (pulse_duration/2)

# Round to two decimal places
round_distance = round(distance,2)

# Display the distance
print("Distance: ", round_distance)
You can place an object a certain distance away from the sensor to check its accuracy. Let’s do 12 cm, and see what distance reading we get printed out on the terminal window.
Run the program by typing:
python3 test_ultrasonic_sensor.py

If you get a reasonable reading, move on to the next section below.
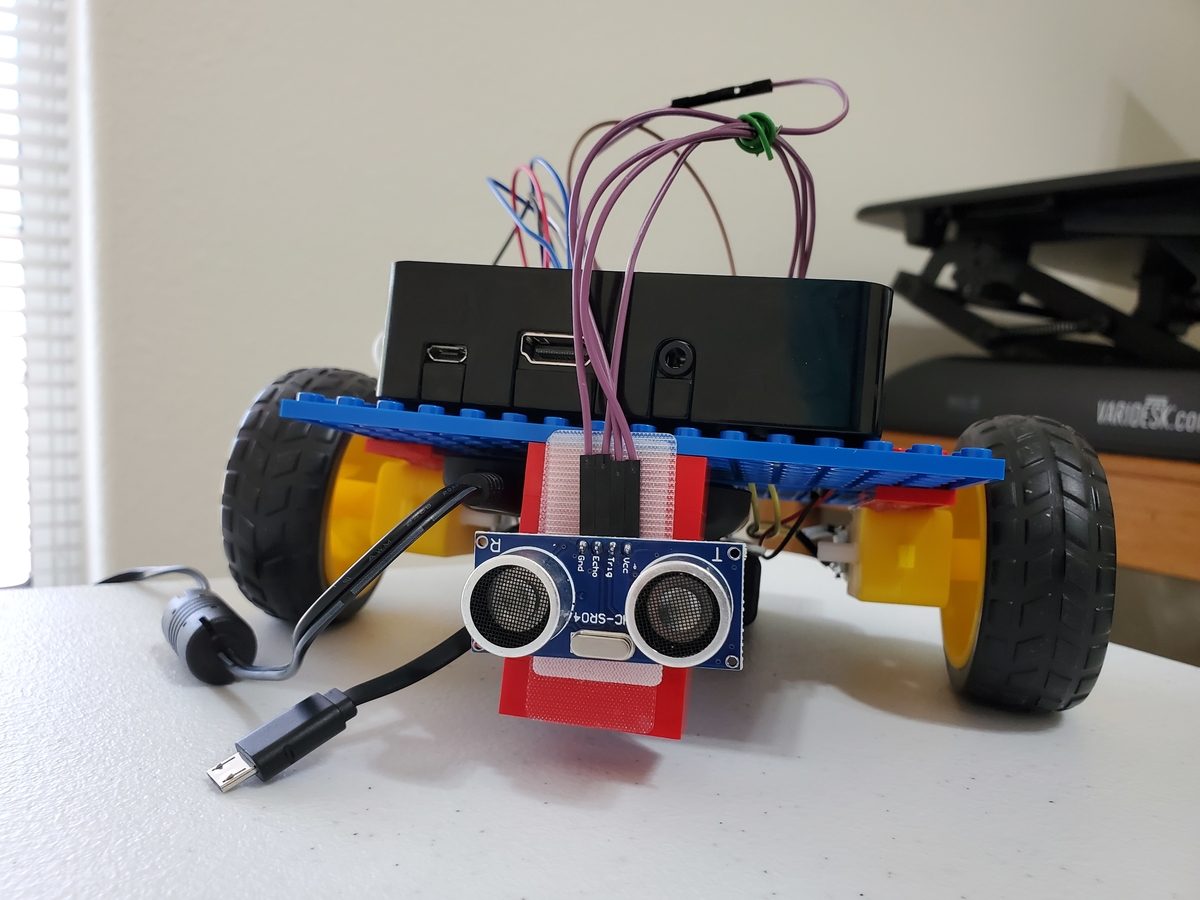
Mounting the HC-SR04 Ultrasonic Sensor
Mount the ultrasonic sensor to the front of the robot using VELCRO or permanent mounting tape.
Let’s program our robot so that it avoids any objects that are less than 15 cm away from it.
Since this program will be somewhat lengthy, I will open IDLE, an Integrated Development Environment that makes developing and debugging Python code a whole lot easier than using Nano, the Linux command line text editor.
Open VNC Viewer to access your Raspberry Pi.
Click the Raspberry Pi icon in the upper left part of the screen, and go to Programming -> Python 3 (IDLE).
Go to File → New File
Here is the code for the program.
import gpiozero  # GPIO Zero library
import time  # Time library

# File name: obstacle_avoiding_robot.py
# Code source (Matt-Timmons Brown): https://github.com/the-raspberry-pi-guy/raspirobots
# Date created: 5/28/2019
# Python version: 3.5.3
# Description: A robot that avoids objects
# using an HC-SR04 ultrasonic distance sensor.

# Assign the GPIO pin number to these variables.
TRIG = 23
ECHO = 24

# This sends out the signal to the object
trigger = gpiozero.OutputDevice(TRIG)

# This variable is an input that receives
# the signal reflected by the object
echo = gpiozero.DigitalInputDevice(ECHO)

# Create a Robot object that is attached to
# GPIO pins 17, 18, 22, and 27 of the
# Raspberry Pi. These pins are inputs for the
# L293D motor controller.
# Objects have data and behavior that is
# predefined by the Robot class (i.e. blueprint)
# declared inside the GPIO Zero library.
# Change the order of the numbers inside
# the parentheses until you get the desired
# behavior.
robot = gpiozero.Robot(left=(22,27), right=(17,18))

# Get the distance to the object
def get_distance(trigger, echo):

  # Send out a 10 microsecond pulse (ping)
  # from the trasmitter (TRIG)
  trigger.on()
  time.sleep(0.00001)
  trigger.off()

  # Start timer as soon as the reflected sound
  # wave is "heard" by the receiver (echo)
  while echo.is_active == False:
    pulse_start = time.time() # Time of last LOW reading

  # Stop the timer one the reflected sound wave
  # is done pushing through the receiver (ECHO)
  # Wave duration is proportional to duration of travel
  # of the original pulse.
  while echo.is_active == True:
    pulse_end = time.time() # Time of last HIGH reading

  pulse_duration = pulse_end - pulse_start

  # 34300 cm/s is the speed of sound
  distance = 34300 * (pulse_duration/2)

  # Round distance to two decimal places
  round_distance = round(distance,2)

  return(round_distance)

while True:
  distance_to_object = get_distance(trigger,echo)

  # Avoid objects less than 15 cm away
  if distance_to_object <= 15:
    robot.right() # Right for
    time.sleep(0.25) # 0.25 seconds
  else:
    robot.forward() # Forward for
    time.sleep(0.1) # 0.1 seconds
Save the file as obstacle_avoiding_robot.py.
Exit IDLE.
When you are ready to run the program, place your robot on the floor in a large open space.
Open a terminal window on the Raspberry Pi and type:
python3 obstacle_avoiding_robot.py
Congratulations! You have developed an autonomous robot that can avoid running into objects all on its own.
When you are done watching your robot avoid obstacles, stop running your program by typing CTRL-C.
Potential Improvements to the Robot
Right now, our robot has only one ultrasonic sensor. We could add more HC-SR04 sensors to make our robot more robust. This would require only small modifications to our original code.