

In this post, I will show you how to add light to a Raspberry Pi wheeled robot.
Special shout out to Matt Timmons-Brown for this project idea. He is the author of a really good book on Raspberry Pi robotics: (Learn Robotics with Raspberry Pi). Go check it out!
Requirements
Here are the requirements:
- Add lights to a wheeled robot using the Adafruit NeoPixel Stick with 8 RGB LEDs.
You Will Need
The following components are used in this project. You will need:
- Wheeled Robot
- Nintendo Wii Remote Control (available from eBay)
- Adafruit NeoPixel Stick with 8 Red Green Blue (RGB) LEDs
- Male Pin Header Connectors
- VELCRO Brand – Thin Clear Fasteners 7/8 in Squares
- Male-to-male Jumper Wires
- Female-to-male Jumper Wires
- Female-to-female Jumper Wires
- Sunglasses (optional)
Directions
Setting Up the RGB LED Stick
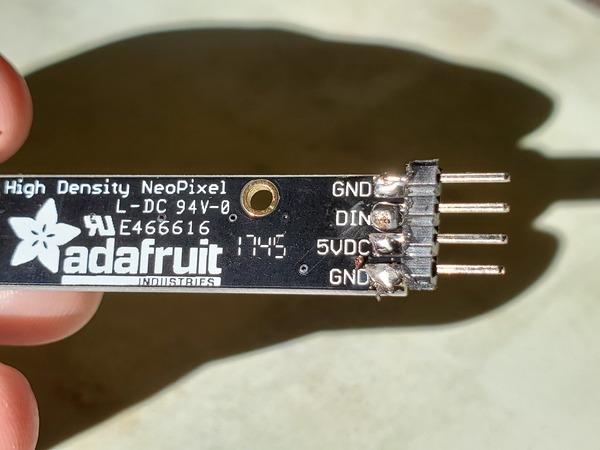
Cut four pins off one of the male pin header connectors with a pair of scissors.
Solder the four pins to the DIN (stands for “data-in”) side of the RGB LED stick.
If you don’t know how to solder, check out my video below.
Connect the 5VDC pin of the RGB LED stick to the positive (red) 5V rail of the solderless breadboard.

Connect the GND (Ground) pin of the RGB LED stick to the blue (negative) rail of the solderless breadboard.
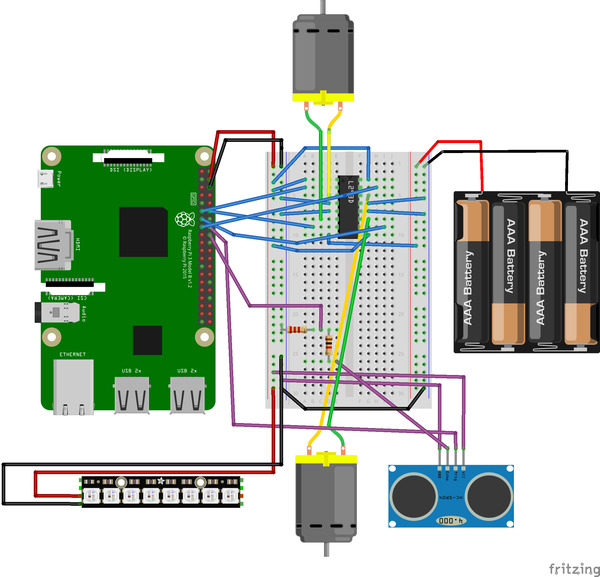
Connect the DIN pin of the RGB LED stick to pin 19 (GPIO 10) of the Raspberry Pi. This is the Master Output Slave Input (MOSI) pin that the Pi uses to send information out via the SPI protocol (more on this in a second).
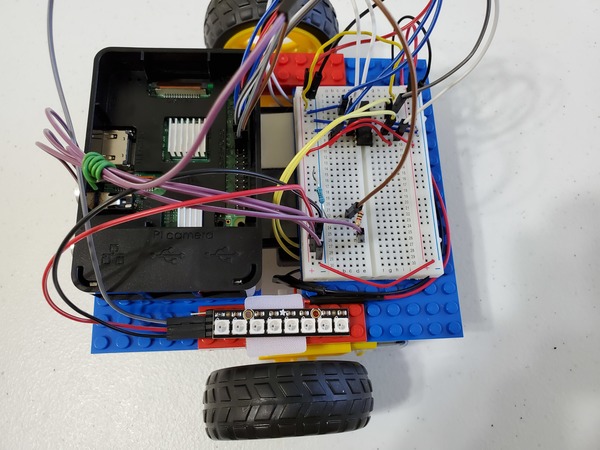
Mount the RGB LED on the Robot using Velcro. You can mount it anywhere you want.
Power up your Raspberry Pi.
Open a terminal window.
Verify that pip is installed. Pip is a tool that enables you to install and manage libraries that are not a part of Python’s standard library. Type the following commands in the terminal window.
sudo apt-get update
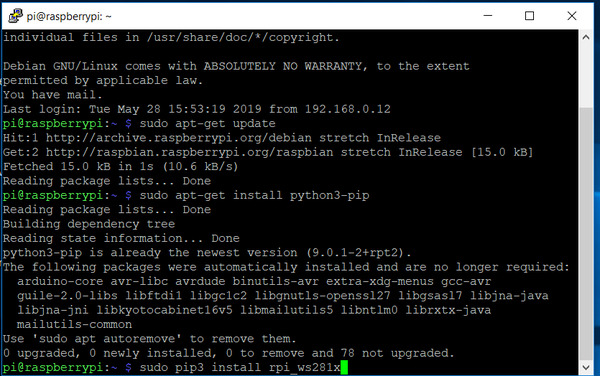
sudo apt-get install python3-pip
Install the rpi_ws 281x library.
sudo pip3 install rpi_ws281x
Make sure the SPI bus is enabled.
SPI is a communication interface built-in to several of the GPIO pins of the Raspberry Pi. It is good to use the SPI bus when you want data to be streamed over short distances, continuously with no interruptions.
Type this terminal command:
sudo raspi-config
Interfacing Options → SPI
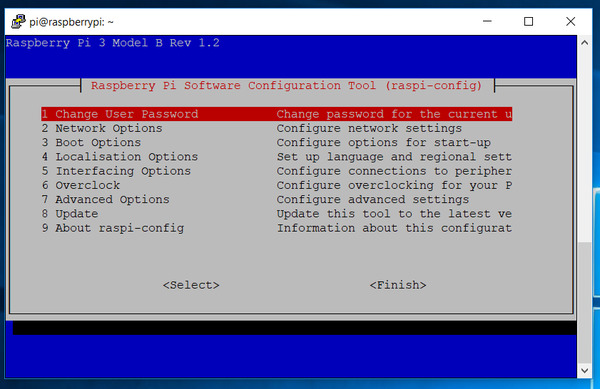
Select Yes
Finish
Reboot the Raspberry Pi.
sudo reboot
Wait for the Raspberry Pi to reboot, then open a terminal window again in Raspberry Pi (I’m using Putty).
Modify the Graphics Programming Unit core frequency so that it is 250 MHz.
sudo nano /boot/config.txt
Scroll down, and add this to the bottom of the file.
core_freq = 250
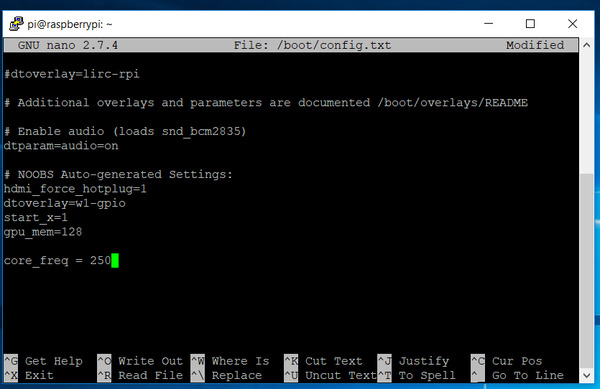
CTRL-X –> Y –> ENTER to save
Reboot the Raspberry Pi.
sudo reboot
Testing the rpi_ws281x Library
Open IDLE on your Raspberry Pi.
Create a new file.
Save it as rgb_library_test.py
Type the following code:
#!/usr/bin/env python3
# NeoPixel library strandtest example
# Author: Tony DiCola (tony@tonydicola.com)
#
# Direct port of the Arduino NeoPixel library strandtest example.  Showcases
# various animations on a strip of NeoPixels.
# Code source (Matt-Timmons Brown): https://github.com/the-raspberry-pi-guy/raspirobots
# Minor edits by Matt Timmons-Brown for "Learn Robotics with Raspberry Pi"

import time
from rpi_ws281x import *
import argparse

# LED strip configuration:
LED_COUNT      = 8      # Number of LED pixels.
#LED_PIN       = 18      # GPIO pin connected to the pixels (18 uses PWM!).
LED_PIN        = 10      # GPIO pin connected to the pixels (10 uses SPI /dev/spidev0.0).
LED_FREQ_HZ    = 800000  # LED signal frequency in hertz (usually 800khz)
LED_DMA        = 10      # DMA channel to use for generating signal (try 10)
LED_BRIGHTNESS = 255     # Set to 0 for darkest and 255 for brightest
LED_INVERT     = False   # True to invert the signal (when using NPN transistor level shift)
LED_CHANNEL    = 0       # set to '1' for GPIOs 13, 19, 41, 45 or 53
LED_STRIP      = ws.WS2811_STRIP_GRB # Strip type and color ordering

# Define functions which animate LEDs in various ways.
def colorWipe(strip, color, wait_ms=50):
    """Wipe color across display a pixel at a time."""
    for i in range(strip.numPixels()):
        strip.setPixelColor(i, color)
        strip.show()
        time.sleep(wait_ms/1000.0)

def theaterChase(strip, color, wait_ms=50, iterations=10):
    """Movie theater light style chaser animation."""
    for j in range(iterations):
        for q in range(3):
            for i in range(0, strip.numPixels(), 3):
                strip.setPixelColor(i+q, color)
            strip.show()
            time.sleep(wait_ms/1000.0)
            for i in range(0, strip.numPixels(), 3):
                strip.setPixelColor(i+q, 0)

def wheel(pos):
    """Generate rainbow colors across 0-255 positions."""
    if pos < 85:
        return Color(pos * 3, 255 - pos * 3, 0)
    elif pos < 170:
        pos -= 85
        return Color(255 - pos * 3, 0, pos * 3)
    else:
        pos -= 170
        return Color(0, pos * 3, 255 - pos * 3)

def rainbow(strip, wait_ms=20, iterations=1):
    """Draw rainbow that fades across all pixels at once."""
    for j in range(256*iterations):
        for i in range(strip.numPixels()):
            strip.setPixelColor(i, wheel((i+j) & 255))
        strip.show()
        time.sleep(wait_ms/1000.0)

def rainbowCycle(strip, wait_ms=20, iterations=5):
    """Draw rainbow that uniformly distributes itself across all pixels."""
    for j in range(256*iterations):
        for i in range(strip.numPixels()):
            strip.setPixelColor(i, wheel((int(i * 256 / strip.numPixels()) + j) & 255))
        strip.show()
        time.sleep(wait_ms/1000.0)

def theaterChaseRainbow(strip, wait_ms=50):
    """Rainbow movie theater light style chaser animation."""
    for j in range(256):
        for q in range(3):
            for i in range(0, strip.numPixels(), 3):
                strip.setPixelColor(i+q, wheel((i+j) % 255))
            strip.show()
            time.sleep(wait_ms/1000.0)
            for i in range(0, strip.numPixels(), 3):
                strip.setPixelColor(i+q, 0)

# Main program logic follows:
if __name__ == '__main__':
    # Process arguments
    parser = argparse.ArgumentParser()
    parser.add_argument('-c', '--clear', action='store_true', help='clear the display on exit')
    args = parser.parse_args()

    # Create NeoPixel object with appropriate configuration.
    strip = Adafruit_NeoPixel(LED_COUNT, LED_PIN, LED_FREQ_HZ, LED_DMA, LED_INVERT, LED_BRIGHTNESS, LED_CHANNEL)
    # Intialize the library (must be called once before other functions).
    strip.begin()

    print ('Press Ctrl-C to quit.')
    if not args.clear:
        print('Use "-c" argument to clear LEDs on exit')

    try:

        while True:
            print ('Color wipe animations.')
            colorWipe(strip, Color(255, 0, 0))  # Red wipe
            colorWipe(strip, Color(0, 255, 0))  # Blue wipe
            colorWipe(strip, Color(0, 0, 255))  # Green wipe
            print ('Theater chase animations.')
            theaterChase(strip, Color(127, 127, 127))  # White theater chase
            theaterChase(strip, Color(127,   0,   0))  # Red theater chase
            theaterChase(strip, Color(  0,   0, 127))  # Blue theater chase
            print ('Rainbow animations.')
            rainbow(strip)
            rainbowCycle(strip)
            theaterChaseRainbow(strip)

    except KeyboardInterrupt:
        if args.clear:
            colorWipe(strip, Color(0,0,0), 10)
Save it.
Open a new terminal window.
Run the test using the following command:
python3 rgb_library_test.py -c
The -c at the end makes sure that the RGB LEDs turn off when you type CTRL-C in the terminal window.
Managing the RGB LEDs Using the Nintendo Wii Remote Control
Now we will create a program to control the LEDs using our Wii remote. Open a new terminal window on your Raspberry Pi, and go to the robot directory.
cd robot
Open a new file in IDLE named rgb_wii_remote.py
Type the following code into the program:
import gpiozero
import cwiid
import time
from rpi_ws281x import *

# Author: Matt Timmons-Brown for "Learn Robotics with Raspberry Pi"
# Description: Enables control of the LED with the Wii Remote
# Minor modifications made by Addison Sears-Collins

robot = gpiozero.Robot(left=(22,27), right=(17,18))

print("Press and hold the 1+2 buttons on your Wiimote simultaneously")
wii = cwiid.Wiimote()
print("Connection established")
wii.rpt_mode = cwiid.RPT_BTN | cwiid.RPT_ACC

LED_COUNT      = 8
LED_PIN        = 10
LED_FREQ_HZ    = 800000
LED_DMA        = 10
LED_BRIGHTNESS = 150
LED_INVERT     = False
LED_CHANNEL    = 0
LED_STRIP      = ws.WS2811_STRIP_GRB

strip = Adafruit_NeoPixel(LED_COUNT, LED_PIN, LED_FREQ_HZ, LED_DMA, LED_INVERT, LED_BRIGHTNESS, LED_CHANNEL, LED_STRIP)
strip.begin()

def colorWipe(strip, color, wait_ms=50):
	"""Wipe color across display a pixel at a time."""
	for i in range(strip.numPixels()):
		strip.setPixelColor(i, color)
		strip.show()
		time.sleep(wait_ms/1000.0)

while True:
	buttons = wii.state["buttons"]
	if (buttons & cwiid.BTN_PLUS):
		colorWipe(strip, Color(255, 0, 0))  # Red wipe
	if (buttons & cwiid.BTN_HOME):
        colorWipe(strip, Color(0, 255, 0))  # Blue wipe
	if (buttons & cwiid.BTN_MINUS):
        colorWipe(strip, Color(0, 0, 255))  # Green wipe
	if (buttons & cwiid.BTN_B):
		colorWipe(strip, Color(0, 0, 0)) # Blank

	x = (wii.state["acc"][cwiid.X] - 95) - 25
	y = (wii.state["acc"][cwiid.Y] - 95) - 25

	if x < -25:
		x = -25
	if y < -25:
		y = -25
	if x > 25:
		x = 25
	if y > 25:
		y = 25

	forward_value = (float(x)/50)*2
	turn_value = (float(y)/50)*2

	if (turn_value < 0.3) and (turn_value > -0.3):
		robot.value = (forward_value, forward_value)
	else:
		robot.value = (-turn_value, turn_value)
Save the program.
Place your robot in an open space, and run the following command from inside your Pi’s robot directory.
python3 rgb_wii_remote.py
You can press the home, minus, and plus buttons to activate different lights.
Turn off the lights using the B button, and stop the program by typing CTRL-C.