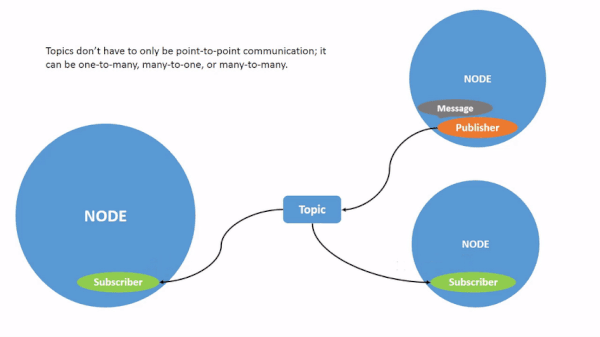
In this post, we will install ROS 2 Foxy Fitzroy. As of the date of this tutorial, ROS 2 Foxy Fitzroy is the latest ROS distribution that has long term support. It will be supported until May 2023.
The official steps for installing ROS are at this link at ROS.org, but I will walk you through the process below so that you can see what each step should look like. We will install ROS 2 Foxy via Debian Packages.
The first thing we are going to do is to set the locale. You can understand what locale means at this link.
Type this command inside the terminal window.
locale
Now type the following command.
sudo apt update && sudo apt install locales
If you get some error that looks like this: “Waiting for cache lock: Could not get lock /var/lib/dpkg/lock. It is held by process 3944”, open a new terminal window, and kill that process:
To check if it was added, type the following command, and scroll all the way to the bottom.:
gedit ~/.bashrc
If you don’t have gedit installed, type:
sudo apt-get install gedit
Now close the current terminal window, and open a new one.
Type the following command to see what version of ROS you are using.
printenv ROS_DISTRO
Here is what you should see.
You can also type:
env |grep ROS
Install some other tools that you will work with in ROS. After you type the command below, press Y and Enter to complete the download process.
sudo apt install -y python3-pip
pip3 install -U argcomplete
sudo apt install python3-argcomplete
Test Your Installation
Open a new terminal window, and launch the talker program. This program is a demo program written in C++ that is publishing messages (i.e. data in the form of a string) to a topic.
ros2 run demo_nodes_cpp talker
Then type the following command in another terminal window to launch the listener program. This Python program listens (i.e. subscribes) to the topic that the talker program is publishing messages to.
ros2 run demo_nodes_py listener
To understand how topics, publisher nodes, and subscriber nodes work in ROS, check out this post.
If you saw the output above, everything is working properly. Yay!
In this tutorial, we will implement human pose estimation. Pose estimation means estimating the position and orientation of objects (in this case humans) relative to the camera. By the end of this tutorial, you will be able to generate the following output:
Real-World Applications
Human pose estimation has a number of real-world applications:
We need to make sure we have all the software packages installed. Check to see if you have OpenCV installed on your machine. If you are using Anaconda, you can type:
conda install -c conda-forge opencv
Alternatively, you can type:
pip install opencv-python
Make sure you have NumPy installed, a scientific computing library for Python.
If you’re using Anaconda, you can type:
conda install numpy
Alternatively, you can type:
pip install numpy
Find Some Videos
The first thing we need to do is find some videos to serve as our test cases.
We want to download videos that contain humans. The video files should be in mp4 format and 1920 x 1080 in dimensions.
Take your videos and put them inside a directory on your computer.
Download the Protobuf File
Inside the same directory as your videos, download the protobuf file on this page. It is named graph_opt.pb. This file contains the weights of the neural network. The neural network is what we will use to determine the human’s position and orientation (i.e. pose).
Brief Description of OpenPose
We will use the OpenPose application along with OpenCV to do what we need to do in this project. OpenPose is an open source real-time 2D pose estimation application for people in video and images. It was developed by students and faculty members at Carnegie Mellon University.
Here is the code. Make sure you put the code in the same directory on your computer where you put the other files.
The only lines you need to change are:
Line 14 (name of the input file in mp4 format)
Line 15 (input file size)
Line 18 (output file name)
# Project: Human Pose Estimation Using Deep Learning in OpenCV
# Author: Addison Sears-Collins
# Date created: February 25, 2021
# Description: A program that takes a video with a human as input and outputs
# an annotated version of the video with the human's position and orientation..
# Reference: https://github.com/quanhua92/human-pose-estimation-opencv
# Import the important libraries
import cv2 as cv # Computer vision library
import numpy as np # Scientific computing library
# Make sure the video file is in the same directory as your code
filename = 'dancing32.mp4'
file_size = (1920,1080) # Assumes 1920x1080 mp4 as the input video file
# We want to save the output to a video file
output_filename = 'dancing32_output.mp4'
output_frames_per_second = 20.0
BODY_PARTS = { "Nose": 0, "Neck": 1, "RShoulder": 2, "RElbow": 3, "RWrist": 4,
"LShoulder": 5, "LElbow": 6, "LWrist": 7, "RHip": 8, "RKnee": 9,
"RAnkle": 10, "LHip": 11, "LKnee": 12, "LAnkle": 13, "REye": 14,
"LEye": 15, "REar": 16, "LEar": 17, "Background": 18 }
POSE_PAIRS = [ ["Neck", "RShoulder"], ["Neck", "LShoulder"], ["RShoulder", "RElbow"],
["RElbow", "RWrist"], ["LShoulder", "LElbow"], ["LElbow", "LWrist"],
["Neck", "RHip"], ["RHip", "RKnee"], ["RKnee", "RAnkle"], ["Neck", "LHip"],
["LHip", "LKnee"], ["LKnee", "LAnkle"], ["Neck", "Nose"], ["Nose", "REye"],
["REye", "REar"], ["Nose", "LEye"], ["LEye", "LEar"] ]
# Width and height of training set
inWidth = 368
inHeight = 368
net = cv.dnn.readNetFromTensorflow("graph_opt.pb")
cap = cv.VideoCapture(filename)
# Create a VideoWriter object so we can save the video output
fourcc = cv.VideoWriter_fourcc(*'mp4v')
result = cv.VideoWriter(output_filename,
fourcc,
output_frames_per_second,
file_size)
# Process the video
while cap.isOpened():
hasFrame, frame = cap.read()
if not hasFrame:
cv.waitKey()
break
frameWidth = frame.shape[1]
frameHeight = frame.shape[0]
net.setInput(cv.dnn.blobFromImage(frame, 1.0, (inWidth, inHeight), (127.5, 127.5, 127.5), swapRB=True, crop=False))
out = net.forward()
out = out[:, :19, :, :] # MobileNet output [1, 57, -1, -1], we only need the first 19 elements
assert(len(BODY_PARTS) == out.shape[1])
points = []
for i in range(len(BODY_PARTS)):
# Slice heatmap of corresponging body's part.
heatMap = out[0, i, :, :]
# Originally, we try to find all the local maximums. To simplify a sample
# we just find a global one. However only a single pose at the same time
# could be detected this way.
_, conf, _, point = cv.minMaxLoc(heatMap)
x = (frameWidth * point[0]) / out.shape[3]
y = (frameHeight * point[1]) / out.shape[2]
# Add a point if it's confidence is higher than threshold.
# Feel free to adjust this confidence value.
points.append((int(x), int(y)) if conf > 0.2 else None)
for pair in POSE_PAIRS:
partFrom = pair[0]
partTo = pair[1]
assert(partFrom in BODY_PARTS)
assert(partTo in BODY_PARTS)
idFrom = BODY_PARTS[partFrom]
idTo = BODY_PARTS[partTo]
if points[idFrom] and points[idTo]:
cv.line(frame, points[idFrom], points[idTo], (0, 255, 0), 3)
cv.ellipse(frame, points[idFrom], (3, 3), 0, 0, 360, (255, 0, 0), cv.FILLED)
cv.ellipse(frame, points[idTo], (3, 3), 0, 0, 360, (255, 0, 0), cv.FILLED)
t, _ = net.getPerfProfile()
freq = cv.getTickFrequency() / 1000
cv.putText(frame, '%.2fms' % (t / freq), (10, 20), cv.FONT_HERSHEY_SIMPLEX, 0.5, (0, 0, 0))
# Write the frame to the output video file
result.write(frame)
# Stop when the video is finished
cap.release()
# Release the video recording
result.release()
Run the Code
To run the code, type:
python openpose.py
Video Output
Here is the output I got:
Further Work
If you would like to do a deep dive into pose estimation, check out the official GitHub for the OpenPose project here.
In this tutorial, we will build a program to categorize each pixel in images and videos. These categories could include things like car, person, sidewalk, bicycle, sky, or traffic sign. This process is known as semantic segmentation. By the end of this tutorial, you will be able to generate the following output:
Semantic segmentation helps self-driving cars and other types of autonomous vehicles gain a deep understanding of their surroundings so they can make decisions without human intervention.
Our goal is to build an early prototype of a semantic segmentation application that could be deployed inside an autonomous vehicle. To accomplish this task, we’ll use a special type of neural network called ENet (Efficient Neural Network) (you don’t need to know the details of ENet to accomplish this task).
Here is the list of classes we will use for this project:
Unlabeled
Road
Sidewalk
Building
Wall
Fence
Pole
TrafficLight
TrafficSign
Vegetation
Terrain
Sky
Person
Rider
Car
Truck
Bus
Train
Motorcycle
Bicycle
Real-World Applications
Self-driving cars and other types of autonomous vehicles
We now need to make sure we have all the software packages installed. Check to see if you have OpenCV installed on your machine. If you are using Anaconda, you can type:
conda install -c conda-forge opencv
Alternatively, you can type:
pip install opencv-python
Make sure you have NumPy installed, a scientific computing library for Python.
If you’re using Anaconda, you can type:
conda install numpy
Alternatively, you can type:
pip install numpy
Install imutils, an image processing library.
pip install imutils
Download Required Folders and Samples Images and Videos
In the same folder where you downloaded all the stuff in the previous section, open a new Python file called semantic_segmentation_images.py.
Here is the full code for the system. The only thing you’ll need to change (if you wish to use your own image) in this code is the name of your desired input image file on line 12. Just copy and paste it into your file.
# Project: How To Detect Objects in an Image Using Semantic Segmentation
# Author: Addison Sears-Collins
# Date created: February 24, 2021
# Description: A program that classifies pixels in an image. The real-world
# use case is autonomous vehicles. Uses the ENet neural network architecture.
import cv2 # Computer vision library
import numpy as np # Scientific computing library
import os # Operating system library
import imutils # Image processing library
ORIG_IMG_FILE = 'test_image_1.jpg'
ENET_DIMENSIONS = (1024, 512) # Dimensions that ENet was trained on
RESIZED_WIDTH = 600
IMG_NORM_RATIO = 1 / 255.0 # In grayscale a pixel can range between 0 and 255
# Read the image
input_img = cv2.imread(ORIG_IMG_FILE)
# Resize the image while maintaining the aspect ratio
input_img = imutils.resize(input_img, width=RESIZED_WIDTH)
# Create a blob. A blob is a group of connected pixels in a binary
# image that share some common property (e.g. grayscale value)
# Preprocess the image to prepare it for deep learning classification
input_img_blob = cv2.dnn.blobFromImage(input_img, IMG_NORM_RATIO,
ENET_DIMENSIONS, 0, swapRB=True, crop=False)
# Load the neural network (i.e. deep learning model)
print("Loading the neural network...")
enet_neural_network = cv2.dnn.readNet('./enet-cityscapes/enet-model.net')
# Set the input for the neural network
enet_neural_network.setInput(input_img_blob)
# Get the predicted probabilities for each of the classes (e.g. car, sidewalk)
# These are the values in the output layer of the neural network
enet_neural_network_output = enet_neural_network.forward()
# Load the names of the classes
class_names = (
open('./enet-cityscapes/enet-classes.txt').read().strip().split("\n"))
# Print out the shape of the output
# (1, number of classes, height, width)
#print(enet_neural_network_output.shape)
# Extract the key information about the ENet output
(number_of_classes, height, width) = enet_neural_network_output.shape[1:4]
# number of classes x height x width
#print(enet_neural_network_output[0])
# Find the class label that has the greatest probability for each image pixel
class_map = np.argmax(enet_neural_network_output[0], axis=0)
# Load a list of colors. Each class will have a particular color.
if os.path.isfile('./enet-cityscapes/enet-colors.txt'):
IMG_COLOR_LIST = (
open('./enet-cityscapes/enet-colors.txt').read().strip().split("\n"))
IMG_COLOR_LIST = [np.array(color.split(",")).astype(
"int") for color in IMG_COLOR_LIST]
IMG_COLOR_LIST = np.array(IMG_COLOR_LIST, dtype="uint8")
# If the list of colors file does not exist, we generate a
# random list of colors
else:
np.random.seed(1)
IMG_COLOR_LIST = np.random.randint(0, 255, size=(len(class_names) - 1, 3),
dtype="uint8")
IMG_COLOR_LIST = np.vstack([[0, 0, 0], IMG_COLOR_LIST]).astype("uint8")
# Tie each class ID to its color
# This mask contains the color for each pixel.
class_map_mask = IMG_COLOR_LIST[class_map]
# We now need to resize the class map mask so its dimensions
# is equivalent to the dimensions of the original image
class_map_mask = cv2.resize(class_map_mask, (
input_img.shape[1], input_img.shape[0]),
interpolation=cv2.INTER_NEAREST)
# Overlay the class map mask on top of the original image. We want the mask to
# be transparent. We can do this by computing a weighted average of
# the original image and the class map mask.
enet_neural_network_output = ((0.61 * class_map_mask) + (
0.39 * input_img)).astype("uint8")
# Create a legend that shows the class and its corresponding color
class_legend = np.zeros(((len(class_names) * 25) + 25, 300, 3), dtype="uint8")
# Put the class labels and colors on the legend
for (i, (cl_name, cl_color)) in enumerate(zip(class_names, IMG_COLOR_LIST)):
color_information = [int(color) for color in cl_color]
cv2.putText(class_legend, cl_name, (5, (i * 25) + 17),
cv2.FONT_HERSHEY_SIMPLEX, 0.5, (0, 0, 255), 2)
cv2.rectangle(class_legend, (100, (i * 25)), (300, (i * 25) + 25),
tuple(color_information), -1)
# Combine the original image and the semantic segmentation image
combined_images = np.concatenate((input_img, enet_neural_network_output), axis=1)
# Resize image if desired
#combined_images = imutils.resize(combined_images, width=1000)
# Display image
#cv2.imshow('Results', enet_neural_network_output)
cv2.imshow('Results', combined_images)
cv2.imshow("Class Legend", class_legend)
print(combined_images.shape)
cv2.waitKey(0) # Display window until keypress
cv2.destroyAllWindows() # Close OpenCV
To run the code, type the following command:
python semantic_segmentation_images.py
Here is the output I got:
How the Code Works
The first thing we need to do is to import the necessary libraries.
import cv2 # Computer vision library
import numpy as np # Scientific computing library
import os # Operating system library
import imutils # Image processing library
We set our constants: name of the image file you want to perform semantic segmentation on, the dimensions of the images that the ENet neural network was trained on, the width we want to resize our input image to, and the ratio that we use to normalize the color values of each pixel.
ORIG_IMG_FILE = 'test_image_1.jpg'
ENET_DIMENSIONS = (1024, 512) # Dimensions that ENet was trained on
RESIZED_WIDTH = 600
IMG_NORM_RATIO = 1 / 255.0 # In grayscale a pixel can range between 0 and 255
Read the input image, resize it, and create a blob. A blob is a group of pixels that have similar intensity values.
# Read the image
input_img = cv2.imread(ORIG_IMG_FILE)
# Resize the image while maintaining the aspect ratio
input_img = imutils.resize(input_img, width=RESIZED_WIDTH)
# Create a blob. A blob is a group of connected pixels in a binary
# image that share some common property (e.g. grayscale value)
# Preprocess the image to prepare it for deep learning classification
input_img_blob = cv2.dnn.blobFromImage(input_img, IMG_NORM_RATIO,
ENET_DIMENSIONS, 0, swapRB=True, crop=False)
We load the pretrained neural network, set the blob as its input, and then extract the predicted probabilities for each of the classes (i.e. sidewalk, person, car, sky, etc.).
# Load the neural network (i.e. deep learning model)
enet_neural_network = cv2.dnn.readNet('./enet-cityscapes/enet-model.net')
# Set the input for the neural network
enet_neural_network.setInput(input_img_blob)
# Get the predicted probabilities for each of the classes (e.g. car, sidewalk)
# These are the values in the output layer of the neural network
enet_neural_network_output = enet_neural_network.forward()
We load the class list.
# Load the names of the classes
class_names = (
open('./enet-cityscapes/enet-classes.txt').read().strip().split("\n"))
Get the key parameters of the ENet output.
# Extract the key information about the ENet output
(number_of_classes, height, width) = enet_neural_network_output.shape[1:4]
Determine the highest probability class for each image pixel.
# Find the class label that has the greatest probability for each image pixel
class_map = np.argmax(enet_neural_network_output[0], axis=0)
We want to create a class legend that is color coded.
# Load a list of colors. Each class will have a particular color.
if os.path.isfile('./enet-cityscapes/enet-colors.txt'):
IMG_COLOR_LIST = (
open('./enet-cityscapes/enet-colors.txt').read().strip().split("\n"))
IMG_COLOR_LIST = [np.array(color.split(",")).astype(
"int") for color in IMG_COLOR_LIST]
IMG_COLOR_LIST = np.array(IMG_COLOR_LIST, dtype="uint8")
# If the list of colors file does not exist, we generate a
# random list of colors
else:
np.random.seed(1)
IMG_COLOR_LIST = np.random.randint(0, 255, size=(len(class_names) - 1, 3),
dtype="uint8")
IMG_COLOR_LIST = np.vstack([[0, 0, 0], IMG_COLOR_LIST]).astype("uint8")
Each pixel will need to have a color, which depends on the highest probability class for that pixel.
# Tie each class ID to its color
# This mask contains the color for each pixel.
class_map_mask = IMG_COLOR_LIST[class_map]
Make sure the class map mask has the same dimensions as the original input image.
# We now need to resize the class map mask so its dimensions
# is equivalent to the dimensions of the original image
class_map_mask = cv2.resize(class_map_mask, (
input_img.shape[1], input_img.shape[0]),
interpolation=cv2.INTER_NEAREST)
Create a blended image of the original input image and the class map mask. In this example, I used 61% of the class map mask and 39% of the original input image. You can change those values, but make sure they add up to 100%.
# Overlay the class map mask on top of the original image. We want the mask to
# be transparent. We can do this by computing a weighted average of
# the original image and the class map mask.
enet_neural_network_output = ((0.61 * class_map_mask) + (
0.39 * input_img)).astype("uint8")
Create a legend that shows each class and its corresponding color.
# Create a legend that shows the class and its corresponding color
class_legend = np.zeros(((len(class_names) * 25) + 25, 300, 3), dtype="uint8")
# Put the class labels and colors on the legend
for (i, (cl_name, cl_color)) in enumerate(zip(class_names, IMG_COLOR_LIST)):
color_information = [int(color) for color in cl_color]
cv2.putText(class_legend, cl_name, (5, (i * 25) + 17),
cv2.FONT_HERSHEY_SIMPLEX, 0.5, (0, 0, 255), 2)
cv2.rectangle(class_legend, (100, (i * 25)), (300, (i * 25) + 25),
tuple(color_information), -1)
Create the final image we want to display. The original input image is combined with the semantic segmentation image.
# Combine the original image and the semantic segmentation image
combined_images = np.concatenate((input_img, enet_neural_network_output), axis=0)
Open a new Python file called semantic_segmentation_videos.py.
Here is the full code for the system. The only thing you’ll need to change (if you wish to use your own video) in this code is the name of your desired input video file on line 13, and the name of your desired output video file on line 17. Make sure the input video is 1920 x 1080 pixels in dimensions and is in mp4 format, otherwise it won’t work.
# Project: How To Detect Objects in a Video Using Semantic Segmentation
# Author: Addison Sears-Collins
# Date created: February 25, 2021
# Description: A program that classifies pixels in a video. The real-world
# use case is autonomous vehicles. Uses the ENet neural network architecture.
import cv2 # Computer vision library
import numpy as np # Scientific computing library
import os # Operating system library
import imutils # Image processing library
# Make sure the video file is in the same directory as your code
filename = '4_orig_lane_detection_1.mp4'
file_size = (1920,1080) # Assumes 1920x1080 mp4
# We want to save the output to a video file
output_filename = 'semantic_seg_4_orig_lane_detection_1.mp4'
output_frames_per_second = 20.0
ENET_DIMENSIONS = (1024, 512) # Dimensions that ENet was trained on
RESIZED_WIDTH = 1200
IMG_NORM_RATIO = 1 / 255.0 # In grayscale a pixel can range between 0 and 255
# Load the names of the classes
class_names = (
open('./enet-cityscapes/enet-classes.txt').read().strip().split("\n"))
# Load a list of colors. Each class will have a particular color.
if os.path.isfile('./enet-cityscapes/enet-colors.txt'):
IMG_COLOR_LIST = (
open('./enet-cityscapes/enet-colors.txt').read().strip().split("\n"))
IMG_COLOR_LIST = [np.array(color.split(",")).astype(
"int") for color in IMG_COLOR_LIST]
IMG_COLOR_LIST = np.array(IMG_COLOR_LIST, dtype="uint8")
# If the list of colors file does not exist, we generate a
# random list of colors
else:
np.random.seed(1)
IMG_COLOR_LIST = np.random.randint(0, 255, size=(len(class_names) - 1, 3),
dtype="uint8")
IMG_COLOR_LIST = np.vstack([[0, 0, 0], IMG_COLOR_LIST]).astype("uint8")
def main():
# Load a video
cap = cv2.VideoCapture(filename)
# Create a VideoWriter object so we can save the video output
fourcc = cv2.VideoWriter_fourcc(*'mp4v')
result = cv2.VideoWriter(output_filename,
fourcc,
output_frames_per_second,
file_size)
# Process the video
while cap.isOpened():
# Capture one frame at a time
success, frame = cap.read()
# Do we have a video frame? If true, proceed.
if success:
# Resize the frame while maintaining the aspect ratio
frame = imutils.resize(frame, width=RESIZED_WIDTH)
# Create a blob. A blob is a group of connected pixels in a binary
# frame that share some common property (e.g. grayscale value)
# Preprocess the frame to prepare it for deep learning classification
frame_blob = cv2.dnn.blobFromImage(frame, IMG_NORM_RATIO,
ENET_DIMENSIONS, 0, swapRB=True, crop=False)
# Load the neural network (i.e. deep learning model)
enet_neural_network = cv2.dnn.readNet('./enet-cityscapes/enet-model.net')
# Set the input for the neural network
enet_neural_network.setInput(frame_blob)
# Get the predicted probabilities for each of
# the classes (e.g. car, sidewalk)
# These are the values in the output layer of the neural network
enet_neural_network_output = enet_neural_network.forward()
# Extract the key information about the ENet output
(number_of_classes, height, width) = (
enet_neural_network_output.shape[1:4])
# Find the class label that has the greatest
# probability for each frame pixel
class_map = np.argmax(enet_neural_network_output[0], axis=0)
# Tie each class ID to its color
# This mask contains the color for each pixel.
class_map_mask = IMG_COLOR_LIST[class_map]
# We now need to resize the class map mask so its dimensions
# is equivalent to the dimensions of the original frame
class_map_mask = cv2.resize(class_map_mask, (
frame.shape[1], frame.shape[0]),
interpolation=cv2.INTER_NEAREST)
# Overlay the class map mask on top of the original frame. We want
# the mask to be transparent. We can do this by computing a weighted
# average of the original frame and the class map mask.
enet_neural_network_output = ((0.90 * class_map_mask) + (
0.10 * frame)).astype("uint8")
# Combine the original frame and the semantic segmentation frame
combined_frames = np.concatenate(
(frame, enet_neural_network_output), axis=1)
# Resize frame if desired
combined_frames = imutils.resize(combined_frames, width=1920)
# Create an appropriately-sized video frame. We want the video height
# to be 1080 pixels
adjustment_for_height = 1080 - combined_frames.shape[0]
adjustment_for_height = int(adjustment_for_height / 2)
black_img_1 = np.zeros((adjustment_for_height, 1920, 3), dtype = "uint8")
black_img_2 = np.zeros((adjustment_for_height, 1920, 3), dtype = "uint8")
# Add black padding to the video frame on the top and bottom
combined_frames = np.concatenate((black_img_1, combined_frames), axis=0)
combined_frames = np.concatenate((combined_frames, black_img_2), axis=0)
# Write the frame to the output video file
result.write(combined_frames)
# No more video frames left
else:
break
# Stop when the video is finished
cap.release()
# Release the video recording
result.release()
main()
To run the code, type the following command:
python semantic_segmentation_videos.py
Video Output
Here is the output:
How the Code Works
This code is pretty much the same as the code for images. The only difference is that we run the algorithm on each frame of the input video rather than a single input image.
I put detailed comments inside the code so that you can understand what is going on.