In this blog post, I will show you how to install ROS 2 Iron (the latest distribution of ROS 2) on Ubuntu.
You Will Need
In order to complete this tutorial, you will need:
- Ubuntu 22.04 installed and running properly (I’m running my Ubuntu in a VirtualBox on Windows 11).
Prerequisites
It is helpful if you’ve completed this tutorial on Linux fundamentals, but it is not required.
Set the Locale
The official steps for installing ROS are at this link at ROS.org, but I will walk you through the process below so that you can see what each step should look like.
We will install ROS 2 Iron via Debian Packages.
The first thing we are going to do is to set the locale. You can understand what locale means at this link.
Click the 9 dots on the bottom-left portion of the screen and search for the “Terminal” application.
Open it.
Type this command inside a terminal window.
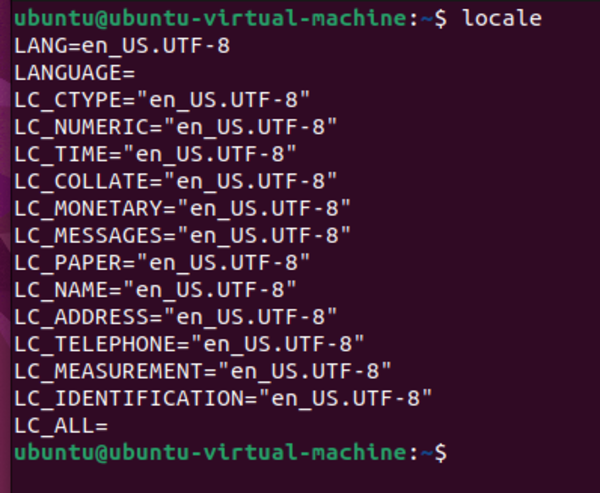
localeThe locale command is used to display or change the locale settings on a Linux system. A locale is a set of environmental variables that define the language, country, and character encoding settings. These settings are used by system libraries and locale-aware applications to determine how to display text, dates, times, and other information.
Now type the following command:
sudo apt update && sudo apt install locales“sudo apt update” updates the package index list, which is a database of all the software packages available for your Linux distribution.
“sudo apt install locales” installs the locales package, which provides support for different languages and regions.
Now type:
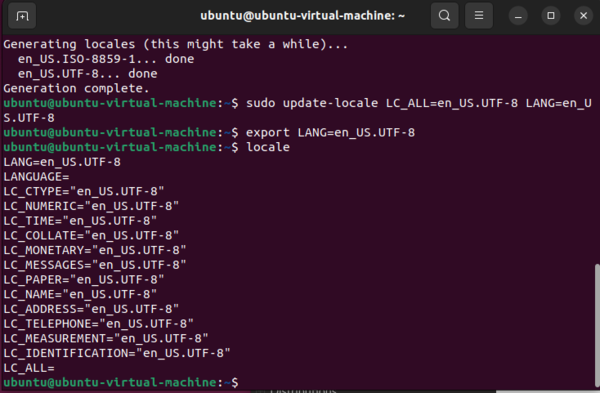
sudo locale-gen en_US en_US.UTF-8The command “sudo locale-gen en_US en_US.UTF-8” generates locale definition files for the specified locales. Locale definition files are used by the system to generate locale data, which is used by programs to determine how to format text, dates, times, and other information.
In this case, the command is generating locale definition files for the English (United States) locale and the English (United States) UTF-8 locale. The UTF-8 locale is a special locale that supports the UTF-8 character encoding, which is the standard encoding for most languages.
Now type:
sudo update-locale LC_ALL=en_US.UTF-8 LANG=en_US.UTF-8The command above is updating the locale data for the English (United States) locale and the English (United States) UTF-8 locale. You typically need to run this command after you have changed the locale on your system. This will ensure that all of your programs are using the correct locale data.
Now type:
export LANG=en_US.UTF-8Setting the LANG environment variable to en_US.UTF-8 will ensure that all of your programs are using the English (United States) UTF-8 locale. This is important for programs that need to display or process text in multiple languages.
Now we need to verify the settings by typing:
localeHere is what you should see:
Enable the Required Repositories
Let’s add the ROS 2 apt repository to our system. Open a terminal window, and type the following two commands:
sudo apt install software-properties-commonsudo add-apt-repository universeThe software-properties-common package provides a number of tools for managing software sources on Ubuntu and Debian systems. One of these tools is the add-apt-repository command, which is used to add new repositories to your system’s software sources.
The universe repository is a software repository that contains a wide variety of software packages, including many that are not included in the default Ubuntu and Debian repositories. Adding the universe repository to your system’s software sources will give you access to a wider selection of software to install.
Now we need to add the ROS 2 GPG key with apt.
The ROS 2 GPG key is a public key that is used to verify the authenticity of ROS 2 packages. It is used by the ROS 2 package manager (apt) to ensure that the packages you are installing are from a trusted source.
To add the ROS 2 GPG key, type these two commands:
sudo apt update && sudo apt install curl -ysudo curl -sSL https://raw.githubusercontent.com/ros/rosdistro/master/ros.key -o /usr/share/keyrings/ros-archive-keyring.gpgAdd the repository to your sources list (copy and paste all of this below):
echo "deb [arch=$(dpkg --print-architecture) signed-by=/usr/share/keyrings/ros-archive-keyring.gpg] http://packages.ros.org/ros2/ubuntu $(. /etc/os-release && echo $UBUNTU_CODENAME) main" | sudo tee /etc/apt/sources.list.d/ros2.list > /dev/nullType the following command to install ROS 2 development tools.
sudo apt update && sudo apt install ros-dev-toolsThe command sudo apt install ros-dev-tools installs the ROS development tools package on Ubuntu systems. This package contains a number of tools that are useful for developing ROS packages, including:
- ament_cmake: A CMake-based build system for ROS packages.
- ament_index: A tool for generating and managing ROS package indexes.
- ament_lint: A tool for linting ROS packages.
- ament_test: A tool for testing ROS packages.
- ament_uncrustify: A tool for formatting ROS code according to the ROS coding style guide.
Now update the apt repository:
sudo apt updateUpgrade the packages on your system to make sure you have the newest versions.
sudo apt upgradeInstall ROS 2
Install ROS 2 Iron by opening a terminal window, and typing:
sudo apt install ros-iron-desktopSome of the tools and resources included in the ROS Iron desktop package include:
- The ROS desktop environment, which includes a number of tools for developing and using ROS, such as RViz2, and RQt.
- A number of documentation resources, such as the ROS wiki and tutorials.
Set Up the Environment Variables
Add Iron to your bash file.
echo "source /opt/ros/iron/setup.bash" >> ~/.bashrcYou can verify it is added by typing:
gedit ~/.bashrc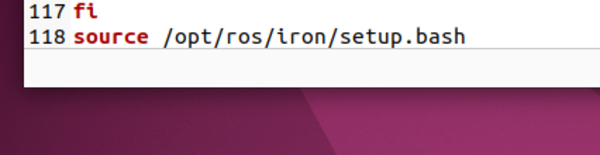
If you don’t have gedit installed, you can type:
sudo apt-get install geditClose the terminal window, and open a new one.
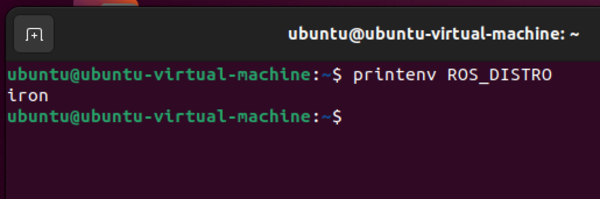
Type the following command to see what version of ROS you are using:
printenv ROS_DISTROHere is what you should see:
You can also type:
env | grep ROS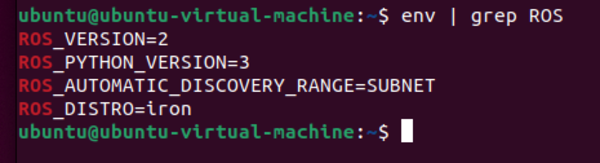
Install some other useful packages:
sudo apt install -y python3-pippip3 install -U argcompletesudo apt-get install ros-$ROS_DISTRO-gazebo-ros-pkgssudo rosdep initrosdep updateTest Your Installation
Open a terminal window, and type:
ros2 run demo_nodes_cpp talker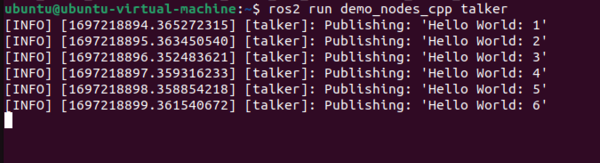
Open another terminal window, and type:
ros2 run demo_nodes_py listener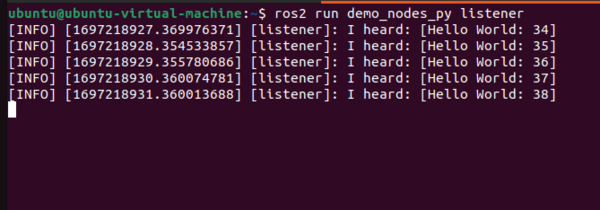
If your output looks like the images above, you have installed ROS 2 successfully. Yay!
That’s it! Keep building!