In this post, I will show you a computer simulation I developed of an omni-directional vehicle with Mecanum wheels. This project was developed during my graduate studies at Johns Hopkins University. My goal was to develop a 2D representation of this type of robot so that I could implement the kinematic equations and control algorithms from scratch, using nothing but Python.
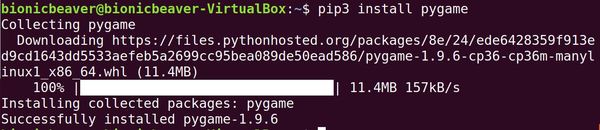
After I developed the source code, I converted the entire Python file (.py) into an executable (.exe file …. i.e. a program that can run on any machine) using a special software program called PyInstaller.
Table of Contents
- Prerequisites
- Requirements
- –Other Requirements
- List of Kinematic Equations Used
- –Forward Kinematic Equations
- –Inverse Kinematic Equations
- List of Control Algorithms Used
- List of Math Equations Used
- Source Code
Prerequisites
- Python 3.6 (or higher)
Requirements
Here are the requirements for this project:
- Build a simulation of an omni-directional wheeled robot from scratch.
- Create an executable so that the simulation can be launched and interfaced with on a normal Windows machine – OS: XP or higher.
- Show the kinematic equations and control algorithm used (see next section).
- Robot’s dimensions must be 4 feet and 2 feet – that is, wheel plane to wheel plane, and axle to axle.
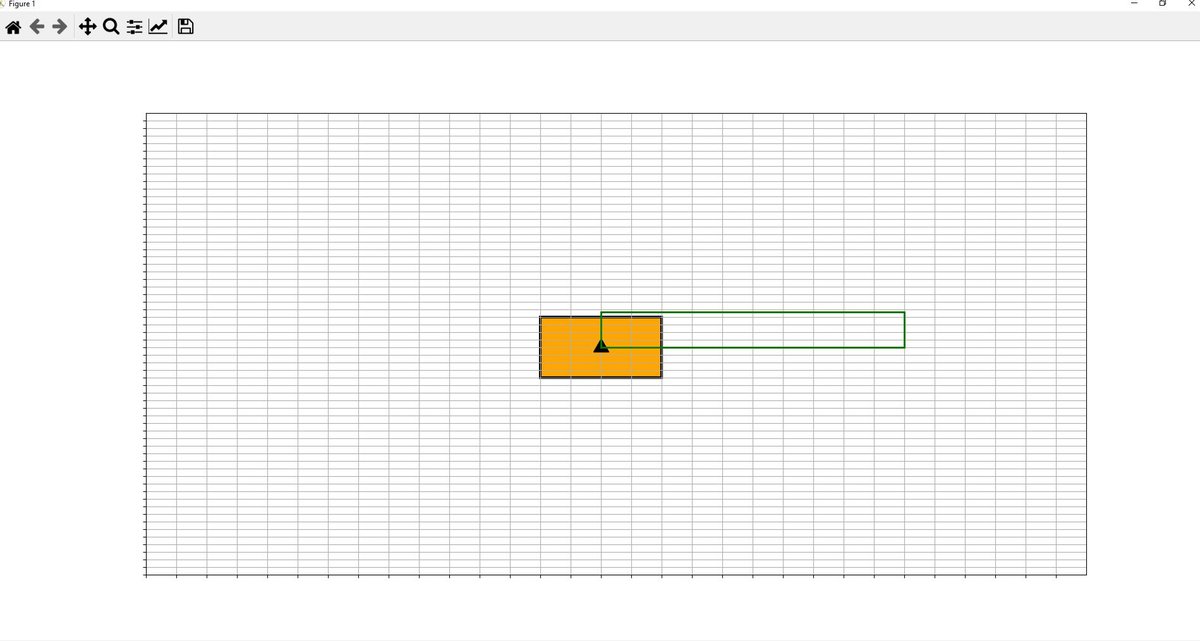
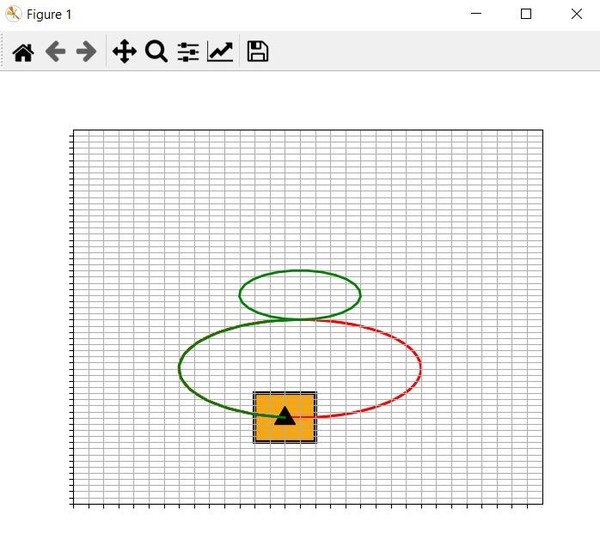
- The simulated environment must be a flat, high friction (i.e., assume no slippage) ‘infinite’ area, with a viewable area (on screen) of 30 feet long by 15 feet wide.
- The environment view is a plan (aerial) view.
- The environment area must have a 6inch by 6inch visible grid underlaid on it (i.e., on its surface but under the vehicle)
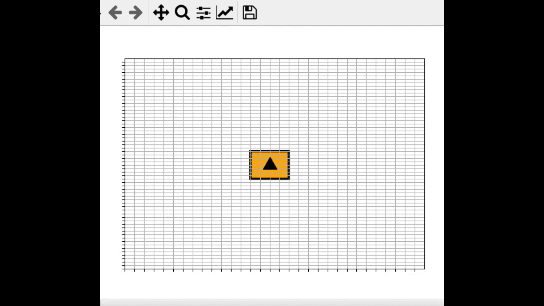
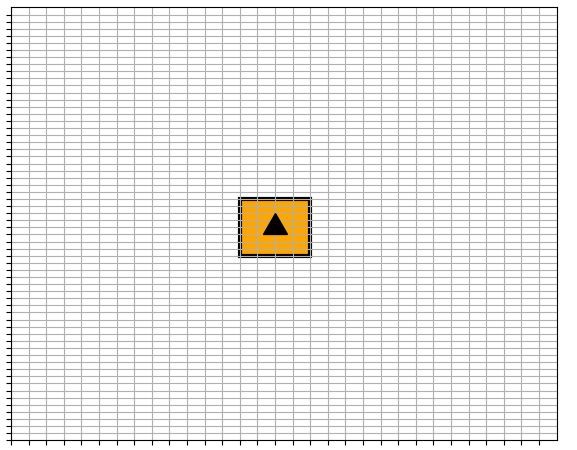
- This grid below is the simulation environment that appears when the program is launched.
- The viewable area must stay fixed until such time as the vehicle reference point travels within 3 feet of the viewable edge, at which point the viewable area shall be repositioned so that the vehicle is at its center.
- An interface is required, to the side of the viewable area.
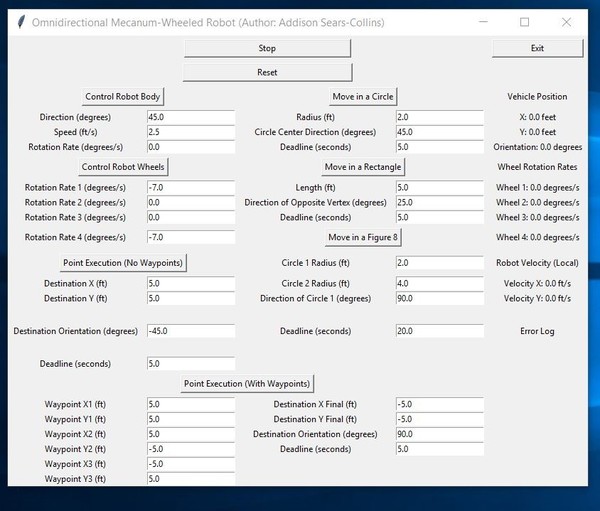
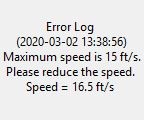
- Autonomous control of the vehicle is required. Maximum speed of the vehicle is 15 ft/sec.
- The vehicle image must move on screen in agreement with the controlled movement.
- The radius of the wheels on the robot must be 0.5 feet.
- Simulation must have a reset capability that when executed, resets the vehicle to the origin at rest, with no commands executed.
The robot must have the following modes:
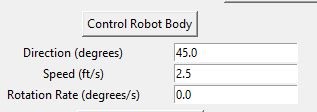
Autonomous Control 1: The direction (θP), speed, and rate of rotation of the vehicle reference point can be specified and executed. In this case, the vehicle will keep executing given command(s) until a ‘stop’ command is provided.
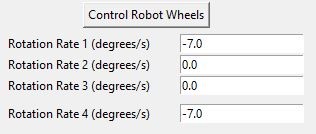
Autonomous Control 2: The user shall be able to specify the rotation rate of each wheel and the vehicle will keep executing the given commands until a ‘stop’ command. In this mode alone, any mouse or keyboard button push will be considered a ‘stop’ command.
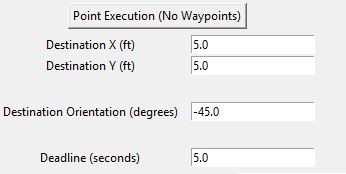
Point Execution: A straight line path may be specified by an end point (XF,YF), including a desired end orientation (θF). The vehicle’s current pose will be considered its starting point and orientation.
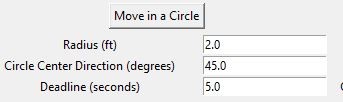
Circle Execution: A circle may be defined (instead of points) and executed, with user-defined radius and inclination, θP (direction of circle center from current vehicle position).
Rectangle Execution: A rectangle may be defined (instead of points) and executed, with user-defined side lengths and inclination, θP, of diagonally opposite vertex from current vehicle position. Vehicle will start at a vertex.
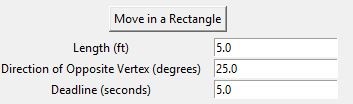
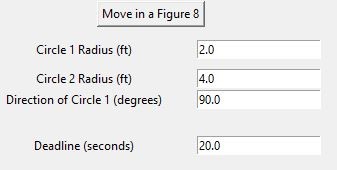
Figure 8 Execution: A figure 8 may be defined (instead of points) and executed, consisting of two circles with two user-defined, possibly different, radii, and inclination, θP (direction of circle centers from current vehicle position).
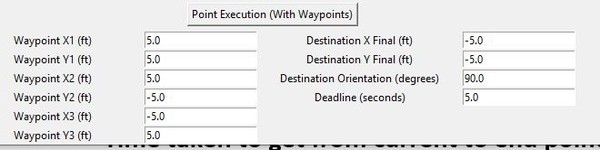
Waypoint Execution: Waypoints (points between start and end points), during Point Execution, can be specified (minimum 3 waypoints – although none are required) and executed.
Other Requirements
- Time taken to get from current to end points can be specified for all path executions above except for the open-ended path of the Autonomous Control Mode. If allotted time requires the vehicle to travel faster than its maximum speed, an error is shown on the interface.
- Both the user-defined path to be executed and the path traveled by the vehicle reference point must be displayed on screen in two different colors that are easily discernible from each other.
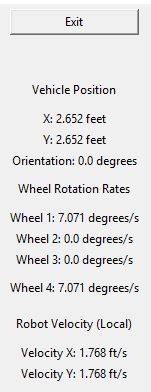
- Simulation must provide: Vehicle position display, Wheel rate displays, Robot x- and y- velocity displays.
List of Kinematic Equations Used
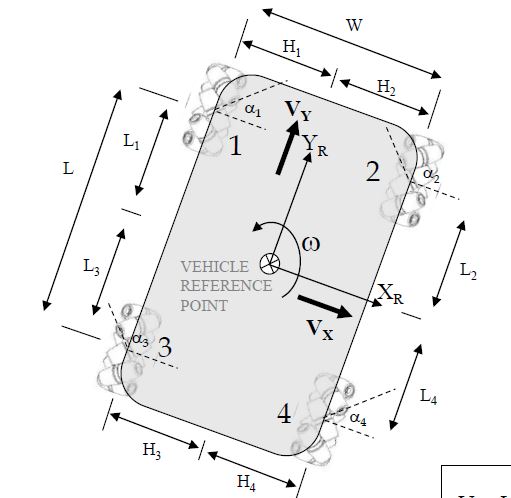
Forward Kinematic Equations
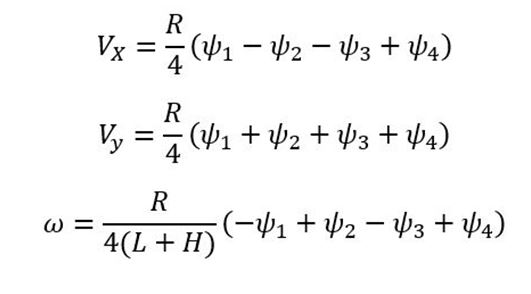
Where:
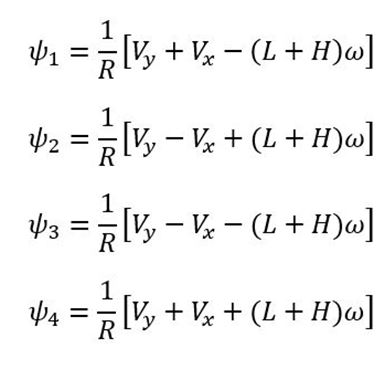
- R = wheel radius (e.g. feet)
- Vx = Velocity in the x direction in the robot (local) reference frame (e.g. feet/second)
- Vy = Velocity in the y direction in the robot (local) reference frame (e.g. feet/second)
- ω = rotation rate of the vehicle reference point (e.g. in degrees/second)
- Ψ = wheel rotation rate (e.g. in degrees per second)
Inverse Kinematic Equations
List of Control Algorithms Used
The control algorithms are contained inside omnidirectional_robot.py. Here is the list:
- control_robot_body(direction, speed, rotation_rate)
- control_robot_wheels(rot1, rot2, rot3, rot4)
- point_execution_no_wp(x_final, y_final, orientation_final, deadline):
- point_execution_with_wp(x_wp1, y_wp1, x_wp2, y_wp2, x_wp3, y_wp3, x_final, y_final, orientation_final, deadline)
- move_in_a_circle(radius, direction, deadline)
- move_in_a_rectangle(length_in_ft, direction_of_opp_vertex, deadline)
- move_in_a_figure_eight(circle1_radius, circle2_radius, direction, deadline)
List of Math Equations Used
Calculate the interior angle in degrees between diagonal of rectangle and the side length
- interior_angle = acos(length_in_ft/diagonal_length))
Converting local velocity in the robot frame to global velocity in the global (inertial reference frame)
- v_x_global = (v_x_local * cos(vehicle_angle_ref)) – (v_y_local * sin(vehicle_angle_ref))
- v_y_global = (v_x_local * sin(vehicle_angle_ref)) + (v_y_local * cos(vehicle_angle_ref))
Calculating the global velocities form the direction/heading angle (yaw)
- v_x_global = magnitude(v) * cos(angle for yaw)
- v_y_global = magnitude(v) * sin(angle for yaw)
Converting global velocity in the global (inertial reference frame) to local velocity in the robot frame
- v_x_local = (v_x_global * cos(vehicle_angle_ref)) + (v_y_global * sin(vehicle_angle_ref))
- v_y_local = (-v_x_global * sin(vehicle_angle_ref)) + (v_y_global * cos(vehicle_angle_ref))
Calculating the direction of travel of the vehicle reference point in degrees
- direction_global = atan2((y_final – y_pos_ref),(x_final – x_pos_ref))
Calculating the distance between two points in feet
- distance = square_root((x2-x1)2 + (y2-y1)2)
Calculating the speed of the vehicle using the distance and time
- speed = distance / time
Convert direction (local) into direction (global) for the rectangle implementation
- direction_global = direction_of_opp_vertex + (vehicle_angle_ref)
Determining the new x-coordinate of the vehicle reference point
- x_pos_ref = x_initial + (v_x_global * dt)
Determining the new y-coordinate of the vehicle reference point
- y_pos_ref = y_initial + (v_y_global * dt)
Determining the new orientation of the vehicle reference point
- vehicle_angle_ref = vehicle_angle_ref_initial + (rotation_rate * dt)
Equation for a circle centered at point (H, K)
- x = rcos(Ɵ) + H
- y = rsin(Ɵ) + K
Get the length of the diagonal of the rectangle
- diagonal_length = abs(length_in_ft/cos(direction_of_opp_vertex))
Get the width of the diagonal of the rectangle
- width_in_ft = abs(diagonal_length *sin(direction_of_opp_vertex))
Source Code
Here is the source code for the program. Make sure you have the Numpy and Matplotlib libraries installed on your system before you run the program. The typical syntax for installing these libraries if you are using something like Anaconda for your Python framework is:
pip install numpy
pip install matplotlib
Other than that, you don’t need anything else to run the program. Just copy and paste this code into your favorite place to run Python programs, and off you go!
import math
import matplotlib.pyplot as plt
import matplotlib.patches as patches
import numpy as np
import time
import tkinter as tk
# Project: Omnidirectional Mecanum-Wheeled Robot
# Author: Addison Sears-Collins
# Date created: 02/22/2020
################### Initialize Constants ##################
# Set the robot vehicle's dimensions
# Robot is 2 feet in width and 4 feet in length
ROBOT_WIDTH = 2.0
ROBOT_LENGTH = 4.0
# Maximum speed of the robot in feet/second
MAX_SPEED = 15.0
# Robot vehicle's wheel radius in feet
WHEEL_RADIUS = 0.5
# Length and width of the viewable area on screen
# The grid is 30 feet long by 15 feet wide
ENV_LENGTH = 30.0
ENV_WIDTH = 15.0
# The distance between ticks on the x and y-axis in feet
# Each square on the grid is 6inch by 6inch
X_TICK_SPACING = 0.5
Y_TICK_SPACING = 0.5
# Boundary in feet. Viewable area will stay fixed until
# such time as the vehicle reference point travels within
# 3 feet of the viewable edge.
BOUNDARY = 3.0
################### Global Variables ######################
# The robot vehicle object (which will be a rectangle)
rect = None
# The coordinates of the vehicle reference point
x_pos_ref = None # in feet
y_pos_ref = None # in feet
vehicle_angle_ref = None # in degrees
# The grid specifications
x_axis_min = None
x_axis_max = None
y_axis_min = None
y_axis_max = None
# Store historical x and y-values in order to track
# the path traveled by the vehicle reference point
hist_x_vals = []
hist_y_vals = []
# The circle that pertains to the move_in_a_circle() method
# and the figure 8 method
circle1 = None
# The rectangle that pertains to the move_in_a_rectangle()
# method
this_rect = None
# Create a window using the Tk class
window = tk.Tk()
# Global flag
running_control_robot_body = False
running_control_robot_wheels = False
##################### Helper Methods ######################
def convert_local_velocity_to_global(v_x_local, v_y_local):
"""
Convert the velocities in the x and y-directions in
the local reference frame to velocities in the global
reference frame.
@param v_x_local float: Velocity in the x-direction
in the local reference frame in ft/s
@param v_y_local float: Velocity in the y-direction
in the local reference frame in ft/s
@return v_x_global float: Velocity in the x-direction
in the global reference frame in ft/s
@return v_y_global float: Velocity in the y-direction
in the global reference frame in ft/s
"""
v_x_global = (v_x_local * math.cos(math.radians(
vehicle_angle_ref))) - (v_y_local * math.sin(
math.radians(vehicle_angle_ref)))
v_y_global = (v_x_local * math.sin(math.radians(
vehicle_angle_ref))) + (v_y_local * math.cos(
math.radians(vehicle_angle_ref)))
return v_x_global, v_y_global
# Method to close the Tkinter window
def close_window():
window.destroy()
def get_distance_btw_points(x1,y1,x2,y2):
"""
Calculate the distance between two points in feet.
@param x1: The x-coordinate of point 1
@param y1: The y-coordinate of point 1
@param x2: The x-coordinate of point 2
@param y2: The y-coordinate of point 2
@return distance: float: in feet
"""
distance = math.sqrt((x2-x1)**2 + (y2-y1)**2)
return distance
def get_robot_motion_values(rot1, rot2, rot3, rot4):
"""
Calculate the velocities in the x and y-directions in
the local reference frame as well as the rotation rate
of the vehicle reference point.
@param rot1: Rotation rate of wheel 1 in degrees/sec
@param rot2: Rotation rate of wheel 2 in degrees/sec
@param rot3: Rotation rate of wheel 3 in degrees/sec
@param rot4: Rotation rate of wheel 4 in degrees/sec
@return v_x_local float: Velocity in the x-direction
in the local reference frame in ft/s
@return v_y_local float: Velocity in the y-direction
in the local reference frame in ft/s
@return rotation_rate: Rotation rate of the vehicle
reference point in degrees per second in the
counter-clockwise direction
"""
v_x_local = (WHEEL_RADIUS/4) * (
rot1 - rot2 - rot3 + rot4)
v_y_local = (WHEEL_RADIUS/4) * (
rot1 + rot2 + rot3 + rot4)
rotation_rate = (WHEEL_RADIUS/(4*(
ROBOT_LENGTH + ROBOT_WIDTH)))*(
-rot1 + rot2 - rot3 + rot4)
return v_x_local, v_y_local, rotation_rate
def get_wheel_rot_rates(v_x_local, v_y_local,
rotation_rate):
"""
Calculate the wheel rotation rates.
@param v_x_local: Velocity in the x-direction
in the local reference frame in ft/s
@param v_y_local: Velocity in the y-direction
in the local reference frame in ft/s
@param rotation_rate: Rotation rate in degrees per
second in the counter-clockwise direction (vehicle
reference point)
@return rot1, rot2, rot3, rot4: float: Wheel rotation
rates in degrees per second
"""
rot1 = (1/WHEEL_RADIUS)*(v_y_local + v_x_local - (
ROBOT_LENGTH + ROBOT_WIDTH) * rotation_rate)
rot2 = (1/WHEEL_RADIUS)*(v_y_local - v_x_local + (
ROBOT_LENGTH + ROBOT_WIDTH) * rotation_rate)
rot3 = (1/WHEEL_RADIUS)*(v_y_local - v_x_local - (
ROBOT_LENGTH + ROBOT_WIDTH) * rotation_rate)
rot4 = (1/WHEEL_RADIUS)*(v_y_local + v_x_local + (
ROBOT_LENGTH + ROBOT_WIDTH) * rotation_rate)
return rot1, rot2, rot3, rot4
def get_speed(distance, time):
"""
Calculate the speed of the vehicle using the distance
and time.
@param distance: The distance the robot vehicle must
travel between 2 or more points in feet
@param time: Total travel time in seconds
@return speed: float
"""
speed = distance / time
return speed
def get_velocity_magnitude(velocity_x, velocity_y):
"""
Calculate the speed of the vehicle using the x and y
components of the velocity.
@param velocity_x: Velocity in x-direction in ft/sec
@param velocity_y: Velocity in y-direction in ft/sec
@return speed: float
"""
speed = math.sqrt(((velocity_x)**2) + ((velocity_y)**2))
return speed
def is_close_to_edge(x, y):
"""
The viewable area will stay fixed until such time as
the vehicle reference point travels within 3 feet of
the viewable edge. Check if the viewable area needs to
be repositioned.
@param x: x-coordinate of the vehicle reference point
@param y: y-coordinate of the vehicle reference point
@return bool
"""
if (x - x_axis_max) > -BOUNDARY:
return True
elif (x - x_axis_min) < BOUNDARY:
return True
elif (y - y_axis_max) > -BOUNDARY:
return True
elif (y - y_axis_min) < BOUNDARY:
return True
else:
return False
def is_too_fast(speed):
"""
The maximum speed of the robot vehicle is 15 ft/second
Check if the user input requires the vehicle to travel
faster than its maximum speed of 15 ft/second
@param speed: The magnitude of the velocity in ft/sec
@return bool
"""
if speed > 15.0:
return True
else:
return False
def plot_arrow(x, y, orientation):
"""
Plot the arrow on the top of the robot. Arrow points
to +y-direction of the robot (i.e. towards the front
center part of the robot). It is centered on the
vehicle reference point.
@param x: x-coordinate of the vehicle reference point
@param y: y-coordinate of the vehicle reference point
@param orientation: orientation of the vehicle
reference point in radians
"""
# Clear datapoints if they exist
try:
for datapoints in ax.get_lines():
datapoints.remove()
except:
pass
# Plot the arrow
plt.plot(x, y, marker=(3, 0, math.degrees(
orientation)), markersize=20, color="black")
def plot_grid(x, y):
"""
Plot the grid.
@param x: x-coordinate of the center of the grid.
@param y: y-coordinate of the center of the grid
"""
global x_axis_min, x_axis_max, y_axis_min, y_axis_max
# Set the x and y limits of the grid.
x_axis_max = x + (ENV_WIDTH / 2.0) + X_TICK_SPACING
x_axis_min = x - (ENV_WIDTH / 2.0)
y_axis_max = y + (ENV_LENGTH / 2.0) + Y_TICK_SPACING
y_axis_min = y - (ENV_LENGTH / 2.0)
ax.set(xlim=(x_axis_min, x_axis_max), ylim=(y_axis_min,
y_axis_max))
# Each square on the grid is 6inch by
# 6inch (6inch = 0.5 feet)
ax.set_xticks(np.arange(x_axis_min, x_axis_max,
X_TICK_SPACING))
ax.set_yticks(np.arange(y_axis_min, y_axis_max,
Y_TICK_SPACING))
ax.grid(True)
turn_off_tick_labels()
def plot_line(x1, y1, direction):
"""
Show the user defined path as a red line
@param x1: x-coordinate of the start point of the line
@param y1: y-coordinate of the start point of the line
@direction: Direction of travel of the vehicle
reference point in radians
"""
# Arbitrary-chosen line length
line_length = 2.0 * math.sqrt(2.0)
x2 = (line_length * math.cos(direction))
x2 = x1 + x2
y2 = (line_length * math.sin(direction))
y2 = y1 + y2
plt.plot([x1, x2], [y1, y2], color='red',
linestyle='-', linewidth=2)
def plot_path_traveled(x_values, y_values):
"""
Show the path traveled by the robot.
@param x_values list: List of x values
@param y_values list: List of y values
"""
plt.plot(x_values, y_values, color='green',
linestyle='-', linewidth=2)
def plot_robot(x, y, orientation):
"""
Plot the robot on the grid.
Rotate lower left coordinate of the robot based on
vehicle reference point's orientation.
This equation gives the lower left coordinate's new
position when rotated around the origin (x=0,y=0):
X = x*cos(θ) - y*sin(θ)
Y = x*sin(θ) + y*cos(θ)
@param x: x-coordinate of the vehicle reference point
@param y: y-coordinate of the vehicle reference point
@param orientation: orientation of the vehicle
reference point in radians
"""
global rect
# Remove the existing rectangle if it exists
try:
rect.remove()
except:
pass
rect_x_pos = ((-ROBOT_WIDTH/2.0) * math.cos(
orientation)) - ((-ROBOT_LENGTH/2.0) * math.sin(
orientation))
rect_y_pos = ((-ROBOT_WIDTH/2.0) * math.sin(
orientation)) + ((-ROBOT_LENGTH/2.0) * math.cos(
orientation))
# Translate lower left coordinate of the robot so it
# is relative to the vehicle reference point
rect_x_pos = rect_x_pos + x
rect_y_pos = rect_y_pos + y
# Update the robot's position and orientation
rect = patches.Rectangle((rect_x_pos,rect_y_pos),
ROBOT_WIDTH,ROBOT_LENGTH, math.degrees(
orientation),lw=3,ec='black', fc='orange')
# Add the rectangle to the Axes
ax.add_patch(rect)
def reset():
"""
This method resets the robot and grid to the origin
"""
global hist_x_vals, hist_y_vals
global x_pos_ref, y_pos_ref, vehicle_angle_ref
global circle1, this_rect
plot_grid(0,0)
plot_robot(0, 0, math.radians(0))
plot_arrow(0, 0, math.radians(0))
hist_x_vals.clear()
hist_y_vals.clear()
x_pos_ref = 0.0
y_pos_ref = 0.0
vehicle_angle_ref = 0.0
hist_x_vals.append(0)
hist_y_vals.append(0)
# Remove circle1 if it exists on the plot
try:
circle1.set_radius(0)
except:
pass
# Remove this_rect if it exists on the plot
try:
this_rect.remove()
except:
pass
# Vehicle position display
veh_pos_label = tk.Label(window,
text = ("Vehicle Position"))
veh_pos_label.grid(row=2, column=4, padx=5)
# Add new position values to display window
veh_x_pos_label = tk.Label(window,
text = ("X: " + str(round(0.0,3)) + " feet"))
veh_x_pos_label.grid(row=3, column=4, padx=5)
veh_y_pos_label = tk.Label(window,
text = ("Y: " + str(round(0.0,3)) + " feet"))
veh_y_pos_label.grid(row=4, column=4, padx=5)
veh_orientation_label = tk.Label(window,
text = ("Orientation: " + str(
round(0.0,3)) + " degrees"))
veh_orientation_label.grid(row=5, column=4, padx=5)
# Wheel Rotation Rates display
wheel_rot_rates_label = tk.Label(window,
text = ("Wheel Rotation Rates"))
wheel_rot_rates_label.grid(row=6, column=4, padx=5)
# Add new rotation rates to display window
wheel_1_rot_label = tk.Label(window,
text = ("Wheel 1: " + str(round(0.0,3)) + " degrees/s"))
wheel_1_rot_label.grid(row=7, column=4, padx=5)
wheel_2_rot_label = tk.Label(window,
text = ("Wheel 2: " + str(round(0.0,3)) + " degrees/s"))
wheel_2_rot_label.grid(row=8, column=4, padx=5)
wheel_3_rot_label = tk.Label(window,
text = ("Wheel 3: " + str(round(0.0,3)) + " degrees/s"))
wheel_3_rot_label.grid(row=9, column=4, padx=5)
wheel_4_rot_label = tk.Label(window,
text = ("Wheel 4: " + str(round(0.0,3)) + " degrees/s"))
wheel_4_rot_label.grid(row=10, column=4, padx=5)
# Robot Velocity Display
robot_velocity_label = tk.Label(window,
text = ("Robot Velocity (Local)"))
robot_velocity_label.grid(row=11, column=4, padx=5)
robot_velocity_x_label = tk.Label(window,
text = ("Velocity X: " + str(round(0.0,3)) + " ft/s"))
robot_velocity_x_label.grid(row=12, column=4, padx=5)
robot_velocity_y_label = tk.Label(window,
text = ("Velocity Y: " + str(round(0.0,3)) + " ft/s"))
robot_velocity_y_label.grid(row=13, column=4, padx=5)
def stop():
"""
This method stops the current processes.
"""
global running_control_robot_body
global running_control_robot_wheels
running_control_robot_body = False
running_control_robot_wheels = False
def turn_off_tick_labels():
"""
Turn off the tick labels if desired.
"""
ax.set_yticklabels([])
ax.set_xticklabels([])
##################### Control Methods #####################
def start_control_robot_body():
"""
This method starts the control_robot_body method
"""
global running_control_robot_body
running_control_robot_body = True
def control_robot_body(direction = 45.0, speed = 2.5,
rotation_rate = 0.0):
"""
The user can specify the direction, speed, and rotation
rate of the vehicle reference point.
@param direction: The direction of the vehicle
reference point in degrees, measured from the
vehicle's positive x-axis
@param speed: The magnitude of the velocity in ft/sec
@param rotation_rate: Rotation rate in degrees/sec,
going in the counter-clockwise direction
"""
global hist_x_vals, hist_y_vals
global x_pos_ref, y_pos_ref, vehicle_angle_ref
if(running_control_robot_body):
# Time interval in seconds
dt = 0.25
# Method will not run if speed entered is >15 ft/s
if (is_too_fast(speed)):
# Error Messages
print("Error: Maximum speed is 15 " +
"ft/s.\nPlease increase the deadline.\n\n" +
"Speed = " + str(speed) + " ft/s")
error_label = tk.Label(window,
text = ("Error Log\n ("+ str(time.strftime(
"%Y-%m-%d %H:%M:%S", time.localtime(
))) + ")\n Maximum speed is 15 " +
"ft/s.\nPlease reduce the speed.\n" +
"Speed = " + str(speed) + " ft/s"))
error_label.grid(row=14, column=4,
padx=5, pady=25)
stop()
if(running_control_robot_body):
x_initial = x_pos_ref
y_initial = y_pos_ref
vehicle_angle_ref_initial = vehicle_angle_ref
# Convert direction (local) into direction (global)
direction_global = direction + vehicle_angle_ref
# Calculate velocity in the x-direction in the
# global reference frame
v_x_global = (speed) * math.cos(
math.radians(direction_global))
# Calculate velocity in the y-direction in the
# global reference frame
v_y_global = (speed) * math.sin(
math.radians(direction_global))
# Determine the new x-coordinate of the vehicle
# reference point
x_pos_ref = x_initial + (v_x_global * dt)
# Determine the new y-coordinate of the vehicle
# reference point
y_pos_ref = y_initial + (v_y_global * dt)
# Determine the new orientation of the vehicle
# reference point
vehicle_angle_ref = vehicle_angle_ref_initial + (
rotation_rate * dt)
# Reposition grid if we are close to the edge
if (is_close_to_edge(x_pos_ref, y_pos_ref)):
plot_grid(x_pos_ref, y_pos_ref)
# Update user-defined path
plot_line(x_initial,
y_initial, math.radians(direction_global))
plt.pause(dt)
# Move robot to new position
plot_robot(x_pos_ref,y_pos_ref,math.radians(
vehicle_angle_ref))
plot_arrow(x_pos_ref,y_pos_ref,math.radians(
vehicle_angle_ref))
# Update path traveled by robot
hist_x_vals.append(x_pos_ref)
hist_y_vals.append(y_pos_ref)
plot_path_traveled(hist_x_vals, hist_y_vals)
# Calculate velocity in the x-direction in the
# local reference frame
v_x_local = (speed) * math.cos(
math.radians(direction))
# Calculate velocity in the y-direction in the
# local reference frame
v_y_local = (speed) * math.sin(
math.radians(direction))
# Update wheel rotation rates
rot1, rot2, rot3, rot4 = get_wheel_rot_rates(
v_x_local, v_y_local, rotation_rate)
# Vehicle position display
print("VEHICLE POSITION")
print("X: " + str(x_pos_ref) + " feet")
print("Y: " + str(y_pos_ref) + " feet")
print("Orientation: " + str(vehicle_angle_ref) +
" degrees\n")
# Wheel rate display
print("WHEEL ROTATION RATES")
print("Wheel 1: " + str(rot1) + " degrees/s")
print("Wheel 2: " + str(rot2) + " degrees/s")
print("Wheel 3: " + str(rot3) + " degrees/s")
print("Wheel 4: " + str(rot4) + " degrees/s\n")
# Robot velocity display
print("ROBOT VELOCITY (LOCAL)")
print("V_X: " + str(v_x_local) + " ft/s")
print("V_Y: " + str(v_y_local) + " ft/s\n\n")
# Vehicle position display
veh_pos_label = tk.Label(window,
text = ("Vehicle Position"))
veh_pos_label.grid(row=2, column=4, padx=5)
# Add new position values to display window
veh_x_pos_label = tk.Label(window,
text = ("X: " + str(round(x_pos_ref,3)) + " feet"))
veh_x_pos_label.grid(row=3, column=4, padx=5)
veh_y_pos_label = tk.Label(window,
text = ("Y: " + str(round(y_pos_ref,3)) + " feet"))
veh_y_pos_label.grid(row=4, column=4, padx=5)
veh_orientation_label = tk.Label(window,
text = ("Orientation: " + str(
round(vehicle_angle_ref,3)) + " degrees"))
veh_orientation_label.grid(row=5, column=4, padx=5)
# Wheel Rotation Rates display
wheel_rot_rates_label = tk.Label(window,
text = ("Wheel Rotation Rates"))
wheel_rot_rates_label.grid(row=6, column=4, padx=5)
# Add new rotation rates to display window
wheel_1_rot_label = tk.Label(window,
text = ("Wheel 1: " + str(round(rot1,3)) + " degrees/s"))
wheel_1_rot_label.grid(row=7, column=4, padx=5)
wheel_2_rot_label = tk.Label(window,
text = ("Wheel 2: " + str(round(rot2,3)) + " degrees/s"))
wheel_2_rot_label.grid(row=8, column=4, padx=5)
wheel_3_rot_label = tk.Label(window,
text = ("Wheel 3: " + str(round(rot3,3)) + " degrees/s"))
wheel_3_rot_label.grid(row=9, column=4, padx=5)
wheel_4_rot_label = tk.Label(window,
text = ("Wheel 4: " + str(round(rot4,3)) + " degrees/s"))
wheel_4_rot_label.grid(row=10, column=4, padx=5)
# Robot Velocity Display
robot_velocity_label = tk.Label(window,
text = ("Robot Velocity (Local)"))
robot_velocity_label.grid(row=11, column=4, padx=5)
robot_velocity_x_label = tk.Label(window,
text = ("Velocity X: " + str(round(v_x_local,3)) + " ft/s"))
robot_velocity_x_label.grid(row=12, column=4, padx=5)
robot_velocity_y_label = tk.Label(window,
text = ("Velocity Y: " + str(round(v_y_local,3)) + " ft/s"))
robot_velocity_y_label.grid(row=13, column=4, padx=5)
plt.pause(dt)
window.after(1, lambda: control_robot_body(
float(direction_entry.get()),
float(speed_entry.get()),
float(rot_rate_entry.get())))
def start_control_robot_wheels():
"""
This method starts the control_robot_wheels method
"""
global running_control_robot_wheels
running_control_robot_wheels = True
def stop_control_robot_wheels(event):
"""
This method stops the control_robot_wheels process
upon either a mouse click on the plot or a
keyboard button push.
"""
global running_control_robot_wheels
running_control_robot_wheels = False
def control_robot_wheels(rot1 = -7.0, rot2 = 0.0,
rot3 = 0.0, rot4 = -7.0):
"""
The user shall be able to specify the rotation rate of
each wheel.
@param rot1: Rotation rate of wheel 1 in degrees/sec
@param rot2: Rotation rate of wheel 2 in degrees/sec
@param rot3: Rotation rate of wheel 3 in degrees/sec
@param rot4: Rotation rate of wheel 4 in degrees/sec
"""
global hist_x_vals, hist_y_vals
global x_pos_ref, y_pos_ref, vehicle_angle_ref
# In this mode alone, any mouse or keyboard button push
# will be considered a stop command.
# Must click directly on the plot.
fig.canvas.mpl_connect('button_press_event',
stop_control_robot_wheels)
fig.canvas.mpl_connect('key_press_event',
stop_control_robot_wheels)
if(running_control_robot_wheels):
# Time interval in seconds
dt = 0.25
# Get current robot motion
v_x_local, v_y_local, rotation_rate = (
get_robot_motion_values(rot1, rot2, rot3, rot4))
speed = get_velocity_magnitude(v_x_local, v_y_local)
# Method will not run if speed entered is >15 ft/s
if (is_too_fast(speed)):
# Error Messages
print("Error: Maximum speed is 15 " +
"ft/s.\nPlease increase the deadline.\n\n" +
"Speed = " + str(speed) + " ft/s")
error_label = tk.Label(window,
text = ("Error Log\n ("+ str(time.strftime(
"%Y-%m-%d %H:%M:%S", time.localtime(
))) + ")\n Maximum speed is 15 " +
"ft/s.\nPlease reduce the wheel rotation rates.\n" +
"Speed = " + str(speed) + " ft/s"))
error_label.grid(row=14, column=4,
padx=5, pady=25)
stop()
if(running_control_robot_wheels):
v_x_global, v_y_global = (
convert_local_velocity_to_global(
v_x_local, v_y_local))
# Calculate the direction of travel of the vehicle
# reference point
direction_global = math.degrees(math.atan2(
v_y_global,v_x_global))
x_initial = x_pos_ref
y_initial = y_pos_ref
vehicle_angle_ref_initial = vehicle_angle_ref
# Determine the new x-coordinate of the vehicle
# reference point
x_pos_ref = x_initial + (v_x_global * dt)
# Determine the new y-coordinate of the vehicle
# reference point
y_pos_ref = y_initial + (v_y_global * dt)
# Determine the new orientation of the vehicle
# reference point
vehicle_angle_ref = vehicle_angle_ref_initial + (
rotation_rate * dt)
# Reposition grid if we are close to the edge
if (is_close_to_edge(x_pos_ref, y_pos_ref)):
plot_grid(x_pos_ref, y_pos_ref)
# Update user-defined path
plot_line(x_initial, y_initial, math.radians(
direction_global))
plt.pause(dt)
# Move robot to new position
plot_robot(x_pos_ref,y_pos_ref,math.radians(
vehicle_angle_ref))
plot_arrow(x_pos_ref,y_pos_ref,math.radians(
vehicle_angle_ref))
# Update path traveled by robot
hist_x_vals.append(x_pos_ref)
hist_y_vals.append(y_pos_ref)
plot_path_traveled(hist_x_vals, hist_y_vals)
# Vehicle position display
print("VEHICLE POSITION")
print("X: " + str(x_pos_ref) + " feet")
print("Y: " + str(y_pos_ref) + " feet")
print("Orientation: " + str(vehicle_angle_ref) +
" degrees\n")
# Wheel rate display
print("WHEEL ROTATION RATES")
print("Wheel 1: " + str(rot1) + " degrees/s")
print("Wheel 2: " + str(rot2) + " degrees/s")
print("Wheel 3: " + str(rot3) + " degrees/s")
print("Wheel 4: " + str(rot4) + " degrees/s\n")
# Robot velocity display
print("ROBOT VELOCITY (LOCAL)")
print("V_X: " + str(v_x_local) + " ft/s")
print("V_Y: " + str(v_y_local) + " ft/s\n\n")
# Vehicle position display
veh_pos_label = tk.Label(window,
text = ("Vehicle Position"))
veh_pos_label.grid(row=2, column=4, padx=5)
# Add new position values to display window
veh_x_pos_label = tk.Label(window,
text = ("X: " + str(round(x_pos_ref,3)) + " feet"))
veh_x_pos_label.grid(row=3, column=4, padx=5)
veh_y_pos_label = tk.Label(window,
text = ("Y: " + str(round(y_pos_ref,3)) + " feet"))
veh_y_pos_label.grid(row=4, column=4, padx=5)
veh_orientation_label = tk.Label(window,
text = ("Orientation: " + str(
round(vehicle_angle_ref,3)) + " degrees"))
veh_orientation_label.grid(row=5, column=4, padx=5)
# Wheel Rotation Rates display
wheel_rot_rates_label = tk.Label(window,
text = ("Wheel Rotation Rates"))
wheel_rot_rates_label.grid(row=6, column=4, padx=5)
# Add new rotation rates to display window
wheel_1_rot_label = tk.Label(window,
text = ("Wheel 1: " + str(round(rot1,3)) + " degrees/s"))
wheel_1_rot_label.grid(row=7, column=4, padx=5)
wheel_2_rot_label = tk.Label(window,
text = ("Wheel 2: " + str(round(rot2,3)) + " degrees/s"))
wheel_2_rot_label.grid(row=8, column=4, padx=5)
wheel_3_rot_label = tk.Label(window,
text = ("Wheel 3: " + str(round(rot3,3)) + " degrees/s"))
wheel_3_rot_label.grid(row=9, column=4, padx=5)
wheel_4_rot_label = tk.Label(window,
text = ("Wheel 4: " + str(round(rot4,3)) + " degrees/s"))
wheel_4_rot_label.grid(row=10, column=4, padx=5)
# Robot Velocity Display
robot_velocity_label = tk.Label(window,
text = ("Robot Velocity (Local)"))
robot_velocity_label.grid(row=11, column=4, padx=5)
robot_velocity_x_label = tk.Label(window,
text = ("Velocity X: " + str(round(v_x_local,3)) + " ft/s"))
robot_velocity_x_label.grid(row=12, column=4, padx=5)
robot_velocity_y_label = tk.Label(window,
text = ("Velocity Y: " + str(round(v_y_local,3)) + " ft/s"))
robot_velocity_y_label.grid(row=13, column=4, padx=5)
plt.pause(dt)
window.after(1, lambda: control_robot_wheels(
float(rot_rate1_entry.get()),
float(rot_rate2_entry.get()),
float(rot_rate3_entry.get()),
float(rot_rate4_entry.get())))
def point_execution_no_wp(x_final = 5.0, y_final = 5.0,
orientation_final = -45.0, deadline = 5.0):
"""
The user can specify a straight line path to an
end point, including a desired end orientation.
No waypoints between start and endpoints.
@param x_final: x-coordinate of the desired end point
@param y_final: y-coordinate of the desired end point
@param orientation_final: Desired end orientation in
degrees, going counter-clockwise from the x-axis
of the global reference frame
@param deadline: Time taken to get to end point in
seconds
"""
global hist_x_vals, hist_y_vals
global x_pos_ref, y_pos_ref, vehicle_angle_ref
distance = get_distance_btw_points(x_pos_ref,y_pos_ref,
x_final,y_final)
speed = get_speed(distance,deadline)
# Method will not run if speed entered is >15 ft/s
if (is_too_fast(speed)):
# Error Messages
print("Error: Maximum speed is 15 " +
"ft/s.\nPlease increase the deadline.\n\n" +
"Speed = " + str(speed) + " ft/s")
error_label = tk.Label(window,
text = ("Error Log\n ("+ str(time.strftime(
"%Y-%m-%d %H:%M:%S", time.localtime(
))) + ")\n Maximum speed is 15 " +
"ft/s.\nPlease increase the deadline.\n" +
"Speed = " + str(speed) + " ft/s"))
error_label.grid(row=14, column=4,
padx=5, pady=25)
stop()
# Calculate rotation rate in degrees/sec
rotation_rate = (orientation_final - (
vehicle_angle_ref))/(deadline)
# Number of frames to reach deadline
no_of_frames = 5
# Time interval in seconds
dt = (deadline / no_of_frames)
# Calculate the direction of travel of the vehicle
# reference point in degrees
direction_global = math.degrees(math.atan2(
(y_final - y_pos_ref),(x_final - x_pos_ref)))
# Plot user-defined path
plt.plot([x_pos_ref, x_final], [y_pos_ref, y_final],
color='red', linestyle='-', linewidth=2)
plt.pause(0.25)
# Calculate velocity in the x-direction in the
# global reference frame
v_x_global = (speed) * math.cos(
math.radians(direction_global))
# Calculate velocity in the y-direction in the
# global reference frame
v_y_global = (speed) * math.sin(
math.radians(direction_global))
for num in range(no_of_frames):
x_initial = x_pos_ref
y_initial = y_pos_ref
vehicle_angle_ref_initial = vehicle_angle_ref
# Determine the new x-coordinate of the vehicle
# reference point
x_pos_ref = x_initial + (v_x_global * dt)
# Determine the new y-coordinate of the vehicle
# reference point
y_pos_ref = y_initial + (v_y_global * dt)
# Determine the new orientation of the vehicle
# reference point
vehicle_angle_ref = vehicle_angle_ref_initial + (
rotation_rate * dt)
plt.pause(dt)
# Reposition grid if we are close to the edge
if (is_close_to_edge(x_pos_ref, y_pos_ref)):
plot_grid(x_pos_ref, y_pos_ref)
# Move robot to new position
plot_robot(x_pos_ref,y_pos_ref,math.radians(
vehicle_angle_ref))
plot_arrow(x_pos_ref,y_pos_ref,math.radians(
vehicle_angle_ref))
# Update path traveled by robot
hist_x_vals.append(x_pos_ref)
hist_y_vals.append(y_pos_ref)
plot_path_traveled(hist_x_vals, hist_y_vals)
# Convert direction (global) into direction (local)
direction = direction_global - vehicle_angle_ref
# Calculate velocity in the x-direction in the
# local reference frame
v_x_local = (speed) * math.cos(
math.radians(direction))
# Calculate velocity in the y-direction in the
# local reference frame
v_y_local = (speed) * math.sin(
math.radians(direction))
# Update wheel rotation rates
rot1, rot2, rot3, rot4 = get_wheel_rot_rates(
v_x_local, v_y_local, rotation_rate)
# Update user-defined path
plt.plot([x_pos_ref, x_final], [y_pos_ref,y_final],
color='red', linestyle='-', linewidth=2)
# Vehicle position display
print("VEHICLE POSITION")
print("X: " + str(x_pos_ref) + " feet")
print("Y: " + str(y_pos_ref) + " feet")
print("Orientation: " + str(vehicle_angle_ref) +
" degrees\n")
# Wheel rate display
print("WHEEL ROTATION RATES")
print("Wheel 1: " + str(rot1) + " degrees/s")
print("Wheel 2: " + str(rot2) + " degrees/s")
print("Wheel 3: " + str(rot3) + " degrees/s")
print("Wheel 4: " + str(rot4) + " degrees/s\n")
# Robot velocity display
print("ROBOT VELOCITY (LOCAL)")
print("V_X: " + str(v_x_local) + " ft/s")
print("V_Y: " + str(v_y_local) + " ft/s\n\n")
# Vehicle position display
veh_pos_label = tk.Label(window,
text = ("Vehicle Position"))
veh_pos_label.grid(row=2, column=4, padx=5)
# Add new position values to display window
veh_x_pos_label = tk.Label(window,
text = ("X: " + str(round(x_pos_ref,3)) + " feet"))
veh_x_pos_label.grid(row=3, column=4, padx=5)
veh_y_pos_label = tk.Label(window,
text = ("Y: " + str(round(y_pos_ref,3)) + " feet"))
veh_y_pos_label.grid(row=4, column=4, padx=5)
veh_orientation_label = tk.Label(window,
text = ("Orientation: " + str(
round(vehicle_angle_ref,3)) + " degrees"))
veh_orientation_label.grid(row=5, column=4, padx=5)
# Wheel Rotation Rates display
wheel_rot_rates_label = tk.Label(window,
text = ("Wheel Rotation Rates"))
wheel_rot_rates_label.grid(row=6, column=4, padx=5)
# Add new rotation rates to display window
wheel_1_rot_label = tk.Label(window,
text = ("Wheel 1: " + str(round(rot1,3)) + " degrees/s"))
wheel_1_rot_label.grid(row=7, column=4, padx=5)
wheel_2_rot_label = tk.Label(window,
text = ("Wheel 2: " + str(round(rot2,3)) + " degrees/s"))
wheel_2_rot_label.grid(row=8, column=4, padx=5)
wheel_3_rot_label = tk.Label(window,
text = ("Wheel 3: " + str(round(rot3,3)) + " degrees/s"))
wheel_3_rot_label.grid(row=9, column=4, padx=5)
wheel_4_rot_label = tk.Label(window,
text = ("Wheel 4: " + str(round(rot4,3)) + " degrees/s"))
wheel_4_rot_label.grid(row=10, column=4, padx=5)
# Robot Velocity Display
robot_velocity_label = tk.Label(window,
text = ("Robot Velocity (Local)"))
robot_velocity_label.grid(row=11, column=4, padx=5)
robot_velocity_x_label = tk.Label(window,
text = ("Velocity X: " + str(round(v_x_local,3)) + " ft/s"))
robot_velocity_x_label.grid(row=12, column=4, padx=5)
robot_velocity_y_label = tk.Label(window,
text = ("Velocity Y: " + str(round(v_y_local,3)) + " ft/s"))
robot_velocity_y_label.grid(row=13, column=4, padx=5)
def point_execution_with_wp(x_wp1 = 5.0, y_wp1 = 5.0,
x_wp2 = 5.0, y_wp2 = -5.0,
x_wp3 = -5.0, y_wp3 = 5.0,
x_final = -5.0, y_final = -5.0,
orientation_final = 90.0, deadline = 5.0):
"""
The user can specify a straight line path to an
end point, including a desired end orientation.
Waypoints between start and endpoints can be specified.
@param x_wp1: x-coordinate of waypoint 1
@param y_wp1: y-coordinate of waypoint 1
@param x_wp2: x-coordinate of waypoint 2
@param y_wp2: y-coordinate of waypoint 2
@param x_wp3: x-coordinate of waypoint 3
@param y_wp3: y-coordinate of waypoint 3
@param x_final: x-coordinate of end point
@param y_final: y-coordinate of end point
@param orientation_final: Desired end orientation in
degrees.
@param deadline float: Time taken to get from current
point to end point in seconds.
"""
global hist_x_vals, hist_y_vals
global x_pos_ref, y_pos_ref, vehicle_angle_ref
# List of all x and y values along the path
x_list = [x_pos_ref, x_wp1, x_wp2, x_wp3, x_final]
y_list = [y_pos_ref, y_wp1, y_wp2, y_wp3, y_final]
# Number of legs on the path
no_of_legs = len(x_list) - 1
# Keep track of the distances of each leg of the trip
distance_list = []
# Calculate the distance of each leg of the trip in ft
for idx in range(no_of_legs):
distance_list.append(get_distance_btw_points(
x_list[idx],y_list[idx],x_list[idx + 1],y_list[
idx + 1]))
total_distance = sum(distance_list)
speed = get_speed(total_distance,deadline)
# Method will not run if speed entered is >15 ft/s
if (is_too_fast(speed)):
print("Error: Maximum speed is 15 " +
"ft/s.\nPlease increase the deadline.\n\n" +
"Speed = " + str(speed) + " ft/s")
error_label = tk.Label(window,
text = ("Error Log\n ("+ str(time.strftime(
"%Y-%m-%d %H:%M:%S", time.localtime(
))) + ")\n Maximum speed is 15 " +
"ft/s.\nPlease increase the deadline.\n" +
"Speed = " + str(speed) + " ft/s"))
error_label.grid(row=14, column=4,
padx=5, pady=25)
stop()
# Calculate rotation rate in degrees/sec
rotation_rate = (orientation_final - (
vehicle_angle_ref))/(deadline)
# Calculate the duration of each leg in seconds
deadline_list = []
for idx in range(no_of_legs):
deadline_list.append((distance_list[
idx]/total_distance) * deadline)
# Number of frames per leg
no_of_frames_per_leg = 5
# Time intervals in seconds for each leg
dt_list = []
for idx in range(no_of_legs):
dt_list.append(deadline_list[idx]/(
no_of_frames_per_leg))
# Move through each leg of the trip
for idx in range(no_of_legs):
# Number of frames per leg
no_of_frames_per_leg = 5
# Calculate the direction of travel of the vehicle
# reference point in degrees
direction_global = math.degrees(math.atan2(
(y_list[idx + 1] - y_list[idx]),(x_list[
idx + 1] - x_list[idx])))
# Calculate velocity in the x-direction in the
# global reference frame
v_x_global = (speed) * math.cos(
math.radians(direction_global))
# Calculate velocity in the y-direction in the
# global reference frame
v_y_global = (speed) * math.sin(
math.radians(direction_global))
for num in range(no_of_frames_per_leg):
x_initial = x_pos_ref
y_initial = y_pos_ref
vehicle_angle_ref_initial = vehicle_angle_ref
# Determine the new x-coordinate of the vehicle
# reference point
x_pos_ref = x_initial + (v_x_global * dt_list[
idx])
# Determine the new y-coordinate of the vehicle
# reference point
y_pos_ref = y_initial + (v_y_global * dt_list[
idx])
# Determine the new orientation of the vehicle
# reference point
vehicle_angle_ref = (
vehicle_angle_ref_initial + (
rotation_rate * dt_list[idx]))
# Reposition grid if we are close to the edge
if (is_close_to_edge(x_pos_ref, y_pos_ref)):
plot_grid(x_pos_ref, y_pos_ref)
# Move robot to new position
plot_robot(x_pos_ref,y_pos_ref,math.radians(
vehicle_angle_ref))
plot_arrow(x_pos_ref,y_pos_ref,math.radians(
vehicle_angle_ref))
# Update path traveled by robot
hist_x_vals.append(x_pos_ref)
hist_y_vals.append(y_pos_ref)
plot_path_traveled(hist_x_vals, hist_y_vals)
# Convert direction (global) into direction (local)
direction = direction_global - vehicle_angle_ref
# Calculate velocity in the x-direction in the
# local reference frame
v_x_local = (speed) * math.cos(
math.radians(direction))
# Calculate velocity in the y-direction in the
# local reference frame
v_y_local = (speed) * math.sin(
math.radians(direction))
# Update wheel rotation rates
rot1, rot2, rot3, rot4 = get_wheel_rot_rates(
v_x_local, v_y_local, rotation_rate)
# Vehicle position display
print("VEHICLE POSITION")
print("X: " + str(x_pos_ref) + " feet")
print("Y: " + str(y_pos_ref) + " feet")
print("Orientation: " + str(vehicle_angle_ref) +
" degrees\n")
# Wheel rate display
print("WHEEL ROTATION RATES")
print("Wheel 1: " + str(rot1) + " degrees/s")
print("Wheel 2: " + str(rot2) + " degrees/s")
print("Wheel 3: " + str(rot3) + " degrees/s")
print("Wheel 4: " + str(rot4) + " degrees/s\n")
# Robot velocity display
print("ROBOT VELOCITY (LOCAL)")
print("V_X: " + str(v_x_local) + " ft/s")
print("V_Y: " + str(v_y_local) + " ft/s\n\n")
# Vehicle position display
veh_pos_label = tk.Label(window,
text = ("Vehicle Position"))
veh_pos_label.grid(row=2, column=4, padx=5)
# Add new position values to display window
veh_x_pos_label = tk.Label(window,
text = ("X: " + str(round(x_pos_ref,3)) + " feet"))
veh_x_pos_label.grid(row=3, column=4, padx=5)
veh_y_pos_label = tk.Label(window,
text = ("Y: " + str(round(y_pos_ref,3)) + " feet"))
veh_y_pos_label.grid(row=4, column=4, padx=5)
veh_orientation_label = tk.Label(window,
text = ("Orientation: " + str(
round(vehicle_angle_ref,3)) + " degrees"))
veh_orientation_label.grid(row=5, column=4, padx=5)
# Wheel Rotation Rates display
wheel_rot_rates_label = tk.Label(window,
text = ("Wheel Rotation Rates"))
wheel_rot_rates_label.grid(row=6, column=4, padx=5)
# Add new rotation rates to display window
wheel_1_rot_label = tk.Label(window,
text = ("Wheel 1: " + str(round(rot1,3)) + " degrees/s"))
wheel_1_rot_label.grid(row=7, column=4, padx=5)
wheel_2_rot_label = tk.Label(window,
text = ("Wheel 2: " + str(round(rot2,3)) + " degrees/s"))
wheel_2_rot_label.grid(row=8, column=4, padx=5)
wheel_3_rot_label = tk.Label(window,
text = ("Wheel 3: " + str(round(rot3,3)) + " degrees/s"))
wheel_3_rot_label.grid(row=9, column=4, padx=5)
wheel_4_rot_label = tk.Label(window,
text = ("Wheel 4: " + str(round(rot4,3)) + " degrees/s"))
wheel_4_rot_label.grid(row=10, column=4, padx=5)
# Robot Velocity Display
robot_velocity_label = tk.Label(window,
text = ("Robot Velocity (Local)"))
robot_velocity_label.grid(row=11, column=4, padx=5)
robot_velocity_x_label = tk.Label(window,
text = ("Velocity X: " + str(round(v_x_local,3)) + " ft/s"))
robot_velocity_x_label.grid(row=12, column=4, padx=5)
robot_velocity_y_label = tk.Label(window,
text = ("Velocity Y: " + str(round(v_y_local,3)) + " ft/s"))
robot_velocity_y_label.grid(row=13, column=4, padx=5)
# Update user-defined path
plt.plot([x_pos_ref, x_list[idx + 1]], [
y_pos_ref,y_list[idx + 1]], color='red',
linestyle='-', linewidth=2)
plt.pause(dt_list[idx])
def move_in_a_circle(radius = 2.0, direction = 45.0,
deadline = 5.0):
"""
Vehicle can move in a circle with user-defined
radius and inclination (direction of circle center
from current vehicle position).
@param radius: Radius of the circle in feet
@param direction: Direction of circle center
from the vehicle reference point, measured
from the vehicle's positive x-axis in degrees
@param deadline float: Time taken to get from current
point to end point in seconds.
"""
global hist_x_vals, hist_y_vals
global x_pos_ref, y_pos_ref, vehicle_angle_ref
global circle1
# Rotation rate of vehicle reference point
rotation_rate = 0.0
# Convert direction (local) into direction (global)
direction_global = direction + vehicle_angle_ref
# x-coordinate of the center of the circle
x_center = x_pos_ref + (radius) * math.cos(
math.radians(direction_global))
# y-coordinate of the center of the circle
y_center = y_pos_ref + (radius) * math.sin(
math.radians(direction_global))
# Plot the circle path
circle1 = plt.Circle((x_center, y_center),
radius, color="red", fill=False, lw=2)
ax.add_artist(circle1)
# Record the angle at which the vehicle reference point
# is from the center of the circle in degrees
starting_angle = math.degrees(math.atan2((
y_pos_ref - y_center),(x_pos_ref - x_center)))
# Convert negative angles to positive angles
if starting_angle < 0:
starting_angle += 360
# Calculate the total distance of travel in feet
total_distance = 2 * math.pi * radius
speed = get_speed(total_distance,deadline)
# Method will not run if speed entered is >15 ft/s
if (is_too_fast(speed)):
print("Error: Maximum speed is 15 " +
"ft/s.\nPlease increase the deadline.\n\n" +
"Speed = " + str(speed) + " ft/s")
error_label = tk.Label(window,
text = ("Error Log\n ("+ str(time.strftime(
"%Y-%m-%d %H:%M:%S", time.localtime(
))) + ")\n Maximum speed is 15 " +
"ft/s.\nPlease increase the deadline.\n" +
"Speed = " + str(speed) + " ft/s"))
error_label.grid(row=14, column=4,
padx=5, pady=25)
stop()
# Number of individual movements along the circle path
no_of_circle_legs = 25
# Number of degrees per circle leg
no_of_degrees_per_circle_leg = 360.0/no_of_circle_legs
# Number of seconds per leg
dt = deadline/no_of_circle_legs
# Create a list of the angles at which the vehicle
# reference point is from the center of the circle
# for a complete circle path (in degrees)
angles_list = []
for angle_count in range(no_of_circle_legs):
starting_angle += no_of_degrees_per_circle_leg
angles_list.append(starting_angle)
# List of all x and y values along the path
x_list = [x_pos_ref]
y_list = [y_pos_ref]
for element in angles_list:
x_temp = radius * math.cos(math.radians(element))+ (
x_center)
y_temp = radius * math.sin(math.radians(element))+ (
y_center)
x_list.append(x_temp)
y_list.append(y_temp)
ax.add_artist(circle1)
plt.pause(dt)
# Move through each leg of the trip
for idx in range(no_of_circle_legs):
# Calculate the direction of travel of the vehicle
# reference point in degrees
direction_global = math.degrees(math.atan2(
(y_list[idx + 1] - y_list[idx]),(x_list[
idx + 1] - x_list[idx])))
# Calculate velocity in the x-direction in the
# global reference frame
v_x_global = (speed) * math.cos(
math.radians(direction_global))
# Calculate velocity in the y-direction in the
# global reference frame
v_y_global = (speed) * math.sin(
math.radians(direction_global))
x_initial = x_pos_ref
y_initial = y_pos_ref
vehicle_angle_ref_initial = vehicle_angle_ref
# Determine the new x-coordinate of the vehicle
# reference point
x_pos_ref = x_initial + (v_x_global * dt)
# Determine the new y-coordinate of the vehicle
# reference point
y_pos_ref = y_initial + (v_y_global * dt)
# Reposition grid if we are close to the edge
if (is_close_to_edge(x_pos_ref, y_pos_ref)):
plot_grid(x_pos_ref, y_pos_ref)
# Move robot to new position
plot_robot(x_pos_ref,y_pos_ref,math.radians(
vehicle_angle_ref))
plot_arrow(x_pos_ref,y_pos_ref,math.radians(
vehicle_angle_ref))
# Update path traveled by robot
hist_x_vals.append(x_pos_ref)
hist_y_vals.append(y_pos_ref)
plot_path_traveled(hist_x_vals, hist_y_vals)
# Convert direction (global) into direction (local)
direction = direction_global - vehicle_angle_ref
# Calculate velocity in the x-direction in the
# local reference frame
v_x_local = (speed) * math.cos(
math.radians(direction))
# Calculate velocity in the y-direction in the
# local reference frame
v_y_local = (speed) * math.sin(
math.radians(direction))
# Update wheel rotation rates
rot1, rot2, rot3, rot4 = get_wheel_rot_rates(
v_x_local, v_y_local, rotation_rate)
# Vehicle position display
print("VEHICLE POSITION")
print("X: " + str(x_pos_ref) + " feet")
print("Y: " + str(y_pos_ref) + " feet")
print("Orientation: " + str(vehicle_angle_ref) +
" degrees\n")
# Wheel rate display
print("WHEEL ROTATION RATES")
print("Wheel 1: " + str(rot1) + " degrees/s")
print("Wheel 2: " + str(rot2) + " degrees/s")
print("Wheel 3: " + str(rot3) + " degrees/s")
print("Wheel 4: " + str(rot4) + " degrees/s\n")
# Robot velocity display
print("ROBOT VELOCITY (LOCAL)")
print("V_X: " + str(v_x_local) + " ft/s")
print("V_Y: " + str(v_y_local) + " ft/s\n\n")
# Vehicle position display
veh_pos_label = tk.Label(window,
text = ("Vehicle Position"))
veh_pos_label.grid(row=2, column=4, padx=5)
# Add new position values to display window
veh_x_pos_label = tk.Label(window,
text = ("X: " + str(round(x_pos_ref,3)) + " feet"))
veh_x_pos_label.grid(row=3, column=4, padx=5)
veh_y_pos_label = tk.Label(window,
text = ("Y: " + str(round(y_pos_ref,3)) + " feet"))
veh_y_pos_label.grid(row=4, column=4, padx=5)
veh_orientation_label = tk.Label(window,
text = ("Orientation: " + str(
round(vehicle_angle_ref,3)) + " degrees"))
veh_orientation_label.grid(row=5, column=4, padx=5)
# Wheel Rotation Rates display
wheel_rot_rates_label = tk.Label(window,
text = ("Wheel Rotation Rates"))
wheel_rot_rates_label.grid(row=6, column=4, padx=5)
# Add new rotation rates to display window
wheel_1_rot_label = tk.Label(window,
text = ("Wheel 1: " + str(round(rot1,3)) + " degrees/s"))
wheel_1_rot_label.grid(row=7, column=4, padx=5)
wheel_2_rot_label = tk.Label(window,
text = ("Wheel 2: " + str(round(rot2,3)) + " degrees/s"))
wheel_2_rot_label.grid(row=8, column=4, padx=5)
wheel_3_rot_label = tk.Label(window,
text = ("Wheel 3: " + str(round(rot3,3)) + " degrees/s"))
wheel_3_rot_label.grid(row=9, column=4, padx=5)
wheel_4_rot_label = tk.Label(window,
text = ("Wheel 4: " + str(round(rot4,3)) + " degrees/s"))
wheel_4_rot_label.grid(row=10, column=4, padx=5)
# Robot Velocity Display
robot_velocity_label = tk.Label(window,
text = ("Robot Velocity (Local)"))
robot_velocity_label.grid(row=11, column=4, padx=5)
robot_velocity_x_label = tk.Label(window,
text = ("Velocity X: " + str(round(v_x_local,3)) + " ft/s"))
robot_velocity_x_label.grid(row=12, column=4, padx=5)
robot_velocity_y_label = tk.Label(window,
text = ("Velocity Y: " + str(round(v_y_local,3)) + " ft/s"))
robot_velocity_y_label.grid(row=13, column=4, padx=5)
plt.pause(dt)
def move_in_a_rectangle(length_in_ft = 5.0,
direction_of_opp_vertex = 25.0, deadline = 5.0):
"""
Vehicle can move in a rectangle shape consisting of
user-defined side lengths and inclination (direction of
opposite vertex from current vehicle position). Vehicle
will start at the vertex.
@param length_in_ft: Length of the rectangle in feet
@param direction_of_opp_vertex: Direction of diagonally
opposite vertex from current vehicle position in
degrees, going counter-clockwise from the vehicle's
positive x-axis.
@param deadline float: Time taken to get from current
point to end point in seconds.
"""
global this_rect
# Get the length of the diagonal of the rectangle
diagonal_length = abs(length_in_ft/math.cos(
math.radians(direction_of_opp_vertex)))
# Get the width of the diagonal of the rectangle
width_in_ft = abs(diagonal_length * math.sin(
math.radians(direction_of_opp_vertex)))
# Convert direction (local) into direction (global)
direction_global = direction_of_opp_vertex + (
vehicle_angle_ref)
# Calculate the interior angle in degrees between
# diagonal of rectangle and the side length
interior_angle = math.degrees(math.acos(
length_in_ft/diagonal_length))
# Calculate coordinates for waypoint 1
x_wp1 = x_pos_ref + (length_in_ft * math.cos(
math.radians(direction_global - interior_angle)))
y_wp1 = y_pos_ref + (length_in_ft * math.sin(
math.radians(direction_global - interior_angle)))
# Calculate coordinates for waypoint 2
x_wp2 = x_pos_ref + (diagonal_length * math.cos(
math.radians(direction_global)))
y_wp2 = y_pos_ref + (diagonal_length * math.sin(
math.radians(direction_global)))
# Angle to wp3 as measured counter-clockwise from the
# global positive x-axis
wp3_angle = direction_global + (90.0-interior_angle)
# Calculate coordinates for waypoint 3
x_wp3 = x_pos_ref + (width_in_ft * math.cos(
math.radians(wp3_angle)))
y_wp3 = y_pos_ref + (width_in_ft * math.sin(
math.radians(wp3_angle)))
# Plot the rectangle
this_rect = patches.Rectangle((x_pos_ref,y_pos_ref),
length_in_ft,width_in_ft, direction_global - interior_angle,
lw=2,ec='red', fill=False)
# Add the rectangle to the Axes
ax.add_patch(this_rect)
point_execution_with_wp(x_wp1, y_wp1, x_wp2, y_wp2,
x_wp3, y_wp3, x_pos_ref, y_pos_ref, 0.0, deadline)
def move_in_a_figure_eight(circle1_radius = 2.0,
circle2_radius = 4.0, direction = 90.0,
deadline = 20.0):
"""
Vehicle can move in a figure 8 consisting of two
circles with two user-defined, possibly different
radii and inclination (direction of circle center
from current vehicle position).
@param circle1_radius: Radius of the 1st circle in feet
@param circle2_radius: Radius of the 2nd circle in feet
@param direction: Direction of circle1 center
from the vehicle reference point, measured
from the vehicle's positive x-axis in degrees
@param deadline float: Time taken to get from current
point to end point in seconds.
"""
# Set the deadlines for the completion of each circle
deadline1 = (circle1_radius/(
circle1_radius + circle2_radius)) * deadline
deadline2 = (circle2_radius/(
circle1_radius + circle2_radius)) * deadline
# Set the directions of each circle from the vehicle
# reference point
direction1 = direction
direction2 = direction + 180.0
# Move in a figure 8 pattern - 1st circle
move_in_a_circle(circle1_radius,direction1,deadline1)
# Clear out the first circle from the plot
circle1.set_radius(0)
# Move in a figure 8 pattern - 2nd circle
move_in_a_circle(circle2_radius,direction2,deadline2)
######################## Main Code ########################
# Initiate the simulation environment (i.e. grid)
plt.ion() # Turn on interactive mode
fig = plt.figure() # Create a new blank canvas
ax = fig.gca() # Get the current axes
reset()
####################### Tkinter GUI #######################
# Set the window title
window.title("Omnidirectional Mecanum-Wheeled Robot " +
"(Author: Addison Sears-Collins)")
# Create user-interface
stop_button = tk.Button(window, text = "Stop", command=stop)
stop_button.grid(row=0, column=1, columnspan=2, pady=3,
ipadx=100)
reset_button = tk.Button(window, text = "Reset", command=reset)
reset_button.grid(row=1, column=1, columnspan=2, pady=3,
ipadx=100)
control_robot_body_button = tk.Button(window,
text = "Control Robot Body",
command=start_control_robot_body)
control_robot_body_button.grid(row=2, column=0,
columnspan=2, padx=5, pady=5)
window.after(1, lambda: control_robot_body(
float(direction_entry.get()),
float(speed_entry.get()),
float(rot_rate_entry.get())))
direction_label = tk.Label(window,
text = "Direction (degrees)")
direction_label.grid(row=3, column=0, padx=5)
direction_entry = tk.Entry(window)
direction_entry.grid(row=3, column=1, padx=5)
direction_entry.insert(0, 45.0)
speed_label = tk.Label(window, text = "Speed (ft/s)")
speed_label.grid(row=4, column=0, padx=5)
speed_entry = tk.Entry(window)
speed_entry.grid(row=4, column=1, padx=5)
speed_entry.insert(0, 2.5)
rot_rate_label = tk.Label(window,
text = "Rotation Rate (degrees/s)")
rot_rate_label.grid(row=5, column=0, padx=5)
rot_rate_entry = tk.Entry(window)
rot_rate_entry.grid(row=5, column=1, padx=5)
rot_rate_entry.insert(0, 0.0)
control_robot_wheels_button = tk.Button(window,
text = "Control Robot Wheels",
command=start_control_robot_wheels)
control_robot_wheels_button.grid(row=6, column=0,
columnspan=2, padx=5, pady=5)
window.after(1, lambda: control_robot_wheels(
float(rot_rate1_entry.get()),
float(rot_rate2_entry.get()),
float(rot_rate3_entry.get()),
float(rot_rate4_entry.get())))
rot_rate1_label = tk.Label(window,
text = "Rotation Rate 1 (degrees/s)")
rot_rate1_label.grid(row=7, column=0, padx=5)
rot_rate1_entry = tk.Entry(window)
rot_rate1_entry.grid(row=7, column=1, padx=5)
rot_rate1_entry.insert(0, -7.0)
rot_rate2_label = tk.Label(window,
text = "Rotation Rate 2 (degrees/s)")
rot_rate2_label.grid(row=8, column=0, padx=5)
rot_rate2_entry = tk.Entry(window)
rot_rate2_entry.grid(row=8, column=1, padx=5)
rot_rate2_entry.insert(0, 0.0)
rot_rate3_label = tk.Label(window,
text = "Rotation Rate 3 (degrees/s)")
rot_rate3_label.grid(row=9, column=0, padx=5)
rot_rate3_entry = tk.Entry(window)
rot_rate3_entry.grid(row=9, column=1, padx=5)
rot_rate3_entry.insert(0, 0.0)
rot_rate4_label = tk.Label(window,
text = "Rotation Rate 4 (degrees/s)")
rot_rate4_label.grid(row=10, column=0, padx=5)
rot_rate4_entry = tk.Entry(window)
rot_rate4_entry.grid(row=10, column=1, padx=5)
rot_rate4_entry.insert(0, -7.0)
point_exec_no_wp_button = tk.Button(window,
text = "Point Execution (No Waypoints)",
command=lambda: point_execution_no_wp(
float(destination_x_entry.get()),
float(destination_y_entry.get()),
float(destination_orientation_entry.get()),
float(deadline_entry.get())))
point_exec_no_wp_button.grid(row=11,
column=0, columnspan=2, padx=5, pady=5)
destination_x_label = tk.Label(window,
text = "Destination X (ft)")
destination_x_label.grid(row=12, column=0, padx=5)
destination_x_entry = tk.Entry(window)
destination_x_entry.grid(row=12, column=1, padx=5)
destination_x_entry.insert(0, 5.0)
destination_y_label = tk.Label(window,
text = "Destination Y (ft)")
destination_y_label.grid(row=13, column=0, padx=5)
destination_y_entry = tk.Entry(window)
destination_y_entry.grid(row=13, column=1, padx=5)
destination_y_entry.insert(0, 5.0)
destination_orientation_label = tk.Label(window,
text = "Destination Orientation (degrees)")
destination_orientation_label.grid(row=14, column=0,padx=5)
destination_orientation_entry = tk.Entry(window)
destination_orientation_entry.grid(row=14, column=1,padx=5)
destination_orientation_entry.insert(0, -45.0)
deadline_label = tk.Label(window,
text = "Deadline (seconds)")
deadline_label.grid(row=15, column=0, padx=5)
deadline_entry = tk.Entry(window)
deadline_entry.grid(row=15, column=1, padx=5)
deadline_entry.insert(0, 5.0)
point_exec_with_wp_button = tk.Button(window,
text = "Point Execution (With Waypoints)",
command=lambda: point_execution_with_wp(
float(wp_x1_entry.get()), float(wp_y1_entry.get()),
float(wp_x2_entry.get()), float(wp_y2_entry.get()),
float(wp_x3_entry.get()), float(wp_y3_entry.get()),
float(wp_xfinal_entry.get()), float(wp_yfinal_entry.get()),
float(destination_orientationwp_final_entry.get()),
float(deadlinewp_entry.get())))
point_exec_with_wp_button.grid(row=16, column=0,
columnspan=4, padx=5, pady=5)
wp_x1_label = tk.Label(window, text = "Waypoint X1 (ft)")
wp_x1_label.grid(row=17, column=0, padx=5)
wp_x1_entry = tk.Entry(window)
wp_x1_entry.grid(row=17, column=1, padx=5)
wp_x1_entry.insert(0, 5.0)
wp_y1_label = tk.Label(window, text = "Waypoint Y1 (ft)")
wp_y1_label.grid(row=18, column=0, padx=5)
wp_y1_entry = tk.Entry(window)
wp_y1_entry.grid(row=18, column=1, padx=5)
wp_y1_entry.insert(0, 5.0)
wp_x2_label = tk.Label(window, text = "Waypoint X2 (ft)")
wp_x2_label.grid(row=19, column=0, padx=5)
wp_x2_entry = tk.Entry(window)
wp_x2_entry.grid(row=19, column=1, padx=5)
wp_x2_entry.insert(0, 5.0)
wp_y2_label = tk.Label(window, text = "Waypoint Y2 (ft)")
wp_y2_label.grid(row=20, column=0, padx=5)
wp_y2_entry = tk.Entry(window)
wp_y2_entry.grid(row=20, column=1, padx=5)
wp_y2_entry.insert(0, -5.0)
wp_x3_label = tk.Label(window, text = "Waypoint X3 (ft)")
wp_x3_label.grid(row=21, column=0, padx=5)
wp_x3_entry = tk.Entry(window)
wp_x3_entry.grid(row=21, column=1, padx=5)
wp_x3_entry.insert(0, -5.0)
wp_y3_label = tk.Label(window, text = "Waypoint Y3 (ft)")
wp_y3_label.grid(row=22, column=0, padx=5)
wp_y3_entry = tk.Entry(window)
wp_y3_entry.grid(row=22, column=1, padx=5)
wp_y3_entry.insert(0, 5.0)
wp_xfinal_label = tk.Label(window,
text = "Destination X Final (ft)")
wp_xfinal_label.grid(row=17, column=2, padx=5)
wp_xfinal_entry = tk.Entry(window)
wp_xfinal_entry.grid(row=17, column=3, padx=5)
wp_xfinal_entry.insert(0, -5.0)
wp_yfinal_label = tk.Label(window,
text = "Destination Y Final (ft)")
wp_yfinal_label.grid(row=18, column=2, padx=5)
wp_yfinal_entry = tk.Entry(window)
wp_yfinal_entry.grid(row=18, column=3, padx=5)
wp_yfinal_entry.insert(0, -5.0)
destination_orientationwp_final_label = tk.Label(
window, text = "Destination Orientation (degrees)")
destination_orientationwp_final_label.grid(row=19,
column=2, padx=5)
destination_orientationwp_final_entry = tk.Entry(window)
destination_orientationwp_final_entry.grid(row=19,
column=3, padx=5)
destination_orientationwp_final_entry.insert(0, 90.0)
deadlinewp_label = tk.Label(window,
text = "Deadline (seconds)")
deadlinewp_label.grid(row=20, column=2, padx=5)
deadlinewp_entry = tk.Entry(window)
deadlinewp_entry.grid(row=20, column=3, padx=5)
deadlinewp_entry.insert(0, 5.0)
move_in_a_circle_button = tk.Button(window, text = "Move in a Circle",
command=lambda: move_in_a_circle(
float(radius_entry.get()),
float(cir_direction_entry.get()),
float(cir_deadline_entry.get())))
move_in_a_circle_button.grid(row=2, column=2, columnspan=2, padx=5, pady=5)
radius_label = tk.Label(window, text = "Radius (ft)")
radius_label.grid(row=3, column=2, padx=5)
radius_entry = tk.Entry(window)
radius_entry.grid(row=3, column=3, padx=5)
radius_entry.insert(0, 2.0)
cir_direction_label = tk.Label(window, text = "Circle Center Direction (degrees)")
cir_direction_label.grid(row=4, column=2, padx=5)
cir_direction_entry = tk.Entry(window)
cir_direction_entry.grid(row=4, column=3, padx=5)
cir_direction_entry.insert(0, 45.0)
cir_deadline_label = tk.Label(window, text = "Deadline (seconds)")
cir_deadline_label.grid(row=5, column=2, padx=5)
cir_deadline_entry = tk.Entry(window)
cir_deadline_entry.grid(row=5, column=3, padx=5)
cir_deadline_entry.insert(0, 5.0)
move_in_a_rectangle_button = tk.Button(window,
text = "Move in a Rectangle",
command=lambda: move_in_a_rectangle(
float(length_entry.get()),
float(direc_opp_vrtx_entry.get()),
float(rect_deadline_entry.get())))
move_in_a_rectangle_button.grid(row=6, column=2, columnspan=2, padx=5, pady=5)
length_label = tk.Label(window, text = "Length (ft)")
length_label.grid(row=7, column=2, padx=5)
length_entry = tk.Entry(window)
length_entry.grid(row=7, column=3, padx=5)
length_entry.insert(0, 5.0)
direc_opp_vrtx_label = tk.Label(window, text = "Direction of Opposite Vertex (degrees)")
direc_opp_vrtx_label.grid(row=8, column=2, padx=5)
direc_opp_vrtx_entry = tk.Entry(window)
direc_opp_vrtx_entry.grid(row=8, column=3, padx=5)
direc_opp_vrtx_entry.insert(0, 25.0)
rect_deadline_label = tk.Label(window, text = "Deadline (seconds)")
rect_deadline_label.grid(row=9, column=2, padx=5)
rect_deadline_entry = tk.Entry(window)
rect_deadline_entry.grid(row=9, column=3, padx=5)
rect_deadline_entry.insert(0, 5.0)
fig8_button = tk.Button(window,
text = "Move in a Figure 8",
command=lambda: move_in_a_figure_eight(
float(circle1_radius_entry.get()),
float(circle2_radius_entry.get()),
float(direction_circle1_entry.get()),
float(fig_8_deadline_entry.get())))
fig8_button.grid(row=10, column=2, columnspan=2, padx=5, pady=5)
circle1_radius_label = tk.Label(window, text = "Circle 1 Radius (ft)")
circle1_radius_label.grid(row=11, column=2, padx=5)
circle1_radius_entry = tk.Entry(window)
circle1_radius_entry.grid(row=11, column=3, padx=5)
circle1_radius_entry.insert(0, 2.0)
circle2_radius_label = tk.Label(window, text = "Circle 2 Radius (ft)")
circle2_radius_label.grid(row=12, column=2, padx=5)
circle2_radius_entry = tk.Entry(window)
circle2_radius_entry.grid(row=12, column=3, padx=5)
circle2_radius_entry.insert(0, 4.0)
direction_circle1_label = tk.Label(window, text = "Direction of Circle 1 (degrees)")
direction_circle1_label.grid(row=13, column=2, padx=5)
direction_circle1_entry = tk.Entry(window)
direction_circle1_entry.grid(row=13, column=3, padx=5)
direction_circle1_entry.insert(0, 90.0)
fig_8_deadline_label = tk.Label(window, text = "Deadline (seconds)")
fig_8_deadline_label.grid(row=14, column=2, padx=5)
fig_8_deadline_entry = tk.Entry(window)
fig_8_deadline_entry.grid(row=14, column=3, padx=5)
fig_8_deadline_entry.insert(0, 20.0)
# Vehicle Position Display
veh_pos_label = tk.Label(window,
text = ("Vehicle Position"))
veh_pos_label.grid(row=2, column=4, padx=5)
veh_x_pos_label = tk.Label(window,
text = ("X: " + "0.0" + " feet"))
veh_x_pos_label.grid(row=3, column=4, padx=5)
veh_y_pos_label = tk.Label(window,
text = ("Y: " + "0.0" + " feet"))
veh_y_pos_label.grid(row=4, column=4, padx=5)
veh_orientation_label = tk.Label(window,
text = ("Orientation: " + "0.0" + " degrees"))
veh_orientation_label.grid(row=5, column=4, padx=5)
# Wheel Rotation Rates display
wheel_rot_rates_label = tk.Label(window,
text = ("Wheel Rotation Rates"))
wheel_rot_rates_label.grid(row=6, column=4, padx=5)
# Add new rotation rates to display window
wheel_1_rot_label = tk.Label(window,
text = ("Wheel 1: " + "0.0" + " degrees/s"))
wheel_1_rot_label.grid(row=7, column=4, padx=5)
wheel_2_rot_label = tk.Label(window,
text = ("Wheel 2: " + "0.0" + " degrees/s"))
wheel_2_rot_label.grid(row=8, column=4, padx=5)
wheel_3_rot_label = tk.Label(window,
text = ("Wheel 3: " + "0.0" + " degrees/s"))
wheel_3_rot_label.grid(row=9, column=4, padx=5)
wheel_4_rot_label = tk.Label(window,
text = ("Wheel 4: " + "0.0" + " degrees/s"))
wheel_4_rot_label.grid(row=10, column=4, padx=5)
# Robot Velocity Display
robot_velocity_label = tk.Label(window,
text = ("Robot Velocity (Local)"))
robot_velocity_label.grid(row=11, column=4, padx=5)
robot_velocity_x_label = tk.Label(window,
text = ("Velocity X: " + "0.0" + " ft/s"))
robot_velocity_x_label.grid(row=12, column=4, padx=5)
robot_velocity_y_label = tk.Label(window,
text = ("Velocity Y: " + "0.0" + " ft/s"))
robot_velocity_y_label.grid(row=13, column=4, padx=5)
# Error Messages
error_label = tk.Label(window,
text = ("Error Log"))
error_label.grid(row=14, column=4,
padx=5, pady=25)
# Quit button
exit_button = tk.Button(window, text = "Exit",
command=close_window)
exit_button.grid(row=0, column=4, columnspan=2,
padx=5, pady=5, ipadx=50)
window.mainloop()