
In this tutorial, we will learn how to set up an extended Kalman filter to fuse wheel encoder odometry information and IMU sensor information to create a better estimate of where a robot is located in the environment (i.e. localization).

We will fuse odometry data (based on wheel encoder tick counts) with data from an IMU sensor (i.e. “sensor fusion”) to generate improved odometry data so that we can get regular estimates of the robot’s position and orientation as it moves about its environment. Accurate information is important for enabling a robot to navigate properly and build good maps.
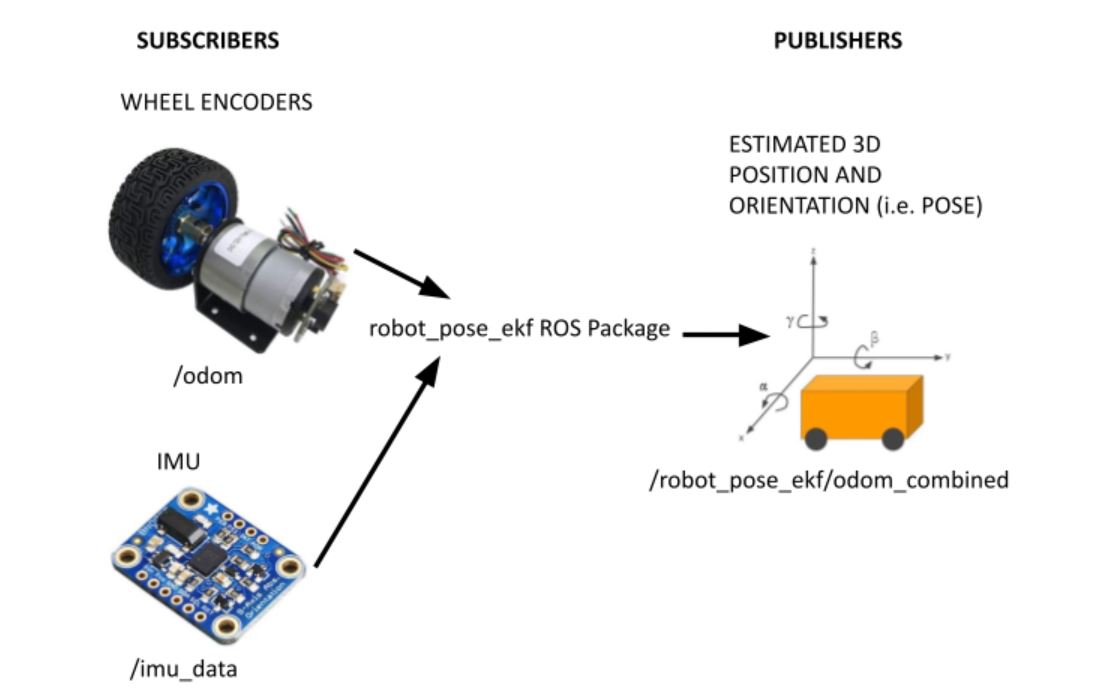
An extended Kalman filter is the work horse behind all this. It provides a more robust estimate of the robot’s pose than using wheel encoders or IMU alone. The way to do this using ROS is to use the robot_pose_ekf package.
Real-World Applications
This project has a number of real-world applications:
- Indoor Delivery Robots
- Room Service Robots
- Mapping of Underground Mines, Caves, and Hard-to-Reach Environments
- Robot Vacuums
- Order Fulfillment
- Factories
Prerequisites
- You have already set up your NVIDIA Jetson Nano (4GB, B01) with ROS. You can also use an Ubuntu-enabled Raspberry Pi that has ROS installed.
- You have created an IMU data publisher.
- You have created a wheel odometry publisher.
Install the robot_pose_ekf Package
Let’s begin by installing the robot_pose_ekf package. Open a new terminal window, and type:
sudo apt-get install ros-melodic-robot-pose-ekf
We are using ROS Melodic. If you are using ROS Noetic, you will need to substitute in ‘noetic’ for ‘melodic’.
Now move to your workspace.
cd ~/catkin_ws
Build the package.
catkin_make
Add the the robot_pose_ekf node to a ROS Launch File
To launch the robot_pose_ekf node, you will need to add it to a launch file. Before we do that, let’s talk about the robot_pose_ekf node.
About the robot_pose_ekf Node
The robot_pose_ekf node will subscribe to the following topics (ROS message types are in parentheses):
- /odom : Position and velocity estimate based on the information from the wheel encoder tick counts. The orientation is in quaternion format. (nav_msgs/Odometry)
- /imu_data : Data from the Inertial Measurement Unit (IMU) sensor (sensor_msgs/Imu.msg)
This node will publish data to the following topics:
- /robot_pose_ekf/odom_combined : The output of the filter…the estimated 3D robot pose (geometry_msgs/PoseWithCovarianceStamped)
Create the Launch File
You might now be asking, how do we give the robot_ekf_pose node the data it needs?
The data for /odom will come from the /odom_data_quat topic. The publisher for this topic is the node we created in this post.
The data for /imu_data will come from the /imu/data topic. The publisher for this topic is the node we created in this post.
In the launch file, we need to remap the data coming from the /odom_data_quat and /imu/data topics since the robot_pose_ekf node needs the topic names to be /odom and /imu_data, respectively.
Here is my full launch file. Don’t worry about trying to understand the static transform publishers at the top. I’ll cover that in a later post:
<launch>

  <!-- Transformation Configuration ... Setting Up the Relationships Between Coordinate Frames -->
  <node pkg="tf" type="static_transform_publisher" name="base_link_to_laser" args="0.06 0 0.08 0 0 0 base_link laser 30" />
  <node pkg="tf" type="static_transform_publisher" name="imu_broadcaster" args="0 0.06 0.02 0 0 0 base_link imu 30" />
  <node pkg="tf" type="static_transform_publisher" name="base_link_broadcaster" args="0 0 0.09 0 0 0 base_footprint base_link 30" />
  <!-- odom to base_footprint transform will be provided by the robot_pose_ekf node -->

  <!-- Wheel Encoder Tick Publisher and Base Controller Using Arduino -->
  <!-- motor_controller_diff_drive_2.ino is the Arduino sketch -->
  <!-- Subscribe: /cmd_vel -->
  <!-- Publish: /right_ticks, /left_ticks -->
  <node pkg="rosserial_python" type="serial_node.py" name="serial_node">
    <param name="port" value="/dev/ttyACM0"/>
    <param name="baud" value="115200"/>
  </node>

  <!-- Wheel Odometry Publisher -->
  <!-- Subscribe: /right_ticks, /left_ticks, /initial_2d -->
  <!-- Publish: /odom_data_euler, /odom_data_quat -->
  <node pkg="localization_data_pub" type="ekf_odom_pub" name="ekf_odom_pub">
  </node>

  <!-- IMU Data Publisher Using the BNO055 IMU Sensor -->
  <!-- Publish: /imu/data -->
  <node ns="imu" name="imu_node" pkg="imu_bno055" type="bno055_i2c_node" respawn="true" respawn_delay="2">
    <param name="device" type="string" value="/dev/i2c-1"/>
    <param name="address" type="int" value="40"/> <!-- 0x28 == 40 is the default for BNO055 -->
    <param name="frame_id" type="string" value="imu"/>
  </node>

  <!-- Extended Kalman Filter from robot_pose_ekf Node-->
  <!-- Subscribe: /odom, /imu_data, /vo -->
  <!-- Publish: /robot_pose_ekf/odom_combined -->
  <remap from="odom" to="odom_data_quat" />
  <remap from="imu_data" to="imu/data" />
  <node pkg="robot_pose_ekf" type="robot_pose_ekf" name="robot_pose_ekf">
    <param name="output_frame" value="odom"/>
    <param name="base_footprint_frame" value="base_footprint"/>
    <param name="freq" value="30.0"/>
    <param name="sensor_timeout" value="1.0"/>
    <param name="odom_used" value="true"/>
    <param name="imu_used" value="true"/>
    <param name="vo_used" value="false"/>
    <param name="gps_used" value="false"/>
    <param name="debug" value="false"/>
    <param name="self_diagnose" value="false"/>
  </node>

  <!-- Initial Pose and Goal Publisher -->
  <!-- Publish: /initialpose, /move_base_simple/goal -->
  <node pkg="rviz" type="rviz" name="rviz">
  </node>

  <!-- Subscribe: /initialpose, /move_base_simple/goal -->
  <!-- Publish: /initial_2d, /goal_2d -->
  <node pkg="localization_data_pub" type="rviz_click_to_2d" name="rviz_click_to_2d">
  </node>

</launch>
You can check out this post to learn how to run ROS launch files.
That’s it. Keep building!