In this tutorial, I will show you how to navigate using speed limit zones using the ROS 2 Navigation Stack (also known as Nav2). A speed limit zone is an area which limits the maximum speed of a robot. Here is the final output you will be able to achieve after going through this tutorial:
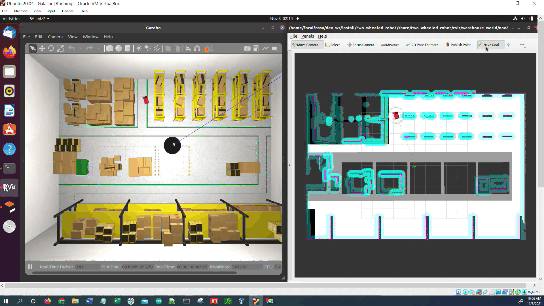
Notice how the robot moves slower through the gray/black areas than the white areas of the map.
Real-World Applications
The application that we will develop in this tutorial can be used in a number of real-world robotic applications:
- Hospitals and Medical Centers
- Hotels (e.g. Room Service)
- House
- Offices
- Restaurants
- Warehouses
- And more…
We will focus on creating an application that will limit the speed of a robot in certain areas of a warehouse or factory floor.
Prerequisites
- ROS 2 Foxy Fitzroy installed on Ubuntu Linux 20.04 or newer. I am using ROS 2 Galactic, which is the latest version of ROS 2 as of the date of this post.
- You have already created a ROS 2 workspace. The name of our workspace is “dev_ws”, which stands for “development workspace.”
- You have Python 3.7 or higher.
- (Optional) You have completed my Ultimate Guide to the ROS 2 Navigation Stack.
- (Optional) You have a package named two_wheeled_robot inside your ~/dev_ws/src folder, which I set up in this post. If you have another package, that is fine.
- (Optional) You know how to load a world file into Gazebo using ROS 2.
You can find the files for this post here on my Google Drive. Credit to this GitHub repository for the map files. And credit to this tutorial that shows the steps for implementing a speed limit filter.
Create a World
Open a terminal window, and move to your package.
cd ~/dev_ws/src/two_wheeled_robot/worlds
Make sure this world is inside this folder. The name of the file is warehouse_speed_limit_zones.world.
Create a Map
Open a terminal window, and move to your package.
cd ~/dev_ws/src/two_wheeled_robot/maps/warehouse_world
Make sure the pgm and yaml map files are inside this folder.
My world map is made up of two files:
- warehouse_world_speed_limit_zones.pgm
- warehouse_world_speed_limit_zones.yaml
Create a Speed Limit Filter
Now we need to create a mask that identifies the speed limit zones.
This tutorial has instructions on how to use a graphics editor like GIMP (you can install using the sudo apt-get install gimp command) to prepare the filter mask.
You will start with a copy of the world file you want to use. In this tutorial, I am going to use my warehouse_world_speed_limit_zones.pgm file. You need to edit this file so that speed limit zones are different shades of gray….the darker the gray, the lower the speed limit.
My filter mask is made up of two files:
- speed_mask.pgm
- speed_mask.yaml
Both of these files are located in my ~/dev_ws/src/two_wheeled_robot/maps/warehouse_world/ folder.
Create the Parameters File
Let’s create the parameters file.
Open a terminal window, and move to your package.
cd ~/dev_ws/src/two_wheeled_robot/params/warehouse_world
Add the speed_limit_zones_params.yaml file from this folder.
Create the RViz Configuration File
Let’s create the RViz configuration file.
Open a terminal window, and move to your package.
cd ~/dev_ws/src/two_wheeled_robot/rviz/warehouse_world
Add the nav2_config_speed_limit_zones.rviz file from this folder.
Create the Launch File
Let’s create the launch file.
Open a terminal window, and move to your package.
cd ~/dev_ws/src/two_wheeled_robot/launch/warehouse_world
Add the warehouse_world_speed_limit_zones.launch.py file from this folder.
Launch the Launch File
We will now build our package.
cd ~/dev_ws/
colcon build
Open a new terminal and launch the robot in a Gazebo world.
ros2 launch two_wheeled_robot warehouse_world_speed_limit_zones.launch.py
Wait for the robot to snap to the estimated initial location within RViz. This process should take a minute or two.
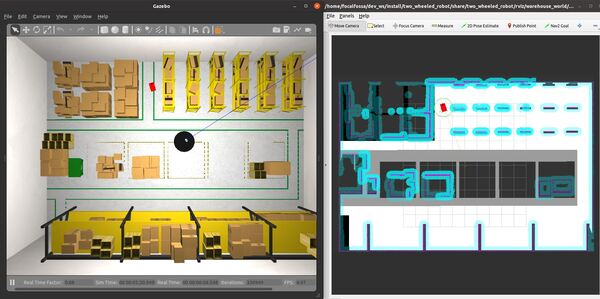
You might notice that the robot’s pose in RViz is not aligned with the pose in Gazebo. Localization using the AMCL (Adaptive Monte Carlo Localization) package is really sensitive to the initial pose estimate. The trick is to make sure the initial location of the robot is in a location with a lot of distinctively shaped obstacles (i.e. the shelves and boxes) for the LIDAR to read.
Even though the initial pose was set when we launched the robot, it is likely that the estimate in RViz is pretty bad. Let’s set the initial pose again by clicking the 2D Pose Estimate button at the top of RViz and then clicking on the map.
You can also set the initial pose by opening a new terminal window and typing the following command.
ros2 topic pub -1 /initialpose geometry_msgs/PoseWithCovarianceStamped '{ header: {stamp: {sec: 0, nanosec: 0}, frame_id: "map"}, pose: { pose: {position: {x: -3.7, y: 9.0, z: 0.0}, orientation: {w: 1.0}}, } }'
When the robot snaps to the location, the map and odom axes should be pretty close to each other right at the origin of the map (x=0, y=0).
Now send the robot to a goal that is on the other side of the speed limit zones by clicking the “Nav2 Goal” button at the top of RViz and clicking on a goal location.
The robot will move to the goal, slowing down in the speed limit zones.
A success message will print once the robot has reached the goal location.
That’s it! Keep building!