Consider a tripod-wheeled (i.e. three-wheeled) unmanned ground vehicle whose motors and wheels look like this:
Two rear wheels that are connected by an axle and a free turning wheel that is in the front.
How will the vehicle move if the right rear wheel is larger than the left? Assume that the free turning wheel remains the same size, and an axle connects the left wheel to the right wheel.
The motion of a point has two types of motion, linear velocity and angular velocity. Because both wheels are connected by the same axle, the big right rear wheel and the relatively smaller left rear wheel will both rotate at the same rates. Therefore, they will have the same angular velocity.
Angular velocity (often denoted as ω) is the rate of change of the angle Ɵ. It is the number of radians (or degrees) the angle Ɵ is changing in a given amount of time.
ω = Ɵ/t
Linear velocity (denoted as v) is the rate of change of the distance traveled of the wheel. Linear velocity is related to angular velocity by the following equation, where r is the radius of the wheel.
v = rω
Therefore, the larger the wheel, the more distance it will travel given the same amount of rotation.
What does this mean for the tripod vehicle that has a right rear wheel that is larger than the left? The right rear wheel is going to cover a lot more distance on the ground in a given amount of time than the left rear wheel it is connected to. This means that, assuming the vehicle is trying to go forward, the vehicle will continuously move in a counter-clockwise direction.
Here is the diagram. Note that the big wheel has a larger radius (denoted as R) than the smaller wheel (denoted as r):
How will the vehicle move if the front turning wheel is larger than the two rear wheels? Assume the two rear wheels are equal in size and are connected by a single axle.
A larger wheel will cover a greater distance over the ground than a smaller wheel given the same amount of rotation (in either radians or degrees) per unit time. Therefore, equipping the vehicle with a larger steering wheel will enable the vehicle to move faster, holding all other wheels constant at ‘normal’.
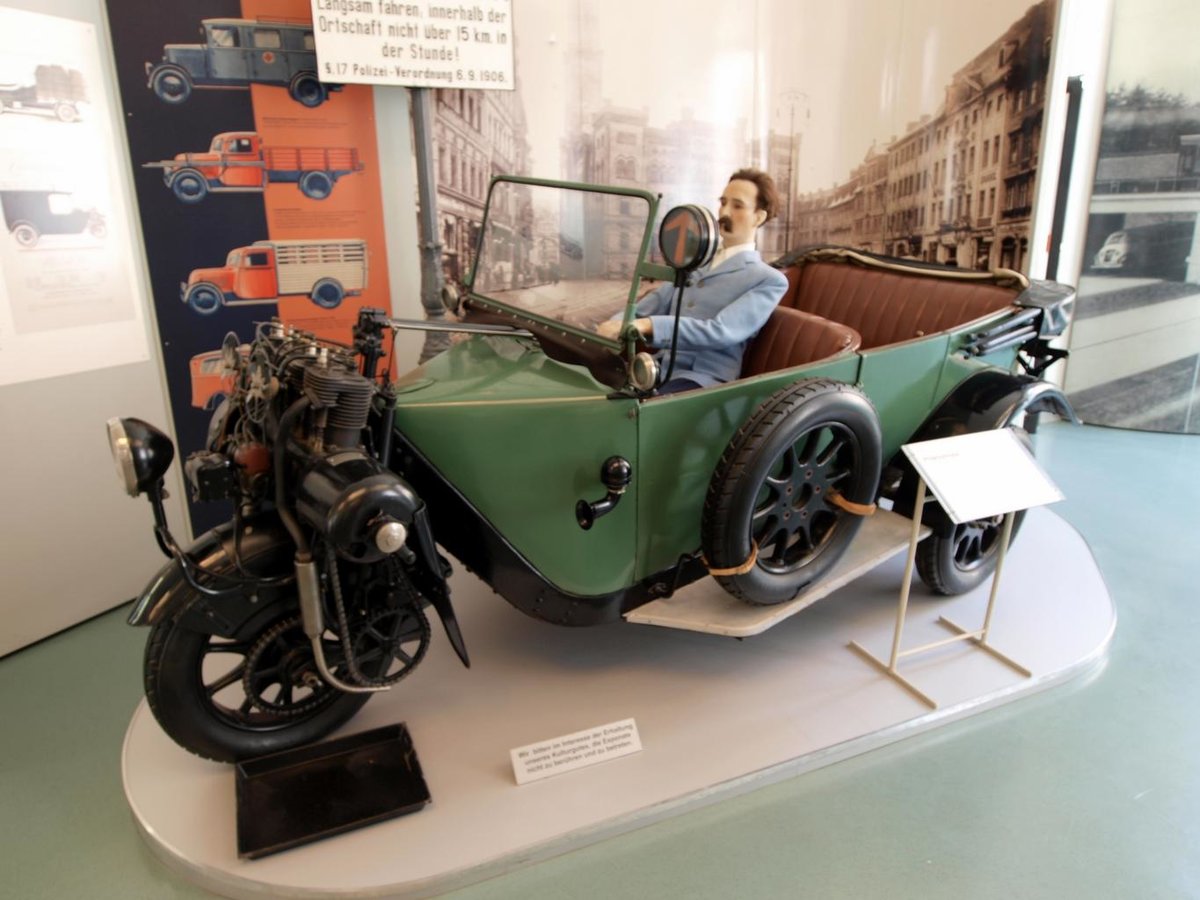
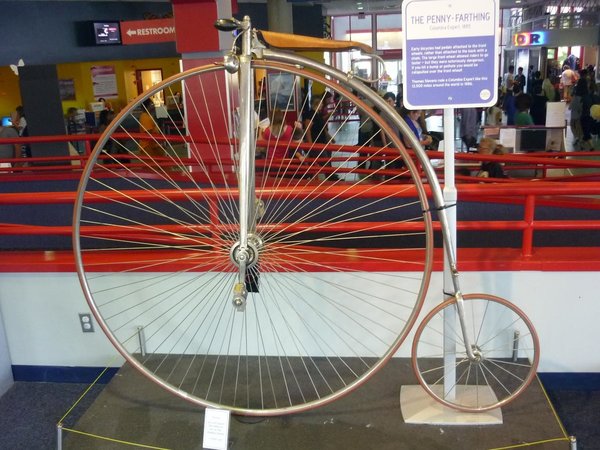
In fact, the penny-farthing bicycles of the 1800s as well as the big wheel tricycles of the 1970s took advantage of this fact. Each had a large front wheel (and two normal rear wheels) that enabled the vehicle to move faster given a certain amount of rotation (i.e. pedaling in those cases).
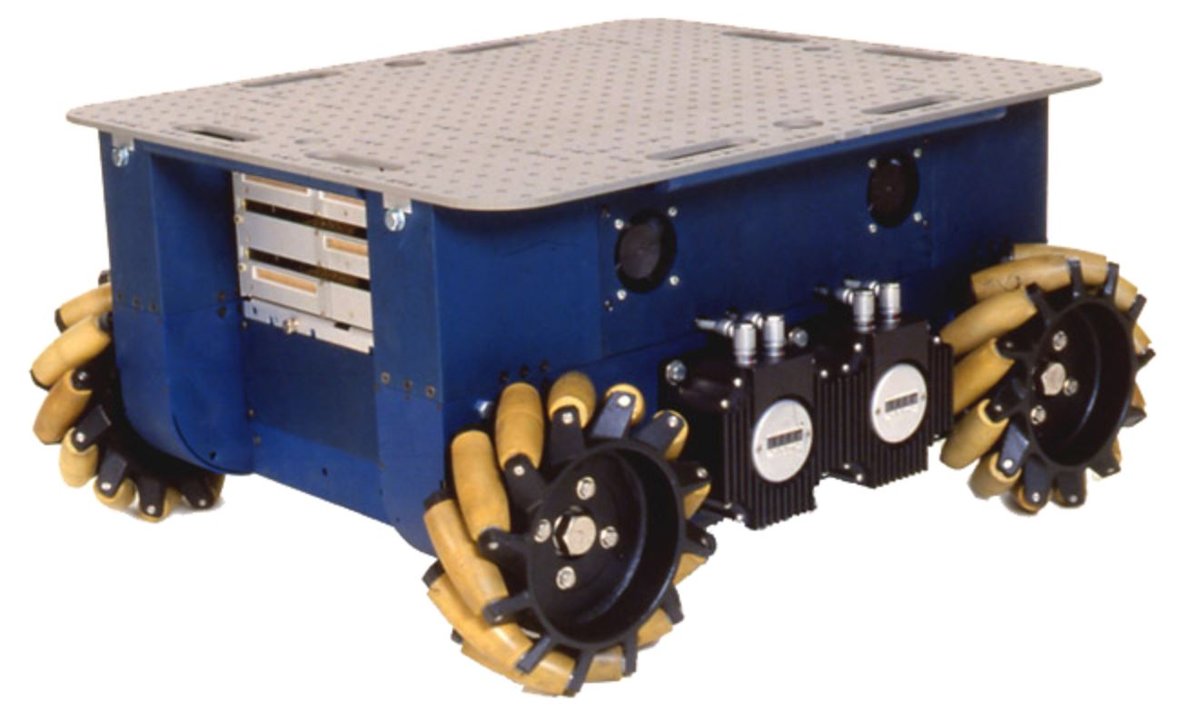
In this post, we will take a look out how to draw the force vector diagrams for an omni-directional mobile robot with Mecanum wheels. But before we do that, let’s take a look at a few real-world applications of these vehicles.
Industrial forklifts: Moving long loads sideways through narrow aisles and doors.
Military: Rescue missions and hazardous environment exploration in tight spaces.
Medical: Powered wheelchairs that can maneuver in congested areas.
Aviation: Transport of helicopters or large pieces of aircraft
Below is a video of Mecanum-wheeled robots helping to move a piece of a passenger train.
Here is a Mecanum-wheeled robot transporting a helicopter.
Here is a sports car design that uses Mecanum wheels. Makes parallel parking a breeze!
Force Vector Diagrams
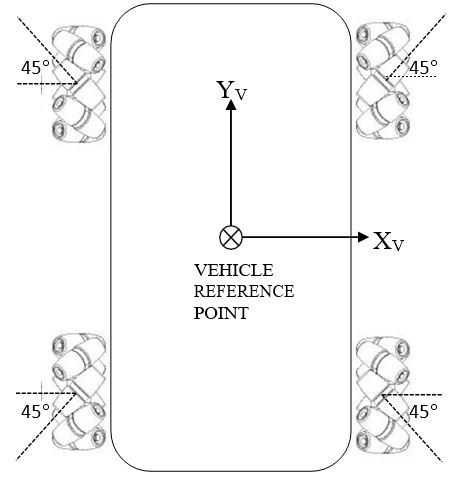
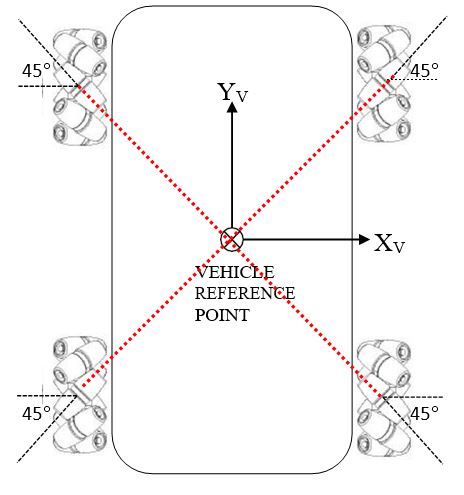
The robot schematic diagram below consists of four Mecanum wheels. Each wheel is driven by a motor and contains a set of passive rubber cylinders that are oriented at an angle of 45° to the axis of rotation of the wheel (the axis of rotation of the wheel is the imaginary line that goes through the center of the wheel).
The 45° orientation of the rollers is what gives the robot the ability to move in directions other than just forwards and backwards.
Another thing to note is that the rubber rollers of the robot are oriented as an ‘X’ (i.e. the red line below). This X configuration enables the Mecanum-wheeled robot to be able to move in any direction (I’ll show why this is the case in the force/rotation diagrams).
The rollers could also be oriented as an ‘O’ as seen from the top, but in this case, we will assume an X configuration.
Before I draw the force/rotation diagrams that cause the different directions of motion of the robot, let’s take a look at the concept of friction because it plays an important role in how the Mecanum wheels do what they do.
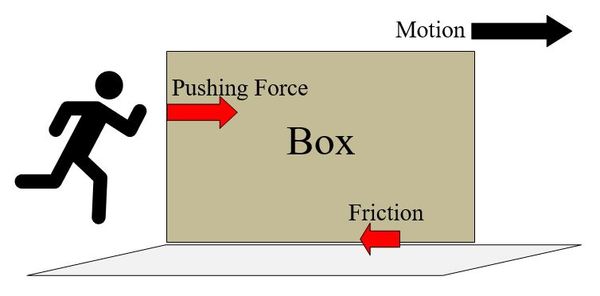
Below we have a person trying to push a box across a floor.
The person exerts a pushing force on the box. As the box moves to the right, the surface of the floor exerts a frictional force that acts in the opposite direction of the motion of the box. The person must make sure he pushes hard enough on the box to overcome that frictional force; otherwise, the box won’t move.
Similarly, in the case of the omni-directional Mecanum-wheeled robot, as the wheels rotate, each rubber roller on each wheel makes contact with the surface of the ground at an angle of 45° to the axis of rotation of the wheel.
At the moment each rubber roller makes contact with the ground, the surface of the ground exerts a frictional force that acts in the opposite direction of the force exerted on the ground surface by the rubber roller. There are four frictional forces that act on the robot simultaneously (one for each wheel). It is these forces that cause the robot to move.
In what direction does the robot move? The direction the robot moves is determined by the magnitude and direction of each of the four frictional forces.
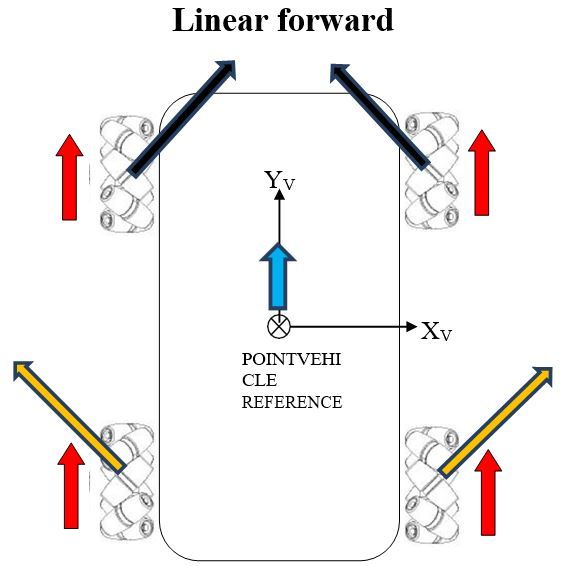
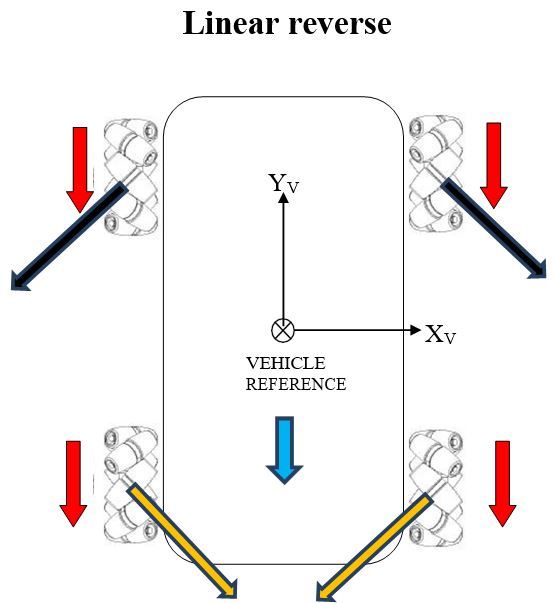
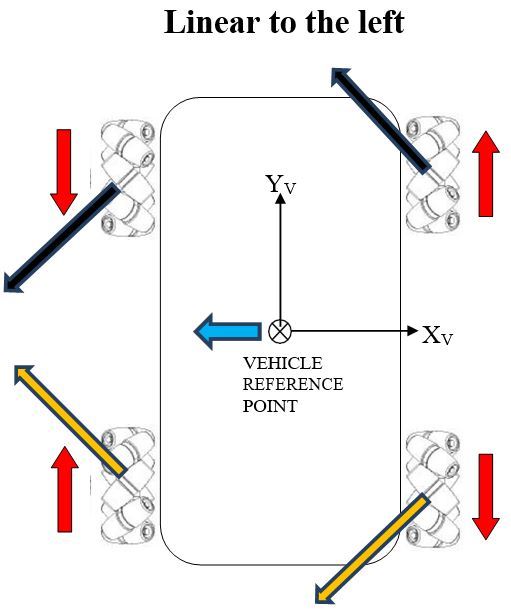
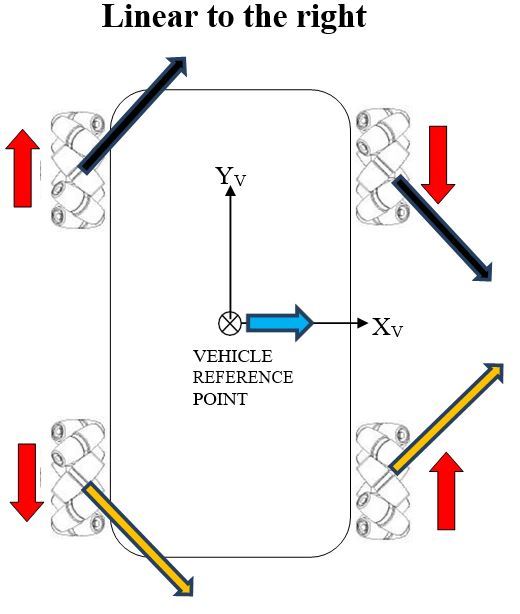
Below are the vehicle diagrams (as shown from above the robot) that show how all of this works. The diagrams show how each wheel must move, both direction and angular rate (long vector for high angular rate, short vector for small), so that the indicated motion results. The diagrams also show which way force is applied on the robot when the wheels rotate along the surface of the ground, with the key point being that the sum of the four force vectors (i.e. resultant force) equals the direction of motion of the reference point (which is located in the center of the robot).
The red arrows show the magnitude and direction of the rotation of the wheels.
The black and orange arrows show the frictional force vectors that act when the rubber roller makes contact with the ground surface. Although these vectors are shown above the robot, they act underneath the robot. They are the frictional forces that act on each rubber roller when it touches the ground surface.
The blue arrow shows the motion of the vehicle reference point.
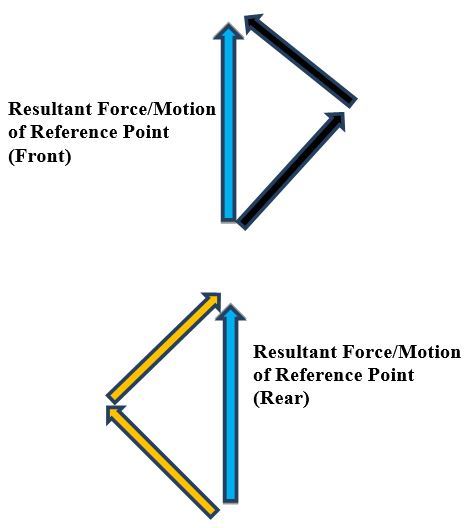
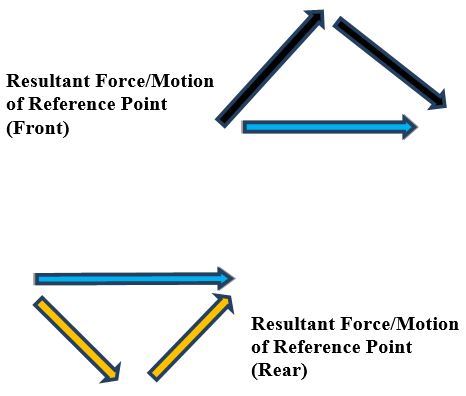
Now, we add up the force vectors on the front and rear of the robot to calculate the resultant force (i.e. motion of the robot/vehicle reference point).
Using the head-to-tail method to add the force vectors (black and orange arrows above), we see that the x-components of these force vectors on both the front and rear of the vehicle cancel out, so all that is left are the y-components. It is this net, resultant force in the positive y-direction, which results in straight-ahead, forward motion of the robot (i.e. vehicle reference point).
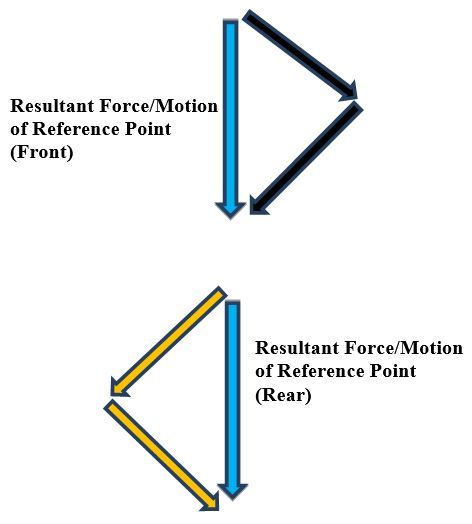
Now, we add up the force vectors on the front and rear of the robot to calculate the resultant force (i.e. motion of the robot/vehicle reference point).
Similar to the linear forward case, the x-components of the force vectors on both the front and rear of the vehicle cancel out, so all that is left are the y-components. The net force is in the negative y-direction, causing the robot (i.e. vehicle reference point) to move in reverse.
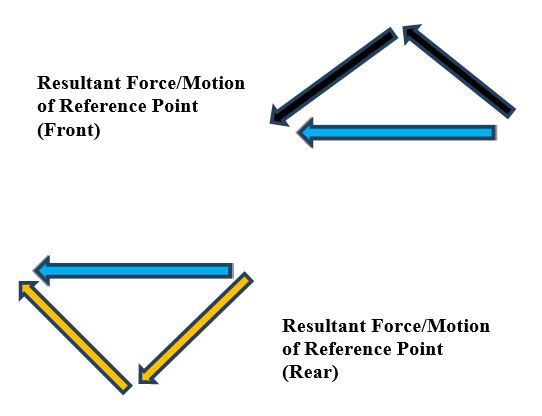
Now, we add up the force vectors on the front and rear of the robot to calculate the resultant force (i.e. motion of the robot/vehicle reference point).
Using the head-to-tail method to add the force vectors (black and orange arrows above), we see that the y-components of these force vectors on both the front and rear of the vehicle cancel out, so all that is left are the x-components. It is this net, resultant force in the negative x-direction, which causes the robot to move linearly to the left.
Now, we add up the force vectors on the front and rear of the robot to calculate the resultant force (i.e. motion of the robot/vehicle reference point).
Using the head-to-tail method to add the force vectors (black and orange arrows above), we see that the y-components of these force vectors on both the front and rear of the vehicle cancel out, so all that is left are the x-components. It is this net, resultant force in the positive x-direction which causes the robot to move in a sideways direction to the right.
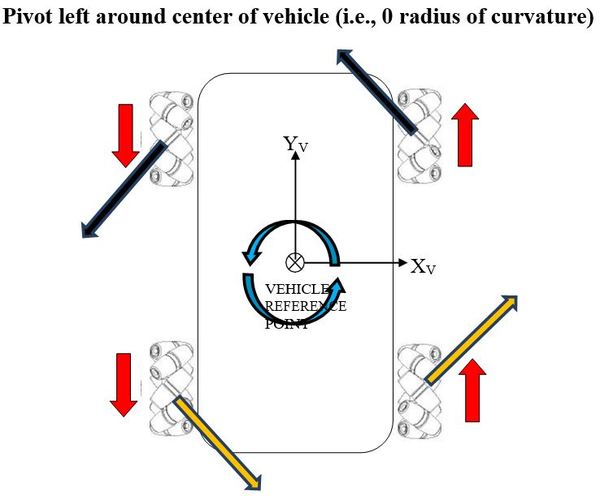
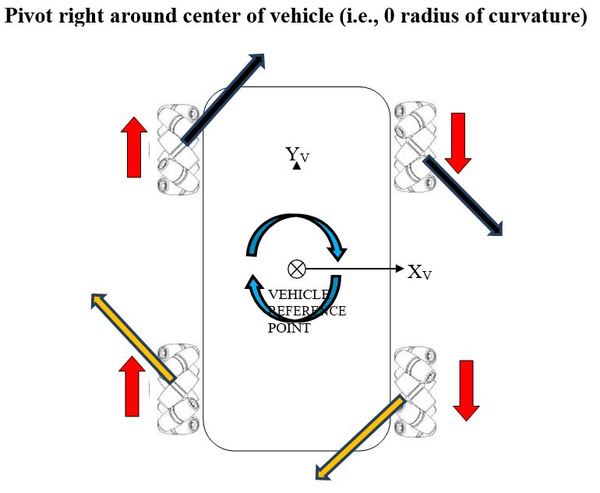
Finally, here are the force vector diagrams for when the robot spins in-place, either to the left or to the right.
Having worked with hundreds of early-stage companies as CFO of the first technology startup accelerator in Brazil, I’ve found that one of the most common reasons a business fails is because the founders build things that no one wants.
A lot of this failure happens because founders — who often have engineering backgrounds — focus so heavily on the shiny, new technology they’ve developed that they overlook the fact that businesses exist to make money by satisfying human desires.
A restaurant makes money by satisfying people’s need to eat food.
A software company makes money by satisfying people’s desire to get more things done in a shorter amount of time.
A real estate firm makes money by satisfying people’s desire for shelter.
A lemonade stand makes money by quenching people’s thirst.
Too many companies create solutions without properly identifying the problem. This happens all the time, especially in robotics.
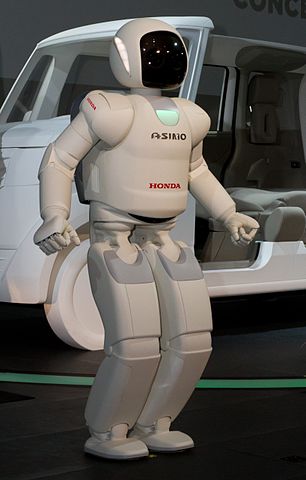
Remember ASIMO, the cute humanoid robot that Honda spent decades developing? It’s a perfect example of engineers creating a solution without a problem. It wasn’t financially viable, and Honda ceased commercial development of it in 2018.
The market wants its problems solved, its needs met, and its desires satisfied. It doesn’t care about how much effort you put into building your technology, no matter how awesome it is.
The best way to make money in the technology business is to take a human desire and use modern technology to make it faster and simpler to satisfy that desire. Start with the customer’s desire and work backwards to the technology.
Solve a big old problem with a unique solution.
Whether you plan to start a small robotics startup or you work for a Fortune 500 company as a machine learning engineer, it’s imperative that you keep the big picture in mind of why a business exists. You’re going to be spending countless hours working on some product, so make sure you:
Build things others want.
Build something that has practical, real-world commercial value.
Generate a return on your time and money.
Life is too short to waste on projects that aren’t worthwhile.
Millions of dollars and developer hours are wasted each year on products that should never have been built. In order to survive, a company has to make sure it uses its limited time and financial resources efficiently and intelligently. This is especially true in startups where money and time are so often scarce.
Before you begin investing your time and money on developing a product, take a day or two to write up a business plan. As I’ll show you below, it doesn’t need to be anything elaborate. You can put everything on just a single page.
For example, Sequoia Capital, the early investors of companies such as Apple, Google, LinkedIn, and WhatsApp, has a one-page business plan template that they recommend to founders interested in pitching them for millions of dollars in funding.
Below is the 12-point business plan template I recommend you fill in before you write the first line of code for your next project. Make sure you spend a lot of time on the two most important slides: the problem and the solution. If you get these two slides right, everything else will take care of itself.
Sample Business Plan: Autonomous Strawberry-Picking Robot
1. Purpose
We developed [product] that makes it easier and faster for [target market] to [human desire…preferably one that has been around for a long time].
Example
We developed a self-driving strawberry-picking robot that makes it easier and faster for California strawberry farmers to harvest strawberries.
2. Problem
Describe the pain of the customer.
How does the customer address this issue today?
Example
California farmers have been unable to find enough workers to harvest their fruits and vegetables, resulting in millions of dollars’ worth of produce rotting in the fields.
Farmers have hired recruiters, raised wages, increased mechanization, and adjusted cultivation practices, yet they still face millions of dollars in crop losses each year (Source: California Farm Bureau Federation).
This video below shows several interviews with farmers who are having trouble finding workers to pick strawberries.
3. Solution
What is the solution, and how does it make it easier and faster to satisfy the customer’s desire?
Example
We developed an autonomous strawberry-picking robot for farmers that is 8x more efficient than humans and can work 24 hours a day, 7 days a week.
4. Product Demo
How does the product work?
Provide use cases.
Example
Using the latest advances in computer vision and deep learning technology, the self-driving robot can pick strawberries without bruising them and detect ripeness better than humans.
Farmer Joe lost 60% of his crop last year because he was unable to find enough workers. Using the strawberry-picking robot, he can harvest his crop 24/7, while requiring up to 70% fewer seasonal workers.
5. Why Now
What recent trend makes this product feasible?
Example
Computer vision and computer processing power have matured to the point where an autonomous strawberry detection and picking system is feasible.
6. Market Size
Who does the product cater to, and how big is that market?
Farmers have tried a number of tactics, such as hiring recruiters, raising wages, increasing mechanization, and adjusting cultivation practices.
8. Competitive Advantage
What about your solution can’t be easily copied or bought?
Example
It’s hard to find someone with more integrated knowledge of both robotics and entrepreneurship to lead the design, development, and deployment of a financially viable robotics product.
Existing customers and switching costs.
9. Business Model
How will you make money?
Do you have any traction?
Example
Subscription (i.e. robotics-as-a-service (RaaS))
15 existing customers, each paying a monthly fee of $2,000.
10. Marketing Plan
How will you acquire new customers?
Example
Trade shows
Door-to-door sales
11. Team
Who are you, and what are your qualifications?
Example
Addison Sears-Collins: A roboticist with over 15 years of experience across a range of industries who has founded several successful technology startups.
12. Financials and Use of Funds
What are your financial projections?
Example
Present Value of Cash Inflow = $20M
Present Value of Cash Outflow = $5M
Net Present Value = US$15M
Return of Investment = 300%
We will use the funds to hire robotics developers and researchers.
Remember Why You’re Doing What You’re Doing
Being able to clearly articulate why a particular product could contribute to business success is a rare skill among engineers. Having that entrepreneurial mindset will almost certainly separate you from the pack.