
In this tutorial, I will show you how to model any robotic arm with a URDF (Unified Robot Description Format) file and then visualize that are using RViz, a 3D visualization tool for ROS 2.
The official tutorial for creating a URDF file is here on the ROS 2 website; but that tutorial only deals with a fictitious robot.
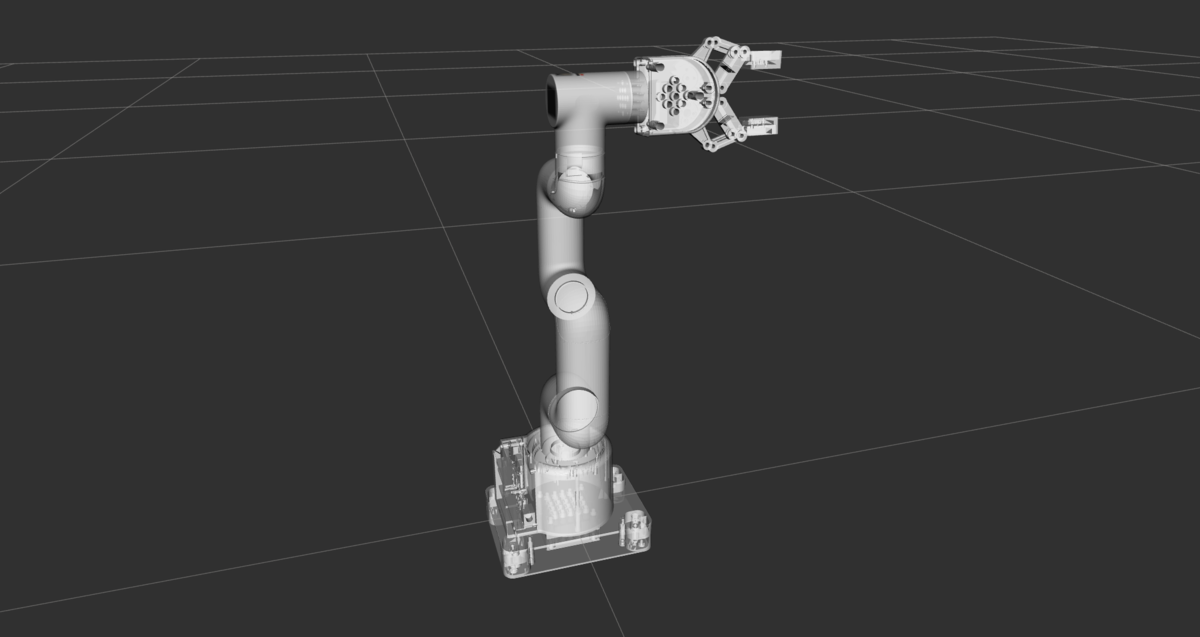
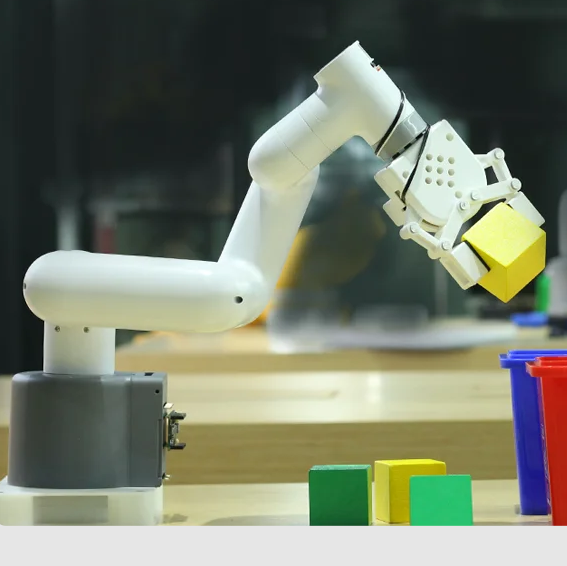
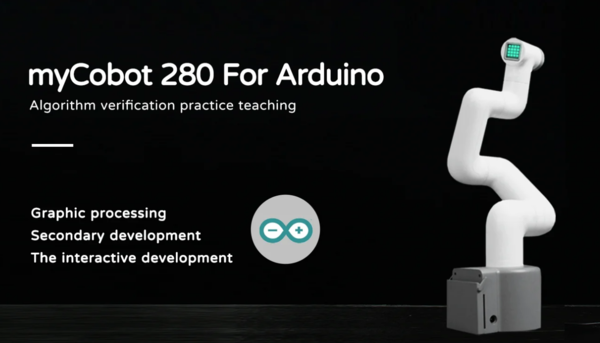
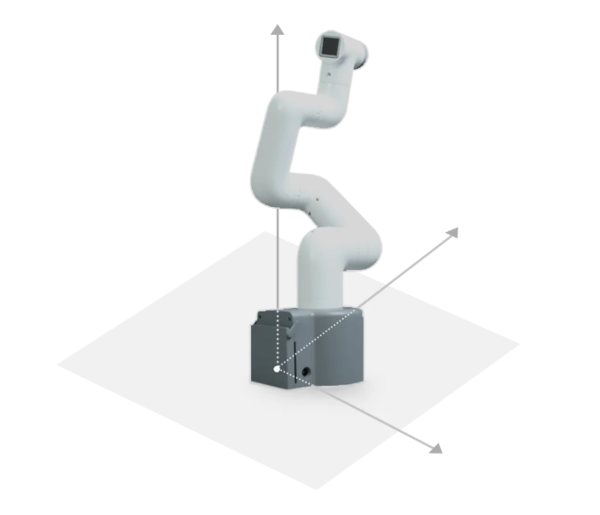
It is far more helpful to show you how to create a URDF file for a real-world robot, like the ones you will work with at your job or at school…like this one below, for example…the myCobot 280 by Elephant Robotics.
Within ROS 2, defining the URDF file of your robotic arm is important because it allows software tools to understand the robot’s structure, enabling tasks like simulation, motion planning, and sensor data interpretation. It’s like giving the robot a digital body that software can interact with.
I want you to get a lot of practice setting up different collaborative robotic arms. We will work with five popular brands.
- myCobot 280 for Arduino by Elephant Robotics
- UR3e by Universal Robots
- Gen3 Lite Robot by Kinova Robotics
- WidowX 250 Robot Arm 6DOF by Trossen Robotics
- A0509 by Doosan Robotics
I will walk through all the steps below for the myCobot 280. If you want to see how to build the URDF files for the other robotic arm models, click on any of the links above to go to that separate tutorial.
Prerequisites
- You understand what a joint and link are.
- You have created a ROS 2 workspace.
- You know what a ROS 2 package is.
Directions – myCobot 280 by Elephant Robotics
I will now show you how to create the URDF file for the myCobot 280 by Elephant Robotics. Below are some helpful reference links in case you want to learn more about this robotic arm.
Here is my GitHub repository for this robotic arm. All the files we will create in this tutorial are also stored there.
Create a Package
The first step is to create a ROS 2 package to store all your files.
Open a new terminal window, and create a new folder named mycobot_ros2.
cd ~/ros2_ws/srcmkdir mycobot_ros2cd mycobot_ros2Now create the package where we will store our URDF file.
ros2 pkg create --build-type ament_cmake --license BSD-3-Clause mycobot_descriptionCreate a metapackage.
I discuss the purpose of a metapackage in this post.
ros2 pkg create --build-type ament_cmake --license BSD-3-Clause mycobot_ros2cd mycobot_ros2rm -rf src/ include/gedit package.xmlMake your package.xml file look like this:
<?xml version="1.0"?>
<?xml-model href="http://download.ros.org/schema/package_format3.xsd" schematypens="http://www.w3.org/2001/XMLSchema"?>
<package format="3">
  <name>mycobot_ros2</name>
  <version>0.0.0</version>
  <description>myCobot series robots by Elephant Robotics (metapackage).</description>
  <maintainer email="automaticaddison@todo.todo">Addison Sears-Collins</maintainer>
  <license>BSD-3-Clause</license>

  <buildtool_depend>ament_cmake</buildtool_depend>

  <exec_depend>mycobot_description</exec_depend>

  <test_depend>ament_lint_auto</test_depend>
  <test_depend>ament_lint_common</test_depend>

  <export>
    <build_type>ament_cmake</build_type>
  </export>
</package>
Add a README.md to describe what the package is about.
gedit README.mdI also recommend adding placeholder README.md files to the mycobot_ros2 folder as well as the mycobot_description folder.
Now let’s build our new package:
cd ~/ros2_wscolcon build Let’s see if our new package is recognized by ROS 2.
Either open a new terminal window or source the bashrc file like this:
source ~/.bashrcros2 pkg listYou can see the newly created package right there at the top.

Start the URDF File
Create a new urdf folder.
mkdir -p ~/ros2_ws/src/mycobot_ros2/mycobot_description/urdf/cd mycobot_ros2(if you are using Visual Studio Code, type the following…otherwise just create the XACRO file below)
code . Create a new file inside the ~/ros2_ws/src/mycobot_ros2/mycobot_description/urdf/ folder called:
mycobot_280_urdf.xacro
XACRO files are like blueprints for URDF files, using macros and variables to simplify complex robot descriptions.
Imagine XACRO as the architect drawing up plans, and URDF as the final, ready-to-use construction document. Both represent the robotic arm, but XACRO offers more flexibility and organization.
Before a ROS tool or component can use the information in a XACRO file, it must first be processed (translated) into a URDF file. This step allows for the dynamic generation of robot descriptions based on the specific configurations defined in the XACRO file.
Now let’s create the following folder:
mkdir -p ~/ros2_ws/src/mycobot_ros2/mycobot_description/meshes/mycobot_280/Mesh files are used to visually represent the geometric shape of the robot parts in simulations and visualizations. These files are typically in formats such as STL (Stereo Lithography – .stl) or COLLADA (.dae).
Mesh files define the 3D shapes of components such as links, which are visualized in tools like RViz (ROS visualization tool) and Gazebo (a robot simulation environment).
Now go to the Downloads folder, and let’s download two packages from GitHub which contain the mesh files we need.
cd ~/Downloads/git clone https://github.com/elephantrobotics/mycobot_ros.gitcd mycobot_ros/mycobot_description/urdf/280_arduino/dirInside here you can see the mesh files (.dae) and the corresponding .png files.
sudo apt-get updatesudo apt-get upgradesudo apt-get install renamerename 's/joint/link/' *.daerename 's/joint/link/' *.pngdirCopy all the .dae and .png files inside this folder into ~/ros2_ws/src/mycobot_ros2/mycobot_description/meshes/mycobot_280/
cp *.dae *.png ~/ros2_ws/src/mycobot_ros2/mycobot_description/meshes/mycobot_280/cd ..cd mycobotcp G_base.dae ~/ros2_ws/src/mycobot_ros2/mycobot_description/meshes/mycobot_280/base_link.dae
cp gripper_base.dae ~/ros2_ws/src/mycobot_ros2/mycobot_description/meshes/mycobot_280/
cp gripper_left1.dae ~/ros2_ws/src/mycobot_ros2/mycobot_description/meshes/mycobot_280/
cp gripper_left2.dae ~/ros2_ws/src/mycobot_ros2/mycobot_description/meshes/mycobot_280/
cp gripper_left3.dae ~/ros2_ws/src/mycobot_ros2/mycobot_description/meshes/mycobot_280/
cp gripper_right1.dae ~/ros2_ws/src/mycobot_ros2/mycobot_description/meshes/mycobot_280/
cp gripper_right2.dae ~/ros2_ws/src/mycobot_ros2/mycobot_description/meshes/mycobot_280/
cp gripper_right3.dae ~/ros2_ws/src/mycobot_ros2/mycobot_description/meshes/mycobot_280/
Now go to the link#.dae files in ~/ros2_ws/src/mycobot_ros2/mycobot_description/meshes/mycobot_280/
Open every link#.dae file. Everywhere it says joint#.png, change that to link#.png (e.g. joint1.png -> link1.png).
Save the files.
Now let’s create our .xacro file for our myCobot 280 robotic arm.
cd ~/ros2_ws/src/mycobot_ros2/mycobot_description/urdf/sudo apt-get install geditgedit mycobot_280_urdf.xacroHere is what the file should look like (you will be directed to the GitHub page for this file).
Now let’s configure the CMakeLists.txt for the mycobot_description package. Make sure it looks like this:
cmake_minimum_required(VERSION 3.8)
project(mycobot_description)

# Check if the compiler being used is GNU's C++ compiler (g++) or Clang.
# Add compiler flags for all targets that will be defined later in the
# CMakeLists file. These flags enable extra warnings to help catch
# potential issues in the code.
# Add options to the compilation process
if(CMAKE_COMPILER_IS_GNUCXX OR CMAKE_CXX_COMPILER_ID MATCHES "Clang")
  add_compile_options(-Wall -Wextra -Wpedantic)
endif()

# Locate and configure packages required by the project.
find_package(ament_cmake REQUIRED)

# Copy necessary files to designated locations in the project
install (
  DIRECTORY meshes urdf
  DESTINATION share/${PROJECT_NAME}
)

# Automates the process of setting up linting for the package, which
# is the process of running tools that analyze the code for potential
# errors, style issues, and other discrepancies that do not adhere to
# specified coding standards or best practices.
if(BUILD_TESTING)
  find_package(ament_lint_auto REQUIRED)
  # the following line skips the linter which checks for copyrights
  # comment the line when a copyright and license is added to all source files
  set(ament_cmake_copyright_FOUND TRUE)
  # the following line skips cpplint (only works in a git repo)
  # comment the line when this package is in a git repo and when
  # a copyright and license is added to all source files
  set(ament_cmake_cpplint_FOUND TRUE)
  ament_lint_auto_find_test_dependencies()
endif()

ament_package()
Be sure to add the meshes and urdf file of the package.
Build the package.
cd ~/ros2_ws/colcon buildsource ~/.bashrcVisualize the URDF File
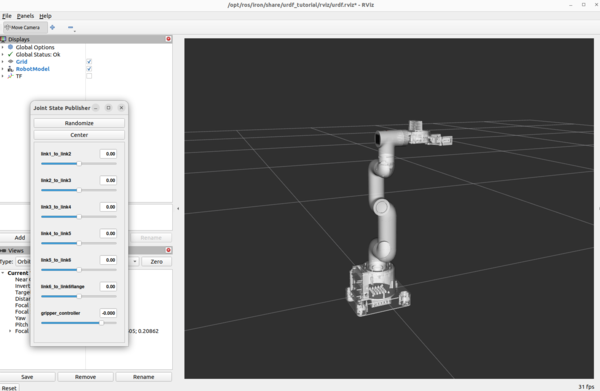
Let’s see the URDF file in RViz first.
sudo apt-get install ros-${ROS_DISTRO}-urdf-tutorialAll of this is a single command below.
ros2 launch urdf_tutorial display.launch.py model:=/home/ubuntu/ros2_ws/src/mycobot_ros2/mycobot_description/urdf/mycobot_280_urdf.xacro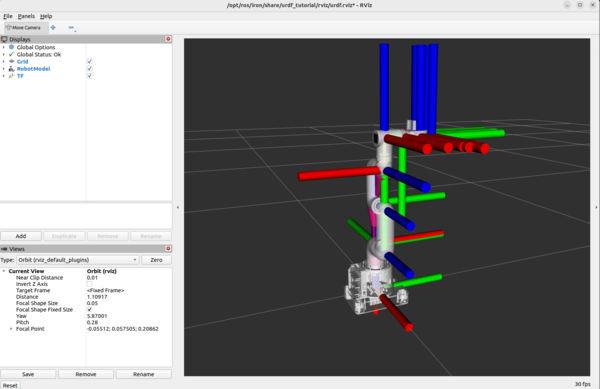
By convention, the red axis is the x-axis, the green axis in the y-axis, and the blue axis is the z-axis.
You can use the Joint State Publisher GUI pop-up window to move the links around.
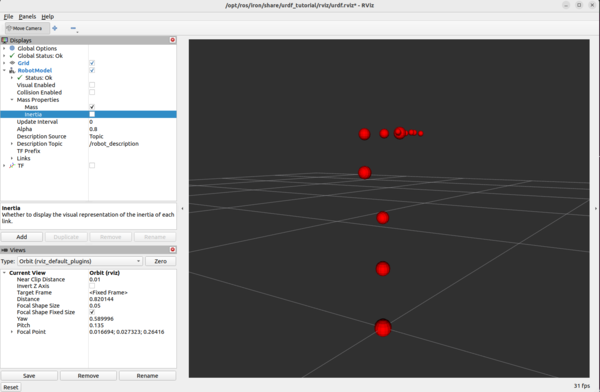
On the left panel under Displays, play around by checking and unchecking different options.
For example, under Robot Model, you can see how the mass is distributed for the robot arm by unchecking “Visual Enabled” and “Collision Enabled” and checking the “Mass” checkbox under “Mass Properties”.
You can also see what simulation engines will use to detect collisions when the robotic arm is command to go to a certain point.
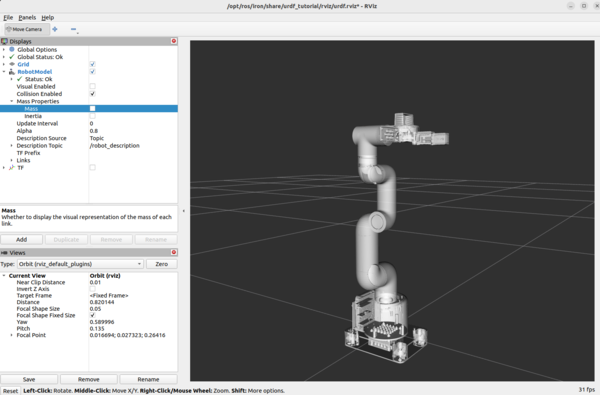
Uncheck “Visual Enabled” under Robot Model and check “Collision Enabled.”
Open a new terminal window, and type the following command.
ros2 run tf2_tools view_framesTo see the coordinate frames, type:
evince your_file_name.pdf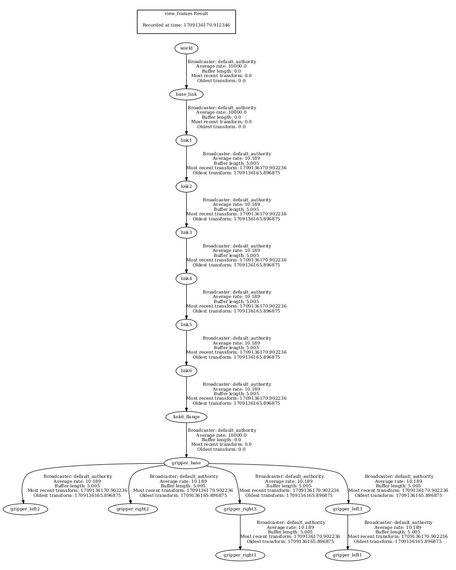
To close RViz, press CTRL + C.
So we can quickly visualize our robot in the future, let’s add a bash command that will enable us to quickly see our URDF.
echo "alias elephant='ros2 launch urdf_tutorial display.launch.py model:=/home/ubuntu/ros2_ws/src/mycobot_ros2/mycobot_description/urdf/mycobot_280_urdf.xacro'" >> ~/.bashrcTo see it was added, type:
cat ~/.bashrcI also have a bash alias called ‘build’ that will build your workspace when run. You can add this alias to the .bashrc file as follows:
echo "alias build='cd ~/ros2_ws && colcon build && source ~/.bashrc'" >> ~/.bashrcNow source the .bashrc file.
source ~/.bashrcGoing forward, if you want to see your urdf, type this command in the terminal window:
elephantUpload Your Work to GitHub (Optional)
At this stage, we have done a lot of work. You can create a GitHub repository to store your code to share it with the world.
That’s it!
Now that you’ve gained some experience building a URDF file from scratch, try building a URDF for other robotic arms. Follow the links at the beginning of this post for those tutorials.