

In this tutorial, we will build a program that can determine the orientation of an object (i.e. rotation angle in degrees) using the popular computer vision library OpenCV.
Real-World Applications
One of the most common real-world use cases of the program we will develop in this tutorial is when you want to develop a pick and place system for robotic arms. Determining the orientation of an object on a conveyor belt is key to determining the appropriate way to grasp the object, pick it up, and place it in another location.
Let’s get started!
Prerequisites
Installation and Setup
Before we get started, let’s make sure we have all the software packages installed. Check to see if you have OpenCV installed on your machine. If you are using Anaconda, you can type:
conda install -c conda-forge opencv
Alternatively, you can type:
pip install opencv-python
Install Numpy, the scientific computing library.
pip install numpy
Find an Image File
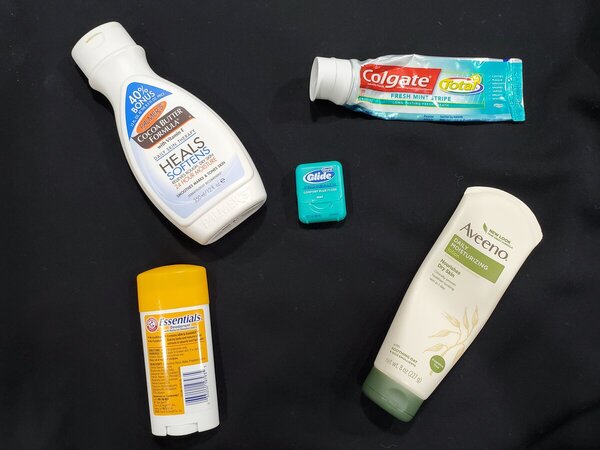
Find an image. My input image is 1200 pixels in width and 900 pixels in height. The filename of my input image is input_img.jpg.
Write the Code
Here is the code. It accepts an image named input_img.jpg and outputs an annotated image named output_img.jpg. Pieces of the code pull from the official OpenCV implementation.
import cv2 as cv
from math import atan2, cos, sin, sqrt, pi
import numpy as np

def drawAxis(img, p_, q_, color, scale):
  p = list(p_)
  q = list(q_)

  ## [visualization1]
  angle = atan2(p[1] - q[1], p[0] - q[0]) # angle in radians
  hypotenuse = sqrt((p[1] - q[1]) * (p[1] - q[1]) + (p[0] - q[0]) * (p[0] - q[0]))

  # Here we lengthen the arrow by a factor of scale
  q[0] = p[0] - scale * hypotenuse * cos(angle)
  q[1] = p[1] - scale * hypotenuse * sin(angle)
  cv.line(img, (int(p[0]), int(p[1])), (int(q[0]), int(q[1])), color, 3, cv.LINE_AA)

  # create the arrow hooks
  p[0] = q[0] + 9 * cos(angle + pi / 4)
  p[1] = q[1] + 9 * sin(angle + pi / 4)
  cv.line(img, (int(p[0]), int(p[1])), (int(q[0]), int(q[1])), color, 3, cv.LINE_AA)

  p[0] = q[0] + 9 * cos(angle - pi / 4)
  p[1] = q[1] + 9 * sin(angle - pi / 4)
  cv.line(img, (int(p[0]), int(p[1])), (int(q[0]), int(q[1])), color, 3, cv.LINE_AA)
  ## [visualization1]

def getOrientation(pts, img):
  ## [pca]
  # Construct a buffer used by the pca analysis
  sz = len(pts)
  data_pts = np.empty((sz, 2), dtype=np.float64)
  for i in range(data_pts.shape[0]):
    data_pts[i,0] = pts[i,0,0]
    data_pts[i,1] = pts[i,0,1]

  # Perform PCA analysis
  mean = np.empty((0))
  mean, eigenvectors, eigenvalues = cv.PCACompute2(data_pts, mean)

  # Store the center of the object
  cntr = (int(mean[0,0]), int(mean[0,1]))
  ## [pca]

  ## [visualization]
  # Draw the principal components
  cv.circle(img, cntr, 3, (255, 0, 255), 2)
  p1 = (cntr[0] + 0.02 * eigenvectors[0,0] * eigenvalues[0,0], cntr[1] + 0.02 * eigenvectors[0,1] * eigenvalues[0,0])
  p2 = (cntr[0] - 0.02 * eigenvectors[1,0] * eigenvalues[1,0], cntr[1] - 0.02 * eigenvectors[1,1] * eigenvalues[1,0])
  drawAxis(img, cntr, p1, (255, 255, 0), 1)
  drawAxis(img, cntr, p2, (0, 0, 255), 5)

  angle = atan2(eigenvectors[0,1], eigenvectors[0,0]) # orientation in radians
  ## [visualization]

  # Label with the rotation angle
  label = "  Rotation Angle: " + str(-int(np.rad2deg(angle)) - 90) + " degrees"
  textbox = cv.rectangle(img, (cntr[0], cntr[1]-25), (cntr[0] + 250, cntr[1] + 10), (255,255,255), -1)
  cv.putText(img, label, (cntr[0], cntr[1]), cv.FONT_HERSHEY_SIMPLEX, 0.5, (0,0,0), 1, cv.LINE_AA)

  return angle

# Load the image
img = cv.imread("input_img.jpg")

# Was the image there?
if img is None:
  print("Error: File not found")
  exit(0)

cv.imshow('Input Image', img)

# Convert image to grayscale
gray = cv.cvtColor(img, cv.COLOR_BGR2GRAY)

# Convert image to binary
_, bw = cv.threshold(gray, 50, 255, cv.THRESH_BINARY | cv.THRESH_OTSU)

# Find all the contours in the thresholded image
contours, _ = cv.findContours(bw, cv.RETR_LIST, cv.CHAIN_APPROX_NONE)

for i, c in enumerate(contours):

  # Calculate the area of each contour
  area = cv.contourArea(c)

  # Ignore contours that are too small or too large
  if area < 3700 or 100000 < area:
    continue

  # Draw each contour only for visualisation purposes
  cv.drawContours(img, contours, i, (0, 0, 255), 2)

  # Find the orientation of each shape
  getOrientation(c, img)

cv.imshow('Output Image', img)
cv.waitKey(0)
cv.destroyAllWindows()

# Save the output image to the current directory
cv.imwrite("output_img.jpg", img)
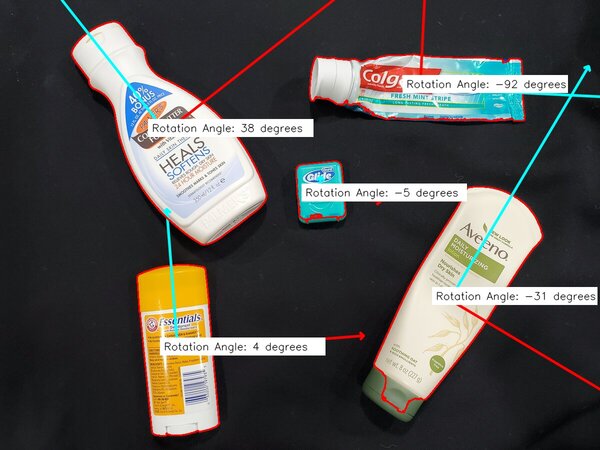
Output Image
Here is the result:
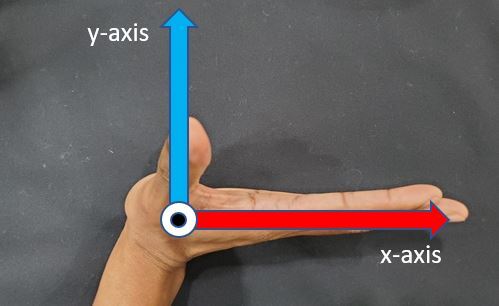
Understanding the Rotation Axes
The positive x-axis of each object is the red line. The positive y-axis of each object is the blue line.
The global positive x-axis goes from left to right horizontally across the image. The global positive z-axis points out of this page. The global positive y-axis points from the bottom of the image to the top of the image vertically.
Using the right-hand rule to measure rotation, you stick your four fingers out straight (index finger to pinky finger) in the direction of the global positive x-axis.
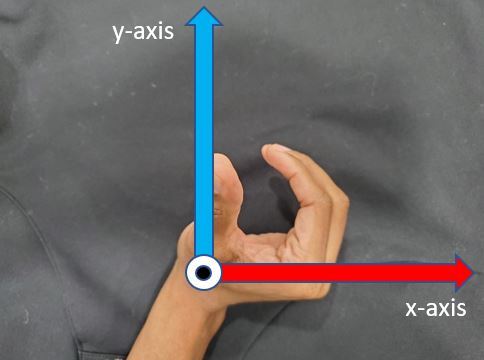
You then rotate your four fingers 90 degrees counterclockwise. Your fingertips point towards the positive y-axis, and your thumb points out of this page towards the positive z-axis.
Calculate an Orientation Between 0 and 180 Degrees
If we want to calculate the orientation of an object and make sure that the result is always between 0 and 180 degrees, we can use this code:
# This programs calculates the orientation of an object.
# The input is an image, and the output is an annotated image
# with the angle of otientation for each object (0 to 180 degrees)

import cv2 as cv
from math import atan2, cos, sin, sqrt, pi
import numpy as np

# Load the image
img = cv.imread("input_img.jpg")

# Was the image there?
if img is None:
  print("Error: File not found")
  exit(0)

cv.imshow('Input Image', img)

# Convert image to grayscale
gray = cv.cvtColor(img, cv.COLOR_BGR2GRAY)

# Convert image to binary
_, bw = cv.threshold(gray, 50, 255, cv.THRESH_BINARY | cv.THRESH_OTSU)

# Find all the contours in the thresholded image
contours, _ = cv.findContours(bw, cv.RETR_LIST, cv.CHAIN_APPROX_NONE)

for i, c in enumerate(contours):

  # Calculate the area of each contour
  area = cv.contourArea(c)

  # Ignore contours that are too small or too large
  if area < 3700 or 100000 < area:
    continue

  # cv.minAreaRect returns:
  # (center(x, y), (width, height), angle of rotation) = cv2.minAreaRect(c)
  rect = cv.minAreaRect(c)
  box = cv.boxPoints(rect)
  box = np.int0(box)

  # Retrieve the key parameters of the rotated bounding box
  center = (int(rect[0][0]),int(rect[0][1]))
  width = int(rect[1][0])
  height = int(rect[1][1])
  angle = int(rect[2])


  if width < height:
    angle = 90 - angle
  else:
    angle = -angle

  label = "  Rotation Angle: " + str(angle) + " degrees"
  textbox = cv.rectangle(img, (center[0]-35, center[1]-25),
    (center[0] + 295, center[1] + 10), (255,255,255), -1)
  cv.putText(img, label, (center[0]-50, center[1]),
    cv.FONT_HERSHEY_SIMPLEX, 0.7, (0,0,0), 1, cv.LINE_AA)
  cv.drawContours(img,[box],0,(0,0,255),2)

cv.imshow('Output Image', img)
cv.waitKey(0)
cv.destroyAllWindows()

# Save the output image to the current directory
cv.imwrite("min_area_rec_output.jpg", img)
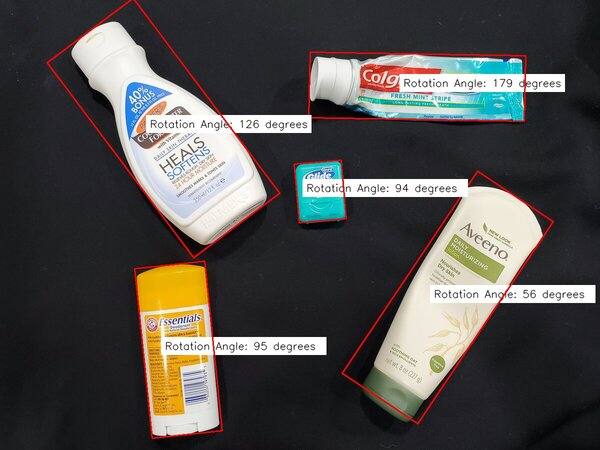
Here is the output:
That’s it. Keep building!