
In this tutorial, we will go through how to detect objects in a video stream using OpenCV. We will use MobileNet SSD, a special type of convolutional neural network architecture.
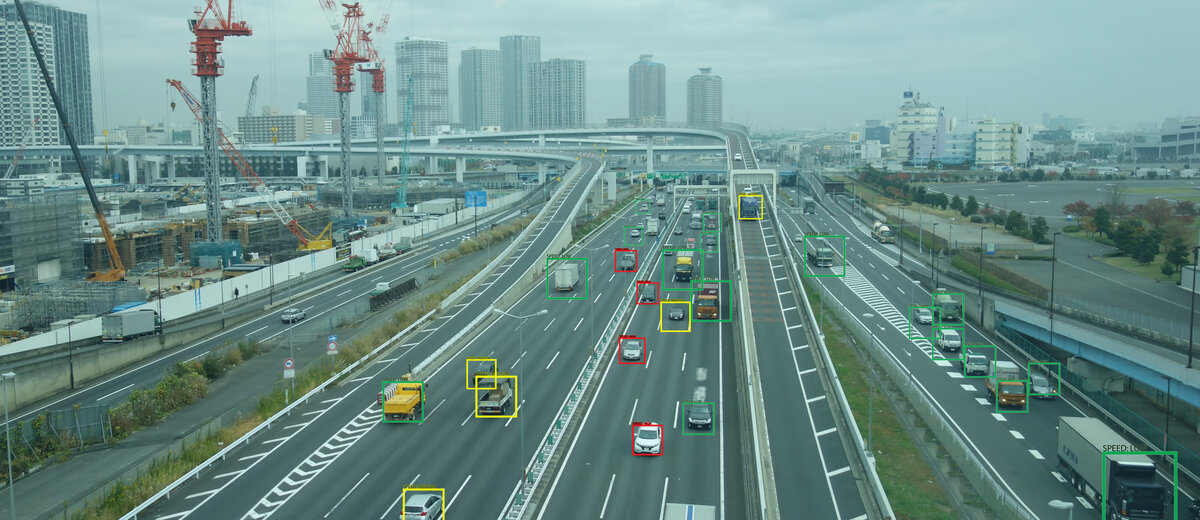
Our output will look like this:
Real-World Applications
- Object Detection
- Object Tracking
- Object Classification
- Autonomous Vehicles
- Self-Driving Cars
Let’s get started!
Prerequisites
Installation and Setup
We now need to make sure we have all the software packages installed. Check to see if you have OpenCV installed on your machine. If you are using Anaconda, you can type:
conda install -c conda-forge opencv
Alternatively, you can type:
pip install opencv-python
Download the Required Files
Download all the video files and other neural network-related files at this link. Place the files inside a directory on your computer.
Code
In the same folder where your image file is, open a new Python file called object_detection_mobile_ssd.py.
Here is the full code for the system. The only things you’ll need to change in this code is the name of your desired input video file on line 10 and the name of your desired output file on line 14.
# Project: How to Detect Objects in Video Using MobileNet SSD in OpenCV
# Author: Addison Sears-Collins
# Date created: March 1, 2021
# Description: Object detection using OpenCV

import cv2 # Computer vision library
import numpy as np # Scientific computing library

# Make sure the video file is in the same directory as your code
filename = 'edmonton_canada.mp4'
file_size = (1920,1080) # Assumes 1920x1080 mp4

# We want to save the output to a video file
output_filename = 'edmonton_canada_obj_detect_mobssd.mp4'
output_frames_per_second = 20.0

RESIZED_DIMENSIONS = (300, 300) # Dimensions that SSD was trained on.
IMG_NORM_RATIO = 0.007843 # In grayscale a pixel can range between 0 and 255

# Load the pre-trained neural network
neural_network = cv2.dnn.readNetFromCaffe('MobileNetSSD_deploy.prototxt.txt',
        'MobileNetSSD_deploy.caffemodel')

# List of categories and classes
categories = { 0: 'background', 1: 'aeroplane', 2: 'bicycle', 3: 'bird',
               4: 'boat', 5: 'bottle', 6: 'bus', 7: 'car', 8: 'cat',
               9: 'chair', 10: 'cow', 11: 'diningtable', 12: 'dog',
              13: 'horse', 14: 'motorbike', 15: 'person',
              16: 'pottedplant', 17: 'sheep', 18: 'sofa',
              19: 'train', 20: 'tvmonitor'}

classes =  ["background", "aeroplane", "bicycle", "bird", "boat", "bottle",
            "bus", "car", "cat", "chair", "cow",
           "diningtable",  "dog", "horse", "motorbike", "person",
           "pottedplant", "sheep", "sofa", "train", "tvmonitor"]

# Create the bounding boxes
bbox_colors = np.random.uniform(255, 0, size=(len(categories), 3))

def main():

  # Load a video
  cap = cv2.VideoCapture(filename)

  # Create a VideoWriter object so we can save the video output
  fourcc = cv2.VideoWriter_fourcc(*'mp4v')
  result = cv2.VideoWriter(output_filename,
                           fourcc,
                           output_frames_per_second,
                           file_size)

  # Process the video
  while cap.isOpened():

    # Capture one frame at a time
    success, frame = cap.read()

    # Do we have a video frame? If true, proceed.
    if success:

      # Capture the frame's height and width
      (h, w) = frame.shape[:2]

      # Create a blob. A blob is a group of connected pixels in a binary
      # frame that share some common property (e.g. grayscale value)
      # Preprocess the frame to prepare it for deep learning classification
      frame_blob = cv2.dnn.blobFromImage(cv2.resize(frame, RESIZED_DIMENSIONS),
                     IMG_NORM_RATIO, RESIZED_DIMENSIONS, 127.5)

      # Set the input for the neural network
      neural_network.setInput(frame_blob)

      # Predict the objects in the image
      neural_network_output = neural_network.forward()

      # Put the bounding boxes around the detected objects
      for i in np.arange(0, neural_network_output.shape[2]):

        confidence = neural_network_output[0, 0, i, 2]

        # Confidence must be at least 30%
        if confidence > 0.30:

          idx = int(neural_network_output[0, 0, i, 1])

          bounding_box = neural_network_output[0, 0, i, 3:7] * np.array(
            [w, h, w, h])

          (startX, startY, endX, endY) = bounding_box.astype("int")

          label = "{}: {:.2f}%".format(classes[idx], confidence * 100)

          cv2.rectangle(frame, (startX, startY), (
            endX, endY), bbox_colors[idx], 2)

          y = startY - 15 if startY - 15 > 15 else startY + 15

          cv2.putText(frame, label, (startX, y),cv2.FONT_HERSHEY_SIMPLEX,
            0.5, bbox_colors[idx], 2)

      # We now need to resize the frame so its dimensions
      # are equivalent to the dimensions of the original frame
      frame = cv2.resize(frame, file_size, interpolation=cv2.INTER_NEAREST)

			# Write the frame to the output video file
      result.write(frame)

    # No more video frames left
    else:
      break

  # Stop when the video is finished
  cap.release()

  # Release the video recording
  result.release()

main()
To run the code, type the following command:
python object_detection_mobile_ssd.py
You will see the video output that is at the top of this tutorial.
That’s it. Keep building!