
In this tutorial, we will go through the basics of how to detect and draw contours around objects in an image using OpenCV. We will also learn how to draw a bounding box around these objects.
A contour is a boundary around an object. That boundary is made up of image pixels that have the same color or intensity.
Note that any given object can have multiple edges. However, it will only have one boundary.
Real-World Applications
- Object Detection
- Object Tracking
- Object Classification
Let’s get started!
Prerequisites
Find an Image File
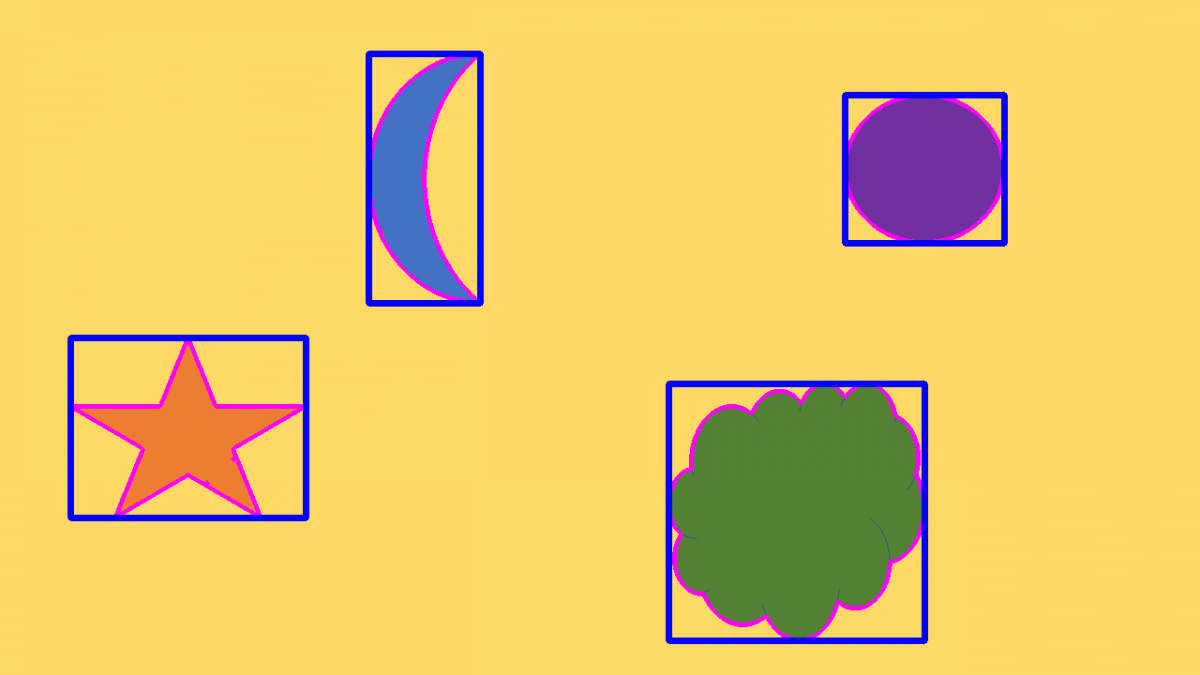
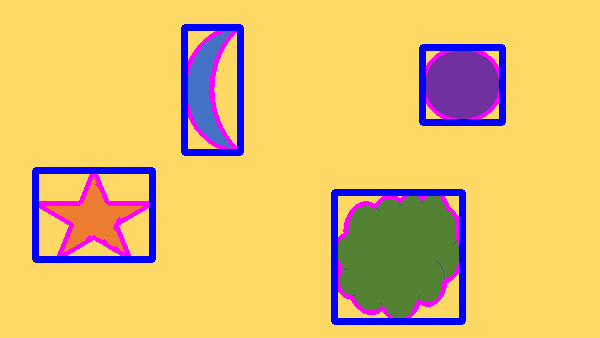
Find an image of any size. Here is mine:

How Contour Detection Works
At a high level, here is the 5-step process for contour detection in OpenCV:
- Read a color image
- Convert the image to grayscale
- Convert the image to binary (i.e. black and white only) using Otsu’s method or a fixed threshold that you choose.
- If the objects in the image are black, and the background is white, we need to invert the image so that white pixels become black and black pixels become white. Otherwise, we leave the image as-is.
- Detect the contours
Code
In the same folder where your image file is, open a new Python file called detecting_contours.py.
Here is the full code for the system. The only thing you’ll need to change (if you wish to use your own image) in this code is the name of your desired input image file on line 11.
# Project: How to Detect and Draw Contours in Images Using OpenCV
# Author: Addison Sears-Collins
# Date created: February 28, 2021
# Description: How to detect and draw contours around objects in
# an image using OpenCV.

import cv2 # Computer vision library

# Read the color image
image = cv2.imread("shapes-small.jpg")

# Make a copy
new_image = image.copy()

# Convert the image to grayscale
gray = cv2.cvtColor(image, cv2.COLOR_BGR2GRAY)

# Display the grayscale image
cv2.imshow('Gray image', gray)
cv2.waitKey(0) # Wait for keypress to continue
cv2.destroyAllWindows() # Close windows

# Convert the grayscale image to binary
ret, binary = cv2.threshold(gray, 100, 255,
  cv2.THRESH_OTSU)

# Display the binary image
cv2.imshow('Binary image', binary)
cv2.waitKey(0) # Wait for keypress to continue
cv2.destroyAllWindows() # Close windows

# To detect object contours, we want a black background and a white
# foreground, so we invert the image (i.e. 255 - pixel value)
inverted_binary = ~binary
cv2.imshow('Inverted binary image', inverted_binary)
cv2.waitKey(0) # Wait for keypress to continue
cv2.destroyAllWindows() # Close windows

# Find the contours on the inverted binary image, and store them in a list
# Contours are drawn around white blobs.
# hierarchy variable contains info on the relationship between the contours
contours, hierarchy = cv2.findContours(inverted_binary,
  cv2.RETR_TREE,
  cv2.CHAIN_APPROX_SIMPLE)

# Draw the contours (in red) on the original image and display the result
# Input color code is in BGR (blue, green, red) format
# -1 means to draw all contours
with_contours = cv2.drawContours(image, contours, -1,(255,0,255),3)
cv2.imshow('Detected contours', with_contours)
cv2.waitKey(0)
cv2.destroyAllWindows()

# Show the total number of contours that were detected
print('Total number of contours detected: ' + str(len(contours)))

# Draw just the first contour
# The 0 means to draw the first contour
first_contour = cv2.drawContours(new_image, contours, 0,(255,0,255),3)
cv2.imshow('First detected contour', first_contour)
cv2.waitKey(0)
cv2.destroyAllWindows()

# Draw a bounding box around the first contour
# x is the starting x coordinate of the bounding box
# y is the starting y coordinate of the bounding box
# w is the width of the bounding box
# h is the height of the bounding box
x, y, w, h = cv2.boundingRect(contours[0])
cv2.rectangle(first_contour,(x,y), (x+w,y+h), (255,0,0), 5)
cv2.imshow('First contour with bounding box', first_contour)
cv2.waitKey(0)
cv2.destroyAllWindows()

# Draw a bounding box around all contours
for c in contours:
  x, y, w, h = cv2.boundingRect(c)

	# Make sure contour area is large enough
  if (cv2.contourArea(c)) > 10:
    cv2.rectangle(with_contours,(x,y), (x+w,y+h), (255,0,0), 5)

cv2.imshow('All contours with bounding box', with_contours)
cv2.waitKey(0)
cv2.destroyAllWindows()
To run the code, type the following command:
python detecting_contours.py
Output
# Convert the image to grayscale
gray = cv2.cvtColor(image, cv2.COLOR_BGR2GRAY)

# Display the grayscale image
cv2.imshow('Gray image', gray)
cv2.waitKey(0) # Wait for keypress to continue
cv2.destroyAllWindows() # Close windows

# Convert the grayscale image to binary
ret, binary = cv2.threshold(gray, 100, 255,
  cv2.THRESH_OTSU)

# Display the binary image
cv2.imshow('Binary image', binary)
cv2.waitKey(0) # Wait for keypress to continue
cv2.destroyAllWindows() # Close windows

# To detect object contours, we want a black background and a white
# foreground, so we invert the image (i.e. 255 - pixel value)
inverted_binary = ~binary
cv2.imshow('Inverted binary image', inverted_binary)
cv2.waitKey(0) # Wait for keypress to continue
cv2.destroyAllWindows() # Close windows

# Find the contours on the inverted binary image, and store them in a list
# Contours are drawn around white blobs.
# hierarchy variable contains info on the relationship between the contours
contours, hierarchy = cv2.findContours(inverted_binary,
  cv2.RETR_TREE,
  cv2.CHAIN_APPROX_SIMPLE)

# Draw the contours (in red) on the original image and display the result
# Input color code is in BGR (blue, green, red) format
# -1 means to draw all contours
with_contours = cv2.drawContours(image, contours, -1,(255,0,255),3)
cv2.imshow('Detected contours', with_contours)
cv2.waitKey(0)
cv2.destroyAllWindows()

# Show the total number of contours that were detected
print('Total number of contours detected: ' + str(len(contours)))

# Draw just the first contour
# The 0 means to draw the first contour
first_contour = cv2.drawContours(new_image, contours, 0,(255,0,255),3)
cv2.imshow('First detected contour', first_contour)
cv2.waitKey(0)
cv2.destroyAllWindows()

# Draw a bounding box around the first contour
# x is the starting x coordinate of the bounding box
# y is the starting y coordinate of the bounding box
# w is the width of the bounding box
# h is the height of the bounding box
x, y, w, h = cv2.boundingRect(contours[0])
cv2.rectangle(first_contour,(x,y), (x+w,y+h), (255,0,0), 5)
cv2.imshow('First contour with bounding box', first_contour)
cv2.waitKey(0)
cv2.destroyAllWindows()

# Draw a bounding box around all contours
for c in contours:
  x, y, w, h = cv2.boundingRect(c)

	# Make sure contour area is large enough
  if (cv2.contourArea(c)) > 10:
    cv2.rectangle(with_contours,(x,y), (x+w,y+h), (255,0,0), 5)

cv2.imshow('All contours with bounding box', with_contours)
cv2.waitKey(0)
cv2.destroyAllWindows()
That’s it! Keep building!