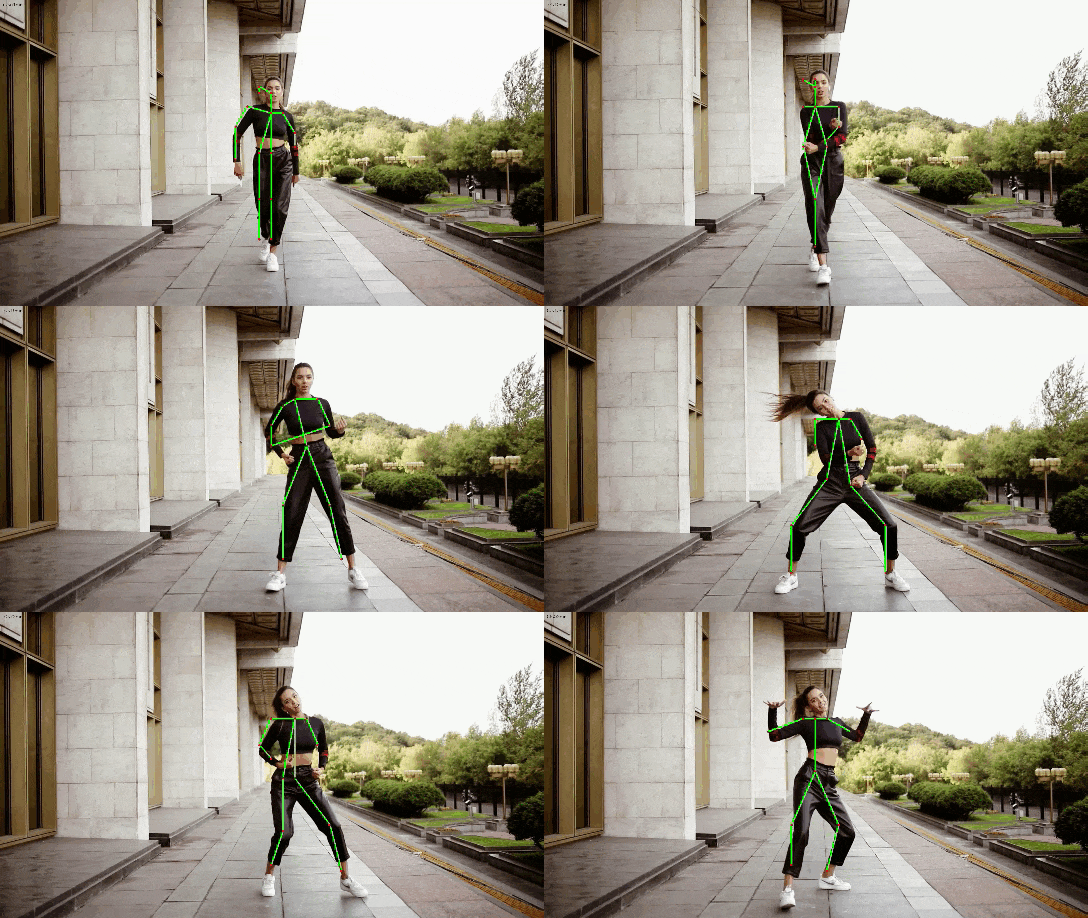
In this tutorial, we will implement human pose estimation. Pose estimation means estimating the position and orientation of objects (in this case humans) relative to the camera. By the end of this tutorial, you will be able to generate the following output:

Real-World Applications
Human pose estimation has a number of real-world applications:
- Robotic task learning: Enabling robots to acquire new skills by imitating the actions of a human teacher
- Virtual reality applications
- Augmented reality applications (overlaying graphics on top of physical objects)
- Sign language understanding
- Recognizing human poses (sitting, standing, running, etc.)
Let’s get started!
Prerequisites
Installation and Setup
We need to make sure we have all the software packages installed. Check to see if you have OpenCV installed on your machine. If you are using Anaconda, you can type:
conda install -c conda-forge opencv
Alternatively, you can type:
pip install opencv-python
Make sure you have NumPy installed, a scientific computing library for Python.
If you’re using Anaconda, you can type:
conda install numpy
Alternatively, you can type:
pip install numpy
Find Some Videos
The first thing we need to do is find some videos to serve as our test cases.
We want to download videos that contain humans. The video files should be in mp4 format and 1920 x 1080 in dimensions.
I found some good candidates on Pixabay.com and Dreamstime.com.
Take your videos and put them inside a directory on your computer.
Download the Protobuf File
Inside the same directory as your videos, download the protobuf file on this page. It is named graph_opt.pb. This file contains the weights of the neural network. The neural network is what we will use to determine the human’s position and orientation (i.e. pose).
Brief Description of OpenPose
We will use the OpenPose application along with OpenCV to do what we need to do in this project. OpenPose is an open source real-time 2D pose estimation application for people in video and images. It was developed by students and faculty members at Carnegie Mellon University.
You can learn the theory and details of how OpenPose works in this paper and at GeeksforGeeks.
Write the Code
Here is the code. Make sure you put the code in the same directory on your computer where you put the other files.
The only lines you need to change are:
- Line 14 (name of the input file in mp4 format)
- Line 15 (input file size)
- Line 18 (output file name)
# Project: Human Pose Estimation Using Deep Learning in OpenCV
# Author: Addison Sears-Collins
# Date created: February 25, 2021
# Description: A program that takes a video with a human as input and outputs
# an annotated version of the video with the human's position and orientation..

# Reference: https://github.com/quanhua92/human-pose-estimation-opencv

# Import the important libraries
import cv2 as cv # Computer vision library
import numpy as np # Scientific computing library

# Make sure the video file is in the same directory as your code
filename = 'dancing32.mp4'
file_size = (1920,1080) # Assumes 1920x1080 mp4 as the input video file

# We want to save the output to a video file
output_filename = 'dancing32_output.mp4'
output_frames_per_second = 20.0

BODY_PARTS = { "Nose": 0, "Neck": 1, "RShoulder": 2, "RElbow": 3, "RWrist": 4,
               "LShoulder": 5, "LElbow": 6, "LWrist": 7, "RHip": 8, "RKnee": 9,
               "RAnkle": 10, "LHip": 11, "LKnee": 12, "LAnkle": 13, "REye": 14,
               "LEye": 15, "REar": 16, "LEar": 17, "Background": 18 }

POSE_PAIRS = [ ["Neck", "RShoulder"], ["Neck", "LShoulder"], ["RShoulder", "RElbow"],
               ["RElbow", "RWrist"], ["LShoulder", "LElbow"], ["LElbow", "LWrist"],
               ["Neck", "RHip"], ["RHip", "RKnee"], ["RKnee", "RAnkle"], ["Neck", "LHip"],
               ["LHip", "LKnee"], ["LKnee", "LAnkle"], ["Neck", "Nose"], ["Nose", "REye"],
               ["REye", "REar"], ["Nose", "LEye"], ["LEye", "LEar"] ]

# Width and height of training set
inWidth = 368
inHeight = 368

net = cv.dnn.readNetFromTensorflow("graph_opt.pb")

cap = cv.VideoCapture(filename)

# Create a VideoWriter object so we can save the video output
fourcc = cv.VideoWriter_fourcc(*'mp4v')
result = cv.VideoWriter(output_filename,
                         fourcc,
                         output_frames_per_second,
                         file_size)
# Process the video
while cap.isOpened():
    hasFrame, frame = cap.read()
    if not hasFrame:
        cv.waitKey()
        break

    frameWidth = frame.shape[1]
    frameHeight = frame.shape[0]

    net.setInput(cv.dnn.blobFromImage(frame, 1.0, (inWidth, inHeight), (127.5, 127.5, 127.5), swapRB=True, crop=False))
    out = net.forward()
    out = out[:, :19, :, :]  # MobileNet output [1, 57, -1, -1], we only need the first 19 elements

    assert(len(BODY_PARTS) == out.shape[1])

    points = []
    for i in range(len(BODY_PARTS)):
        # Slice heatmap of corresponging body's part.
        heatMap = out[0, i, :, :]

        # Originally, we try to find all the local maximums. To simplify a sample
        # we just find a global one. However only a single pose at the same time
        # could be detected this way.
        _, conf, _, point = cv.minMaxLoc(heatMap)
        x = (frameWidth * point[0]) / out.shape[3]
        y = (frameHeight * point[1]) / out.shape[2]
        # Add a point if it's confidence is higher than threshold.
        # Feel free to adjust this confidence value.
        points.append((int(x), int(y)) if conf > 0.2 else None)

    for pair in POSE_PAIRS:
        partFrom = pair[0]
        partTo = pair[1]
        assert(partFrom in BODY_PARTS)
        assert(partTo in BODY_PARTS)

        idFrom = BODY_PARTS[partFrom]
        idTo = BODY_PARTS[partTo]

        if points[idFrom] and points[idTo]:
            cv.line(frame, points[idFrom], points[idTo], (0, 255, 0), 3)
            cv.ellipse(frame, points[idFrom], (3, 3), 0, 0, 360, (255, 0, 0), cv.FILLED)
            cv.ellipse(frame, points[idTo], (3, 3), 0, 0, 360, (255, 0, 0), cv.FILLED)

    t, _ = net.getPerfProfile()
    freq = cv.getTickFrequency() / 1000
    cv.putText(frame, '%.2fms' % (t / freq), (10, 20), cv.FONT_HERSHEY_SIMPLEX, 0.5, (0, 0, 0))

    # Write the frame to the output video file
    result.write(frame)

# Stop when the video is finished
cap.release()

# Release the video recording
result.release()
Run the Code
To run the code, type:
python openpose.py
Video Output
Here is the output I got:
Further Work
If you would like to do a deep dive into pose estimation, check out the official GitHub for the OpenPose project here.
That’s it. Keep building!

