Neural networks are the workhorses of the rapidly growing field known as deep learning. Neural networks are used for all sorts of applications where a prediction of some sort is desired. Here are some examples:
- Predicting the type of objects in an image or video
- Sales forecasting
- Speech recognition
- Medical diagnosis
- Risk management
- and countless other applications…
In this post, I will explain how neural networks make those predictions by boiling these structures down to their fundamental parts and then building up from there.
You Will Need
Create Your First Neural Network
Imagine you run a business that provides short online courses for working professionals. Some of your courses are free, but your best courses require the students to pay for a subscription.
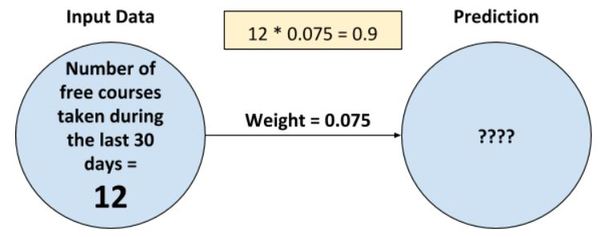
You want to create a neural network to predict if a free student is likely to upgrade to a paid subscription. Let’s create the most basic neural network you can make.

OK, so there is our neural network. To implement this neural network on a computer, we need to translate this diagram into a software program. Let’s do that now using Python, the most popular language for machine learning.
# Declare a variable named weight and
# initiate it with a value
weight = 0.075

# Create a method called neural_network that
# takes as inputs, the input data (number of
free courses a student has taken during the
# last 30 days) and the weight of the connection.
# The method returns the prediction.

def neural_network(input, weight):

  # The input data multiplied by the weight
  # equals the prediction
  prediction = input * weight

  # This is the output
  return prediction
So we currently have five students, all of whom are free students. The number of free courses these users have taken during the last 30 days is 12, 3, 5, 6, and 8. Let’s code this in Python as a list.
number_of_free_courses_taken = [12, 3, 5, 6, 8]
Let’s make a prediction for the first student, the one who has taken 12 free courses over the last 30 days.
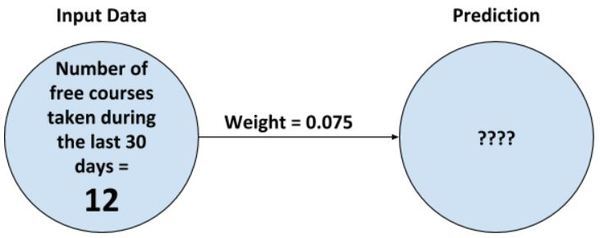
Now let’s put the diagram into code.
# Extract the first value of the list...12...
# and store into a variable named input
first_student_input = number_of_free_courses_taken[0]

# Call the neural_network method and store the
# prediction result into a variable
first_student_prediction = neural_network(
                         first_student_input, weight)

# Print the prediction
print(first_student_prediction)
OK. We have finished the code. Let’s see how it looks all together.
weight = 0.075

def neural_network(input, weight):

  prediction = input * weight

  return prediction

number_of_free_courses_taken = [
                        12, 3, 5, 6, 8]

first_student_input = number_of_free_courses_taken[0]

first_student_prediction = neural_network(
                       first_student_input, weight)

print(first_student_prediction)
Open a Jupyter Notebook and run the code above, or run the code inside your favorite Python IDE.
Here is what I got:
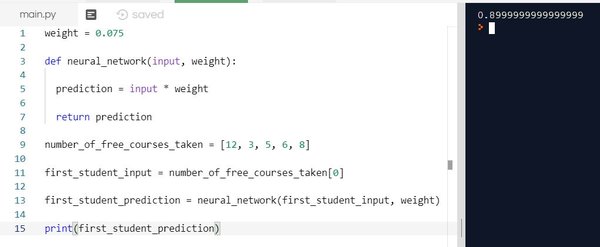
What did you get? Did you get 0.9? If so, congratulations!
Let’s see what is happening when we run our code. We called the neural_network method. The first operation performed inside that method is to multiply the input by the weight and return the result. In this case, the input is 12, and the weight is 0.075. The result is 0.9.
0.9 is stored in the first_student_prediction variable.
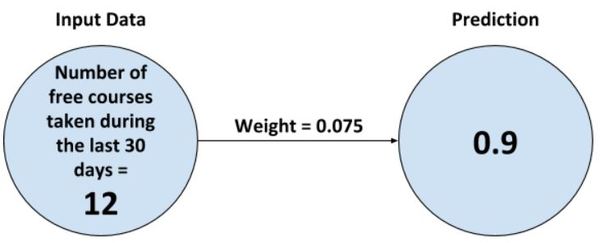
And this, my friend, is the most basic building block of a neural network. A neural network in its simplest form consists of one or more weights which you can multiply by input data to make a prediction.
Let’s take a look at some questions you might have at this stage.
What kind of input data can go into a neural network?
Real numbers that can be measured or calculated somewhere in the real world. Yesterday’s high temperature, a medical patient’s blood pressure reading, previous year’s rainfall, or average annual rainfall are all valid inputs into a neural network. Negative numbers are totally acceptable as well.
A good rule of thumb is, if you can quantify it, you can use it as an input into a neural network. It is best to use input data into a neural network that you think will be relevant for making the prediction you desire.
For example, if you are trying to create a neural network to predict if a patient has breast cancer or not, how many fingers a person has probably not going to be all that relevant. However, how many days per month a patient exercises is likely to be a relevant piece of input data that you would want to feed into your neural network.
What does a neural network predict?
A neural network outputs some real number. In some neural network implementations, we can do some fancy mathematics to limit the output to some real number between 0 and 1. Why would we want to do that? Well in some applications we might want to output probabilities. Let me explain.
Suppose you want to predict the probability that tomorrow will be sunny. The input into a neural network to make such a prediction could be today’s high temperature.
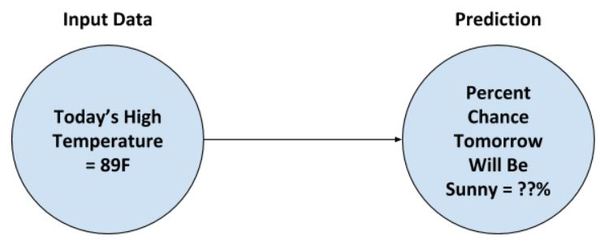
If the output is some number like 0.30, we can interpret this as a 30% change of the weather being sunny tomorrow given today’s high temperature. Pretty cool huh!
We don’t have to limit the output to between 0 and 1. For example, let’s say we have a neural network designed to predict the price of a house given the house’s area in square feet. Such a network might tell us, “given the house’s area in square feet, the predicted price of the house is $432,000.”
What happens if the neural network’s predictions are incorrect?
The neural network will adjust its weights so that the next time it makes a more accurate prediction. Recall that the weights are multiplied by the input values to make a prediction.
What is a neural network really learning?
A neural network is learning the best possible set of weights. “Best” in the context of neural networks means the weights that minimize the prediction error.
Remember, the core math operation in a neural network is multiplication, where the simplest neural network is:
Input Value * Weight = Prediction
How does the neural network find the best set of weights?
Short answer: Trial and error
Long answer: A neural network starts out with random numbers for weights. It then takes in a single input data point, makes a prediction, and then sees if its prediction was either too high or too low. The neural network then adjusts its weight(s) accordingly so that the next time it sees the same input data point, it makes a more accurate prediction.
Once the weights are adjusted, the neural network is fed the next data point, and so on. A neural network gets better and better each time it makes a prediction. It “learns” from its mistakes one data point at a time.
Do you notice something here?
Standard neural networks have no memory. They are fed an input data point, make a prediction, see how close the prediction was to reality, adjust the weights accordingly, and then move on to the next data point. At each step of the learning process of a neural network, it has no memory of the most recent prediction it made.
Standard neural networks focus on one input data point at a time. For example, in our subscriber prediction neural network we built earlier in this tutorial, if we feed our neural network number_of_free_courses_taken[1], it will have no clue what it predicted when number_of_free_courses_taken[0] was the input value.
There are some networks that have short term memories. These are called Long short-term memory networks (LSTM).