
In this tutorial, I will show you how to use background subtraction to detect moving objects. We will use the OpenCV computer vision library on a Raspberry Pi 4.
Prerequisites
- You have set up Raspberry Pi with the Raspbian Operating System.
- You have OpenCV and a Raspberry Camera Module Installed.
What is Background Subtraction?
Background subtraction is a technique that is commonly used to identify moving objects in a video stream. A real-world use case would be video surveillance or in a factory to detect moving objects (i.e. object detection) on a conveyor belt using a stationary video camera.
The idea behind background subtraction is that once you have a model of the background, you can detect objects by examining the difference between the current video frame and the background frame.
Let’s see background subtraction in action using a couple (there are many more than two) of OpenCV’s background subtraction algorithms. I won’t go into the detail and math behind each algorithm, but if you want to learn how each one works, check out this page.
If you are building a product like a robot, you don’t need to get bogged down in the details. You just need to be able to know how to use the algorithm to detect objects.
Absolute Difference Method
The idea behind this algorithm is that we first take a snapshot of the background. We then identify changes by taking the absolute difference between the current video frame and that original snapshot of the background.
This algorithm runs really fast, but it is sensitive to noise, like shadows and even the smallest changes in lighting.
Start your Raspberry Pi.
Go to the Python IDE in your Raspberry Pi by clicking the logo -> Programming -> Thonny Python IDE.
Write the following code. I’ll name the file absolute_difference_method.py.
# Author: Addison Sears-Collins
# Description: This algorithm detects objects in a video stream
#   using the Absolute Difference Method. The idea behind this
#   algorithm is that we first take a snapshot of the background.
#   We then identify changes by taking the absolute difference
#   between the current video frame and that original
#   snapshot of the background (i.e. first frame).

# import the necessary packages
from picamera.array import PiRGBArray # Generates a 3D RGB array
from picamera import PiCamera # Provides a Python interface for the RPi Camera Module
import time # Provides time-related functions
import cv2 # OpenCV library
import numpy as np # Import NumPy library

# Initialize the camera
camera = PiCamera()

# Set the camera resolution
camera.resolution = (640, 480)

# Set the number of frames per second
camera.framerate = 30

# Generates a 3D RGB array and stores it in rawCapture
raw_capture = PiRGBArray(camera, size=(640, 480))

# Wait a certain number of seconds to allow the camera time to warmup
time.sleep(0.1)

# Initialize the first frame of the video stream
first_frame = None

# Create kernel for morphological operation. You can tweak
# the dimensions of the kernel.
# e.g. instead of 20, 20, you can try 30, 30
kernel = np.ones((20,20),np.uint8)

# Capture frames continuously from the camera
for frame in camera.capture_continuous(raw_capture, format="bgr", use_video_port=True):

    # Grab the raw NumPy array representing the image
    image = frame.array

    # Convert the image to grayscale
    gray = cv2.cvtColor(image, cv2.COLOR_BGR2GRAY)

    # Close gaps using closing
    gray = cv2.morphologyEx(gray,cv2.MORPH_CLOSE,kernel)

    # Remove salt and pepper noise with a median filter
    gray = cv2.medianBlur(gray,5)

    # If first frame, we need to initialize it.
    if first_frame is None:

      first_frame = gray

      # Clear the stream in preparation for the next frame
      raw_capture.truncate(0)

      # Go to top of for loop
      continue

    # Calculate the absolute difference between the current frame
    # and the first frame
    absolute_difference = cv2.absdiff(first_frame, gray)

    # If a pixel is less than ##, it is considered black (background).
    # Otherwise, it is white (foreground). 255 is upper limit.
    # Modify the number after absolute_difference as you see fit.
    _, absolute_difference = cv2.threshold(absolute_difference, 100, 255, cv2.THRESH_BINARY)

    # Find the contours of the object inside the binary image
    contours, hierarchy = cv2.findContours(absolute_difference,cv2.RETR_TREE,cv2.CHAIN_APPROX_SIMPLE)[-2:]
    areas = [cv2.contourArea(c) for c in contours]

    # If there are no countours
    if len(areas) < 1:

      # Display the resulting frame
      cv2.imshow('Frame',image)

      # Wait for keyPress for 1 millisecond
      key = cv2.waitKey(1) & 0xFF

      # Clear the stream in preparation for the next frame
      raw_capture.truncate(0)

      # If "q" is pressed on the keyboard,
      # exit this loop
      if key == ord("q"):
        break

      # Go to the top of the for loop
      continue

    else:

      # Find the largest moving object in the image
      max_index = np.argmax(areas)

    # Draw the bounding box
    cnt = contours[max_index]
    x,y,w,h = cv2.boundingRect(cnt)
    cv2.rectangle(image,(x,y),(x+w,y+h),(0,255,0),3)

    # Draw circle in the center of the bounding box
    x2 = x + int(w/2)
    y2 = y + int(h/2)
    cv2.circle(image,(x2,y2),4,(0,255,0),-1)

    # Print the centroid coordinates (we'll use the center of the
    # bounding box) on the image
    text = "x: " + str(x2) + ", y: " + str(y2)
    cv2.putText(image, text, (x2 - 10, y2 - 10),
      cv2.FONT_HERSHEY_SIMPLEX, 0.5, (0, 255, 0), 2)

    # Display the resulting frame
    cv2.imshow("Frame",image)

    # Wait for keyPress for 1 millisecond
    key = cv2.waitKey(1) & 0xFF

    # Clear the stream in preparation for the next frame
    raw_capture.truncate(0)

    # If "q" is pressed on the keyboard,
    # exit this loop
    if key == ord("q"):
      break

# Close down windows
cv2.destroyAllWindows()
Run the code.
Here is the background:
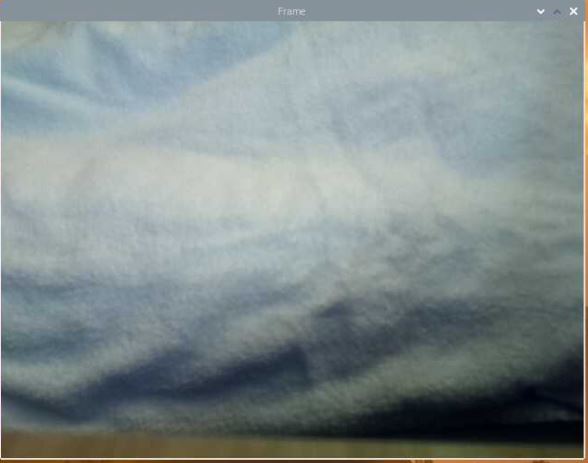
Here is what things look like after we place an object in the field of view:
You notice that we’ve drawn a bounding box. We have also labeled the center of the object with the pixel coordinates (i.e. centroid).
Feel free to tweak the lower threshold on the _, absolute_difference = cv2.threshold… line to your liking.
BackgroundSubtractorMOG2
Here is another method. I named the file background_subtractor_mog2_method.py.
# Author: Addison Sears-Collins
# Description: This algorithm detects objects in a video stream
#   using the Gaussian Mixture Model background subtraction method.

# import the necessary packages
from picamera.array import PiRGBArray # Generates a 3D RGB array
from picamera import PiCamera # Provides a Python interface for the RPi Camera Module
import time # Provides time-related functions
import cv2 # OpenCV library
import numpy as np # Import NumPy library

# Initialize the camera
camera = PiCamera()

# Set the camera resolution
camera.resolution = (640, 480)

# Set the number of frames per second
camera.framerate = 30

# Generates a 3D RGB array and stores it in rawCapture
raw_capture = PiRGBArray(camera, size=(640, 480))

# Create the background subtractor object
# Feel free to modify the history as you see fit.
back_sub = cv2.createBackgroundSubtractorMOG2(history=150,
  varThreshold=25, detectShadows=True)

# Wait a certain number of seconds to allow the camera time to warmup
time.sleep(0.1)

# Create kernel for morphological operation. You can tweak
# the dimensions of the kernel.
# e.g. instead of 20, 20, you can try 30, 30
kernel = np.ones((20,20),np.uint8)

# Capture frames continuously from the camera
for frame in camera.capture_continuous(raw_capture, format="bgr", use_video_port=True):

    # Grab the raw NumPy array representing the image
    image = frame.array

    # Convert to foreground mask
    fg_mask = back_sub.apply(image)

    # Close gaps using closing
    fg_mask = cv2.morphologyEx(fg_mask,cv2.MORPH_CLOSE,kernel)

    # Remove salt and pepper noise with a median filter
    fg_mask = cv2.medianBlur(fg_mask,5)

    # If a pixel is less than ##, it is considered black (background).
    # Otherwise, it is white (foreground). 255 is upper limit.
    # Modify the number after fg_mask as you see fit.
    _, fg_mask = cv2.threshold(fg_mask, 127, 255, cv2.THRESH_BINARY)

    # Find the contours of the object inside the binary image
    contours, hierarchy = cv2.findContours(fg_mask,cv2.RETR_TREE,cv2.CHAIN_APPROX_SIMPLE)[-2:]
    areas = [cv2.contourArea(c) for c in contours]

    # If there are no countours
    if len(areas) < 1:

      # Display the resulting frame
      cv2.imshow('Frame',image)

      # Wait for keyPress for 1 millisecond
      key = cv2.waitKey(1) & 0xFF

      # Clear the stream in preparation for the next frame
      raw_capture.truncate(0)

      # If "q" is pressed on the keyboard,
      # exit this loop
      if key == ord("q"):
        break

      # Go to the top of the for loop
      continue

    else:

      # Find the largest moving object in the image
      max_index = np.argmax(areas)

    # Draw the bounding box
    cnt = contours[max_index]
    x,y,w,h = cv2.boundingRect(cnt)
    cv2.rectangle(image,(x,y),(x+w,y+h),(0,255,0),3)

    # Draw circle in the center of the bounding box
    x2 = x + int(w/2)
    y2 = y + int(h/2)
    cv2.circle(image,(x2,y2),4,(0,255,0),-1)

    # Print the centroid coordinates (we'll use the center of the
    # bounding box) on the image
    text = "x: " + str(x2) + ", y: " + str(y2)
    cv2.putText(image, text, (x2 - 10, y2 - 10),
      cv2.FONT_HERSHEY_SIMPLEX, 0.5, (0, 255, 0), 2)

    # Display the resulting frame
    cv2.imshow("Frame",image)

    # Wait for keyPress for 1 millisecond
    key = cv2.waitKey(1) & 0xFF

    # Clear the stream in preparation for the next frame
    raw_capture.truncate(0)

    # If "q" is pressed on the keyboard,
    # exit this loop
    if key == ord("q"):
      break

# Close down windows
cv2.destroyAllWindows()
This method is more computationally-intensive than the previous method, but it handles shadows better. If you want to detect objects that are moving, this is a good method. If you want to detect objects that enter the field of view and then stay there, use the absolute difference method.
Here is the before:
Here is the after:
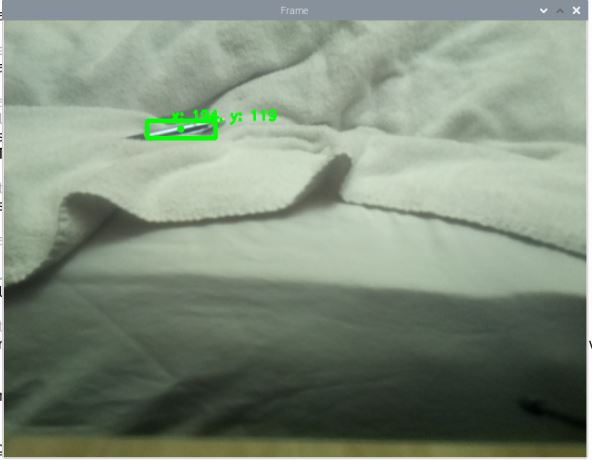
You can see that the algorithm detected that pen pretty well.
Unlike the absolute difference method which uses the same initial frame as the background until the program stops execution, with the background subtractor MOG2 method, the background image continually updates based on a certain number of previous frames (i.e. history) that you specify in the code.
That’s it. Keep building!