
In this tutorial, I will show you how to determine the pose (i.e. position and orientation) of an ArUco Marker in real-time video (i.e. my webcam) using OpenCV (Python). The official tutorial is here, but I will walk through all the steps below.
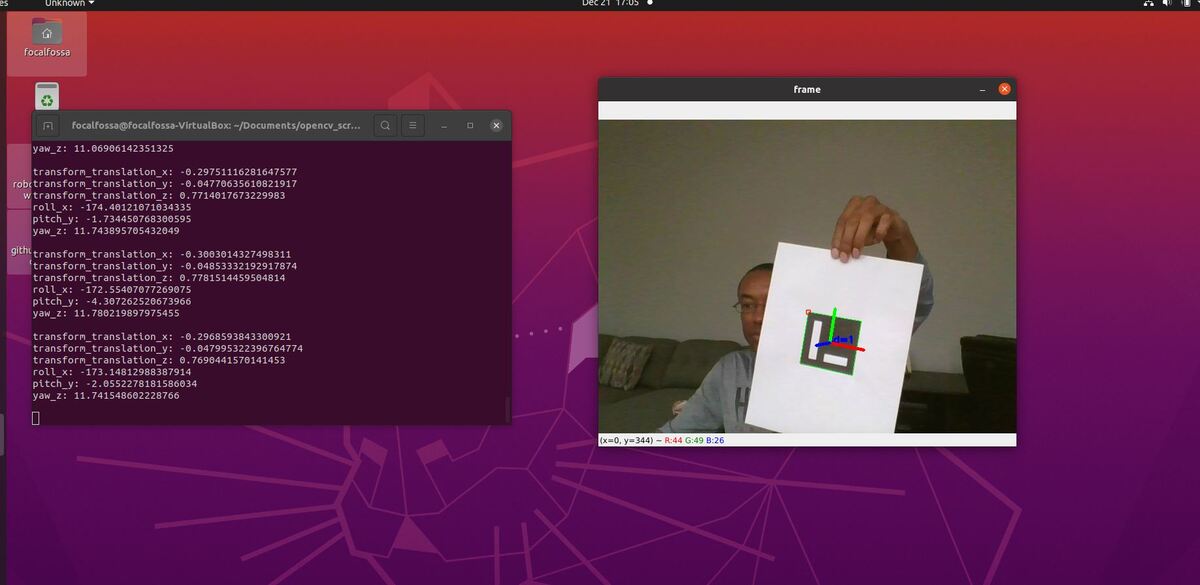
Here is the output you will be able to generate by completing this tutorial:
Prerequisites
- You have created an ArUco marker.
- You have OpenCV (Python) installed on your system (pip install opencv-contrib-python).
- (Optional) You are able to run the code on this tutorial without any problems.
Calibrate the Camera
The first thing we need to do is to perform camera calibration. To learn why we need to perform camera calibration, check out this post. This post has a short but sweet explanation of the code, and this post has good instructions on how to save the parameters and load them at a later date.
Print a Chessboard
The first step is to get a chessboard and print it out on regular A4 size paper. You can download this pdf, which is the official chessboard from the OpenCV documentation, and just print that out.
Measure Square Length
Measure the length of the side of one of the squares. In my case, I measured 2.5 cm (0.025 m).
Take Photos of the Chessboard From Different Distances and Orientations
We need to take at least 10 photos of the chessboard from different distances and orientations. The more photos you take, the better.
Take the photos, and move them to a directory on your computer.
Here are examples of some of the photos I took from an old camera calibration project.
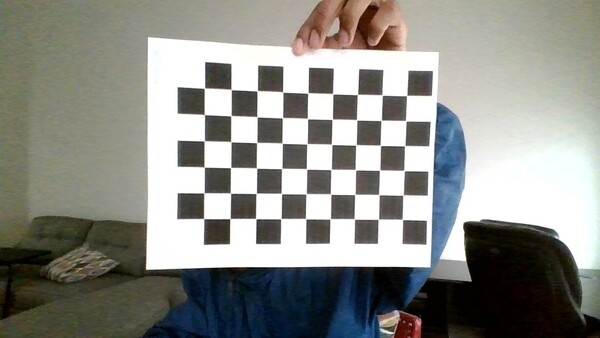
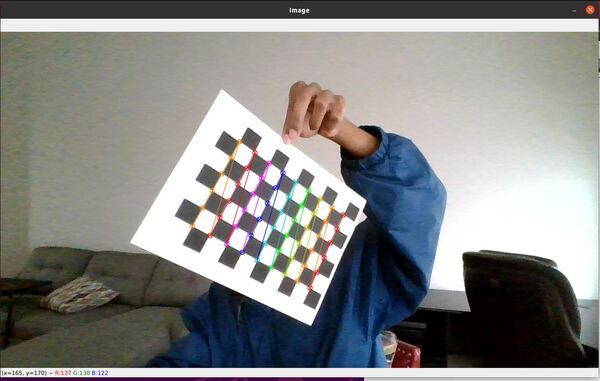
Here is a photo I took for this project. I kept the webcam steady while I moved the chessboard around with my hand and took photos with the built-in webcam on my computer.
Create the Code
Open your favorite code editor, and write the following code. I will name my program camera_calibration.py. This program performs camera calibration using images of chessboards. It also saves the parameters to a yaml file.
#!/usr/bin/env python

'''
Welcome to the Camera Calibration Program!

This program:
  - Performs camera calibration using a chessboard.
'''

from __future__ import print_function # Python 2/3 compatibility
import cv2 # Import the OpenCV library to enable computer vision
import numpy as np # Import the NumPy scientific computing library
import glob # Used to get retrieve files that have a specified pattern

# Project: Camera Calibration Using Python and OpenCV
# Date created: 12/19/2021
# Python version: 3.8

# Chessboard dimensions
number_of_squares_X = 10 # Number of chessboard squares along the x-axis
number_of_squares_Y = 7  # Number of chessboard squares along the y-axis
nX = number_of_squares_X - 1 # Number of interior corners along x-axis
nY = number_of_squares_Y - 1 # Number of interior corners along y-axis
square_size = 0.025 # Size, in meters, of a square side

# Set termination criteria. We stop either when an accuracy is reached or when
# we have finished a certain number of iterations.
criteria = (cv2.TERM_CRITERIA_EPS + cv2.TERM_CRITERIA_MAX_ITER, 30, 0.001)

# Define real world coordinates for points in the 3D coordinate frame
# Object points are (0,0,0), (1,0,0), (2,0,0) ...., (5,8,0)
object_points_3D = np.zeros((nX * nY, 3), np.float32)

# These are the x and y coordinates
object_points_3D[:,:2] = np.mgrid[0:nY, 0:nX].T.reshape(-1, 2)

object_points_3D = object_points_3D * square_size

# Store vectors of 3D points for all chessboard images (world coordinate frame)
object_points = []

# Store vectors of 2D points for all chessboard images (camera coordinate frame)
image_points = []

def main():

  # Get the file path for images in the current directory
  images = glob.glob('*.jpg')

  # Go through each chessboard image, one by one
  for image_file in images:

    # Load the image
    image = cv2.imread(image_file)

    # Convert the image to grayscale
    gray = cv2.cvtColor(image, cv2.COLOR_BGR2GRAY)

    # Find the corners on the chessboard
    success, corners = cv2.findChessboardCorners(gray, (nY, nX), None)

    # If the corners are found by the algorithm, draw them
    if success == True:

      # Append object points
      object_points.append(object_points_3D)

      # Find more exact corner pixels
      corners_2 = cv2.cornerSubPix(gray, corners, (11,11), (-1,-1), criteria)

      # Append image points
      image_points.append(corners_2)

      # Draw the corners
      cv2.drawChessboardCorners(image, (nY, nX), corners_2, success)

      # Display the image. Used for testing.
      cv2.imshow("Image", image)

      # Display the window for a short period. Used for testing.
      cv2.waitKey(1000)

  # Perform camera calibration to return the camera matrix, distortion coefficients, rotation and translation vectors etc
  ret, mtx, dist, rvecs, tvecs = cv2.calibrateCamera(object_points,
                                                    image_points,
                                                    gray.shape[::-1],
                                                    None,
                                                    None)

  # Save parameters to a file
  cv_file = cv2.FileStorage('calibration_chessboard.yaml', cv2.FILE_STORAGE_WRITE)
  cv_file.write('K', mtx)
  cv_file.write('D', dist)
  cv_file.release()

  # Load the parameters from the saved file
  cv_file = cv2.FileStorage('calibration_chessboard.yaml', cv2.FILE_STORAGE_READ)
  mtx = cv_file.getNode('K').mat()
  dst = cv_file.getNode('D').mat()
  cv_file.release()

  # Display key parameter outputs of the camera calibration process
  print("Camera matrix:")
  print(mtx)

  print("\n Distortion coefficient:")
  print(dist)

  # Close all windows
  cv2.destroyAllWindows()

if __name__ == '__main__':
  print(__doc__)
  main()
Save the file, and close it.
Run the Code
To run the program in Linux for example, type the following command:
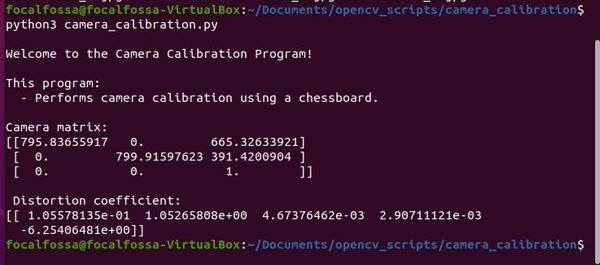
python3 camera_calibration.py
The parameters will be saved to a yaml file. Here is what my yaml file looks like:
%YAML:1.0
---
K: !!opencv-matrix
   rows: 3
   cols: 3
   dt: d
   data: [ 7.9583655916512669e+02, 0., 6.6532633921223646e+02, 0.,
       7.9991597622640393e+02, 3.9142009039738559e+02, 0., 0., 1. ]
D: !!opencv-matrix
   rows: 1
   cols: 5
   dt: d
   data: [ 1.0557813457472758e-01, 1.0526580754799850e+00,
       4.6737646216940517e-03, 2.9071112143870346e-03,
       -6.2540648080086747e+00 ]
You will also see the parameters printed to the terminal window.
Estimate the ArUco Marker Pose Using OpenCV
We will now estimate the pose of the ArUco marker with respect to the camera lens frame.
What is the camera lens frame coordinate system? Imagine you are looking through the camera viewfinder. The:
- positive x-axis points to the right
- positive y-axis points straight down towards your toes
- positive z-axis points straight ahead away from you, out of the camera
Open your favorite code editor and write the following code. I will name my program aruco_marker_pose_estimator.py.
#!/usr/bin/env python

'''
Welcome to the ArUco Marker Pose Estimator!

This program:
  - Estimates the pose of an ArUco Marker
'''

from __future__ import print_function # Python 2/3 compatibility
import cv2 # Import the OpenCV library
import numpy as np # Import Numpy library
from scipy.spatial.transform import Rotation as R
import math # Math library

# Project: ArUco Marker Pose Estimator
# Date created: 12/21/2021
# Python version: 3.8

# Dictionary that was used to generate the ArUco marker
aruco_dictionary_name = "DICT_ARUCO_ORIGINAL"

# The different ArUco dictionaries built into the OpenCV library.
ARUCO_DICT = {
  "DICT_4X4_50": cv2.aruco.DICT_4X4_50,
  "DICT_4X4_100": cv2.aruco.DICT_4X4_100,
  "DICT_4X4_250": cv2.aruco.DICT_4X4_250,
  "DICT_4X4_1000": cv2.aruco.DICT_4X4_1000,
  "DICT_5X5_50": cv2.aruco.DICT_5X5_50,
  "DICT_5X5_100": cv2.aruco.DICT_5X5_100,
  "DICT_5X5_250": cv2.aruco.DICT_5X5_250,
  "DICT_5X5_1000": cv2.aruco.DICT_5X5_1000,
  "DICT_6X6_50": cv2.aruco.DICT_6X6_50,
  "DICT_6X6_100": cv2.aruco.DICT_6X6_100,
  "DICT_6X6_250": cv2.aruco.DICT_6X6_250,
  "DICT_6X6_1000": cv2.aruco.DICT_6X6_1000,
  "DICT_7X7_50": cv2.aruco.DICT_7X7_50,
  "DICT_7X7_100": cv2.aruco.DICT_7X7_100,
  "DICT_7X7_250": cv2.aruco.DICT_7X7_250,
  "DICT_7X7_1000": cv2.aruco.DICT_7X7_1000,
  "DICT_ARUCO_ORIGINAL": cv2.aruco.DICT_ARUCO_ORIGINAL
}

# Side length of the ArUco marker in meters
aruco_marker_side_length = 0.0785

# Calibration parameters yaml file
camera_calibration_parameters_filename = 'calibration_chessboard.yaml'

def euler_from_quaternion(x, y, z, w):
  """
  Convert a quaternion into euler angles (roll, pitch, yaw)
  roll is rotation around x in radians (counterclockwise)
  pitch is rotation around y in radians (counterclockwise)
  yaw is rotation around z in radians (counterclockwise)
  """
  t0 = +2.0 * (w * x + y * z)
  t1 = +1.0 - 2.0 * (x * x + y * y)
  roll_x = math.atan2(t0, t1)

  t2 = +2.0 * (w * y - z * x)
  t2 = +1.0 if t2 > +1.0 else t2
  t2 = -1.0 if t2 < -1.0 else t2
  pitch_y = math.asin(t2)

  t3 = +2.0 * (w * z + x * y)
  t4 = +1.0 - 2.0 * (y * y + z * z)
  yaw_z = math.atan2(t3, t4)

  return roll_x, pitch_y, yaw_z # in radians

def main():
  """
  Main method of the program.
  """
  # Check that we have a valid ArUco marker
  if ARUCO_DICT.get(aruco_dictionary_name, None) is None:
    print("[INFO] ArUCo tag of '{}' is not supported".format(
      args["type"]))
    sys.exit(0)

  # Load the camera parameters from the saved file
  cv_file = cv2.FileStorage(
    camera_calibration_parameters_filename, cv2.FILE_STORAGE_READ)
  mtx = cv_file.getNode('K').mat()
  dst = cv_file.getNode('D').mat()
  cv_file.release()

  # Load the ArUco dictionary
  print("[INFO] detecting '{}' markers...".format(
	aruco_dictionary_name))
  this_aruco_dictionary = cv2.aruco.Dictionary_get(ARUCO_DICT[aruco_dictionary_name])
  this_aruco_parameters = cv2.aruco.DetectorParameters_create()

  # Start the video stream
  cap = cv2.VideoCapture(0)

  while(True):

    # Capture frame-by-frame
    # This method returns True/False as well
    # as the video frame.
    ret, frame = cap.read()

    # Detect ArUco markers in the video frame
    (corners, marker_ids, rejected) = cv2.aruco.detectMarkers(
      frame, this_aruco_dictionary, parameters=this_aruco_parameters,
      cameraMatrix=mtx, distCoeff=dst)

    # Check that at least one ArUco marker was detected
    if marker_ids is not None:

      # Draw a square around detected markers in the video frame
      cv2.aruco.drawDetectedMarkers(frame, corners, marker_ids)

      # Get the rotation and translation vectors
      rvecs, tvecs, obj_points = cv2.aruco.estimatePoseSingleMarkers(
        corners,
        aruco_marker_side_length,
        mtx,
        dst)

      # Print the pose for the ArUco marker
      # The pose of the marker is with respect to the camera lens frame.
      # Imagine you are looking through the camera viewfinder,
      # the camera lens frame's:
      # x-axis points to the right
      # y-axis points straight down towards your toes
      # z-axis points straight ahead away from your eye, out of the camera
      for i, marker_id in enumerate(marker_ids):

        # Store the translation (i.e. position) information
        transform_translation_x = tvecs[i][0][0]
        transform_translation_y = tvecs[i][0][1]
        transform_translation_z = tvecs[i][0][2]

        # Store the rotation information
        rotation_matrix = np.eye(4)
        rotation_matrix[0:3, 0:3] = cv2.Rodrigues(np.array(rvecs[i][0]))[0]
        r = R.from_matrix(rotation_matrix[0:3, 0:3])
        quat = r.as_quat()

        # Quaternion format
        transform_rotation_x = quat[0]
        transform_rotation_y = quat[1]
        transform_rotation_z = quat[2]
        transform_rotation_w = quat[3]

        # Euler angle format in radians
        roll_x, pitch_y, yaw_z = euler_from_quaternion(transform_rotation_x,
                                                       transform_rotation_y,
                                                       transform_rotation_z,
                                                       transform_rotation_w)

        roll_x = math.degrees(roll_x)
        pitch_y = math.degrees(pitch_y)
        yaw_z = math.degrees(yaw_z)
        print("transform_translation_x: {}".format(transform_translation_x))
        print("transform_translation_y: {}".format(transform_translation_y))
        print("transform_translation_z: {}".format(transform_translation_z))
        print("roll_x: {}".format(roll_x))
        print("pitch_y: {}".format(pitch_y))
        print("yaw_z: {}".format(yaw_z))
        print()

        # Draw the axes on the marker
        cv2.aruco.drawAxis(frame, mtx, dst, rvecs[i], tvecs[i], 0.05)

    # Display the resulting frame
    cv2.imshow('frame',frame)

    # If "q" is pressed on the keyboard,
    # exit this loop
    if cv2.waitKey(1) & 0xFF == ord('q'):
      break

  # Close down the video stream
  cap.release()
  cv2.destroyAllWindows()

if __name__ == '__main__':
  print(__doc__)
  main()
Save the file, and close it.
Make sure the calibration_chessboard.yaml file we created earlier is in the same directory as aruco_marker_pose_estimator.py.
You need to have opencv-contrib-python installed and not opencv-python. Open a terminal window, and type:
pip uninstall opencv-python
pip install opencv-contrib-python
Also install scipy.
pip install scipy
To run the program in Linux for example, type the following command (make sure there is a lot of light in your room):
python3 aruco_marker_pose_estimation.py

You might notice that the blue z-axis jitters a bit, or the axis disappears from time to time. Here are a few suggestions on how to improve the pose estimation accuracy:
- Use better lighting conditions.
- Improve your camera calibration parameters by using a lot more than 10 photos of the chessboard pattern.
- Print the AruCo marker on a hard surface like cardboard, or place the ArUco marker on a desk. When the surface of the ArUco marker is curved, the pose estimation algorithm can have problems.
- Use a higher resolution camera.
- Make sure there is enough ArUco marker on the screen.
If you want to restore OpenCV to the previous version after you’re finished creating the ArUco markers, type:
pip uninstall opencv-contrib-python
pip install opencv-python
To set the changes, I recommend rebooting your computer.
That’s it. Keep building!