
In this tutorial, we will build a convolutional neural network that can classify handwritten digits (i.e. 0 through 9). We will train and test our neural networking using the MNIST data set, a large data set of handwritten digits that is often used as a first project for people who are getting started in deep learning for computer vision.

Real-World Applications
The program we develop in this project is the basis for a number of real-world applications, including:
- Convert handwritten notes into text
- Road sign recognition
- Check scanning
- And more…
Prerequisites
- You have TensorFlow 2 Installed.
- Windows 10 Users, see this post.
- If you want to use GPU support for your TensorFlow installation, you will need to follow these steps. If you have trouble following those steps, you can follow these steps (note that the steps change quite frequently, but the overall process remains relatively the same).
- This post can also help you get your system setup, including your virtual environment in Anaconda (if you decide to go this route).
Directions
Open up a new Python program (in your favorite text editor or Python IDE), and write the following code. I’m going to name the program mnist_handwritten_digits.py.
Here is the code. Don’t be afraid of how long the code is. All you need to do is copy the code and paste it in a file. I included a lot of comments. I’ll explain each piece of the code in detail in a second.
# Project: Detect Handwritten Digits Using the MNIST Data Set
# Author: Addison Sears-Collins
# Date created: January 4, 2021
import tensorflow as tf # Machine learning library
from tensorflow import keras # Library for neural networks
from tensorflow.keras.datasets import mnist # MNIST data set
from tensorflow.keras.layers import Conv2D, Dense, Flatten, MaxPooling2D
from tensorflow.keras.optimizers import Adam
from tensorflow.keras.losses import categorical_crossentropy
import numpy as np
from time import time
import matplotlib.pyplot as plt
num_classes = 10 # Number of distinct labels
def generate_neural_network(x_train):
"""
Create a convolutional neural network.
:x_train: Training images of handwritten digits (grayscale)
:return: Neural network
"""
model = keras.Sequential()
# Add a convolutional layer to the neural network
model.add(Conv2D(filters=6, kernel_size=(
5, 5), activation='relu', padding='same', input_shape=x_train.shape[
1:]))
model.add(MaxPooling2D()) # subsampling using max pooling
# Add a convolutional layer to the neural network
model.add(Conv2D(filters=16, kernel_size=(5, 5), activation='relu'))
model.add(MaxPooling2D())
# Add the dense layers
model.add(Flatten())
model.add(Dense(units=120, activation='relu'))
model.add(Dense(units=84, activation='relu'))
# Softmax transforms the prediction into a probability
# The highest probability corresponds to the category of the image (i.e. 0-9)
model.add(Dense(units=num_classes, activation='softmax'))
return model
def tf_and_gpu_ok():
"""
Test if TensorFlow and GPU support are working properly.
"""
# Test code to see if Tensorflow is installed properly
print("Tensorflow:", tf.__version__)
print("Tensorflow Git:", tf.version.GIT_VERSION)
# See if you can use the GPU on your computer
print("CUDA ON" if tf.test.is_built_with_cuda() else "CUDA OFF")
print("GPU ON" if tf.test.is_gpu_available() else "GPU OFF")
def main():
# Uncomment to check if everything is working properly
#tf_and_gpu_ok()
# Load the MNIST data set and make sure the training and testing
# data are four dimensions (which is what Keras needs)
(x_train, y_train), (x_test, y_test) = mnist.load_data()
x_train = np.reshape(x_train, np.append(x_train.shape, (1)))
x_test = np.reshape(x_test, np.append(x_test.shape, (1)))
# Uncomment to display the dimensions of the training data set and the
# testing data set
#print('x_train', x_train.shape, ' --- x_test', x_test.shape)
#print('y_train', y_train.shape, ' --- y_test', y_test.shape)
# Normalize image intensity values to a range between 0 and 1 (from 0-255)
x_train = x_train.astype('float32')
x_test = x_test.astype('float32')
x_train = x_train / 255
x_test = x_test / 255
# Uncomment to display the first 3 labels
#print('First 3 labels for train set:', y_train[0], y_train[1], y_train[2])
#print('First 3 labels for testing set:', y_test[0], y_test[1], y_test[2])
# Perform one-hot encoding
y_train = keras.utils.to_categorical(y_train, num_classes)
y_test = keras.utils.to_categorical(y_test, num_classes)
# Create the neural network
model = generate_neural_network(x_train)
# Uncomment to print the summary statistics of the neural network
#print(model.summary())
# Configure the neural network
model.compile(loss=categorical_crossentropy, optimizer=Adam(), metrics=['accuracy'])
start = time()
history = model.fit(x_train, y_train, batch_size=16, epochs=5, validation_data=(x_test, y_test), shuffle=True)
training_time = time() - start
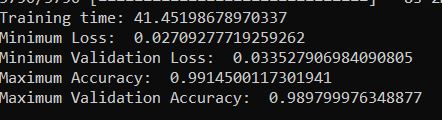
print(f'Training time: {training_time}')
# A measure of how well the neural network learned the training data
# The lower, the better
print("Minimum Loss: ", min(history.history['loss']))
# A measure of how well the neural network did on the validation data set
# The lower, the better
print("Minimum Validation Loss: ", min(history.history['val_loss']))
# Maximum percentage of correct predictions on the training data
# The higher, the better
print("Maximum Accuracy: ", max(history.history['accuracy']))
# Maximum percentage of correct predictions on the validation data
# The higher, the better
print("Maximum Validation Accuracy: ", max(history.history['val_accuracy']))
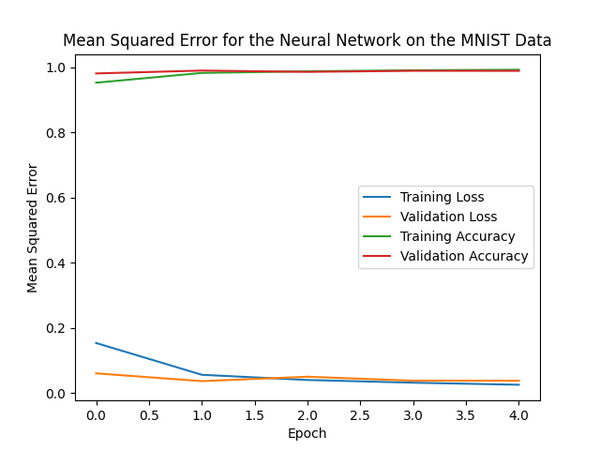
# Plot the key statistics
plt.plot(history.history['loss'])
plt.plot(history.history['val_loss'])
plt.plot(history.history['accuracy'])
plt.plot(history.history['val_accuracy'])
plt.title("Mean Squared Error for the Neural Network on the MNIST Data")
plt.ylabel("Mean Squared Error")
plt.xlabel("Epoch")
plt.legend(['Training Loss', 'Validation Loss', 'Training Accuracy',
'Validation Accuracy'], loc='center right')
plt.show() # Press Q to close the graph
# Save the neural network in Hierarchical Data Format version 5 (HDF5) format
model.save('mnist_nnet.h5')
# Import the saved model
model = keras.models.load_model('mnist_nnet.h5')
print("\n\nNeural network has loaded successfully...\n")
main()
Code Walkthrough
The tf_and_gpu_ok() method is used to check if:
- TensorFlow is installed properly.
- TensorFlow is able to use the GPU (Graphic Processing Unit) on your computer. The GPU on your computer will help speed up the training of your neural network.
If you see the output below when you run the mnist_handwritten_digits.py program…
python mnist_handwritten_digits.py


…the software is installed correctly.
The next piece of code in main displays the dimensions of x_train and y_train. You can see from the output that we train the neural network on 60,000 grayscale images that are 28×28 pixels in size and test the data set on 10,000 grayscale images that are 28×28 pixels in size. Each image contains a handwritten number from 0-9.

At this stage, the intensity for all of the images in the sample ranges from 0-255 (i.e. grayscale). To improve the performance of the neural network, it is helpful to normalize the image intensities to values between 0 and 1. To do this, we need to take the intensity values for each image and divide by the largest value (i.e. 255).
At this stage, we have 10 different labels: 0, 1, 2, 3, 4, 5, 6, 7, 8, 9. These labels represent the 10 different categories (i.e. values) that the handwritten digits could possibly be. To enable the neural network to make better predictions, we need to convert this categorical data into a vector format of just 0s and 1s using a technique known as one-hot encoding.
For each of the 10 possible label values, you get a 10-element vector where only one element is hot (i.e. 1), and the rest of the elements are cold (i.e. 0).
For example, here is the one-hot encoding for the label possibilities in this project:
0 -> 1 0 0 0 0 0 0 0 0 0
1 -> 0 1 0 0 0 0 0 0 0 0
2 -> 0 0 1 0 0 0 0 0 0 0
3 -> 0 0 0 1 0 0 0 0 0 0
4 -> 0 0 0 0 1 0 0 0 0 0
5 -> 0 0 0 0 0 1 0 0 0 0
6 -> 0 0 0 0 0 0 1 0 0 0
7 -> 0 0 0 0 0 0 0 1 0 0
8 -> 0 0 0 0 0 0 0 0 1 0
9 -> 0 0 0 0 0 0 0 0 0 1
Now, we need to generate the neural network. I created a method named generate_neural_network to do just that. If there is something you don’t understand in the code, consult the reference for Keras.
If you want to understand how neural networks make predictions, check out this post.
Here is what you will see for the summary statistics:
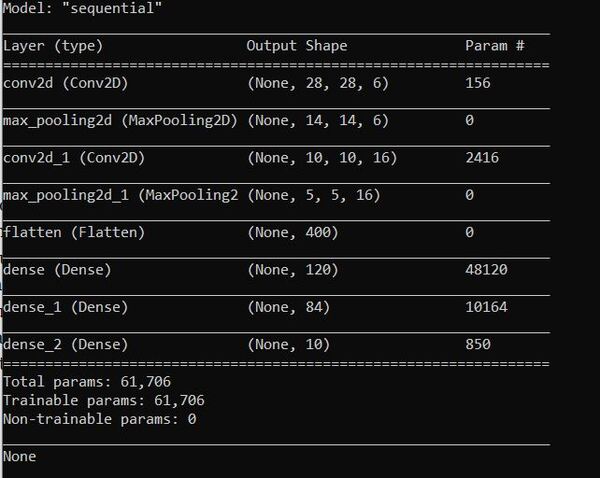
You can see that the neural network has 61,706 parameters. This number is considerably more than the 4,865 parameters used when we used a deep neural network to predict vehicle fuel economy because we are dealing with images rather than just numbers. As the saying goes, “A picture is worth 1,000 words.”
Now that we have constructed our neural network, we need to train it so that it can be able to make predictions (i.e. convert handwritten numbers into digits 0-9).
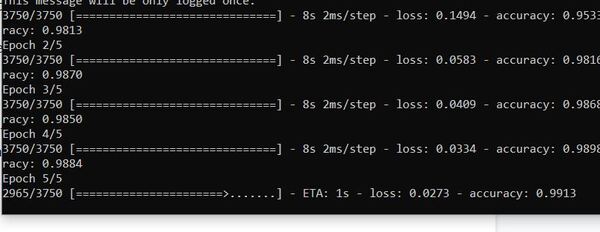
We need to feed our network the training samples that consist of the handwritten digits and the corresponding truth (i.e. the labels 0-9). Then we need to train the model and store the data into the history object. If you run the program and hit issues with the version of cuDNN, go to the Anaconda terminal, and type:
conda install -c anaconda cudnn
When you run the program, you will see that the accuracy statistics are around 99%.
At the end of main, I saved our neural network in Hierarchical Data Format version 5 (HDF5) format. I then added some other code to show you how to load the model if you want to do that at a later date.

That’s it! You now know how to build a neural network to accurately classify handwritten digits.
Keep building!