In this tutorial, we will create a model of a robotic arm from scratch.
Our robotic arm model will be in the standard Unified Robot Description Format, also known as URDF. We will then visualize the robotic arm in RViz, a 3D visualization tool for ROS 2.
This tutorial will follow a previous tutorial I created.
The official tutorial for creating a URDF file is here on the ROS 2 website; but that tutorial only deals with a fictitious robot.
It is far more fun and helpful to show you how to create a URDF file for a real-world robot, like the ones you will work with at your job or at school…like this one…a robotic arm made by Universal Robots that is making an omelette at the M Social Singapore Hotel: A robot made my omelette!
Within ROS 2, defining the URDF file of your robotic arm is important because it allows software tools to understand the robot’s structure, enabling tasks like simulation, motion planning, and sensor data interpretation. It is like giving the robot a digital body that software can interact with.
I will walk through all the steps below for creating the URDF for the myCobot 280 robotic arm by Elephant Robotics. Follow along with me click by click, keystroke by keystroke.
If you prefer to learn by video, you can follow this video below:
Prerequisites
- You have completed this tutorial: How to Create Unit Tests with GTest – ROS 2 Jazzy (recommended)
- I am assuming you are using Visual Studio Code, but you can use any code editor.
You can find all the code here on GitHub.
References for the myCobot 280 Robot
What is a URDF File?
A URDF (Universal Robot Description Format) file is an XML file that describes what a robot should look like in real life. It contains the complete physical description of the robot. Building the body of the robot is the first step when integrating your mobile robot or robotic arm with ROS 2.
The body of a robot consists of two components:
- Links
- Joints
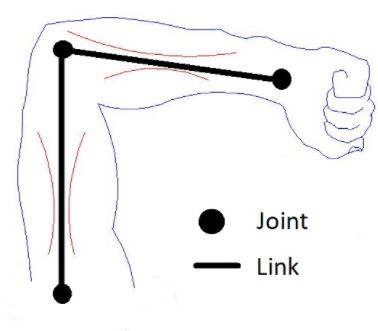
Links are the rigid pieces of a robot. They are the “bones”.
Links are connected to each other by joints. Joints are the pieces of the robot that move, enabling motion between connected links.
Consider the human arm below as an example. The shoulder, elbow, and wrist are joints. The upper arm, forearm and palm of the hand are links.
For a robotic arm, links and joints look like this.
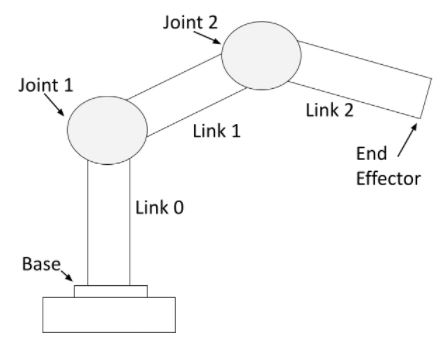
You can see that a robotic arm is made of rigid pieces (links) and non-rigid pieces (joints). Servo motors at the joints cause the links of a robotic arm to move.
For a mobile robot with LIDAR, links and joints look like this:
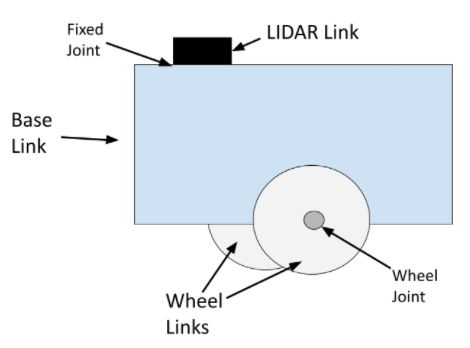
The wheel joints are revolute joints. Revolute joints cause rotational motion. The wheel joints in the photo connect the wheel link to the base link.
Fixed joints have no motion at all. You can see that the LIDAR is connected to the base of the robot via a fixed joint (i.e. this could be a simple screw that connects the LIDAR to the base of the robot).You can also have prismatic joints. The SCARA robot in this post has a prismatic joint. Prismatic joints cause linear motion between links (as opposed to rotational motion).
Create a Package
The first step is to create a ROS 2 package to store all your files.
Open a new terminal window, and create a new folder named mycobot_ros2.
cd ~/ros2_ws/srcmkdir mycobot_ros2cd mycobot_ros2Now create the package where we will store our URDF file.
ros2 pkg create --build-type ament_cmake --license BSD-3-Clause mycobot_descriptionNow, let’s create a metapackage.
I discuss the purpose of a metapackage in this post.
A metapackage doesn’t contain anything except a list of dependencies to other packages. You can use a metapackage to make it easier to install multiple related packages at once.
If you were to make your package available to install publicly using the apt-get package manager on Ubuntu for example, a metapackage would enable someone to automatically install all the ROS2 packages that are referenced in your metapackage.
ros2 pkg create --build-type ament_cmake --license BSD-3-Clause mycobot_ros2cd mycobot_ros2Configure your package.xml file.
gedit package.xmlMake your package.xml file look like this:
<?xml version="1.0"?>
<?xml-model href="http://download.ros.org/schema/package_format3.xsd" schematypens="http://www.w3.org/2001/XMLSchema"?>
<package format="3">
  <name>mycobot_ros2</name>
  <version>0.0.0</version>
  <description>myCobot series robots by Elephant Robotics (metapackage).</description>
  <maintainer email="automaticaddison@todo.todo">ubuntu</maintainer>
  <license>BSD-3-Clause</license>

  <buildtool_depend>ament_cmake</buildtool_depend>

  <exec_depend>mycobot_description</exec_depend>

  <test_depend>ament_lint_auto</test_depend>
  <test_depend>ament_lint_common</test_depend>

  <export>
    <build_type>ament_cmake</build_type>
  </export>
</package>
Add a README.md to describe what the package is about.
cd ..gedit README.md
# mycobot_ros2 #


I also recommend adding placeholder README.md files to the mycobot_ros2 folder.
# mycobot_ros2 #
The my_cobot_ros2 package is a metapackage. It contains lists of dependencies to other packages.
… as well as the mycobot_description folder.
# mycobot_description #
The mycobot_description package contains the robot description files that define the physical aspects of a robot, including its geometry, kinematics, dynamics, and visual aspects.
Now let’s build our new package:
cd ~/ros2_wscolcon buildLet’s see if our new package is recognized by ROS 2.
Either open a new terminal window or source the bashrc file like this:
source ~/.bashrcros2 pkg listYou can see the newly created package of you scroll up to the “m” packages.
Now let’s create the following folders:
mkdir -p ~/ros2_ws/src/mycobot_ros2/mycobot_description/meshes/mycobot_280/visual
mkdir -p ~/ros2_ws/src/mycobot_ros2/mycobot_description/urdf/control
mkdir -p ~/ros2_ws/src/mycobot_ros2/mycobot_description/urdf/mech
mkdir -p ~/ros2_ws/src/mycobot_ros2/mycobot_description/urdf/sensors
mkdir -p ~/ros2_ws/src/mycobot_ros2/mycobot_description/urdf/robots/
Add the Meshes
Mesh files are what make your robotic arm look realistic in robotics simulation and visualization programs.
Mesh files visually represent the 3D shape of the robot parts. These files are typically in formats such as STL (Stereo Lithography – .stl) or COLLADA (.dae).
The mesh files we are going to use were already available in the GitHub repository for Elephant Robotics, the manufacturers of the robotic arm we will be using in this tutorial. We didn’t have to create these files from scratch.
However, if you want to create your own custom 3D printed robotic arm in the future, for example, you can make your own mesh file. Here is how:
- Design the robot’s body using CAD programs like Onshape, Fusion 360, AutoCAD, or Solidworks. These tools help you create 3D models of the robot parts.
- Export the 3D models as mesh files in formats like STL or COLLADA. These files contain information about the robot’s shape, including vertices, edges, and faces.
- If needed, use a tool like Blender to simplify the mesh files. This makes them easier to use in simulations and visualizations.
- Add the simplified mesh files to your URDF file to visually represent what the robot looks like.
Let’s pull these mesh files off GitHub.
First, open a new terminal window, and type:
cd ~/Downloads/Clone the mycobot repository to your machine.
git clone -b jazzy https://github.com/automaticaddison/mycobot_ros2.gitMove to the mesh files for the robotic arm we are going to model:
cp -r mycobot_ros2/mycobot_description/meshes/* ~/ros2_ws/src/mycobot_ros2/mycobot_description/meshes/ls ~/ros2_ws/src/mycobot_ros2/mycobot_description/meshes/mycobot_280/visual/You can see the mesh files (.dae) and the corresponding .png files for the robotic arm.

Configure CMakeLists.txt
Let’s open Visual Studio Code.
cd ~/ros2_ws/code .Configure the CMakeLists.txt for the mycobot_description package. Make sure it looks like this:
cmake_minimum_required(VERSION 3.8)
project(mycobot_description)

# Check if the compiler being used is GNU's C++ compiler (g++) or Clang.
# Add compiler flags for all targets that will be defined later in the
# CMakeLists file. These flags enable extra warnings to help catch
# potential issues in the code.
# Add options to the compilation process
if(CMAKE_COMPILER_IS_GNUCXX OR CMAKE_CXX_COMPILER_ID MATCHES "Clang")
  add_compile_options(-Wall -Wextra -Wpedantic)
endif()

# Locate and configure packages required by the project.
find_package(ament_cmake REQUIRED)
find_package(urdf_tutorial REQUIRED)

# Copy necessary files to designated locations in the project
install (
  DIRECTORY meshes urdf
  DESTINATION share/${PROJECT_NAME}
)

# Automates the process of setting up linting for the package, which
# is the process of running tools that analyze the code for potential
# errors, style issues, and other discrepancies that do not adhere to
# specified coding standards or best practices.
if(BUILD_TESTING)
  find_package(ament_lint_auto REQUIRED)
  # the following line skips the linter which checks for copyrights
  # comment the line when a copyright and license is added to all source files
  set(ament_cmake_copyright_FOUND TRUE)
  # the following line skips cpplint (only works in a git repo)
  # comment the line when this package is in a git repo and when
  # a copyright and license is added to all source files
  set(ament_cmake_cpplint_FOUND TRUE)
  ament_lint_auto_find_test_dependencies()
endif()

ament_package()
Configure package.xml
Make sure your package.xml for the mycobot_description package looks like this:
<?xml version="1.0"?>
<?xml-model href="http://download.ros.org/schema/package_format3.xsd" schematypens="http://www.w3.org/2001/XMLSchema"?>
<package format="3">
  <name>mycobot_description</name>
  <version>0.0.0</version>
  <description>Contains the robot description files that define the physical
    aspects of a robot, including its geometry, kinematics, dynamics, and
    visual aspects.</description>
  <maintainer email="automaticaddison@todo.todo">ubuntu</maintainer>
  <license>BSD-3-Clause</license>

  <buildtool_depend>ament_cmake</buildtool_depend>
  <depend>urdf_tutorial</depend>

  <test_depend>ament_lint_auto</test_depend>
  <test_depend>ament_lint_common</test_depend>

  <export>
    <build_type>ament_cmake</build_type>
  </export>
</package>
Build the Package
Now let’s build the package.
cd ~/ros2_ws/rosdep install -i --from-path src --rosdistro $ROS_DISTRO -yYou will now see this in the terminal:

Type your password, and press Enter to install.
Open a terminal window, and type:
buildIf this command doesn’t work, type these commands:
echo "alias build='cd ~/ros2_ws/ && colcon build && source ~/.bashrc'" >> ~/.bashrcbuildCreate the URDF File
Now let’s create our URDF file. We will actually create it in XACRO format. I will use the terms URDF and XACRO interchangeably going forward.
XACRO files are like blueprints for URDF files, using macros and variables to simplify complex robot descriptions.
Imagine XACRO as the architect drawing up plans, and URDF as the final, ready-to-use construction document. Both file types represent the robotic arm, but XACRO offers more flexibility and organization.
Before a ROS tool or component can use the information in a XACRO file, it must first be processed (translated) into a URDF file. This step allows for the dynamic generation of robot descriptions based on the specific configurations defined in the XACRO file.
Open a terminal window, and type this command to create all the files we need. This is all a single command:
touch ~/ros2_ws/src/mycobot_ros2/mycobot_description/urdf/mech/{g_shape_base_v2_0.urdf.xacro,adaptive_gripper.urdf.xacro,mycobot_280_arm.urdf.xacro} ~/ros2_ws/src/mycobot_ros2/mycobot_description/urdf/robots/mycobot_280.urdf.xacro
Let’s start with creating our gripper: adaptive_gripper.urdf.xacro. Add this code.
Now let’s create the robot base: g_shape_base_v2_0.urdf.xacro. Add this code.
Now let’s create the robot arm: mycobot_280_arm.urdf.xacro. Add this code.
Now let’s create the full robot: mycobot_280.urdf.xacro. Add this code.
Understanding the URDF
Let’s walk through each file so we can understand what is going on.
adaptive_gripper.urdf.xacro
At the very start, we begin with our XML declaration and robot tag – this is standard for any URDF file. The xacro namespace tells us we’re using Xacro macros for more maintainable robot descriptions.
Looking at the first block of properties, these define the core characteristics of our gripper’s joints:
<xacro:property name="joint_effort" value="56.0"/>
<xacro:property name="joint_velocity" value="2.792527"/>
<xacro:property name="joint_damping" value="0.0"/>
<xacro:property name="joint_friction" value="0.0"/>
These values control how much force our joints can exert (effort), how fast they can move (velocity), and their friction/damping characteristics. Think of these as the physical limitations we’re putting on our gripper’s movements.
Next, we define some mass and inertial properties:
<xacro:property name="gripper_link_mass" value="0.007"/>
<xacro:property name="gripper_link_ixx" value="1e-6"/>
<xacro:property name="gripper_link_iyy" value="1e-6"/>
<xacro:property name="gripper_link_izz" value="1e-6"/>
These properties describe the mass of our gripper components and how their mass is distributed (inertia). These values are important for accurate physics simulation.
We then see a macro called gripper_link_inertial. This is a reusable template for inertial properties that we’ll use multiple times:
<xacro:macro name="gripper_link_inertial">
    <inertial>
      <origin xyz="0 0 0.0" rpy="0 0 0"/>
      <mass value="${gripper_link_mass}"/>
      <inertia ixx="${gripper_link_ixx}" ixy="0.0" ixz="0.0"
               iyy="${gripper_link_iyy}" iyz="0.0"
               izz="${gripper_link_izz}"/>
    </inertial>
</xacro:macro>
The main gripper definition starts with <xacro:macro name=”adaptive_gripper”>. This macro takes three parameters:
- parent: what the gripper attaches to
- prefix: a namespace prefix for unique naming
- origin: where the gripper mounts
Looking at the links, we start with the gripper base. Each link has three main components:
<link name="${prefix}gripper_base">
    <inertial>...</inertial>    <!-- Physical properties -->
    <visual>...</visual>        <!-- How it looks -->
    <collision>...</collision>  <!-- Simplified shape for collision detection -->
</link>
The visual elements use mesh files (.dae format) for realistic appearance, while collision uses simple geometric shapes (boxes) for efficient collision checking.
Moving down, we see several joints. The key joint is gripper_controller, which is the main control point. Other joints are marked as “mimic” joints, meaning they follow the controller’s movement.
In the mimic element:
- joint: The name of the joint to mimic.
- multiplier: Scales the movement.
- offset: Adds an offset to the movement.
   <joint name="${prefix}gripper_controller" type="revolute">
      <axis xyz="0 0 1"/>
      <limit effort="${joint_effort}" lower="-0.7" upper="0.15" velocity="${joint_velocity}"/>
      <parent link="${prefix}gripper_base"/>
      <child link="${prefix}gripper_left3"/>
      <origin xyz="-0.012 0.005 0" rpy="0 0 0"/>
      <dynamics damping="${joint_damping}" friction="${joint_friction}"/>
    </joint>

    <joint name="${prefix}gripper_base_to_${prefix}gripper_left2" type="revolute">
      <axis xyz="0 0 1"/>
      <limit effort="${joint_effort}" lower="-0.8" upper="0.5" velocity="${joint_velocity}"/>
      <parent link="${prefix}gripper_base"/>
      <child link="${prefix}gripper_left2"/>
      <origin xyz="-0.005 0.027 0" rpy="0 0 0"/>
      <mimic joint="${prefix}gripper_controller" multiplier="1.0" offset="0"/>
      <dynamics damping="${joint_damping}" friction="${joint_friction}"/>
    </joint>
The joint definitions include:
- axis: which direction it rotates
- limits: how far it can move
- parent/child relationships: how parts connect
- origin: where the joint is located relative to its parent
Finally, at the bottom, we have Gazebo-specific elements that define how the gripper appears in simulation:
<gazebo reference="${prefix}gripper_base">
    <visual>
        <material>...</material>
    </visual>
</gazebo>
The overall structure creates a gripper with six synchronized moving parts (three on each side) that can open and close to grasp objects. The gripper’s movement is controlled through a single main joint, with other joints following in a coordinated fashion.
g_shape_base_v2_0.urdf.xacro
Starting at the top, we have the standard XML declaration and robot tag with the xacro namespace. This is the same setup as our previous file.
The file defines a single macro called g_shape_base that takes two parameters:
- base_link: The name of the base link
- prefix: A namespace prefix for unique naming
Inside this macro, we define a single link with standard URDF components.
The inertial properties describe the physical characteristics.
- origin: The position (xyz) and orientation (rpy: roll, pitch, yaw) of the link’s center of mass.
- mass: The mass of the link in kilograms.
- inertia: This describes how the mass is distributed, affecting how the link resists rotational motion.
<inertial>
    <origin xyz="0 0 0.0" rpy="0 0 0"/>  <!-- Center of mass at origin -->
    <mass value="0.33"/>                  <!-- Mass in kilograms -->
    <inertia                              <!-- Inertia matrix values -->
        ixx="0.000784" ixy="0.0" ixz="0.0"
        iyy="0.000867" iyz="0.0"
        izz="0.001598"/>
</inertial>
The visual component uses a mesh file for appearance. In this section, we specify how the link appears in simulations:
- geometry: The shape of the link, defined here using a mesh file.
- origin: The position and orientation of the visual representation.
<visual>
    <geometry>
        <mesh filename="file://$(find mycobot_description)/meshes/g_shape_base_v2_0/visual/base_link.dae"/>
    </geometry>
    <origin xyz="0.0 0 -0.03" rpy="0 0 ${pi/2}"/>  <!-- Offset and rotated 90 degrees -->
</visual>
The collision geometry uses a simple box shape for efficient collision detection:
- geometry: Again, the shape, using the same mesh file.
- origin: Position and orientation for collision purposes.
<collision>
    <geometry>
        <box size="0.105 0.14 0.02"/>  <!-- Box dimensions in meters -->
    </geometry>
    <origin xyz="0.0 0.0 -0.015" rpy="0 0 0"/>
</collision>
Finally, there’s a Gazebo-specific section that defines how the base appears in simulation, with gray coloring (0.5, 0.5, 0.5):
<gazebo reference="${prefix}${base_link}">
    <visual>
        <material>
            <ambient>0.5 0.5 0.5 1</ambient>
            <diffuse>0.5 0.5 0.5 1</diffuse>
            <specular>0.5 0.5 0.5 1</specular>
        </material>
    </visual>
</gazebo>
This file is much simpler than the gripper because it’s just describing a static base piece – there are no joints or moving parts. It’s essentially defining a gray platform that other robot components can be mounted to.
mycobot_280_arm.urdf.xacro
At the top, we start with our common joint properties. These will be used for all the moving joints in the arm:
<xacro:property name="joint_effort" value="56.0"/>      <!-- Maximum force the joint can exert -->
<xacro:property name="joint_velocity" value="2.792527"/> <!-- Maximum joint velocity -->
<xacro:property name="joint_damping" value="0.0"/>      <!-- Joint damping coefficient -->
<xacro:property name="joint_friction" value="0.0"/>     <!-- Joint friction coefficient →
Then we define the masses for each link in the arm:
<xacro:property name="link1_mass" value="0.12"/>
<xacro:property name="link2_mass" value="0.19"/>
<!-- ... and so on for links 3-6 and flange -->
The file includes two helpful macros to reduce code repetition:
- link_inertial: A template for defining inertial properties of links
- material_visual: A template for defining how links appear in Gazebo simulation
The main robot arm definition is in the mycobot_280_arm macro. This takes parameters for the base link name, flange link name, and a prefix for unique naming.
For each link (link1 through link6 plus the flange), we define:
<link name="${prefix}linkN">
    <inertial>...</inertial>    <!-- Physical properties using the link_inertial macro -->
    <visual>                    <!-- Visual appearance using mesh files -->
        <geometry>
            <mesh filename="..."/>
        </geometry>
    </visual>
    <collision>                 <!-- Simplified shapes for collision detection -->
        <geometry>
            <cylinder/> or <box/>
        </geometry>
    </collision>
</link>
The joints connecting these links are defined next. The first joint is fixed, while the others are revolute (rotating) joints:
- name: The name of the joint.
- type: The type of joint, which can be ‘fixed’, ‘revolute’, or others. A ‘fixed’ joint means no relative motion between the connected links.
- parent and child: The links this joint connects.
- origin: The position and orientation of the joint relative to the parent link.
<joint name="${prefix}linkN_to_${prefix}linkN+1" type="revolute">
    <axis xyz="0 0 1"/>         <!-- Rotation axis -->
    <limit effort="${joint_effort}"
           lower="-2.879793"
           upper="2.879793"
           velocity="${joint_velocity}"/>  <!-- Motion limits -->
    <parent link="${prefix}linkN"/>       <!-- Which link it's attached to -->
    <child link="${prefix}linkN+1"/>      <!-- Which link it moves -->
    <origin xyz="x y z" rpy="r p y"/>     <!-- Position and orientation -->
</joint>
For revolute joints, we typically specify the following parameters:
- axis: The axis of rotation.
- 0 0 1 means we have rotation around the z axis of the parent coordinate frame.
- limit: This parameter defines the motion limits.
- effort: Maximum torque the joint can apply. Torque is the twisting force that makes something turn or rotate.
- lower and upper: The range of allowed angles in radians.
- velocity: Maximum angular velocity in radians per second.
- damping: This parameter measured in Newton-meters per radian per second (N⋅m⋅s/rad), determines how much the joint resists moving at a certain speed, similar to how a shock absorber in a car slows down the movement of the wheels over bumps.
Finally, at the bottom, we set the visual properties for each link in Gazebo:
<xacro:material_visual ref_link="${prefix}link1"
    ambient="0.5 0.5 0.5 1"
    diffuse="0.5 0.5 0.5 1"
    specular="0.5 0.5 0.5 1"/>
Most links are set to white (1 1 1), while the base and flange are gray (0.5 0.5 0.5).
This URDF describes a complete 6-axis robot arm with:
- Realistic mass and inertial properties
- Detailed 3D meshes for visualization
- Simplified collision geometries for physics
- Joint limits and dynamics
- Consistent materials for simulation
mycobot_280.urdf.xacro
This file brings everything together.
At the top, we define several arguments that control how the robot is configured:
<xacro:arg name="add_world" default="true"/>      <!-- Whether to add a world link -->
<xacro:arg name="base_link" default="base_link"/> <!-- Name of the base link -->
<xacro:arg name="base_type" default="g_shape"/>   <!-- Type of base to use -->
<xacro:arg name="flange_link" default="link6_flange"/> <!-- Name of end flange -->
<xacro:arg name="gripper_type" default="adaptive_gripper"/> <!-- Type of gripper -->
<xacro:arg name="prefix" default=""/>        <!-- Prefix for naming -->
<xacro:arg name="use_gripper" default="true"/>    <!-- Whether to add a gripper -->
If add_world is true, we create a world link and connect our robot to it:
<xacro:if value="$(arg add_world)">
    <link name="world"/>
    <joint name="$(arg prefix)virtual_joint" type="fixed">
        <parent link="world"/>
        <child link="$(arg prefix)$(arg base_link)"/>
        <origin xyz="0 0 0" rpy="0 0 0"/>
    </joint>
</xacro:if>
Next, we handle the base:
<xacro:if value="${current_base == 'g_shape'}">
    <xacro:include filename="...g_shape_base_v2_0.urdf.xacro"/>
    <xacro:g_shape_base
        base_link="$(arg base_link)"
        prefix="$(arg prefix)"/>
</xacro:if>
Then we include and configure the main robot arm:
<xacro:include filename="...mycobot_280_arm.urdf.xacro"/>
<xacro:mycobot_280_arm
    base_link="$(arg base_link)"
    flange_link="$(arg flange_link)"
    prefix="$(arg prefix)">
    <origin xyz="0 0 0" rpy="0 0 0"/>
</xacro:mycobot_280_arm>
Finally, if we want a gripper, we add it:
<xacro:if value="$(arg use_gripper)">
    <xacro:if value="${current_gripper == 'adaptive_gripper'}">
        <xacro:include filename="...adaptive_gripper.urdf.xacro"/>
        <xacro:adaptive_gripper
            parent="$(arg flange_link)"
            prefix="$(arg prefix)">
            <origin xyz="0 0 0.034" rpy="1.579 0 0"/>
        </xacro:adaptive_gripper>
    </xacro:if>
</xacro:if>
This file acts as the main assembly file, bringing together:
- Optional world connection
- The base
- The 6-axis robot arm
- Optional adaptive gripper
Each component is included as a separate file and configured using the arguments at the top. This modular approach makes it easy to swap out different bases or grippers, or create multiple robots with different configurations.
And that’s a detailed walkthrough of our XACRO file.
We’ve covered everything from declaring the robot model, defining links and joints, to setting up properties and mimics.
XACRO files look complex the first time you see one. I remember the first time I looked at a XACRO file, and I got scared at how complicated it looked. Breaking them down into their components helps us understand how each part contributes to the robot’s functionality.
Build the Package
Now let’s build the package.
buildVisualize the URDF File
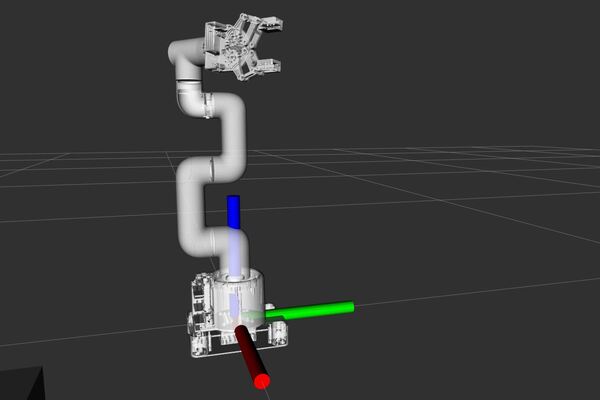
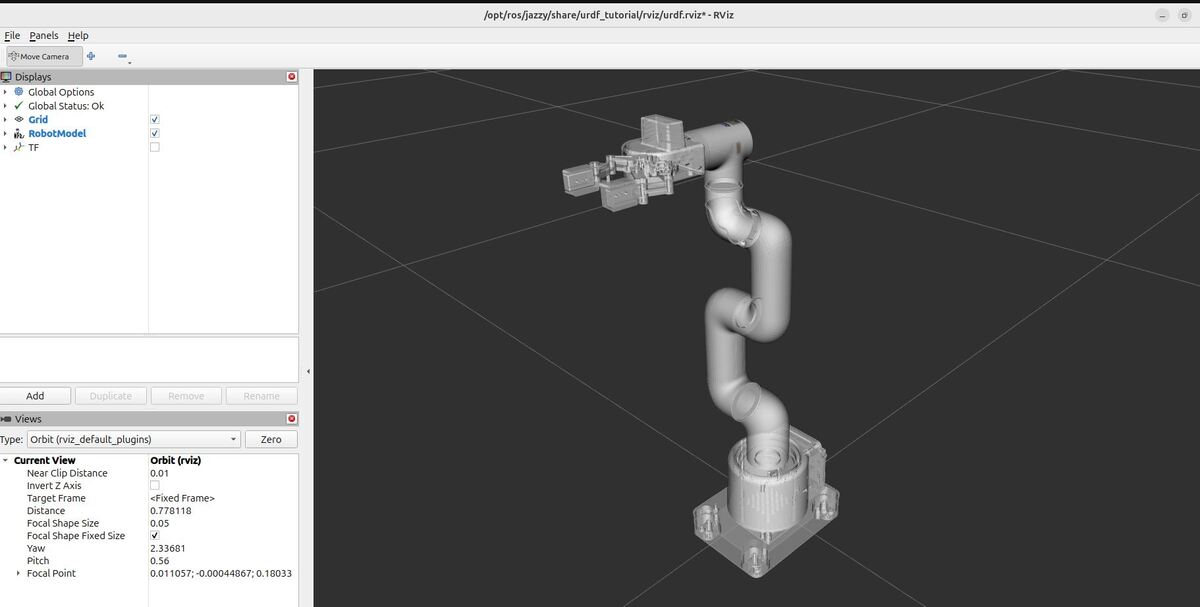
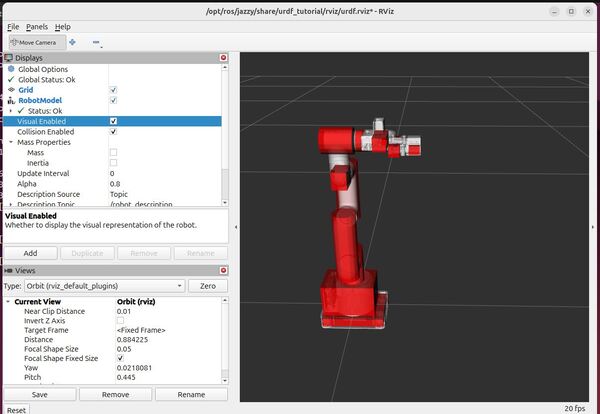
Let’s see the URDF file in RViz.
Launch the URDF file. The conversion from XACRO to URDF happens behind the scenes. Be sure to have the correct path to your XACRO file.
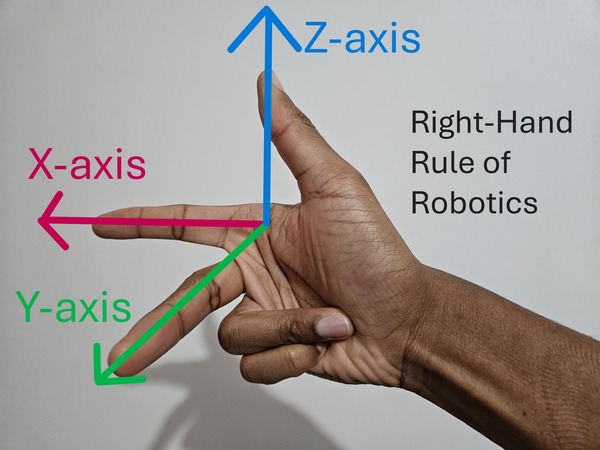
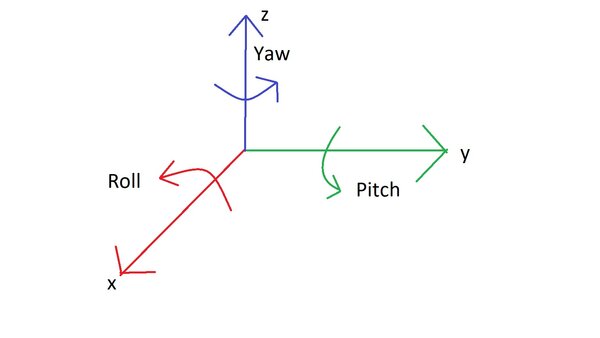
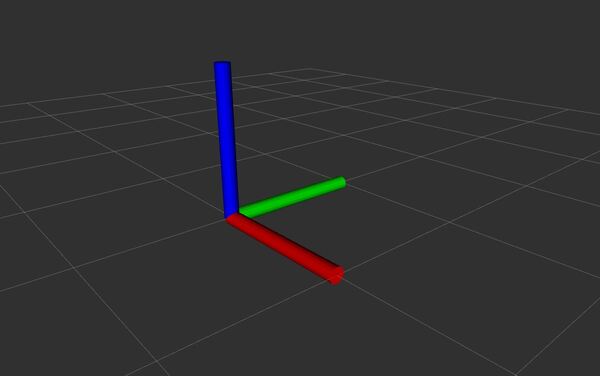
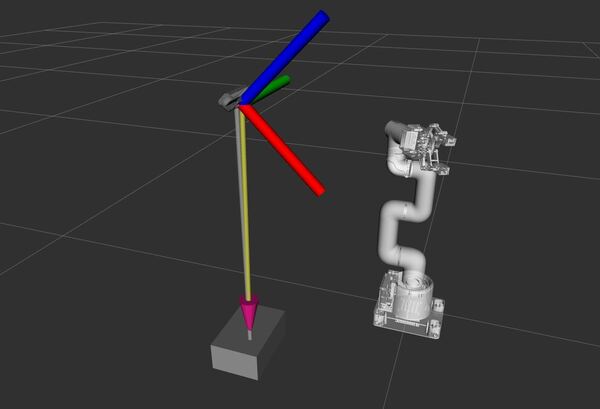
ros2 launch urdf_tutorial display.launch.py model:=/home/ubuntu/ros2_ws/src/mycobot_ros2/mycobot_description/urdf/robots/mycobot_280.urdf.xacroBy convention, the red axis is the x-axis, the green axis in the y-axis, and the blue axis is the z-axis.
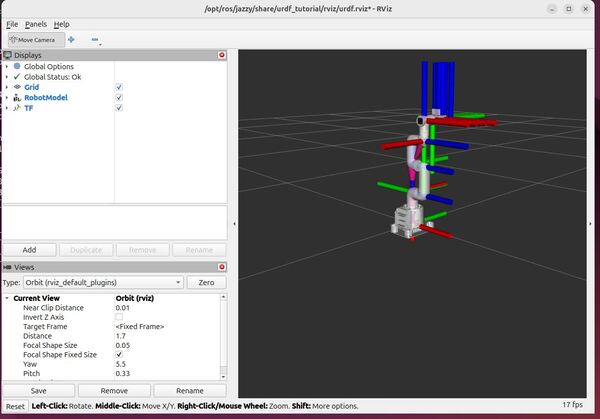
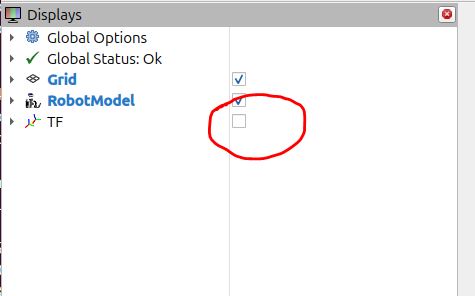
Uncheck the TF checkbox to turn off the axes.
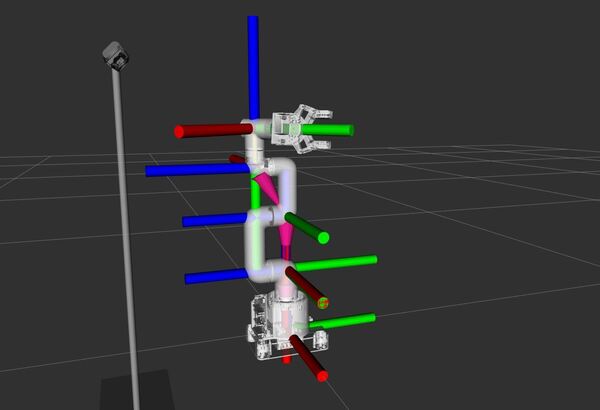
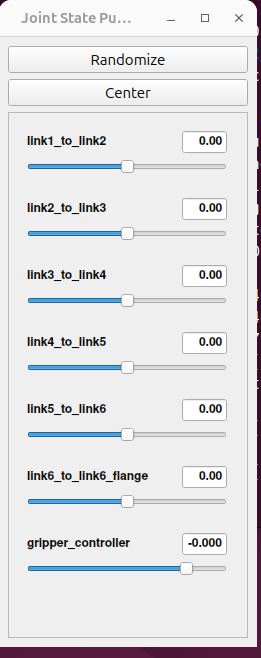
You can use the Joint State Publisher GUI pop-up window to move the links around.
On the left panel under Displays, play around by checking and unchecking different options.
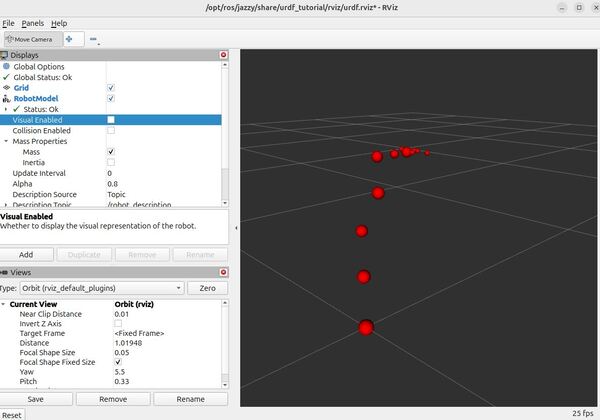
For example, under Robot Model, you can see how the mass is distributed for the robot arm by unchecking “Visual Enabled” and “Collision Enabled” and checking the “Mass” checkbox under “Mass Properties”.
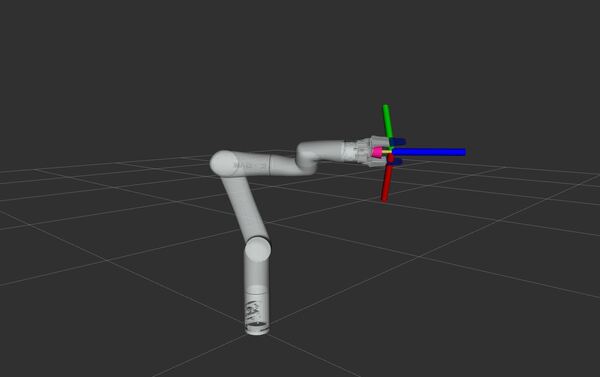
You can also see what simulation engines will use to detect collisions when the robotic arm is commanded to go to a certain point.
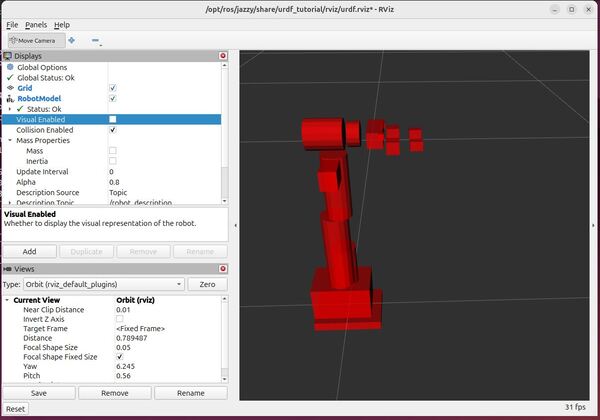
Uncheck “Visual Enabled” under Robot Model and check “Collision Enabled.”
You can also see the coordinate frames.
Open a new terminal window, and type the following commands:
cd ~/Documents/ros2 run tf2_tools view_framesTo see the coordinate frames, type:
direvince frames_YYYY-MM-DD_HH.MM.SS.pdf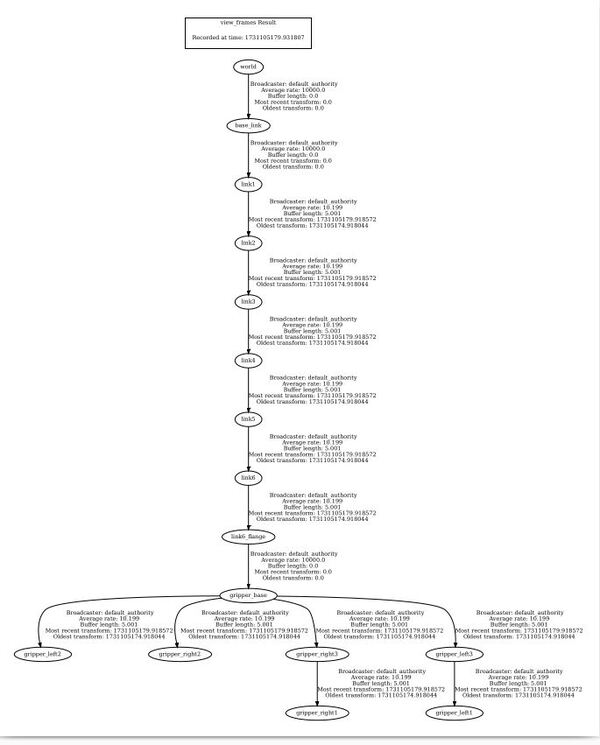
To close RViz, press CTRL + C.
So we can quickly visualize our robot in the future, let’s add a bash command that will enable us to quickly see our URDF.
echo "alias elephant='ros2 launch urdf_tutorial display.launch.py model:=/home/ubuntu/ros2_ws/src/mycobot_ros2/mycobot_description/urdf/robots/mycobot_280.urdf.xacro'" >> ~/.bashrcTo see it was added, type:
cat ~/.bashrcbuildGoing forward, if you want to see your URDF file, type this command in the terminal window:
elephantThat’s it. Keep building, and I will see you in the next tutorial!