How to Install ROS 2 Navigation (Nav2) – ROS 2 Jazzy

In this tutorial, I will walk you through the process of installing the ROS 2 Navigation (Nav2) stack. By the end of this tutorial, you will have Nav2 fully installed on your system, and you will be able to run this demo:

install-ros2-nav2-jazzy

We will use concepts both from the official Nav2 website as well as the official tutorials.

If you prefer to learn by video, you can follow this video below:

What is ROS 2 Navigation (Nav2)?

ROS 2 Navigation, or Nav2 for short, is a set of ROS 2 packages that provide a complete solution for autonomous robot navigation. It includes modules for localization, mapping, path planning, and control, allowing robots to navigate through their environment safely and efficiently. Nav2 is built on top of the ROS 2 framework, leveraging its modularity, scalability, and robustness.

Real-World Applications

Nav2 has numerous real-world applications across various industries. Some examples include:

  • Warehouse automation: Autonomous mobile robots (AMRs) equipped with Nav2 can navigate warehouses, pick up and deliver goods, and optimize inventory management.
  • Healthcare and hospitality: Robots powered by Nav2 can assist in hospitals, hotels, and restaurants, navigating through dynamic environments and interacting with humans.
  • Agricultural robotics: Nav2 enables autonomous tractors and harvesters to navigate fields, monitor crops, and perform precision farming tasks.

Types of Robots That Can Use ROS 2 Navigation

Nav2 is versatile and can be used with a wide range of robot platforms, including:

  • Differential drive robots: Robots with two independently driven wheels, such as the TurtleBot and the iRobot Create.
  • Holonomic robots: Robots that can move in any direction without changing their orientation, like the Yahboom ROSMASTER X3.
  • Ackermann steering robots: Robots with car-like steering, such as autonomous vehicles and some agricultural robots.

Prerequisites

All my code for this project is located here on GitHub.

Create Packages

Navigate to your workspace, and create the following packages. You can replace the maintainer-name and maintainer email with your own information.

cd ~/ros2_ws/src/yahboom_rosmaster/
ros2 pkg create --build-type ament_cmake \
                --license BSD-3-Clause \
                --maintainer-name ubuntu \
                --maintainer-email automaticaddison@todo.com \
                yahboom_rosmaster_localization
ros2 pkg create --build-type ament_cmake \
                --license BSD-3-Clause \
                --maintainer-name ubuntu \
                --maintainer-email automaticaddison@todo.com \
               yahboom_rosmaster_navigation

Update the package.xml files for all packages, including the metapackage. Be sure to add a good description line for each.

You can also update the metapackage with the new packages you just created.

cd yahboom_rosmaster
gedit package.xml
<?xml version="1.0"?>
<?xml-model href="http://download.ros.org/schema/package_format3.xsd" schematypens="http://www.w3.org/2001/XMLSchema"?>
<package format="3">
  <name>yahboom_rosmaster</name>
  <version>0.0.0</version>
  <description>ROSMASTER series robots by Yahboom (metapackage).</description>
  <maintainer email="automaticaddison@todo.todo">ubuntu</maintainer>
  <license>BSD-3-Clause</license>

  <buildtool_depend>ament_cmake</buildtool_depend>

  <exec_depend>yahboom_rosmaster_bringup</exec_depend>
  <exec_depend>yahboom_rosmaster_description</exec_depend>
  <exec_depend>yahboom_rosmaster_gazebo</exec_depend>
  <exec_depend>yahboom_rosmaster_localization</exec_depend>
  <exec_depend>yahboom_rosmaster_navigation</exec_depend>
  <exec_depend>yahboom_rosmaster_system_tests</exec_depend>

  <test_depend>ament_lint_auto</test_depend>
  <test_depend>ament_lint_common</test_depend>

  <export>
    <build_type>ament_cmake</build_type>
  </export>
</package>

Edit package.xml

Now let’s make sure some key packages are installed.

Open a terminal window, and go to your package.xml folder inside the yahboom_rosmaster_navigation package.

cd ~/ros2_ws/src/yahboom_rosmaster/yahboom_rosmaster_navigation

Open the package.xml file.

Make sure it has these blocks:

…
 <description>Navigation package for ROSMASTER series robots by Yahboom</description>
…

  <depend>navigation2</depend>
  <depend>nav2_bringup</depend>
  <depend>nav2_simple_commander</depend>
  <depend>slam_toolbox</depend>
…

Open a terminal window, and go to your package.xml folder inside the yahboom_rosmaster_localization package.

cd ~/ros2_ws/src/yahboom_rosmaster/yahboom_rosmaster_localization

Open the package.xml file.

Make sure it has these blocks:

…
 <description>Localization package for ROSMASTER series robots by Yahboom</description>
…

  <depend>robot_localization</depend>

…

Edit CMakeLists.txt

Now open the CMakeLists.txt file of the yahboom_rosmaster_navigation package, and add this block:

find_package(navigation2 REQUIRED)
find_package(nav2_bringup REQUIRED)
find_package(slam_toolbox REQUIRED)

Now open the CMakeLists.txt file of the yahboom_rosmaster_localization package, and add this block:

find_package(robot_localization REQUIRED)

Build the Workspace

Now let’s build our workspace.

cd ~/ros2_ws/
rosdep install --from-paths src --ignore-src -r -y

Install any required dependencies. You should then see:

#All required rosdeps installed successfully

If you encounter errors installing the navigation and localization packages, type this:

echo "deb [arch=$(dpkg --print-architecture) signed-by=/usr/share/keyrings/ros-archive-keyring.gpg] http://packages.ros.org/ros2/ubuntu $(. /etc/os-release && echo $UBUNTU_CODENAME) main" | sudo tee /etc/apt/sources.list.d/ros2.list > /dev/null
sudo apt-get update -y
sudo apt-get upgrade -y

Then try building again:

cd ~/ros2_ws/
rosdep install --from-paths src --ignore-src -r -y
colcon build && source ~/.bashrc

Let’s add a shortcut alias to make building our workspace quicker:

echo "alias build='cd ~/ros2_ws/ && colcon build && source ~/.bashrc'" >> ~/.bashrc

Now going forward, any time you want to build you workspace, just type:

build

Test Your Installation

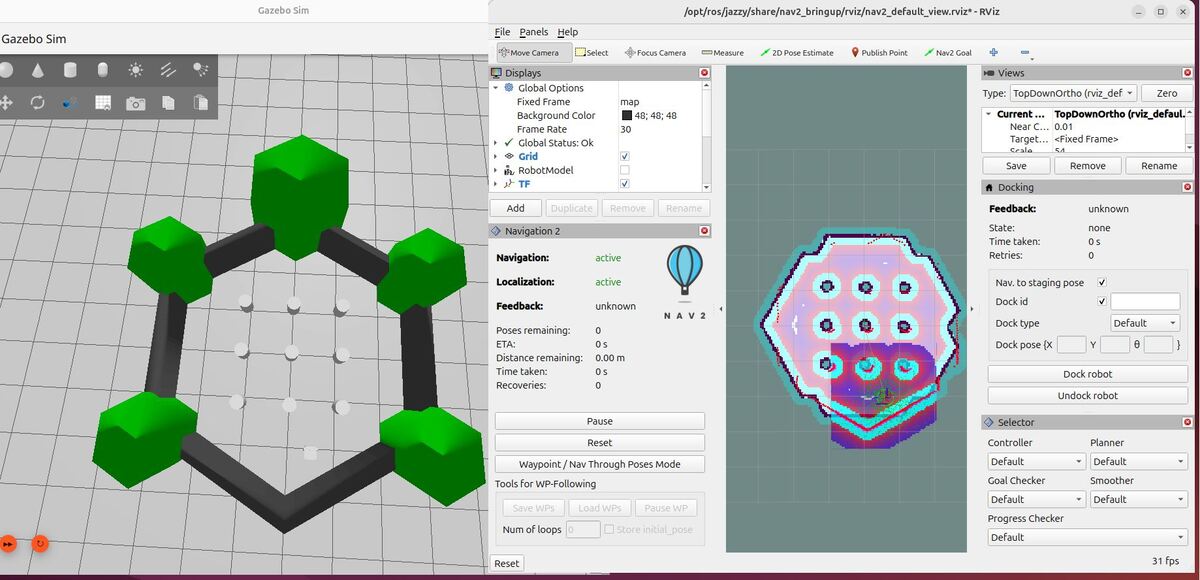
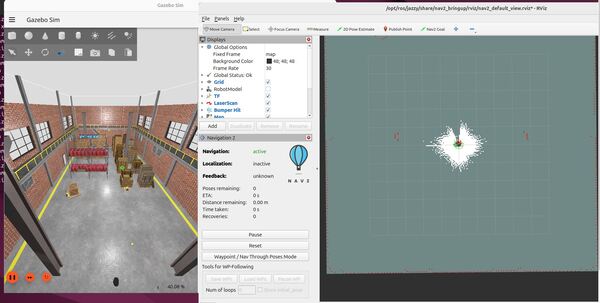
To test your installation, type the following command in the terminal window:

ros2 launch nav2_bringup tb3_simulation_launch.py headless:=False

To move the robot around, first set the initial pose in RViz based on where you think the robot is located and the direction you think the robot is pointed. 

Click the 2D Pose Estimate button.

2-2d-pose-estimate

Click and hold where you think the robot is and then drag your mouse in the direction the robot is oriented.

Now click the Nav2 Goal button.

3-nav2-goal

Click and hold where you want to send the robot. And drag in the direction of your desired goal orientation.

The robot will move to the goal.

4-move-to-goal

Press CTRL + C to close everything.

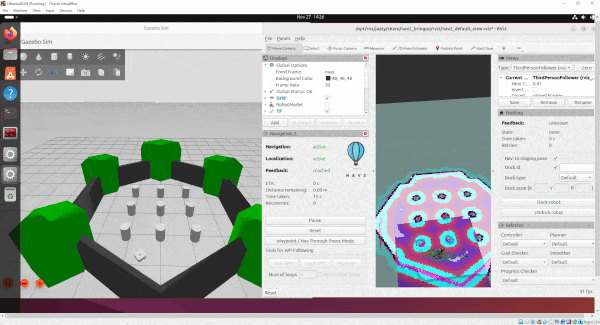
To test mapping, open a terminal window, and type the following command:

ros2 launch nav2_bringup tb4_simulation_launch.py slam:=True headless:=False

Click and hold where you want to send the robot. And drag in the direction of your desired goal orientation.

5-creating-a-map

The robot will move to the goal and map in the process.

6-creating-a-map-2

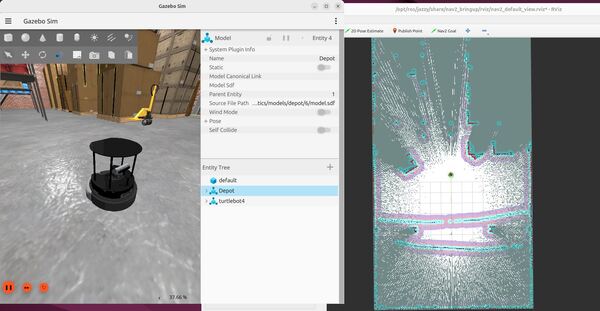
Press CTRL + C when you’re done.

That’s it. Keep building!

How to Write a ROS 2 Service in C++ – ROS 2 Jazzy

In this tutorial, we’ll create a ROS 2 service using C++

A ROS 2 service is a way for different parts of a robot system to communicate with each other by sending a request and receiving a response, similar to making a phone call and waiting for an answer. This form of communication is different from the publish-subscribe communication method, where one part of the system continuously broadcasts information, and any other parts that are interested can listen in, like a radio station broadcasting to many listeners. 

With a service, the communication is direct and specific, where the caller sends a request to a particular service provider and waits for a response before proceeding. In contrast, publish-subscribe allows for more flexible and asynchronous communication between multiple parts of the system without waiting for specific responses.

Services are useful when you need a quick but specific task done, and you need to wait for it to finish before moving on. You generally do not want to use a service if you need to make continuous calls for information. If you need to make continuous calls for information, topics are better suited.

Real-World Applications

Here are some real-world examples of how ROS 2 service and client nodes can be used in robotic applications:

  • Starting a Robot Vacuum Cleaner
    • Service: A service node called start_cleaning is created. When this service is called, it initiates the cleaning process of the robot vacuum cleaner.
    • Client: A client node calls the start_cleaning service to begin the cleaning process. It waits for a response from the service confirming that the cleaning process has started.
  • Localization on a Map
    • Service: A service node determines the current position and orientation of a robot on a map based on a provided map and LIDAR scans.
    • Client: A client node requests the current position and orientation of a robot on a map.
  • Gripper Control
    • Service: A service node controls the robotic arm’s gripper to open or close.
    • Client: A client node sends requests to the gripper service to open the gripper to release an object into a bin.

Prerequisites

All my code for this project is located here on GitHub.

Creating a Cleaning Service for a Robotic Vacuum Cleaner  

Let’s imagine we have a fictitious robotic vacuum cleaner:

  • If this service is called with a value of True, the robot will start cleaning.
  • If this service is called with a value of False, the robot will stop cleaning.

The name of the service is /set_cleaning_state.

We will call the service using the following syntax:

ros2 service call <service_name> <service_type> <arguments>

To start cleaning, we will run this command:

ros2 service call /set_cleaning_state yahboom_rosmaster_msgs/srv/SetCleaningState "{desired_cleaning_state: true}"

To stop cleaning, we will run this command:

ros2 service call /set_cleaning_state yahboom_rosmaster_msgs/srv/SetCleaningState "{desired_cleaning_state: false}"

Create a Custom Service Definition

Create the srv folder inside the yahboom_rosmaster_msgs package:

cd ~/ros2_ws/src/yahboom_rosmaster/yahboom_rosmaster_msgs
mkdir srv

Create the service definition file SetCleaningState.srv inside the srv folder:

cd srv

Open the SetCleaningState.srv file and add the following content:

# Request
bool desired_cleaning_state  # Request: true to start cleaning, false to stop
---
bool success                 # Response: whether the request was successful
string message               # Response: information about the result

Update CMakeLists.txt

Add these lines to yahboom_rosmaster_msgs/CMakeLists.txt:

# Find required packages
find_package(ament_cmake REQUIRED)
find_package(rosidl_default_generators REQUIRED)

# Generate interfaces
rosidl_generate_interfaces(${PROJECT_NAME}
  "action/TimedRotation.action"
  "srv/SetCleaningState.srv"
)

ament_package()

Build the Service Messages

cd ~/ros2_ws
colcon build
source ~/.bashrc

Confirm the service creation:

ros2 interface show yahboom_rosmaster_msgs/srv/SetCleaningState
1-create-a-service

Write the Service Node

Let’s write the service node.

Create the set_cleaning_state_service.cpp file inside the src directory of yahboom_rosmaster_system_tests:

cd ~/ros2_ws/src/yahboom_rosmaster/yahboom_rosmaster_system_tests/src

Add the following content:

/**
 * @file set_cleaning_state_service.cpp
 * @brief ROS 2 node that implements a service to set the cleaning state of a robot
 *
 * This program implements a ROS 2 node that provides a service to set the cleaning state
 * of a robot. It demonstrates the use of service servers in ROS 2.
 *
 * Subscription Topics:
 *   None
 *
 * Publishing Topics:
 *   None
 *
 * Services:
 *   /set_cleaning_state (yahboom_rosmaster_msgs/srv/SetCleaningState):
 *     Sets the cleaning state of the robot
 *
 * @author Addison Sears-Collins
 * @date November 26, 2024
 */
#include <memory>
#include "rclcpp/rclcpp.hpp"
#include "yahboom_rosmaster_msgs/srv/set_cleaning_state.hpp"

/**
 * @class SetCleaningStateService
 * @brief A ROS 2 node that provides a service to set the cleaning state of a robot
 */
class SetCleaningStateService : public rclcpp::Node
{
public:
  /**
   * @brief Constructor for the SetCleaningStateService class.
   *
   * Initializes the node with the name "set_cleaning_state_service"
   * and creates the service server for the "/set_cleaning_state" service.
   */
  SetCleaningStateService()
  : Node("set_cleaning_state_service")
  {
    service_ = this->create_service<yahboom_rosmaster_msgs::srv::SetCleaningState>(
      "/set_cleaning_state",
      std::bind(&SetCleaningStateService::set_cleaning_state_callback, this,
                std::placeholders::_1, std::placeholders::_2));

    RCLCPP_INFO(this->get_logger(), "Cleaning Service Server is ready.");
  }

private:
  /**
   * @brief Callback function for the set_cleaning_state service.
   *
   * This function is called when a request is received for the "/set_cleaning_state" service.
   * It checks the desired cleaning state in the request and sets the appropriate response.
   *
   * @param request The request shared pointer for the set_cleaning_state service.
   * @param response The response shared pointer for the set_cleaning_state service.
   */
  void set_cleaning_state_callback(
    const std::shared_ptr<yahboom_rosmaster_msgs::srv::SetCleaningState::Request> request,
    std::shared_ptr<yahboom_rosmaster_msgs::srv::SetCleaningState::Response> response)
  {
    if (request->desired_cleaning_state) {
      RCLCPP_INFO(this->get_logger(), "Starting cleaning...");
      response->success = true;
      response->message = "Robot started cleaning";
    } else {
      RCLCPP_INFO(this->get_logger(), "Stopping cleaning...");
      response->success = true;
      response->message = "Robot stopped cleaning";
    }

    RCLCPP_INFO(this->get_logger(), "Response sent: %s", response->message.c_str());
  }

  /// Service server for setting cleaning state
  rclcpp::Service<yahboom_rosmaster_msgs::srv::SetCleaningState>::SharedPtr service_;
};

/**
 * @brief Main function to run the SetCleaningStateService node.
 *
 * @param argc Number of command-line arguments.
 * @param argv Array of command-line arguments.
 * @return int Exit status of the program.
 */
int main(int argc, char * argv[])
{
  rclcpp::init(argc, argv);
  auto node = std::make_shared<SetCleaningStateService>();
  rclcpp::spin(node);
  rclcpp::shutdown();
  return 0;
}

Update CMakeLists.txt

Edit the CMakeLists.txt file:

add_executable(set_cleaning_state_service 
  src/set_cleaning_state_service.cpp
)

ament_target_dependencies(set_cleaning_state_service
  rclcpp
  yahboom_rosmaster_msgs
)

install(TARGETS
  set_cleaning_state_service
  DESTINATION lib/${PROJECT_NAME}
)

Build the Package

cd ~/ros2_ws
colcon build
source ~/.bashrc

Run the Service Node

Open a new terminal window, and type:

ros2 run yahboom_rosmaster_system_tests set_cleaning_state_service
2-cleaning-service-server-is-ready
ros2 service list -t

The ros2 service list -t command lists all the available services along with their corresponding service types. It shows that the /set_cleaning_state service uses the yahboom_rosmaster_msgs/srv/SetCleaningState service type.

3-ros2-service-list

Open a new terminal window, and call the service to start cleaning:

ros2 service call /set_cleaning_state yahboom_rosmaster_msgs/srv/SetCleaningState "{desired_cleaning_state: true}"
4-ros2-service-call

Now call the service to stop cleaning:

ros2 service call /set_cleaning_state yahboom_rosmaster_msgs/srv/SetCleaningState "{desired_cleaning_state: false}"
5-ros2-service-call-false

You see how we called the service via the terminal. You can also create an actual program that is the service client that calls the service just like we did in the terminal.

This tutorial showed you a simple service that:

  • Listens for requests
  • Processes the requests
  • Returns appropriate responses

All services are structured this way, so you can use this as a template for any service you create.

That’s it! Keep building!

How to Remap Topics in ROS 2

In this tutorial, we will demonstrate how to remap a topic called /chatter from the command line using ROS 2. 

Remapping topics can be useful in several scenarios, such as avoiding naming conflicts when multiple nodes publish or subscribe to topics with the same name, or integrating third-party packages that use different topic names than your existing system.

We will use the built-in demo_nodes_cpp package, which contains a simple publisher (talker) and subscriber (listener) pair.

 The talker node publishes messages on the /chatter topic, and the listener node subscribes to the /chatter topic.

Prerequisites

  • You have ROS 2 installed.

Command Line

First, open a new terminal and source your ROS 2 installation.

Run the talker node without remapping:

ros2 run demo_nodes_cpp talker

Open another terminal, and run the listener node without remapping:

ros2 run demo_nodes_cpp listener

You should see the listener node receiving messages from the talker node on the /chatter topic.

In a new terminal, run ros2 topic list to see the available topics:

ros2 topic list

You should see the /chatter topic in the list.

1-ros2-topic-list

To verify that the talker node is publishing messages on the /chatter topic, run ros2 topic echo:

ros2 topic echo /chatter
2-ros2-topic-echo

You should see the messages being published by the talker node.

Run ros2 topic info to see the total number of publishers and subscribers for the /chatter topic:

ros2 topic info /chatter

You should see that there is one publisher and one subscriber for the /chatter topic.

3-ros2-topic-info

Now, let’s remap the talker node to publish on a new topic called /conversation.

Stop the talker node using CTRL + C, and type this:

ros2 run demo_nodes_cpp talker --ros-args -r /chatter:=/conversation

Check the listener node terminal. You will notice that it is no longer receiving messages because it is still subscribed to the /chatter topic.

Run ros2 topic list again:

ros2 topic list

You will see the new /conversation topic in the list, but the /chatter topic is no longer present.

4-ros2-topic-list-again

If you run ros2 topic echo /conversation, you will see the messages being published by the talker node on the new topic:

ros2 topic echo /conversation

Run ros2 topic info for the /conversation topic:

ros2 topic info /conversation

You should see that there is one publisher and no subscribers for the /conversation topic.

5-ros2-topic-info

To make the listener node receive messages from the talker node again, we need to remap its subscription from /chatter to /conversation. Stop the listener node (Ctrl+C) and run it with the remapping argument:

ros2 run demo_nodes_cpp listener --ros-args -r /chatter:=/conversation

Now, the listener node will receive messages from the talker node on the remapped /conversation topic.

Run ros2 topic info for the /conversation topic again:

ros2 topic info /conversation

You should now see that there is one publisher and one subscriber for the /conversation topic.

In a Launch File

To remap topics using a launch file in ROS 2, you can use the <remap> tag within the <node> tag.

Create a new launch file called remap_demo.launch.py:

#!/usr/bin/env python3
"""
ROS 2 Topic Remapping Launch File.

This launch file demonstrates how to remap topics in ROS 2 by launching a talker and listener
node pair with remapped topic names. It shows how to change the default topic '/chatter'
to '/conversation' for both nodes.

Launch File Nodes:
    * talker_node (demo_nodes_cpp/talker): Publishes messages on remapped topic
    * listener_node (demo_nodes_cpp/listener): Subscribes to messages on remapped topic

Topic Remappings:
    * /chatter -> /conversation: Remaps the default topic to a new name for both nodes

Example Usage:
    $ ros2 launch your_package remap_demo.launch.py

:author: Addison Sears-Collins
:date: November 26, 2024
"""

# Import the necessary ROS 2 launch modules
from launch import LaunchDescription
from launch_ros.actions import Node


def generate_launch_description():
    """
    Generate a launch description for topic remapping demonstration.

    This function creates and returns a LaunchDescription object that specifies how
    to launch and configure the talker and listener nodes with topic remapping.

    Returns
    -------
    LaunchDescription
        A launch description object containing the configured nodes
    """
    return LaunchDescription([
        # Create and configure the talker node
        # This node will publish messages on the remapped topic '/conversation'
        Node(
            package='demo_nodes_cpp',      # The package containing the node
            executable='talker',           # The name of the executable
            name='talker_node',           # A unique name for this node instance
            remappings=[
                # Remap the default '/chatter' topic to '/conversation'
                ('/chatter', '/conversation'),
            ],
            output='screen'               # Display node output in the terminal
        ),

        # Create and configure the listener node
        # This node will subscribe to messages on the remapped topic '/conversation'
        Node(
            package='demo_nodes_cpp',      # The package containing the node
            executable='listener',         # The name of the executable
            name='listener_node',         # A unique name for this node instance
            remappings=[
                # Remap the default '/chatter' topic to '/conversation'
                # This must match the talker's remapping to receive messages
                ('/chatter', '/conversation'),
            ],
            output='screen'               # Display node output in the terminal
        ),
    ])

In this launch file, we define two nodes: talker and listener. For each node, we specify the package, executable, and name. We also use the remappings parameter to remap the /chatter topic to /conversation for both nodes.

To run the launch file, open a new terminal, source your ROS 2 installation, and navigate to the package containing the remap_demo.launch.py file. Then, run the following command:

ros2 launch remap_demo.launch.py

You should see both the talker and listener nodes running, with the talker node publishing messages on the /conversation topic and the listener node subscribing to the /conversation topic.

In a new terminal, run ros2 topic list to see the available topics:

ros2 topic list

You should see the /conversation topic in the list.

To verify that the talker node is publishing messages on the /conversation topic, run ros2 topic echo:

ros2 topic echo /conversation

You should see the messages being published by the talker node.

Run ros2 topic info for the /conversation topic:

ros2 topic info /conversation
7-conversation-topic-launch

You should see that there is one publisher and one subscriber for the /conversation topic.

6-one-publisher-one-subcriber

Using a launch file to remap topics has several advantages:

  1. It allows you to centralize the configuration of your nodes and their remappings in a single file.
  2. It makes it easier to manage complex systems with multiple nodes and remappings.
  3. It enables you to create reusable launch files that can be shared across different projects or with other users.

That’s it! Keep building!