In this post, I’ll explain how to transmit time and temperature using a TMP36 sensor and an Arduino. The application that you will develop executes on an Arduino and transmits the time and temperature at a periodic rate of around 10 seconds across a Serial bus (e.g. USB) to a host computer (such as your personal laptop computer).
Requirements
Here are the requirements I created for this project:
- The system must execute on an Arduino.
- A temperature sensor connected to an Arduino must be calibrated.
- The main program must use a Round Robin with interrupts design:
- The temperature must be captured and converted to Fahrenheit.
- The temperature must begin recording after the temperature has stabilized at room temperature.
- The temperature must be recorded at a periodic rate of around 10 seconds (i.e. 10,000 milliseconds) at room temperature.
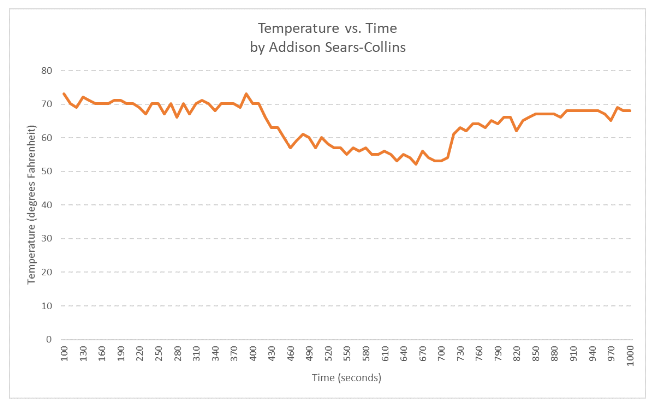
- The temperature must then be recorded for 5 minutes at a periodic rate of around 10 seconds inside a refrigerator.
- The temperature must then be recorded for 5 minutes at a periodic rate of around 10 seconds at room temperature.
- The time and temperature must be transmitted across a Serial bus such as USB to my host.
- The time and temperature data must be exported as a comma separated value file.
- The comma separated value file must be read into a spreadsheet program (e.g. Microsoft Excel).
- The temperature vs time must be plotted.
Hardware Design
The following components are used in this project. You will need:
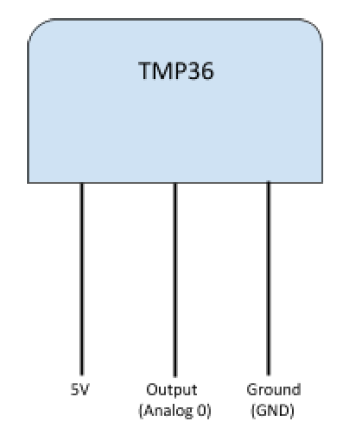
Here is the diagram of the TMP36 temperature sensor:
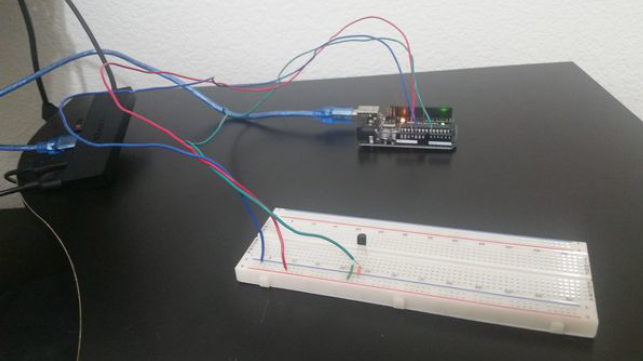
Here is the diagram of the hardware setup:
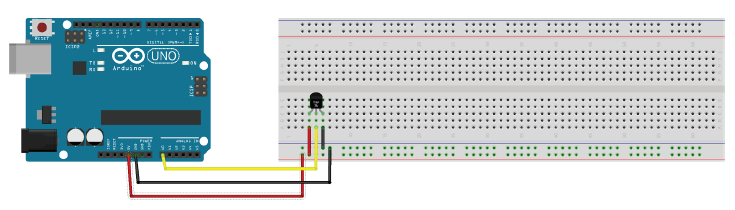
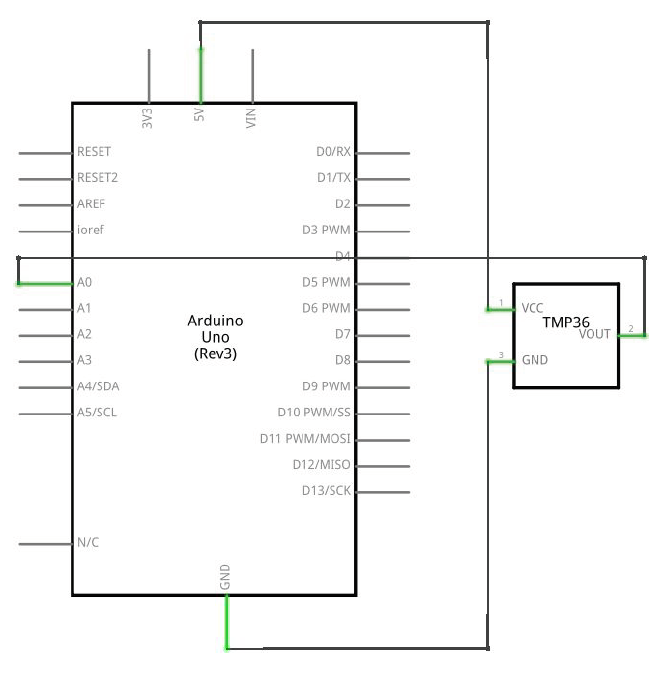
Here are the steps for setting up the hardware of the Serial Transmit of Temperature system:
- Step 1. Place the TMP36 sensor on the breadboard. Each lead of the sensor will be on a different rail section of the breadboard.
- Step 2. Connect a jumper wire between the ground lead of the TMP36 sensor and the – rail of the breadboard.
- Step 3. Connect a jumper wire between the – rail of the breadboard and the GND pin of the Arduino.
- Step 4. Connect a jumper wire between the 5V pin of the Arduino and the + rail of the breadboard.
- Step 5. Connect a jumper wire between + rail of the breadboard and the 5V lead of the TMP36 sensor.
- Step 6. Connect a jumper wire between the middle output lead of the TMP36 sensor and the Analog 0 pin of the Arduino.

Here are the steps for calibrating the TMP36 sensor:
We will use the One Point Calibration technique using a known temperature, 32°F, which is the freezing point of water.
- Crush several ice cubes and place in a plastic bag with some distilled water (Ada 2015).
- Close the bag up, making sure it is tied tight.
- Make sure the bag is completely dry on the outside and place it on top of the TMP36 sensor.
- Adjust temperature accordingly to calibrate.
Implementation
Here is the source code that you will need to load to your Arduino:
#include <TimerOne.h>
// This TimerOne.h library handles time-based interrupts

/**
 * In this program, we develop an application which executes on an Arduino
 * and transmits the time and temperature at a periodic rate of around 10
 * seconds across a Serial bus (USB) to the Host.
 *
 * Uses the timer interrupts technique discussed on page 270 in
 * "Exploring Arduino: Tools and Techniques for Engineering Wizardry"
 * by Jeremy Blum
 *
 * @version 7.0 2019-02-14
 * @author Addison Sears-Collins
 */

// Assign a name to the TMP36 sensor pin on the Arduino Uno
const unsigned int TEMP_SENSOR_PIN = A0;

// Flag used to stop the program
bool done = false;

// Used for capturing the time
unsigned long time;

// Used for capturing the temperature in Fahrenheit
float temp_fahrenheit;

/**
 *  Function runs only once, after each powerup or reset of the Arduino Uno
 */
void setup() {

  // Open the serial port and set the data transmission rate to 9600 bits
  // per second. 9600 is the default baud rate for Arduino Uno.
  Serial.begin(9600);

  // Show a welcome message as human-readable ASCII text
  Serial.println("SERIAL TRASMIT OF TEMPERATURE PROGRAM");
  Serial.println("This program transmits the time and temperature at a periodic");
  Serial.println("rate of ~10 seconds across a Serial bus (USB) to the Host.");
  Serial.println("Created by Addison Sears-Collins");
  Serial.println("");
  Serial.println("Press ! to end the program");
  Serial.println("");
  Serial.println("Recording temperature every 10 seconds...");
  Serial.println("");
  Serial.println("TIME, TEMPERATURE IN DEGREES FAHRENHEIT");

  // Interrupt: Set a timer of length 10000000 microseconds (10 seconds)
  Timer1.initialize(10000000);

  //Runs "isr_read_temperature" on each timer interrupt
  Timer1.attachInterrupt(isr_read_temperature);

}

/**
 *  Main function
 */
void loop() {

  // Wait 100 seconds for temperature to stabilize
  // Temperature is being read in the background
  // via the interrupts
  delay(100000);

  while(!done) {

    // Display the time and temperature
    display_time_and_temperature();

    // End program if sentinel is entered
    end_program();

    // Display time and temperature every 10 seconds
    delay(10000);
  }

  // Do nothing
  while (true) {}
}

/**
  * This function is the interrupt service routine.
  * It reads the voltage and converts to degrees Fahrenheit
  */
void isr_read_temperature() {

  // Read the voltage of the TMP36 sensor
  int sensor_voltage = analogRead(TEMP_SENSOR_PIN);

  // Calibrated. Equation taken from datasheet.
  // http://kookye.com/wp-content/uploads/samplecode/tempsensor.txt
  temp_fahrenheit = 5.1 + ((125 * sensor_voltage) >> 8);
}

/**
  * Function displays the time and temperature
  */
void display_time_and_temperature() {

  // Capture the time and covert to seconds
  time = millis() / 1000;

  // Display the time
  Serial.print(time);
  Serial.print(" , ");
  // Println so the next line begins on a new line
  // Display the temperature in Fahrenheit
  Serial.println(temp_fahrenheit);
}

/**
  * This function ends the program
  */
void end_program() {

  // Used for reading data from the serial monitor
  char ch;

  // Check to see if ! is available to be read
  if (Serial.available()) {

    // Read the character
    // Serial.read() returns the first (oldest) character in the buffer
    // and removes that byte of data from the buffer
    ch = Serial.read();

    // End the program if an exclamation point is entered in the
    // serial monitor
    if (ch == '!') {
      done = true;
      Serial.println("Finished recording temperature. Goodbye.");
    }
  }
}