

In this post, we will install ROS Noetic Ninjemys. As of the date of this tutorial, ROS Noetic Ninjemys is the latest ROS distribution that has long term support. It will be supported until May 2025.
You Will Need
In order to complete this tutorial, you will need:
- Ubuntu 20.04 installed and running properly (I’m running my Ubuntu in a VirtualBox on Windows 10)
Directions
The official steps for installing ROS are at this link at ROS.org, but I will walk you through the process below so that you can see what each step should look like.
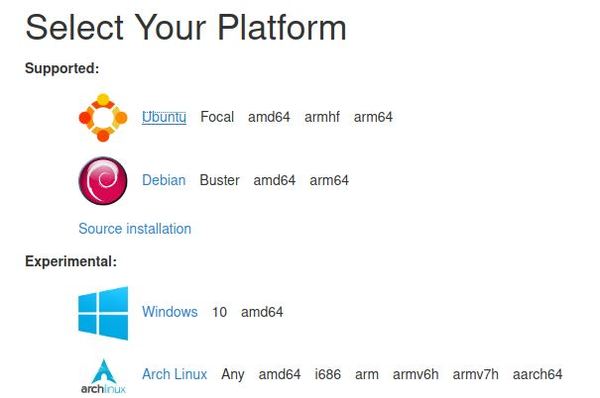
Select Noetic Ninjemys on this page.
Next, select your platform. I am using Ubuntu, so I will click on the Ubuntu option.
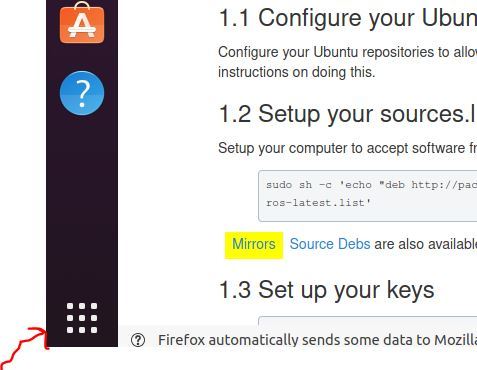
Now we need to configure our repositories to allow “restricted”, “universe,” and “multiverse.
Click the 9 white dots at the bottom left of your screen.
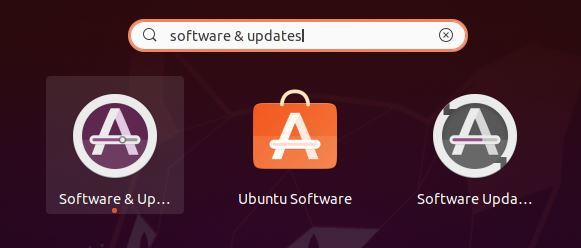
Search for Software & Updates. Then click on it.
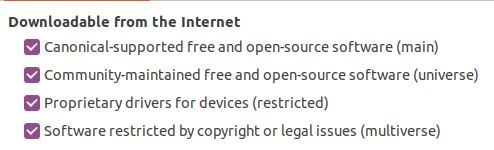
Make sure main, universe, restricted, and multiverse are all checked. Then click Close.
Now open up a new terminal window, and type (or copy and paste) the following command:
sudo sh -c 'echo "deb http://packages.ros.org/ros/ubuntu $(lsb_release -sc) main" > /etc/apt/sources.list.d/ros-latest.list'
The command above sets your computer up to accept software from packages.ros.org.
Now we need to set up the secure keys so that our system accepts what we are going to download.
Type or copy & paste the following command.
sudo apt-key adv --keyserver 'hkp://keyserver.ubuntu.com:80' --recv-key C1CF6E31E6BADE8868B172B4F42ED6FBAB17C654
Now, update the package list. This command makes sure you have the most recent list of software packages that can be installed in your Linux system.
sudo apt updateNow do a full desktop install of ROS. The command below installs all the software, tools, algorithms, and robot simulators for ROS.
sudo apt install ros-noetic-desktop-fullAfter you type the command and press Enter, press Y and hit Enter when asked if you want to continue. It will take a while to download all this stuff, so feel free to take a break while ROS downloads to your system.

Set up the environment variables. These variables are necessary in order for ROS to work.
Type the following commands, one right after the other. We are using Bash, so this is what we type:
echo "source /opt/ros/noetic/setup.bash" >> ~/.bashrc
source ~/.bashrc
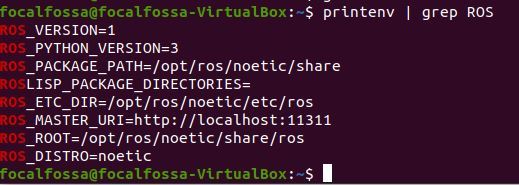
Check that the environment variables are properly set up. Type the following command:
printenv | grep ROSHere is what you should see:
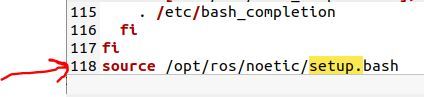
Let’s also check our .bashrc file to see if the “source /opt/ros/noetic/setup.bash” line was added to it successfully.
gedit .bashrcThere it is at the bottom of the .bashrc file.
Now, let’s create a ROS workspace.
A workspace is a folder that contains other folders that store related pieces of ROS code.
The official name for workspaces in ROS is catkin workspaces. The word ‘catkin’ comes from the tail-shaped flower cluster found on willow trees (see photo below) — a reference to Willow Garage, the original developers of ROS.
All the ROS software packages that you create need to reside inside a catkin workspace. The name of this catkin workspace can be anything, but by convention, it is typically called catkin_ws.
Open a new terminal window, and type the following commands, one right after the other.
First create the workspace.
mkdir -p ~/catkin_ws/srcMove inside the workspace.
cd ~/catkin_ws/Build the workspace.
catkin_makeYou should now have a build, devel, and src folder. Type this command to see those:
dir
Now, source the new setup.*sh file. This is a file that makes sure your workspace is recognized in your ROS environment.
source devel/setup.bashLet’s add this code to the .bashrc file so that we don’t have to run it everytime we open a new terminal window.
echo "source ~/catkin_ws/devel/setup.bash" >> ~/.bashrcWe can check to see if that was set up properly by typing this command:
echo $ROS_PACKAGE_PATH
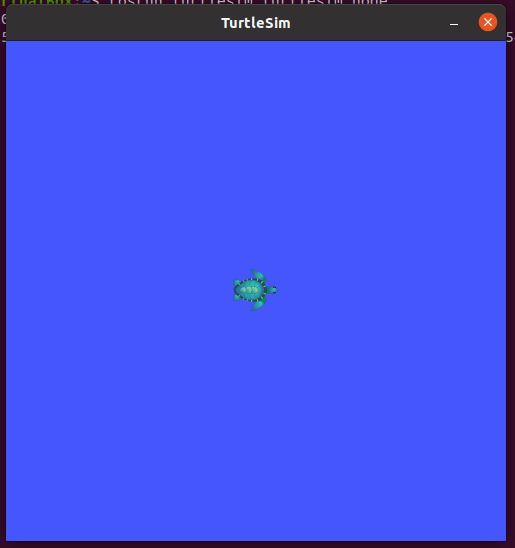
Finally, let’s launch a program to do a final check everything is set up properly. We will launch a simulation of a turtle.
Open a new terminal window, and type this command:
roscoreOpen a new terminal tab, and type this command:
rosrun turtlesim turtlesim_nodeHere is what you should see:
Congratulations. You have installed ROS!
From here, you can go check out the basics of ROS Noetic Ninjemys. If you’re already familar with ROS, it is often helpful to go through these tutorials to refresh the basics.
Keep building!