Welcome to this tutorial on three-dimensional coordinate frames for robots. Understanding 3D coordinate frames is essential for robots to determine their position and navigate the world effectively. Whether it’s picking up an item, avoiding obstacles, or moving around a room, robots rely on these frames to plan their movements with precision.
The Coordinate Axes

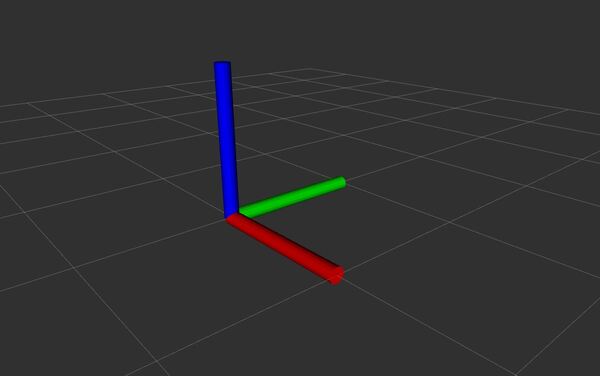
A 3D coordinate frame consists of three perpendicular axes that intersect at a common point called the origin. Each axis is typically represented by a different color for easy identification:
- X-axis (red): Points forward.
- Y-axis (green): Points to the left.
- Z-axis (blue): Points upward.
Think of these axes as directions in space that help describe any position or movement.
The Right-Hand Rule
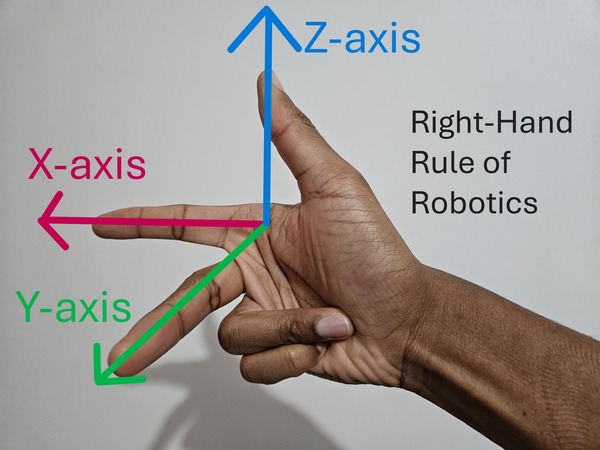
To remember the orientation of the coordinate axes, use the right-hand rule:
- Hold out your right hand with your thumb, index finger, and middle finger all perpendicular to each other.
- Assign your fingers to the axes:
- Index Finger: Points along the positive x-axis (forward).
- Middle Finger: Points along the positive y-axis (left).
- Thumb: Points along the positive z-axis (upward).
Understanding Rotation: Roll, Pitch, and Yaw
The right-hand rule helps us understand the basic orientation of our coordinate frame, but robots need to do more than just move along straight lines. They also need to rotate and change their orientation in space. This brings us to three fundamental types of rotation: roll, pitch, and yaw. Remember those terms…roll, pitch, and yaw.
Let’s relate these terms to head movements:
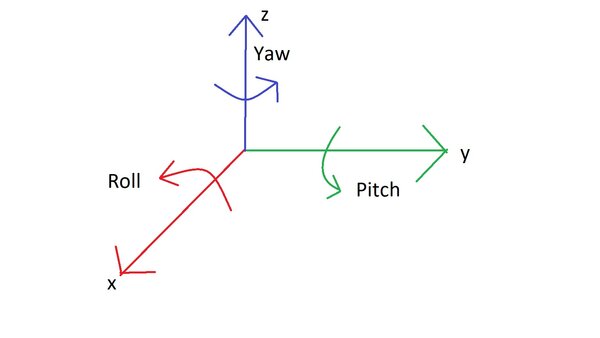
- Roll (rotation around the x-axis) is like tilting your head from side to side, as if you’re touching your ear to your shoulder.
- Pitch (rotation around the y-axis) is like nodding your head up and down.
- Yaw (rotation around the z-axis) is like shaking your head ‘no’.
Now let’s relate these to the right-hand rule:
- Rotate your hand as if turning a doorknob. That is roll.
- Rotate your hand up and down, as if nodding your head “yes.” That is pitch
- Rotate your hand left and right, as if shaking your head “no.”. That is yaw.
Coordinate Frame Hierarchy
Now that we understand how individual coordinate frames work and how objects can rotate within them, let’s explore how robots use multiple coordinate frames together. This system of related frames, known as a coordinate frame hierarchy, is important for robots to understand their place in the world and how their parts relate to each other.
World Coordinate Frame
The world coordinate frame, which can often be referred to as the map frame, serves as the fixed, global reference point for all robots and objects in a given environment. It never moves or changes, providing a stable point of reference. This frame is often placed at a convenient location, such as the center of a room’s floor or the battery charging station.
Think of the world frame as the “ground truth” of the environment. All other coordinate frames are ultimately referenced back to this frame, allowing different robots and sensors to understand each other’s positions and coordinate actions.
Robot-Specific Frames
Base Frame
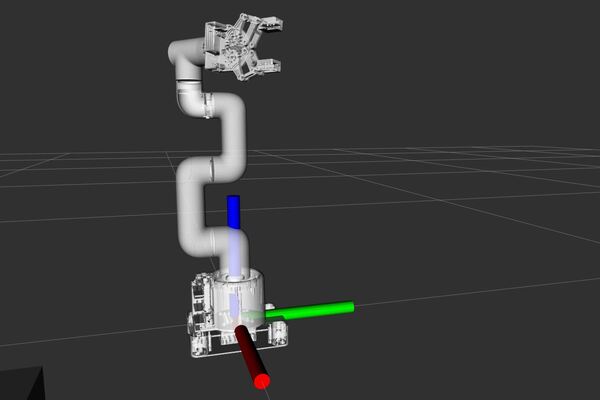
The base frame is attached to the robot’s base or body and moves with the robot as it navigates.
For mobile robots, the base frame changes position relative to the world frame as the robot moves around.
For robotic arms, the base frame is typically fixed at the bottom/mount point of the arm. This fixed base frame serves as the primary reference point for all joint movements and gripper positions.
Sensor Frames
Think of sensor frames like the eyes and ears of the robot. Each camera, distance sensor, or touch sensor has its own frame (i.e. x, y, and z axis) that tells the robot what that sensor can “see” or “feel” from its specific location on the robot.
Joint Frames
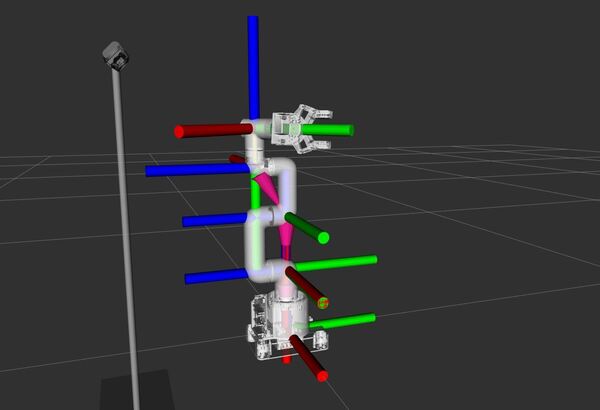
For robots with arms or moving parts, each joint (like your elbow or wrist) has its own frame. These frames help the robot know how each joint is bent or twisted.
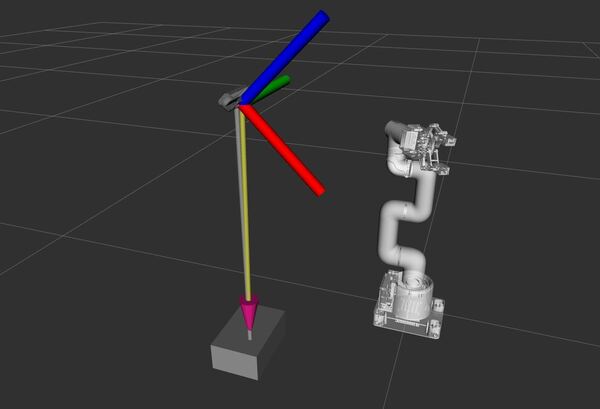
End-Effector Frame
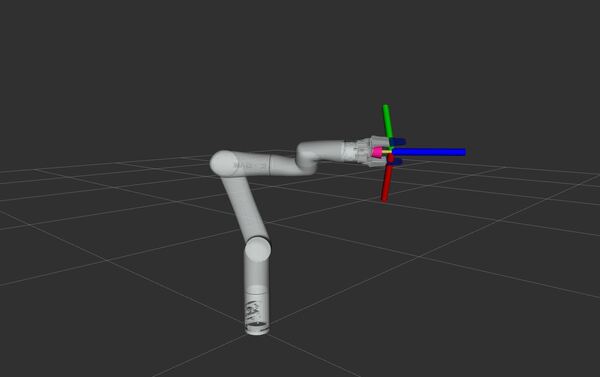
This is like the robot’s “hand” – it’s the frame at the very end of a robotic arm where tools or grippers are attached. When a robot needs to pick something up or use a tool, it uses this frame to know exactly where its “hand” is.
Frame Relationships
Understanding the relationships between different frames is key to controlling a robot’s movements and interpreting its sensor data.
For example, imagine you want a robotic arm to pick up a ball on a table. The arm’s movements are defined in its local frame, but the ball’s position is given in the world (map) frame. By transforming the ball’s world coordinates into the arm’s frame, the robot can accurately reach and grasp it.
Practical Example
Consider a self-driving car:
- The car’s starting position is the origin of its coordinate frame.
- Moving forward means it’s traveling in the positive x direction.
- Turning left or right involves rotation around the z-axis, which is its yaw movement.
- If the car moves sideways, that’s along the y-axis.
- If the car could jump (imagine it could), that would be along the z-axis.
Make Sure You Understand Coordinate Frames
Coordinate frames form the foundation of a robot’s spatial understanding. By maintaining clear relationships between different frames—such as the world (map) frame, robot base frame, sensor frames, and manipulator frames—robots can effectively plan and execute complex tasks.
By understanding 3D coordinate frames, you’ll be better equipped to program and control robots, whether you’re working on simple projects or advanced robotic systems.
To learn more about common coordinate frames specific to ROS 2 mobile robots, check out this tutorial.
That’s it. Keep building!