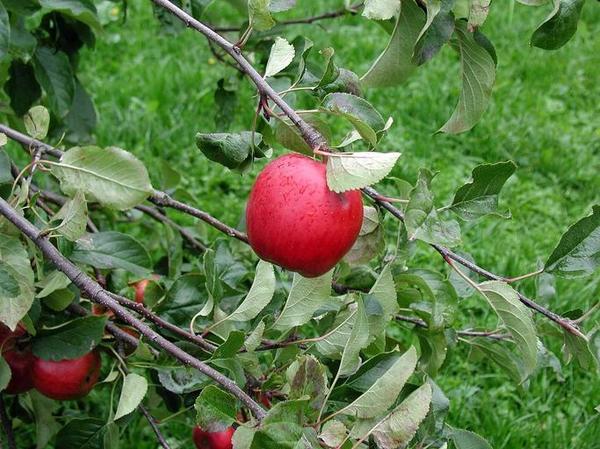
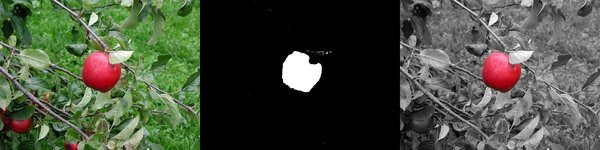
In this project, we will learn how to apply a mask to an image using OpenCV. Image masking involves highlighting a specific object within an image by masking it.
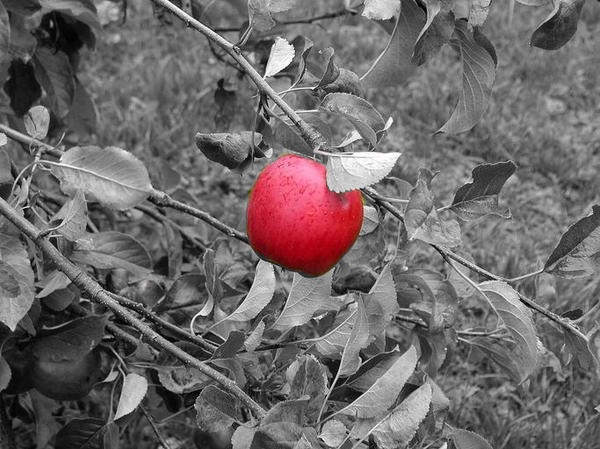
You want to highlight the apple in the image by applying a mask. The desired output is as follows.
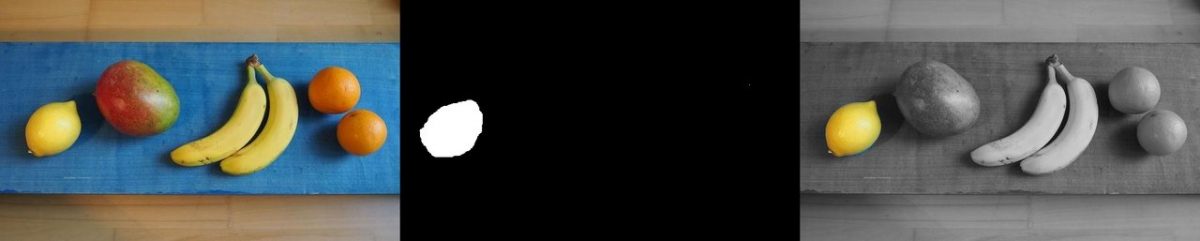
You also want to see the process it took to get to that output image above. In other words, you want to have the program output, not only the masked image (as above), but also a table that shows all the steps involved: input image -> mask -> output.
common.py is a helper program. image_masking.py is the main driver program. To run it, you will type:
Here is the code. I recommend:
#!/usr/bin/env python

'''
Welcome to the Image Masking Program!

This program allows users to highlight a specific
object within an image by masking it.

Usage:
  image_masking.py [<image>]

Keys:
  r     - mask the image
  SPACE - reset the inpainting mask
  ESC   - exit
'''

# Python 2/3 compatibility
from __future__ import print_function

import cv2 # Import the OpenCV library
import numpy as np # Import Numpy library
import matplotlib.pyplot as plt # Import matplotlib functionality
import sys # Enables the passing of arguments
from common import Sketcher

# Project: Image Masking Using OpenCV
# Author: Addison Sears-Collins
# Date created: 9/18/2019
# Python version: 3.7
# Description: This program allows users to highlight a specific
# object within an image by masking it.

# Define the file name of the image
INPUT_IMAGE = "fruits.jpg"
IMAGE_NAME = INPUT_IMAGE[:INPUT_IMAGE.index(".")]
OUTPUT_IMAGE = IMAGE_NAME + "_output.jpg"
TABLE_IMAGE = IMAGE_NAME + "_table.jpg"

def main():
    """
    Main method of the program.
    """
    # Pull system arguments
    try:
        fn = sys.argv[1]
    except:
        fn = INPUT_IMAGE

    # Load the image and store into a variable
    image = cv2.imread(cv2.samples.findFile(fn))

    if image is None:
        print('Failed to load image file:', fn)
        sys.exit(1)

    # Create an image for sketching the mask
    image_mark = image.copy()
    sketch = Sketcher('Image', [image_mark], lambda : ((255, 255, 255), 255))

    # Sketch a mask
    while True:
        ch = cv2.waitKey()
        if ch == 27: # ESC - exit
            break
        if ch == ord('r'): # r - mask the image
            break
        if ch == ord(' '): # SPACE - reset the inpainting mask
            image_mark[:] = image
            sketch.show()

    # define range of white color in HSV
    lower_white = np.array([0,0,255])
    upper_white = np.array([255,255,255])

    # Create the mask
    mask = cv2.inRange(image_mark, lower_white, upper_white)

    # Create the inverted mask
    mask_inv = cv2.bitwise_not(mask)

    # Convert to grayscale image
    gray = cv2.cvtColor(image, cv2.COLOR_BGR2GRAY)

    # Extract the dimensions of the original image
    rows, cols, channels = image.shape
    image = image[0:rows, 0:cols]

    # Bitwise-OR mask and original image
    colored_portion = cv2.bitwise_or(image, image, mask = mask)
    colored_portion = colored_portion[0:rows, 0:cols]

    # Bitwise-OR inverse mask and grayscale image
    gray_portion = cv2.bitwise_or(gray, gray, mask = mask_inv)
    gray_portion = np.stack((gray_portion,)*3, axis=-1)

    # Combine the two images
    output = colored_portion + gray_portion

    # Save the image
    cv2.imwrite(OUTPUT_IMAGE, output)

    # Create a table showing input image, mask, and output
    mask = np.stack((mask,)*3, axis=-1)
    table_of_images = np.concatenate((image, mask, output), axis=1)
    cv2.imwrite(TABLE_IMAGE, table_of_images)

    # Display images, used for debugging
    #cv2.imshow('Original Image', image)
    #cv2.imshow('Sketched Mask', image_mark)
    #cv2.imshow('Mask', mask)
    #cv2.imshow('Output Image', output)
    cv2.imshow('Table of Images', table_of_images)
    cv2.waitKey(0) # Wait for a keyboard event

if __name__ == '__main__':
    print(__doc__)
    main()
    cv2.destroyAllWindows()
#!/usr/bin/env python

'''
This module contains some common routines used by other samples.
'''

# Python 2/3 compatibility
from __future__ import print_function
import sys
PY3 = sys.version_info[0] == 3

if PY3:
    from functools import reduce

import numpy as np
import cv2 as cv

# built-in modules
import os
import itertools as it
from contextlib import contextmanager

image_extensions = ['.bmp', '.jpg', '.jpeg', '.png', '.tif', '.tiff', '.pbm', '.pgm', '.ppm']

class Bunch(object):
    def __init__(self, **kw):
        self.__dict__.update(kw)
    def __str__(self):
        return str(self.__dict__)

def splitfn(fn):
    path, fn = os.path.split(fn)
    name, ext = os.path.splitext(fn)
    return path, name, ext

def anorm2(a):
    return (a*a).sum(-1)
def anorm(a):
    return np.sqrt( anorm2(a) )

def homotrans(H, x, y):
    xs = H[0, 0]*x + H[0, 1]*y + H[0, 2]
    ys = H[1, 0]*x + H[1, 1]*y + H[1, 2]
    s  = H[2, 0]*x + H[2, 1]*y + H[2, 2]
    return xs/s, ys/s

def to_rect(a):
    a = np.ravel(a)
    if len(a) == 2:
        a = (0, 0, a[0], a[1])
    return np.array(a, np.float64).reshape(2, 2)

def rect2rect_mtx(src, dst):
    src, dst = to_rect(src), to_rect(dst)
    cx, cy = (dst[1] - dst[0]) / (src[1] - src[0])
    tx, ty = dst[0] - src[0] * (cx, cy)
    M = np.float64([[ cx,  0, tx],
                    [  0, cy, ty],
                    [  0,  0,  1]])
    return M


def lookat(eye, target, up = (0, 0, 1)):
    fwd = np.asarray(target, np.float64) - eye
    fwd /= anorm(fwd)
    right = np.cross(fwd, up)
    right /= anorm(right)
    down = np.cross(fwd, right)
    R = np.float64([right, down, fwd])
    tvec = -np.dot(R, eye)
    return R, tvec

def mtx2rvec(R):
    w, u, vt = cv.SVDecomp(R - np.eye(3))
    p = vt[0] + u[:,0]*w[0]    # same as np.dot(R, vt[0])
    c = np.dot(vt[0], p)
    s = np.dot(vt[1], p)
    axis = np.cross(vt[0], vt[1])
    return axis * np.arctan2(s, c)

def draw_str(dst, target, s):
    x, y = target
    cv.putText(dst, s, (x+1, y+1), cv.FONT_HERSHEY_PLAIN, 1.0, (0, 0, 0), thickness = 2, lineType=cv.LINE_AA)
    cv.putText(dst, s, (x, y), cv.FONT_HERSHEY_PLAIN, 1.0, (255, 255, 255), lineType=cv.LINE_AA)

class Sketcher:
    def __init__(self, windowname, dests, colors_func):
        self.prev_pt = None
        self.windowname = windowname
        self.dests = dests
        self.colors_func = colors_func
        self.dirty = False
        self.show()
        cv.setMouseCallback(self.windowname, self.on_mouse)

    def show(self):
        cv.imshow(self.windowname, self.dests[0])

    def on_mouse(self, event, x, y, flags, param):
        pt = (x, y)
        if event == cv.EVENT_LBUTTONDOWN:
            self.prev_pt = pt
        elif event == cv.EVENT_LBUTTONUP:
            self.prev_pt = None

        if self.prev_pt and flags & cv.EVENT_FLAG_LBUTTON:
            for dst, color in zip(self.dests, self.colors_func()):
                cv.line(dst, self.prev_pt, pt, color, 5)
            self.dirty = True
            self.prev_pt = pt
            self.show()


# palette data from matplotlib/_cm.py
_jet_data =   {'red':   ((0., 0, 0), (0.35, 0, 0), (0.66, 1, 1), (0.89,1, 1),
                         (1, 0.5, 0.5)),
               'green': ((0., 0, 0), (0.125,0, 0), (0.375,1, 1), (0.64,1, 1),
                         (0.91,0,0), (1, 0, 0)),
               'blue':  ((0., 0.5, 0.5), (0.11, 1, 1), (0.34, 1, 1), (0.65,0, 0),
                         (1, 0, 0))}

cmap_data = { 'jet' : _jet_data }

def make_cmap(name, n=256):
    data = cmap_data[name]
    xs = np.linspace(0.0, 1.0, n)
    channels = []
    eps = 1e-6
    for ch_name in ['blue', 'green', 'red']:
        ch_data = data[ch_name]
        xp, yp = [], []
        for x, y1, y2 in ch_data:
            xp += [x, x+eps]
            yp += [y1, y2]
        ch = np.interp(xs, xp, yp)
        channels.append(ch)
    return np.uint8(np.array(channels).T*255)

def nothing(*arg, **kw):
    pass

def clock():
    return cv.getTickCount() / cv.getTickFrequency()

@contextmanager
def Timer(msg):
    print(msg, '...',)
    start = clock()
    try:
        yield
    finally:
        print("%.2f ms" % ((clock()-start)*1000))

class StatValue:
    def __init__(self, smooth_coef = 0.5):
        self.value = None
        self.smooth_coef = smooth_coef
    def update(self, v):
        if self.value is None:
            self.value = v
        else:
            c = self.smooth_coef
            self.value = c * self.value + (1.0-c) * v

class RectSelector:
    def __init__(self, win, callback):
        self.win = win
        self.callback = callback
        cv.setMouseCallback(win, self.onmouse)
        self.drag_start = None
        self.drag_rect = None
    def onmouse(self, event, x, y, flags, param):
        x, y = np.int16([x, y]) # BUG
        if event == cv.EVENT_LBUTTONDOWN:
            self.drag_start = (x, y)
            return
        if self.drag_start:
            if flags & cv.EVENT_FLAG_LBUTTON:
                xo, yo = self.drag_start
                x0, y0 = np.minimum([xo, yo], [x, y])
                x1, y1 = np.maximum([xo, yo], [x, y])
                self.drag_rect = None
                if x1-x0 > 0 and y1-y0 > 0:
                    self.drag_rect = (x0, y0, x1, y1)
            else:
                rect = self.drag_rect
                self.drag_start = None
                self.drag_rect = None
                if rect:
                    self.callback(rect)
    def draw(self, vis):
        if not self.drag_rect:
            return False
        x0, y0, x1, y1 = self.drag_rect
        cv.rectangle(vis, (x0, y0), (x1, y1), (0, 255, 0), 2)
        return True
    @property
    def dragging(self):
        return self.drag_rect is not None


def grouper(n, iterable, fillvalue=None):
    '''grouper(3, 'ABCDEFG', 'x') --> ABC DEF Gxx'''
    args = [iter(iterable)] * n
    if PY3:
        output = it.zip_longest(fillvalue=fillvalue, *args)
    else:
        output = it.izip_longest(fillvalue=fillvalue, *args)
    return output

def mosaic(w, imgs):
    '''Make a grid from images.

    w    -- number of grid columns
    imgs -- images (must have same size and format)
    '''
    imgs = iter(imgs)
    if PY3:
        img0 = next(imgs)
    else:
        img0 = imgs.next()
    pad = np.zeros_like(img0)
    imgs = it.chain([img0], imgs)
    rows = grouper(w, imgs, pad)
    return np.vstack(map(np.hstack, rows))

def getsize(img):
    h, w = img.shape[:2]
    return w, h

def mdot(*args):
    return reduce(np.dot, args)

def draw_keypoints(vis, keypoints, color = (0, 255, 255)):
    for kp in keypoints:
        x, y = kp.pt
        cv.circle(vis, (int(x), int(y)), 2, color)