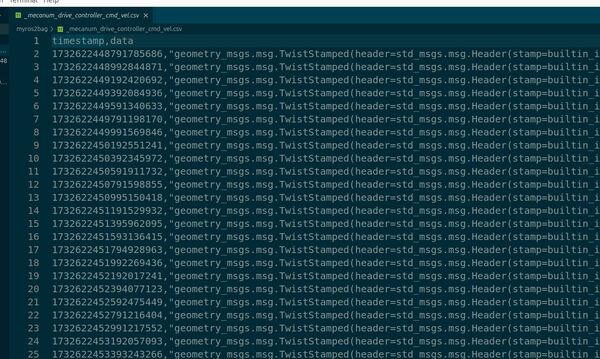
In this tutorial, we will explore ROS 2 Bag, a powerful tool for recording and playing back data in a ROS 2 system. We will learn about the purpose of ROS 2 Bag, its real-world applications, and how to use it effectively. By the end of this tutorial, you will be able to record data from your ROS 2 system, analyze the recorded data, play it back for various purposes, and convert it to a CSV file (i.e. comma-separated text file).
Prerequisites
All my code for this project is located here on GitHub.
Purpose of ROS 2 Bag
ROS 2 Bag allows you to record data from various topics and services in your ROS 2 system and store it in a file format called a “bag.” This recorded data can be later played back, analyzed, or used for debugging and testing purposes.
ROS 2 Bag is particularly useful when you need to capture data from sensors, robot states, or any other relevant information during runtime.
Real-World Applications
The following are several real-world applications of ROS 2 bag:
- Autonomous Vehicle Development: ROS 2 Bag can be used to record sensor data, such as LIDAR scans, camera images, and GPS information, during autonomous vehicle testing. This recorded data can be used for offline analysis, algorithm development, and simulation purposes.
- Robot Debugging: When troubleshooting issues with a robot, ROS 2 Bag can be used to record data from various topics during the occurrence of the problem. This recorded data can be analyzed later to identify the root cause of the issue and facilitate debugging efforts.
- Dataset Creation: ROS 2 Bag is often used to create datasets for machine learning and computer vision applications. By recording data from sensors and ground truth information, researchers can build datasets for tasks such as object detection, semantic segmentation, and localization.
I will be working with the mobile robot I set up in this tutorial. I want to record the velocity commands, and then play them back.
Setup
Open a terminal window, and launch your robot.
I will type the following command:
x3
or
bash ~/ros2_ws/src/yahboom_rosmaster/yahboom_rosmaster_bringup/scripts/rosmaster_x3_gazebo.sh
Choose a Topic
In another terminal window, type:
cd ~/Downloads/
mkdir bag_files && cd bag_files
Check out the active topics:
ros2 topic list
The /mecanum_drive_controller/cmd_vel topic contains the velocity messages.
ros2 bag record
Open a new terminal window, and move the robot in a square-shaped pattern using this command:
ros2 run yahboom_rosmaster_system_tests square_mecanum_controller
To start recording data, use the ros2 bag record command followed by the topic(s) you want to record.
For example, to record the /mecanum_drive_controller/cmd_vel topic, run:
ros2 bag record /mecanum_drive_controller/cmd_vel
The recording will start, and you will see output indicating the number of messages recorded for each topic.
To stop the recording, press Ctrl + C in the terminal where the ros2 bag record command is running.
Close down the robot and the square mecanum controller as well using CTRL + C.
The recorded data will be saved in a bag file with a name format of rosbag2_year_month_day-hour_minute_second. This folder contains a metadata.yaml folder and the bag file.
dir
Here is what I see:
rosbag2_2024_11_26-07_00_48
The metadata.yaml file provides important information about the recorded bag file, such as the duration of the recording, the starting time, the number of messages recorded, and the details of each recorded topic. This metadata helps in understanding the contents of the bag file and can be useful for analysis and playback purposes.
If you want to record multiple topics and change the name of the topic, type the following command:
ros2 bag record -o <bag_file_name> <topic1> <topic2> ... <topicN>
If you want to record all topics, you would type this command:
ros2 bag record -a
You can find other options here at the ROS 2 Bag GitHub page.
ros2 bag info
To view information about a recorded bag file, use the `ros2 bag info` command followed by the path to the bag file. For example:
ros2 bag info rosbag2_2024_11_26-07_00_48
The command will display information such as the duration of the recording, the number of messages recorded for each topic, and the start and end times of the recording.
ros2 bag play
Open a terminal window, and launch your robot.
I will type the following command:
x3
or
bash ~/ros2_ws/src/yahboom_rosmaster/yahboom_rosmaster_bringup/scripts/rosmaster_x3_gazebo.sh
To play back a recorded bag file, use the ros2 bag play command followed by the path to the bag file.
cd ~/Downloads/bag_files
Run the bag file:
ros2 bag play rosbag2_2024_11_26-07_00_48
You can use the –loop option to play the bag file in a loop:
ros2 bag play rosbag2_2024_11_26-07_00_48 --loop
Let’s play it in a loop.
The recorded data will be played back, and you will see the messages being published to the respective topic.
ros2 topic echo /mecanum_drive_controller/cmd_vel
Your robot will start moving as well.
To pause the playback, press the spacebar in the terminal where the ros2 bag play command is running. Your robot will continue based on the last velocity message it received.
Press the spacebar again to resume playback.
To stop the playback, press Ctrl+C in all terminal windows.
Convert the ROS 2 Bag File to a CSV File
Let’s convert the ROS 2 bag file into CSV format.
cd ~/Downloads/bag_files/rosbag2_2024_11_26-07_00_48
If you take a look inside the ROS 2 bag folder, you see two files.
- rosbag2_2024_11_26-07_00_48_0.mcap: The ROS 2 bag file
- metadata.yaml: This is a supplementary file that provides extra detail about the data in the .mcap file. It is written in YAML format to make it easy for both humans and computers to read and understand.
Now let’s convert the ROS 2 bag file (in mcap format, the default for ROS 2) into .csv format.
First, type this command to install the package we need (it is usually already installed):
sudo apt-get install ros-${ROS_DISTRO}-rosbag2-storage-mcap
cd ~/Downloads/bag_files/
Create a new file called ros2bag_to_csv.py.
Add this code.
#!/usr/bin/env python3
"""
Convert a ROS 2 bag file to CSV format.

This script reads messages from a ROS 2 bag file and converts them to CSV format,
creating separate CSV files for each topic in the bag.

Usage:
  python3 ros2bag_to_csv.py <input_bag_path> <output_folder>

Subscription Topics:
    None (reads from bag file)

Publishing Topics:
    None (writes to CSV files)

:author: Addison Sears-Collins
:date: November 26, 2024
"""

import argparse
import csv
import os

from rclpy.serialization import deserialize_message
from rosidl_runtime_py.utilities import get_message
import rosbag2_py
from std_msgs.msg import String


def read_messages(input_bag: str):
    """
    Read messages from a ROS 2 bag file.

    :param input_bag: Path to the input bag file.
    :return: A generator yielding (topic, message, timestamp) tuples.
    """
    # Create a SequentialReader to read messages from the bag file
    reader = rosbag2_py.SequentialReader()

    # Open the bag file for reading
    reader.open(
        rosbag2_py.StorageOptions(uri=input_bag, storage_id="mcap"),
        rosbag2_py.ConverterOptions(
            input_serialization_format="cdr", output_serialization_format="cdr"
        ),
    )

    # Get all the topic types available in the bag file
    topic_types = reader.get_all_topics_and_types()

    def typename(topic_name):
        """
        Get the message type for a given topic.

        :param topic_name: The name of the topic.
        :return: The message type as a string.
        :raises ValueError: If the topic is not found in the bag.
        """
        # Iterate through the topic types to find the matching topic name
        for topic_type in topic_types:
            if topic_type.name == topic_name:
                return topic_type.type
        raise ValueError(f"topic {topic_name} not in bag")

    # Iterate through the messages in the bag file
    while reader.has_next():
        topic, data, timestamp = reader.read_next()
        msg_type = get_message(typename(topic))
        msg = deserialize_message(data, msg_type)
        yield topic, msg, timestamp

    # Clean up the reader
    del reader


def main():
    """
    Main function to parse arguments and convert ROS 2 bag to CSV.
    """
    # Create an argument parser
    parser = argparse.ArgumentParser(description="Convert ROS 2 bag to CSV")
    parser.add_argument("input", help="Input bag path (folder) to read from")
    parser.add_argument("output", help="Output folder to save CSV files")

    # Parse the command-line arguments
    args = parser.parse_args()

    # Create the output folder if it doesn't exist
    if not os.path.exists(args.output):
        os.makedirs(args.output)

    # Initialize dictionaries to store topic files and writers
    topic_files = {}
    topic_writers = {}

    # Iterate through the messages in the bag file
    for topic, msg, timestamp in read_messages(args.input):
        # If the topic hasn't been processed before, create a new CSV file and writer
        if topic not in topic_files:
            output_file = os.path.join(args.output, topic.replace('/', '_') + '.csv')
            topic_files[topic] = open(output_file, mode='w',
                                      newline='', encoding='utf-8')
            topic_writers[topic] = csv.writer(topic_files[topic])
            topic_writers[topic].writerow(['timestamp', 'data'])

        # Write the message data to the corresponding CSV file
        if isinstance(msg, String):
            topic_writers[topic].writerow([timestamp, msg.data])
        else:
            topic_writers[topic].writerow([timestamp, str(msg)])

    # Close all the topic files
    for file in topic_files.values():
        file.close()


if __name__ == "__main__":
    main()
Save the file.
Change the file’s permissions:
chmod +x ros2bag_to_csv.py
Run the script:
python3 ros2bag_to_csv.py rosbag2_2024_11_26-07_00_48 myros2bag
Here is the syntax:
python3 ros2bag_to_csv.py <ROS 2 bag folder> <desired output folder>
cd myros2bag
Inside this folder you will see your .csv file.
That’s it!
You can now use this knowledge to capture and analyze data from your ROS 2 system, debug issues, and create datasets for various applications.
Keep building!


