Some of the most frequently used sensors in mobile robotics include:
Lidar
IMUs
Depth cameras
RGB cameras
GPS
The mobile robot I use for the examples in this tutorial is equipped with simulated LIDAR, IMU, and a depth camera.
An RGB camera is nice to have but not critical for navigation.
GPS is not relevant to use because our robot is designed for indoor navigation.
For a real robot, instead of using simulated sensors, we would use real hardware. Fortunately, most of the popular LIDARs, IMUs, and depth cameras on the market have ROS 2 publishers you can find on GitHub that will read the data from the sensor and publish that data in a ROS 2-compatible format. These ROS 2 publishers are also known as “drivers.”
How ROS 2 Helps Sensors Work Together
The beauty of ROS 2 is how it makes it easier for different types of sensors to work together, even if they’re made by different companies. It does this by providing special packages that define standard ways for sensors to communicate.
The sensor_msgs package creates a common language for a variety of sensors. This means that you can use any sensor as long as it speaks this common language.
Some of the most important messages for navigation include:
sensor_msgs/LaserScan: Used for LIDARs
sensor_msgs/PointCloud2: Used for depth cameras
sensor_msgs/Range: Used for distance sensors, both infrared and ultrasonic sensors
sensor_msgs/Image: Used for cameras
In addition to the sensor_msgs package, we have two other packages that you should know about if you come across these during your robotics career:
radar_msgs
The radar_msgs package is specifically for radar sensors and defines how they should communicate.
vision_msgs
The vision_msgs package is for sensors used in computer vision, like cameras that can detect and recognize objects or people. Some of the messages it supports include:
vision_msgs/Classification2D and vision_msgs/Classification3D: Used for identifying objects in 2D or 3D
vision_msgs/Detection2D and vision_msgs/Detection3D: Used for detecting objects in 2D or 3D
As mentioned earlier, most real robots come with special programs called ROS drivers that allow their sensors to talk using the common language defined in these packages. This makes it easier to use sensors from different manufacturers because general software packages like Nav2 can understand this common language and do their job no matter what specific sensor hardware is being used.
In simulated environments, like what we will use in this tutorial, special plugins, which we defined in the URDF file, are used to make the simulated sensors communicate using the sensor_msgs package format.
Visualizing Sensor Data in RViz
Let’s take a look at the sensor data we have to work with on our simulated robot. Open a terminal window, and type this command:
In the “Fixed Frame” field, enter odom as the Fixed Frame.
Let’s look at the sensor readings.
Click the “Add” button at the bottom of the RViz window.
Click the “By topic” tab.
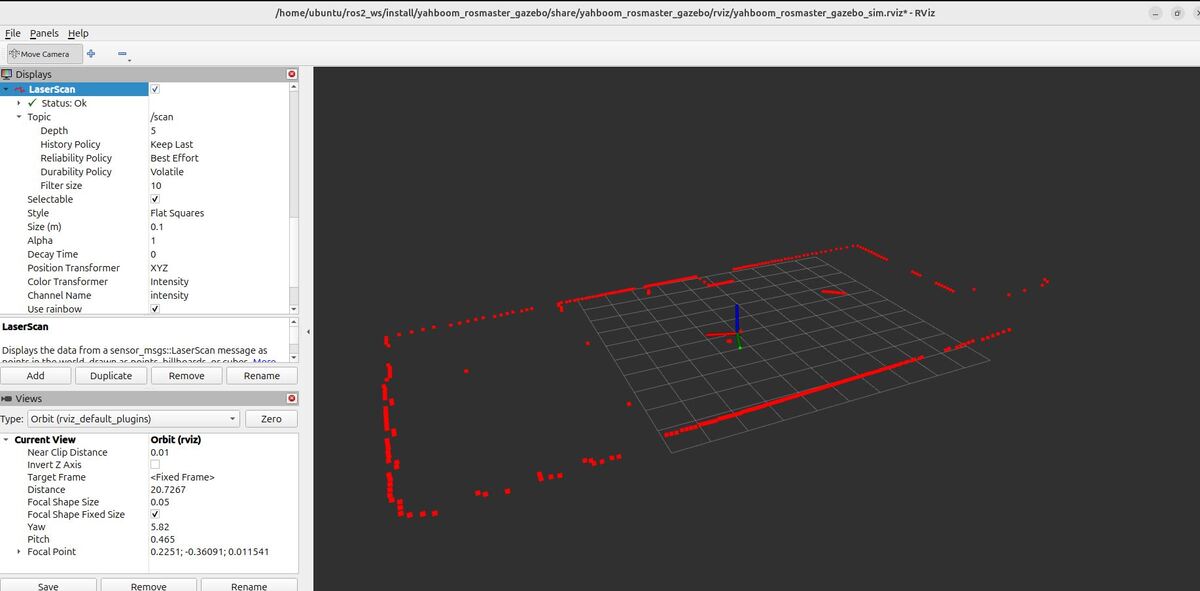
Select the “/scan” topic so we can view the sensor_msgs/LaserScan messages.
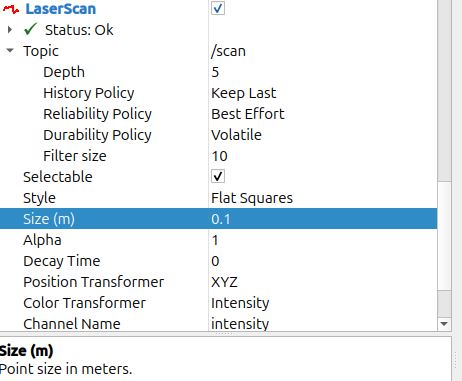
On the left panel, set the Reliability Policy in RViz to “Best Effort”. Setting the Reliability Policy to “Best Effort” for a LIDAR sensor means that RViz will display the most recently received data from the sensor, even if some data packets have been lost or delayed along the way.
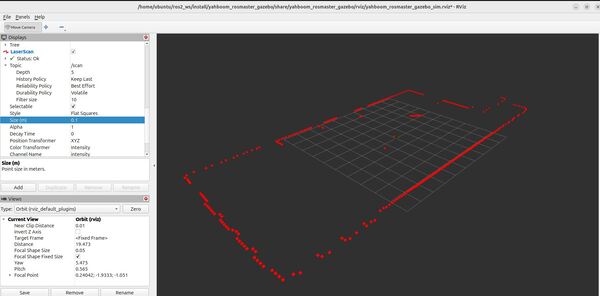
Now set the size to 0.1 so it is easier to see the scans. You can see the scans match up pretty well with the detected objects around the robot in the Gazebo environment.
Let’s look at the IMU information.
Click the “Add” button at the bottom of the RViz window.
Click the “By topic” tab.
Select the “/imu/data” topic so we can view the sensor_msgs/Imu messages.
You will see the IMU orientation and acceleration visualized using the IMU plugin.
Observe how the visualizations change in real-time as your robot moves and interacts with the environment.
When you build a mobile robot, one of the most important things to consider is how the robot will figure out where it is and which direction it’s facing. This process is called localization.
Imagine you’re blindfolded and placed in a room. You might be able to feel around and make guesses about where you are based on what you touch, but it would be much easier if you could see.
This is where the ROS2 robot_localization package comes in. It’s like giving your robot a special superpower to combine (or “fuse”) information from different sensors, like wheel encoders and an Inertial Measurement Unit (IMU), to better understand its position and orientation.
In this tutorial, I will show you how to set up the robot_localization ROS 2 package on a simulated mobile robot. We will fuse odometry data from the /mecanum_drive_controller/odom topic (which is like the robot counting its own steps) with IMU data from the /imu/data topic (which tells the robot if it’s tilting or turning). By combining these two sources of information using a special mathematical tool called an Extended Kalman Filter, our robot will have a much better idea of where it is and which way it’s pointing.
Why is this important? Here are a few reasons:
Correcting Wheel Slip: Sometimes the robot’s wheels can slip, causing inaccurate data. By fusing data from both the wheels and the IMU, we can correct these errors and improve the robot’s navigation.
Enhancing Navigation: Accurate data from sensor fusion allows the robot to navigate more efficiently, making fewer mistakes and taking more precise paths.
Improving Reliability: Combining multiple data sources makes the robot’s movement data more reliable, even if one of the sensors temporarily fails or provides bad or noisy data.
Optimizing Performance: With smoother and more accurate movement data, the robot can perform tasks more effectively, whether it’s moving objects, exploring new environments, or performing complex maneuvers.
Let’s get started!
If you prefer learning by video, watch the video below, which covers this entire tutorial from start to finish.
The engine behind the robot_localization package for ROS 2 is an Extended Kalman Filter (EKF). The default name of the ROS 2 node is ekf_node.
An EKF is a mathematical algorithm that combines data from different sensors to figure out a robot’s position, which way it’s facing, and how fast it’s moving. It does this by constantly making educated guesses based on how the robot is expected to move, and then fine-tuning these guesses using the actual sensor readings. This helps to smooth out any noise or inaccuracies in the sensor data, giving us a cleaner and more reliable estimate of where the robot is and what it’s doing.
One of the best things about the EKF is that it can handle noisy sensor data. It’s smart enough to trust the sensors that are more likely to be accurate, while still using data from the less precise sensors. This means that even if one sensor is a bit inaccurate, the EKF can still do a good job of locating the robot by relying more on the other sensors.
Another great aspect of the EKF is that it can keep working even if a sensor stops providing data for a little while. It does this by using its educated guesses and the last known sensor readings to keep tracking the robot. When the sensor starts working again, the EKF smoothly brings the new data back into the mix. This helps to keep the robot’s location estimates reliable, even if things get a bit tricky in the real world.
The ekf_node we will configure in this tutorial will subscribe to the following topics (ROS message types are in parentheses):
This node will publish data to the following topics:
/odometry/filtered : The smoothed odometry information (nav_msgs/Odometry) generated by fusing the IMU and wheel odometry data.
/tf : Coordinate transform from the odom frame (parent) to the base_footprint frame (child).
Configure Robot Localization
We need to specify the configuration parameters of the ekf_node by creating a YAML file. Your friend for configuring the robot_localization package for your robot is the official documentation at this website.
Let’s get into it!
Open a new terminal window, and type:
cd ~/ros2_ws/src/yahboom_rosmaster/yahboom_rosmaster_localization/
mkdir -p config && cd config
touch ekf.yaml
Add this code inside this file:
### ekf config file ###
ekf_filter_node:
    ros__parameters:

# The frequency, in Hz, at which the filter will output a position estimate. Note that the filter will not begin
# computation until it receives at least one message from one of the inputs. It will then run continuously at the
# frequency specified here, regardless of whether it receives more measurements. Defaults to 30 if unspecified.
        frequency: 15.0

# ekf_localization_node and ukf_localization_node both use a 3D omnidirectional motion model. If this parameter is
# set to true, no 3D information will be used in your state estimate. Use this if you are operating in a planar
# environment and want to ignore the effect of small variations in the ground plane that might otherwise be detected
# by, for example, an IMU. Defaults to false if unspecified.
        two_d_mode: true

# Whether to broadcast the transformation over the /tf topic. Defaults to true if unspecified.
        publish_tf: true

# REP-105 (http://www.ros.org/reps/rep-0105.html) specifies four principal coordinate frames: base_link, odom, map, and
# earth. base_link is the coordinate frame that is affixed to the robot. Both odom and map are world-fixed frames.
# The robot's position in the odom frame will drift over time, but is accurate in the short term and should be
# continuous. The odom frame is therefore the best frame for executing local motion plans. The map frame, like the odom
# frame, is a world-fixed coordinate frame, and while it contains the most globally accurate position estimate for your
# robot, it is subject to discrete jumps, e.g., due to the fusion of GPS data or a correction from a map-based
# localization node. The earth frame is used to relate multiple map frames by giving them a common reference frame.
# ekf_localization_node and ukf_localization_node are not concerned with the earth frame.
# Here is how to use the following settings:
# 1. Set the map_frame, odom_frame, and base_link frames to the appropriate frame names for your system.
#     1a. If your system does not have a map_frame, just remove it, and make sure "world_frame" is set to the value of
#         odom_frame.
# 2. If you are fusing continuous position data such as wheel encoder odometry, visual odometry, or IMU data, set
#   "world_frame" to your odom_frame value. This is the default behavior for robot_localization's state estimation nodes.
# 3. If you are fusing global absolute position data that is subject to discrete jumps (e.g., GPS or position updates
# from landmark observations) then:
#     3a. Set your "world_frame" to your map_frame value
#     3b. MAKE SURE something else is generating the odom->base_link transform. Note that this can even be another state
#         estimation node from robot_localization! However, that instance should *not* fuse the global data.
        map_frame: map                   # Defaults to "map" if unspecified
        odom_frame: odom                 # Defaults to "odom" if unspecified
        base_link_frame: base_footprint  # Defaults to "base_link" if unspecified
        world_frame: odom                # Defaults to the value of odom_frame if unspecified

# The filter accepts an arbitrary number of inputs from each input message type (nav_msgs/Odometry,
# geometry_msgs/PoseWithCovarianceStamped, geometry_msgs/TwistWithCovarianceStamped,
# sensor_msgs/Imu). To add an input, simply append the next number in the sequence to its "base" name, e.g., odom0,
# odom1, twist0, twist1, imu0, imu1, imu2, etc. The value should be the topic name. These parameters obviously have no
# default values, and must be specified.
        odom0: mecanum_drive_controller/odom

# Each sensor reading updates some or all of the filter's state. These options give you greater control over which
# values from each measurement are fed to the filter. For example, if you have an odometry message as input, but only
# want to use its Z position value, then set the entire vector to false, except for the third entry. The order of the
# values is x, y, z, roll, pitch, yaw, vx, vy, vz, vroll, vpitch, vyaw, ax, ay, az. Note that not some message types
# do not provide some of the state variables estimated by the filter. For example, a TwistWithCovarianceStamped message
# has no pose information, so the first six values would be meaningless in that case. Each vector defaults to all false
# if unspecified, effectively making this parameter required for each sensor.
        odom0_config: [false, false, false,
                       false, false, false,
                       true, true, false,
                       false, false, true,
                       false, false, false]

        #        [x_pos   , y_pos    , z_pos,
        #         roll    , pitch    , yaw,
        #         x_vel   , y_vel    , z_vel,
        #         roll_vel, pitch_vel, yaw_vel,
        #         x_accel , y_accel  , z_accel]


        imu0: imu/data
        imu0_config: [false, false, false,
                      false, false, false,
                      false, false, false,
                      false, false, true,
                      true, true, false]
Let’s walk through this file together.
First, let’s talk about the frequency parameter. This parameter determines how often the filter provides updated location data. In our case, it’s set to 15 Hz, which means the robot gets a new position estimate 15 times every second.
Next, we have the two_d_mode setting. By setting this to true, we’re telling the filter to focus only on the robot’s position in a flat, two-dimensional plane. This means it will ignore any small up and down movements, which is perfect for our robot since it has mecanum wheels that allow it to move smoothly on a flat surface.
Now, let’s discuss coordinate frames. The configuration file specifies three main frames: map_frame, odom_frame, and base_link_frame. These frames help the robot understand its location from different perspectives.
The map_frame represents the robot’s position in the overall environment.
The odom_frame tracks the robot’s movement from its starting point
I like to set the base_link_frame to the base_footprint.
The world_frame is a special coordinate frame that serves as a reference for the other frames. In the configuration file, it’s set to the same value as the odom_frame. This means that the robot’s odometry frame, which tracks its movement from its starting point, is being used as the reference frame for the entire system.
Using the odom_frame as the world_frame is a common practice when the robot is primarily relying on continuous position data from sources like wheel encoders, visual odometry, or IMU data. By setting the world_frame to the odom_frame, we’re essentially telling the robot that its odometry data is the most reliable source for tracking its overall position and movement.
However, there are cases where you might want to set the world_frame to the map_frame instead. This is typically done when the robot is using global absolute position data that may be subject to sudden jumps or corrections, such as GPS data or position updates from recognizing landmarks. In such cases, setting the world_frame to the map_frame helps the robot maintain a more accurate global position estimate.
To estimate the robot’s position and movement, the ekf_filter_node needs data from the robot’s sensors. This is where the odom0 and imu0 parameters come into play.
odom0 refers to the wheel odometry data, which is used to estimate the robot’s velocity in the x and y directions, as well as its rotation speed around the vertical axis (yaw). The odom0_config parameter specifies which aspects of the odometry data should be used by the filter.
Similarly, imu0 refers to the data from the Inertial Measurement Unit (IMU), which provides information about the robot’s acceleration and rotation. The imu0_config parameter defines which aspects of the IMU data should be used by the filter.
By putting all these settings together in the configuration file, we give our robot the tools it needs to understand its position and movement as it navigates through its environment on its mecanum wheels. This setup enables the robot to perform tasks more effectively and safely, as it has a clear understanding of its location and how it is moving.
Create Launch Files
Now let’s create a launch file.
Open up a new terminal window, and type:
cd ~/ros2_ws/src/yahboom_rosmaster/yahboom_rosmaster_localization/
mkdir -p launch/ && cd launch
touch ekf_gazebo.launch.py
Add this code.
#!/usr/bin/env python3
"""
Launch file for the Extended Kalman Filter (EKF) node in Gazebo simulation.

This script starts the robot_localization package's EKF node which combines (fuses)
data from wheel odometry and IMU sensors to better estimate the robot's position
and orientation.

:author: Addison Sears-Collins
:date: November 29, 2024
"""

import os
from launch import LaunchDescription
from launch.actions import DeclareLaunchArgument
from launch.substitutions import LaunchConfiguration
from launch_ros.actions import Node
from launch_ros.substitutions import FindPackageShare


def generate_launch_description():
    """
    Generate a launch description for the EKF node.

    This function creates and returns a LaunchDescription object that will start
    the EKF node from the robot_localization package. The node is configured
    using parameters from a YAML file.

    Returns:
        LaunchDescription: A complete launch description for the EKF node
    """
    # Constants for paths to different files and folders
    package_name = 'yahboom_rosmaster_localization'

    # Config file paths
    ekf_config_file_path = 'config/ekf.yaml'

    # Set the path to different packages
    pkg_share = FindPackageShare(package=package_name).find(package_name)

    # Set the path to config files
    default_ekf_config_path = os.path.join(pkg_share, ekf_config_file_path)

    # Launch configuration variables
    ekf_config_file = LaunchConfiguration('ekf_config_file')
    use_sim_time = LaunchConfiguration('use_sim_time')

    # Declare the launch arguments
    declare_ekf_config_file_cmd = DeclareLaunchArgument(
        name='ekf_config_file',
        default_value=default_ekf_config_path,
        description='Full path to the EKF configuration YAML file'
    )

    declare_use_sim_time_cmd = DeclareLaunchArgument(
        name='use_sim_time',
        default_value='true',
        description='Use simulation (Gazebo) clock if true'
    )

    # Specify the actions
    start_ekf_node_cmd = Node(
        package='robot_localization',
        executable='ekf_node',
        name='ekf_filter_node',
        output='screen',
        parameters=[
            ekf_config_file,
            {'use_sim_time': use_sim_time}
        ]
    )

    # Create the launch description and populate
    ld = LaunchDescription()

    # Add the declarations
    ld.add_action(declare_ekf_config_file_cmd)
    ld.add_action(declare_use_sim_time_cmd)

    # Add the actions
    ld.add_action(start_ekf_node_cmd)

    return ld
Save the file, and close it.
Open up a new terminal window, and type:
cd ~/ros2_ws/src/yahboom_rosmaster/yahboom_rosmaster_bringup/launch
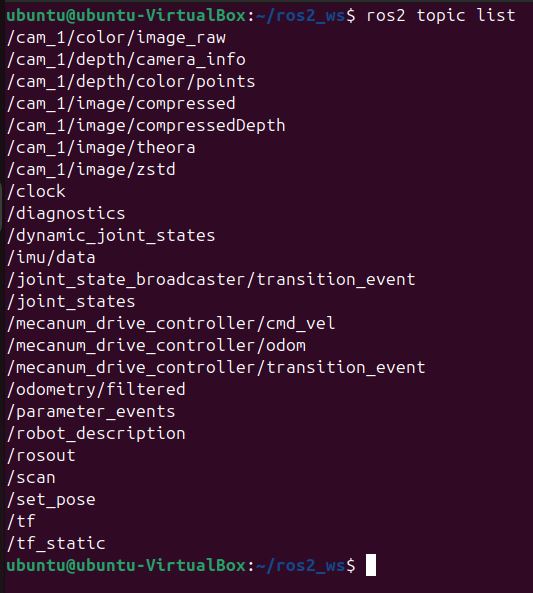
To see the active topics, open a terminal window, and type:
ros2 topic list
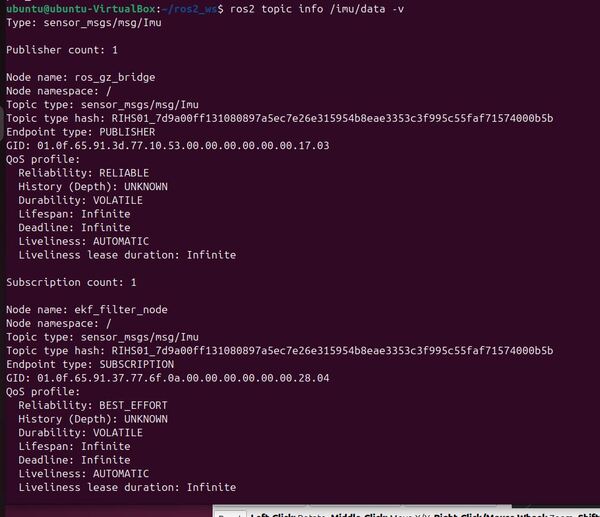
To see more information about the topics, execute:
ros2 topic info /imu/data -v
To see the data type:
ros2 topic echo /imu/data
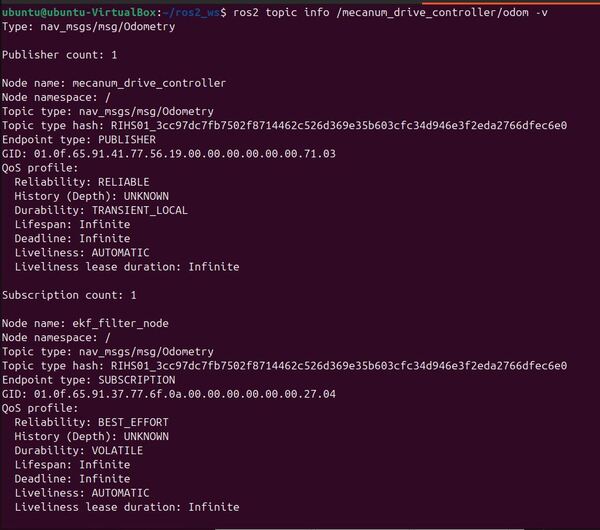
Now check out the wheel odometry:
ros2 topic info /mecanum_drive_controller/odom -v
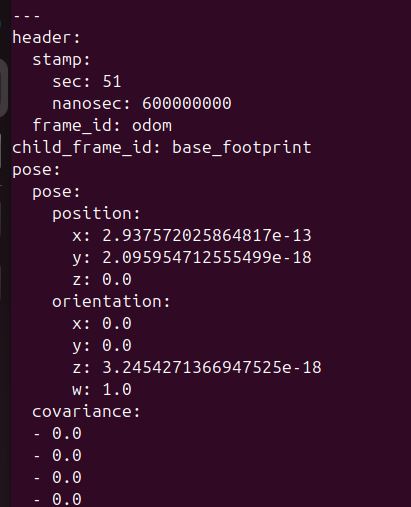
ros2 topic echo /mecanum_drive_controller/odom
Make sure the timestamp on the topic indicates simulation time.
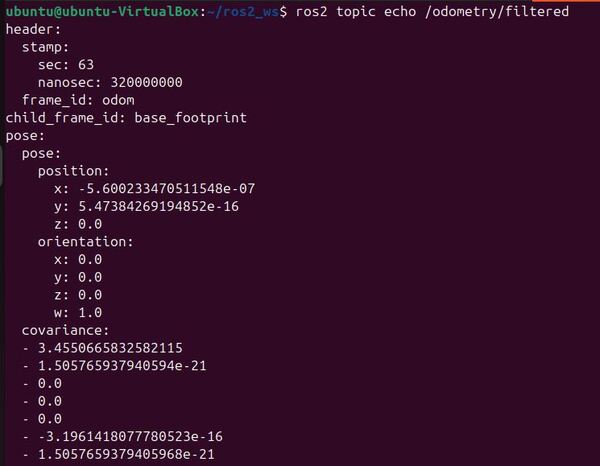
To see the output of the robot localization package (i.e. the Extended Kalman Filter (EKF)), type:
ros2 topic echo /odometry/filtered
Make sure the timestamp on this odometry topic indicates simulation time.
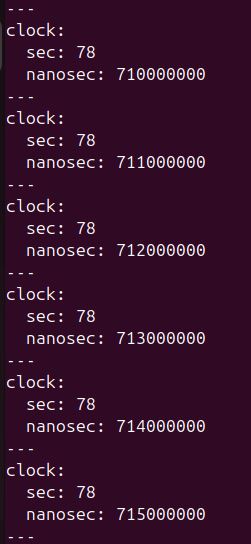
Let’s see the simulation time:
ros2 topic echo /clock
This clock data is coming from Gazebo via the ROS 2 Gazebo bridge YAML file we configured earlier in this tutorial.
I will move my robot around in a square shaped pattern:
ros2 run yahboom_rosmaster_system_tests square_mecanum_controller --ros-args -p use_sim_time:=true
Remember we need to set use_sim_time to true in the command above so that the node gets the time from the /clock ROS 2 topic rather than the system time.
We can see the output of the odom -> base_footprint transform by typing the following command:
ros2 run tf2_ros tf2_echo odom base_footprint
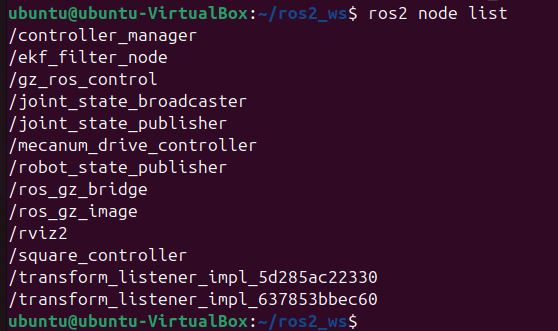
Let’s see the active nodes.
ros2 node list
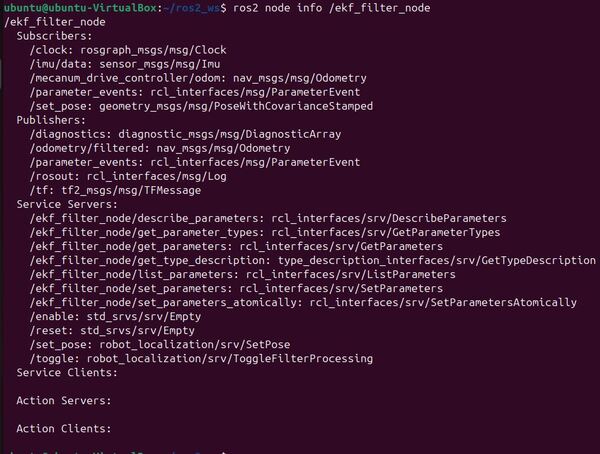
Let’s check out the ekf_node (named ekf_filter_node).
ros2 node info /ekf_filter_node
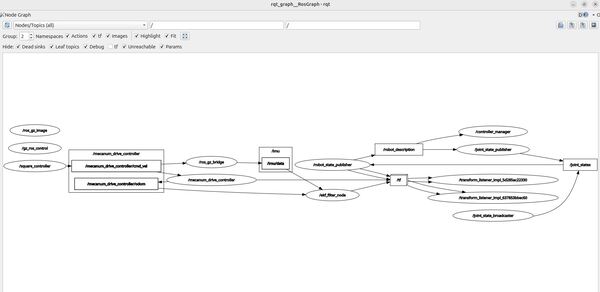
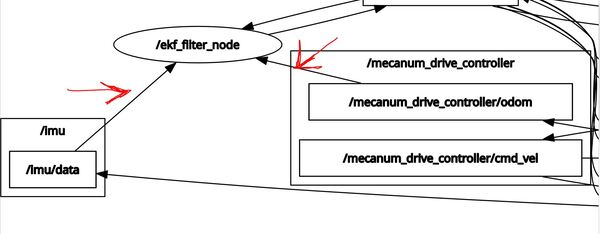
Let’s check out the ROS node graph.
rqt_graph
Click the blue circular arrow in the upper left to refresh the node graph. Also select “Nodes/Topics (all)”.
To see the coordinate frames, type the following command in a terminal window.
cd ~/Downloads/
ros2 run tf2_tools view_frames
In the current working directory, you will have a file called frames_20XX.pdf. Open that file.
evince frames_20XX.pdf
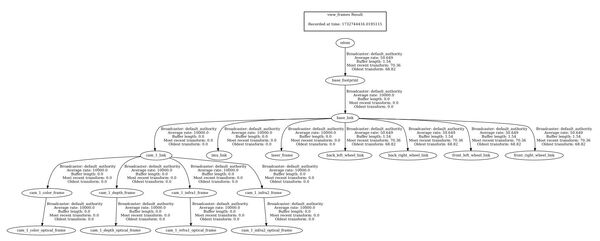
Here is what my coordinate transform (i.e. tf) tree looks like:
You can see that the parent frame is the odom frame. The odom frame is the initial position and orientation of the robot. Every other frame below that is a child of the odom frame.
Later, we will add a map frame. The map frame will be the parent frame of the odom frame.
In this tutorial, we’ll dive into the world of coordinate frames, the backbone of mobile robot navigation using ROS 2.
Imagine you’re a robot trying to move around in a room. To do that effectively, you need to understand where you are, where your sensors are, and how to translate the information they provide into a format you can use to navigate safely. That’s where coordinate transformations come in.
Different sensors (like LIDAR, cameras, and IMUs) provide data in their own coordinate frames. Coordinate transformations convert this data into a common frame, usually the robot base frame, making it easier to process and use for navigation.
If you prefer learning by video, watch the video below, which covers this entire tutorial from start to finish.
Why are coordinate transformations so important? Well, think about it like this: your robot is like a person with two “eyes”: a LIDAR and a depth camera. The LIDAR measures distances to objects, while the depth camera provides a 3D image of the environment.
These sensors are located at different positions on the robot, so they have different perspectives.
To navigate safely in the world, the robot needs to combine the obstacle detection information from both sensors into a common understanding of its surroundings. This is where coordinate transformations come in. They act as a translator, converting the information from each sensor’s unique perspective into a shared language – the robot’s base coordinate frame.
By expressing the LIDAR and depth camera data in the same coordinate frame, the robot can effectively merge the information and create a unified obstacle map of its environment. This allows the robot to plan paths and avoid obstacles, taking into account its own dimensions and the location of objects detected by both sensors.
In essence, coordinate transformations enable the robot to make sense of the world by unifying the different perspectives of its sensors.
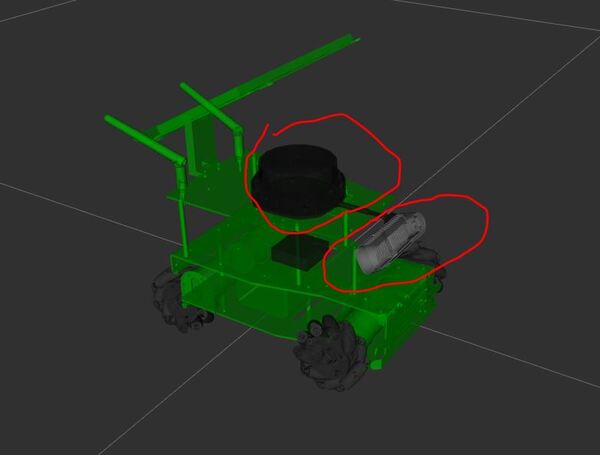
Launch the Mobile Robot
Let’s bring your robot to life. Open a terminal window, and type the following command:
You should now see your robot in Gazebo as well as RViz.
Visualize the Coordinate Frames
Let’s take a look at the coordinate frames.
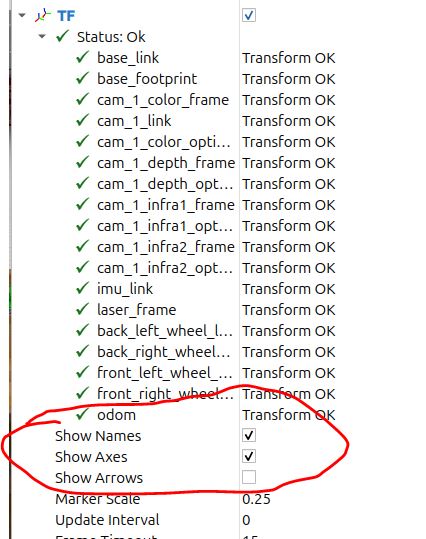
In RViz, find the Displays panel on the left-hand side.
Untick the “Robot Model” so that you only see the coordinate frames.
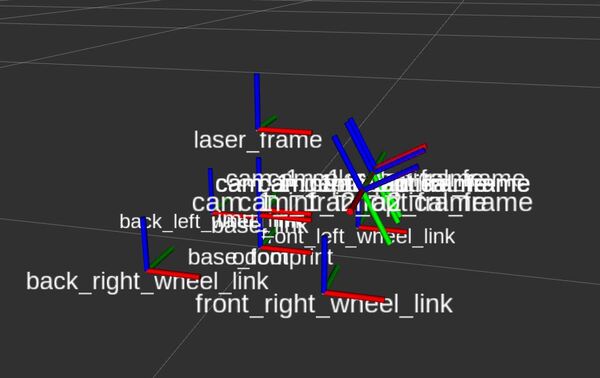
In the TF dropdown menu, tick “Show Axes” and “Show Names”.
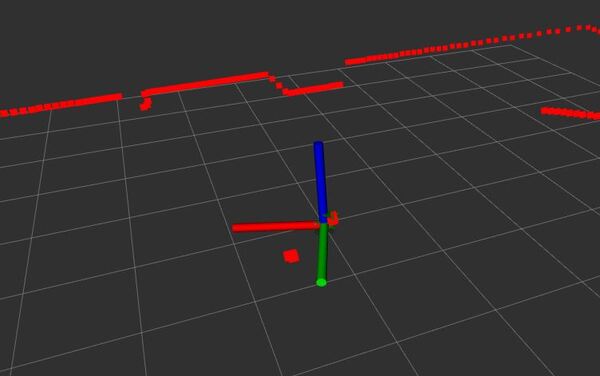
These frames are 3D coordinate systems that define the position and orientation of different parts of your robot.
Each part of the robot, such as the base, LIDAR, or depth camera, has its own coordinate frame. A coordinate frame consists of three perpendicular axes. By convention:
The red arrows represent the x axes
The green arrows represent the y axes.
The blue arrows represent the z axes.
The origin of each coordinate frame is the point where all three axes intersect.
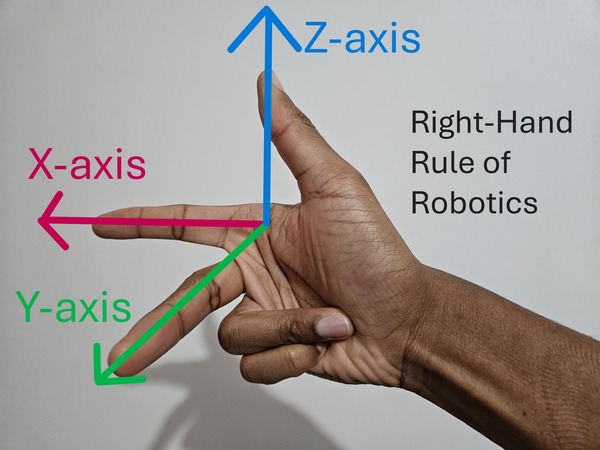
Right-Hand Rule of Robotics
The right-hand rule is a helpful method to remember the orientation of these axes:
Take your right hand and point your index finger forward. That represents the x-axis (red).
Now point your middle finger to the left. That represents the y-axis (green).
Point your thumb towards the sky. Your thumb represents the z-axis (blue).
Visualize the Coordinate Frames
As a friendly reminder, if you ever want to see the hierarchy of the coordinate frames for your robot in a PDF file, you can do this.
Open a terminal window, and move to any directory. I will move to my Downloads folder.
cd ~/Downloads/
Type this command:
ros2 run tf2_tools view_frames
In the current working directory, you will have a file called frames_20XX.pdf. Open that file.
evince frames_20XX.pdf
In my case, I will type:
evince frames_2024-11-27_16.53.36.pdf
You can see all your coordinate frames.
Coordinate Transformations in Nav2
How Nav2 Uses Coordinate Frames
The Nav2 package for ROS 2 makes extensive use of coordinate transformations to enable a robot to navigate autonomously through an environment. It uses coordinate transformations not just for obstacle detection, but also localization.
Imagine your robot as a character in a video game. Just like how the game keeps track of the character’s position in the game world, Nav2 uses coordinate transformations to keep track of the robot’s position in the real world.
ROS Enhancement Proposals (REPs) Relevant to Nav2
When it comes to configuring your robot for autonomous navigation, ROS has some guidelines to make sure everyone’s robots can play nicely with Nav2. These guidelines are called “REP,” which stands for “ROS Enhancement Proposals.”
Two important REPs for Nav2 are:
1. REP 105: This guideline explains how to name and describe the different coordinate frames (think of them as different perspectives) for mobile robots.
2. REP 103: This guideline talks about using standard units of measurement (like meters for distance) and following certain rules for describing positions and orientations.
Nav2 follows these guidelines to ensure it can work well with other ROS packages.
Key Coordinate Frames in Nav2
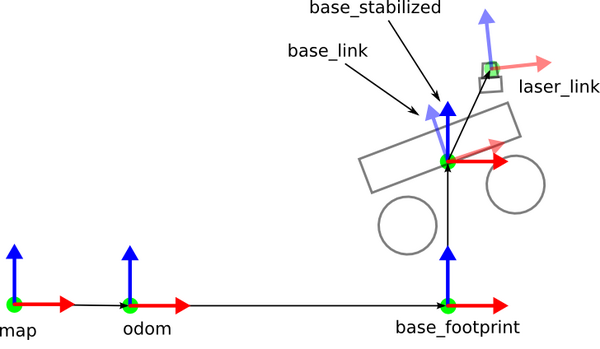
The four most important coordinate frames in Nav2 are as follows:
base_link
The base_link is usually the center point of your robot’s base. No matter how much the robot moves or turns, the base_link stays put, and is the unifying reference point for the car’s movement and sensors.
base_footprint
This coordinate frame is a projection of the base_link frame onto the ground plane. Nav2 uses the base_footprint link to determine the robot’s position relative to the ground and nearby obstacles.
odom:
The odom frame is the robot’s “starting point.” Think of the odom frame like the odometer on your car that measures the distance the car has traveled from some starting point.
The odom frame in Nav2 keeps track of the robot’s position and orientation relative to its starting position and orientation. The data from the odom frame is usually based on wheel encoders or other sensors.
Like an odometer for your car, the odom frame can drift over time due to small errors accumulating (e.g. slippage of the wheels), making it unreliable for making a long-term estimate of how far the robot has traveled and which way the robot is turned.
map:
The map frame provides a global, long-term reference for the robot’s position and orientation in an environment. It is constantly updated by a localization system that uses sensor data to correct any drift in the robot’s estimated position.
The map frame is like a car’s GPS system. It shows the car’s location on a global map, ensuring that the car’s position remains accurate over long distances. However, just like a GPS update, the robot’s position in the map frame can sometimes jump suddenly when the localization system makes corrections.
Key Coordinate Transformations in Nav2
For Nav2 to do its job, it needs to know how these coordinate frames relate to each other. Nav2 requires the following specific transformations between coordinate frames to be published over ROS 2:
map => odom: This transform connects the global map frame to the robot’s odometry frame. It’s usually provided by a localization or mapping package such as AMCL, which continuously updates the robot’s estimated position in the map.
odom => base_link: This transform relates the robot’s odometry frame to its base frame. It’s typically published by the robot’s odometry system, which combines data from sensors like wheel encoders and IMUs using packages like robot_localization. We will see how to do this in a future tutorial.
base_link => sensor_frames: These transforms describe the relationship between the robot’s base frame and its sensor frames, such as laser_frame for your LIDAR. If your robot has multiple sensors, each sensor frame needs a transform to the base_link frame.
Publishing Transforms in Nav2
To provide the necessary transforms to Nav2, you’ll typically use two methods:
Static Transforms: These are fixed transforms that define the relationship between the robot’s base and its sensors. They are usually specified in the robot’s URDF file and published by the Robot State Publisher package.
Dynamic Transforms: These transforms change over time, like the map => odom transform, which is updated as the robot moves through the environment. Dynamic transforms are usually published by packages responsible for localization, mapping, or odometry.
Why Transformations Matter in Nav2
Transformations are important for several aspects of Nav2’s functionality:
Localization: By combining sensor data with transform information, Nav2 can estimate the robot’s pose (position and orientation) in the environment.
Path Planning: Nav2’s path planner uses transforms to create a path from the robot’s current position to its goal in the map frame. The planned path is then transformed into the robot’s base frame for execution.
Recovery Behaviors: When the robot encounters issues during navigation, Nav2’s recovery behaviors use transform information to help the robot get back on track.
In summary, transformations help the robot understand its surroundings, keep track of its position, and navigate safely. By following ROS guidelines and managing these transforms, Nav2 ensures your robot can explore the world with ease.
That’s it for the theory. In the next tutorials, you will get hands-on practice with these concepts.