In this tutorial, we will explore miscellaneous useful features in C++.
Prerequisites
- You have completed this tutorial: How to Use the Standard Template Library (STL) in C++.
- I am assuming you are using Visual Studio Code, but you can use any code editor.
Defining Enums
Let’s explore enums in C++, which allow you to create named constants for better code readability and type safety in robotics applications.
Open a terminal window, and type this:
cd ~/Documents/cpp_tutorial code . Create a new C++ file and name it enum_example.cpp.
Type the following code into the editor:
#include <iostream>

enum class RobotState {
    IDLE,
    MOVING,
    GRASPING,
    ERROR
};

void print_robot_state(RobotState state) {
    switch (state) {
        case RobotState::IDLE:
            std::cout << "Robot is idle." << std::endl;
            break;
        case RobotState::MOVING:
            std::cout << "Robot is moving." << std::endl;
            break;
        case RobotState::GRASPING:
            std::cout << "Robot is grasping an object." << std::endl;
            break;
        case RobotState::ERROR:
            std::cout << "Robot encountered an error." << std::endl;
            break;
    }
}

int main() {
    RobotState current_state = RobotState::IDLE;
    print_robot_state(current_state);

    current_state = RobotState::MOVING;
    print_robot_state(current_state);

    return 0;
}
In this code, we include the necessary header: iostream for input/output operations.
We define an enum class named RobotState to represent different states of a robot. The enum constants are IDLE, MOVING, GRASPING, and ERROR. Using an enum class provides strong typing and prevents naming conflicts.
We define a function print_robot_state() that takes a RobotState as a parameter. Inside the function, we use a switch statement to match the state and print the corresponding message.
In the main function, we create a variable current_state of type RobotState and initialize it with RobotState::IDLE. We pass this state to the print_robot_state() function, which prints the appropriate message.
We then change the current_state to RobotState::MOVING and call print_robot_state() again with the updated state.
Run the code.
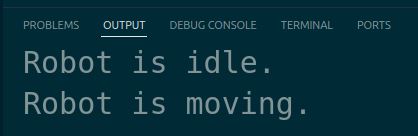
You should see the messages corresponding to the idle and moving states of the robot printed in the terminal.
Enums provide a way to create named constants, making your code more expressive and self-explanatory. They are particularly useful for representing states, modes, or options in robotic systems, improving code readability and reducing the chances of errors.
Generating Random Numbers
Let’s explore how to generate random numbers in C++, a useful technique for various robotics applications, such as simulations, sensor noise modeling, and path planning algorithms.
Let’s create a new C++ file called random_numbers_example.cpp.
Type the following code into the editor:
#include <iostream>
#include <random>
#include <ctime>

int main() {
    // Seed the random number generator
    std::srand(static_cast<unsigned int>(std::time(nullptr)));

    // Generate random integers
    int random_int = std::rand();
    std::cout << "Random integer: " << random_int << std::endl;

    // Generate random floats between 0 and 1
    float random_float = static_cast<float>(std::rand()) / static_cast<float>(RAND_MAX);
    std::cout << "Random float between 0 and 1: " << random_float << std::endl;

    // Generate random numbers within a range
    int min_value = 10;
    int max_value = 50;
    int random_range = min_value + (std::rand() % (max_value - min_value + 1));
    std::cout << "Random integer between " << min_value << " and " << max_value << ": " << random_range << std::endl;

    // Using the Mersenne Twister random number engine
    std::random_device rd;
    std::mt19937 gen(rd());
    std::uniform_real_distribution<double> dis(0.0, 1.0);
    double random_double = dis(gen);
    std::cout << "Random double between 0 and 1 (Mersenne Twister): " << random_double << std::endl;

    return 0;
}
In this example, we include the necessary headers: iostream for input/output operations, random for the Mersenne Twister random number engine, and ctime for seeding the random number generator.
First, we seed the random number generator using std::srand and the current time from std::time(nullptr). This ensures that we get a different sequence of random numbers each time we run the program.
We then generate a random integer using std::rand() and print it to the console.
Next, we generate a random float between 0 and 1 by dividing a random integer from std::rand() by the maximum value RAND_MAX.
To generate a random number within a specific range, we use the modulo operator % to get a random value between min_value and max_value and add min_value to shift the range.
For more advanced random number generation, we use the Mersenne Twister algorithm, which provides better statistical properties than the standard std::rand() function.
We create a std::random_device object rd to obtain a seed value, initialize a std::mt19937 generator gen with the seed, and create a std::uniform_real_distribution object dis to generate random doubles between 0 and 1.
Finally, we generate a random double using dis(gen) and print it to the console.
Run the code.

You will see the random integers, floats, and doubles generated using different techniques printed in the terminal.
We’ve covered a lot of ground in these tutorials, from basic C++ concepts to advanced topics. Each of these features plays an important role in robotics programming, whether you’re working on motion control, sensor processing, or complex autonomous systems.
Remember that writing good robotics code is about more than just making things work – it’s about writing clean, efficient, and maintainable code that can be reliably deployed in real-world applications.
Don’t be afraid to experiment with combining different features to solve complex problems. The skills you’ve learned in these C++ tutorials will serve as a strong foundation for your robotics programming journey.
Thanks for following along with these tutorials.
Keep building!