How to Use Memory Management and Smart Pointers in C++

In this tutorial, we will explore memory management and smart pointers in C++. 

Prerequisites

Managing Memory with malloc 

Let’s explore memory management in C++ using malloc and free. Understanding manual memory management is crucial for robotics programming, especially in resource-constrained environments. 

Open a terminal window, and type this: 

cd ~/Documents/cpp_tutorial 
code . 

Create a new C++ file and name it memory_management_example.cpp

Type the following code into the editor:

#include <iostream>
#include <cstdlib>  // For malloc and free

int main() {
    int *ptr = (int*) malloc(sizeof(int));  // Allocating memory for an integer
    if (ptr == nullptr) {
        std::cout << "Memory allocation failed" << std::endl;
        return -1;  // Return an error if memory allocation failed
    }
    
    *ptr = 5;  // Assigning value to the allocated memory
    std::cout << "Value at pointer: " << *ptr << std::endl;

    free(ptr);  // Freeing the allocated memory
    ptr = nullptr;  // Setting pointer to nullptr after freeing memory

    return 0;
}

In this code snippet, we use malloc to allocate memory for an integer and check if the memory allocation was successful. We then assign a value to this memory, print it, and finally, free the memory using free to avoid memory leaks. 

Setting the pointer to nullptr after freeing is a good practice to prevent dangling pointers.

Run the code.
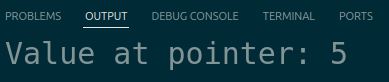
1-memory-management

You should see the output “Value at pointer: 5”, confirming that our memory management operations are functioning correctly.

Using Smart Pointers

Let’s explore smart pointers in C++, which provide automatic memory management and help prevent memory leaks. We’ll look at unique_ptr, shared_ptr, and weak_ptr, which are part of modern C++’s memory management toolkit. 

Create a new C++ file and name it smart_pointers.cpp

Type the following code into the editor:

#include <iostream>
#include <memory>

// Sensor class representing a sensor with a name and a value
class Sensor {
private:
    std::string name;
    double value;

public:
    Sensor(const std::string& name, double value) : name(name), value(value) {}

    void printInfo() const {
        std::cout << "Sensor: " << name << ", Value: " << value << std::endl;
    }
};

int main() {
    // Create a unique_ptr to a Sensor object
    std::unique_ptr<Sensor> sensor1 = std::make_unique<Sensor>("TemperatureSensor", 25.5);
    sensor1->printInfo();

    // Create a shared_ptr to a Sensor object
    std::shared_ptr<Sensor> sensor2 = std::make_shared<Sensor>("HumiditySensor", 60.0);
    sensor2->printInfo();

    // Create a weak_ptr to the shared_ptr
    std::weak_ptr<Sensor> weak_sensor = sensor2;
    if (auto shared_sensor = weak_sensor.lock()) {
        shared_sensor->printInfo();
    }

    return 0;
}

In this code, we define a Sensor class that represents a sensor with a name and a value.

In the main() function, we demonstrate the usage of different smart pointers:

  • unique_ptr: We create a unique_ptr to a Sensor object using std::make_unique(). The unique_ptr ensures exclusive ownership and automatically deletes the object when it goes out of scope.
  • shared_ptr: We create a shared_ptr to a Sensor object using std::make_shared(). The shared_ptr allows multiple pointers to share ownership of the object. The object is deleted when all shared_ptr instances go out of scope.
  • weak_ptr: We create a weak_ptr to the shared_ptr. The weak_ptr does not participate in ownership but can be used to check if the object is still valid. We use lock() to obtain a shared_ptr from the weak_ptr and access the object.

Run the code.
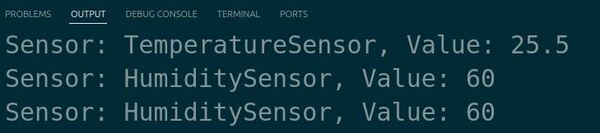
2-smart-pointers

The output displays the information of the Sensor objects created using smart pointers.

This example demonstrates how to use smart pointers in C++ for robotics projects. Smart pointers provide automatic memory management, helping to prevent memory leaks and simplify memory ownership. They are particularly useful when dealing with dynamically allocated objects and help make the code more robust and maintainable.

Thanks, and I’ll see you in the next tutorial.

Keep building!
How to Use Templates and Macros in C++

In this tutorial, we will explore templates and macros in C++.

Prerequisites

Employing Macros

Let’s explore how to use macros in C++ and their application in robotics projects. Macros are preprocessor directives that allow you to define reusable pieces of code, processed before compilation. 

Open a terminal window, and type this: 

cd ~/Documents/cpp_tutorial && code . 

Create a new C++ file and name it basic_macro.cpp.

Type the following code into the editor:

#include <iostream>

// Define a constant macro
#define PI 3.14159

// Define a function-like macro
#define AREA_CIRCLE(radius) (PI * (radius) * (radius))

int main() {
    double radius = 5.0;
    double area = AREA_CIRCLE(radius);

    std::cout << "The area of a circle with radius " << radius << " is: " << area << std::endl;

    return 0;
}

In this code, we define two macros:

  1. PI is a constant macro that defines the value of pi.
  2. AREA_CIRCLE(radius) is a function-like macro that calculates the area of a circle given its radius.

In the main() function, we use the AREA_CIRCLE macro to calculate the area of a circle with a radius of 5.0 and store the result in the area variable. We then print the calculated area using std::cout.

Run the code.

1-basic-macro

The output displays the calculated area of the circle using the AREA_CIRCLE macro.

It’s important to note that macros should be used sparingly and with caution, as they can sometimes lead to unexpected behavior if not used carefully. In modern C++, const variables, inline functions, or templates are often preferred over macros when possible.

Implementing Template Functions

Let’s explore template functions in C++, which allow us to write generic functions that can work with different data types. This is particularly useful in robotics when dealing with various sensor data types or mathematical operations. 

Create a new C++ file and name it template_functions_example.cpp

Type the following code into the editor:

#include <iostream>

template<typename T>
T find_max(T a, T b) {
    return (a > b) ? a : b;
}

int main() {
    std::cout << "Max of 10 and 20 is: " << find_max<int>(10, 20) << std::endl;
    std::cout << "Max of 5.5 and 2.1 is: " << find_max<double>(5.5, 2.1) << std::endl;
    return 0;
}

In this code, we define a template function find_max that takes two parameters of the same type and returns the greater of the two. The function uses the ternary operator to compare the two values. We then test this function with integers and doubles to show its versatility.

Run the code.

2-template-functions-example

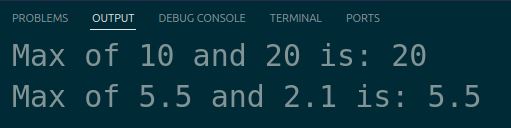
The output should display “Max of 10 and 20 is: 20” and “Max of 5.5 and 2.1 is: 5.5”, demonstrating how the template function adapts to different data types.

Defining Template Classes

Let’s explore template classes in C++, which allow us to create generic classes that can work with different data types. This is particularly useful for creating reusable data structures in robotics applications. 

Create a new C++ file and name it template_class.cpp.

Type the following code into the editor:

#include <iostream>

// Template class for a point in 2D space
template <typename T>
class Point {
private:
    T x;
    T y;

public:
    Point(T x, T y) : x(x), y(y) {}

    T getX() const { return x; }
    T getY() const { return y; }

    void printPoint() const {
        std::cout << "(" << x << ", " << y << ")" << std::endl;
    }
};

int main() {
    Point<int> int_point(5, 10);
    Point<double> double_point(3.14, 2.71);

    std::cout << "Integer point: ";
    int_point.printPoint();

    std::cout << "Double point: ";
    double_point.printPoint();

    return 0;
}

In this code, we define a template class called Point that represents a point in 2D space. The class has two private member variables, x and y, of type T. The typename keyword is used to specify that T is a type parameter.

The Point class has a constructor that takes x and y values and initializes the member variables. It also provides getter functions getX() and getY() to access the values of x and y, respectively. The printPoint() function is a member function that prints the point in the format (x, y).

In the main() function, we create two instances of the Point class: int_point with integer values and double_point with double values. 

We use the printPoint() function to print the points and verify that the template class works correctly with different data types.

Run the code.

3-template-class

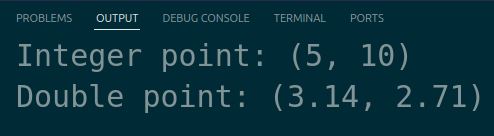
The output displays the points created with integer and double values.

Template classes provide flexibility and help reduce code duplication, making the code more maintainable and efficient.

Thanks, and I’ll see you in the next tutorial.

Keep building!

How to Use Functions and Pointers in C++

In this tutorial, we will explore functions and pointers in C++.

Prerequisites

Using Mathematical Functions

Let’s explore how to use mathematical functions in C++ for robotics. Mathematical functions are essential for performing various calculations in robotic applications.

Open a terminal window, and type this:

cd ~/Documents/cpp_tutorial

code .

Let’s create a new C++ file and name it robot_math_functions.cpp.

Type the following code into the editor:

#include <iostream>
#include <cmath>

using namespace std;

int main() {
    double angle = 45.0;
    double radians = angle * M_PI / 180.0;

    double sine = sin(radians);
    double cosine = cos(radians);

    cout << "Sine: " << sine << endl;
    cout << "Cosine: " << cosine << endl;

    return 0;
}

In this example, we demonstrate how to use mathematical functions to calculate the sine and cosine of an angle.

First, we include the <cmath> header to use the mathematical functions. Then, we declare a double variable angle and assign it the value 45.0, representing an angle in degrees.

To convert the angle from degrees to radians, we multiply it by M_PI (which represents the mathematical constant pi) and divide by 180.0. We store the result in the radians variable.

To calculate the sine and cosine of the angle, we use the sin() and cos() functions, respectively. These functions expect the angle to be in radians. 

We pass the radians variable as an argument to these functions and store the results in the sine and cosine variables.

Finally, we print the values of sine and cosine using cout.

Run the code.

1-robot-math-functions

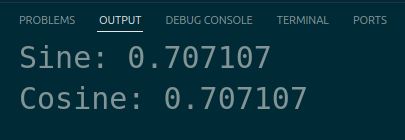
You should see the values of sine and cosine printed in the terminal.

In robotic projects, mathematical functions are commonly used for tasks such as calculating robot positions, orientations, sensor data processing, control algorithms, and motion planning.

Implementing Functions

Let’s explore how to implement functions in C++ for robotics. Functions are essential for organizing and reusing code in robotic applications.

Let’s create a new C++ file and name it robot_functions.cpp.

Type the following code into the editor:

#include <iostream>
#include <cmath>  // Added header for sqrt()
using namespace std;

// Function declaration 
double calculate_distance(double x1, double y1, double x2, double y2);

int main() {
    double distance = calculate_distance(0, 0, 3, 4);
    cout << "Distance: " << distance << endl;
    return 0;
}

// Function definition
double calculate_distance(double x1, double y1, double x2, double y2) {
    double dx = x2 - x1;
    double dy = y2 - y1;
    double distance = sqrt(dx * dx + dy * dy);
    return distance;
}

In this example, we demonstrate how to implement a function to calculate the distance between two points.

First, we declare the calculate_distance function before the main function. The function takes four parameters: x1, y1, x2, and y2, representing the coordinates of two points. It returns a double value, which is the calculated distance.

In the main function, we call the calculate_distance function with the coordinates (0, 0) and (3, 4). The returned distance is stored in the distance variable and then printed using cout.

After the main function, we provide the function definition for calculate_distance. Inside the function, we calculate the differences in x and y coordinates (dx and dy). 

Then, we use the distance formula (Pythagorean theorem) to calculate the distance between the points. 

Finally, we return the calculated distance.

Run the code.

2-robot-functions

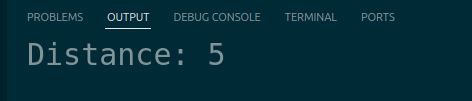
You should see the calculated distance printed in the terminal.

In robotic projects, you can use functions for various purposes, such as calculating sensor data, controlling robot movements, implementing algorithms, and more.

Handling Pointers

Let’s explore how to handle pointers in C++ for robotics. Pointers are variables that store memory addresses and allow you to manipulate data directly in memory.

Let’s create a new C++ file and name it robot_pointers.cpp.

Type the following code into the editor:

#include <iostream>

using namespace std;

int main() {
    int robot_id = 42;
    int* ptr = &robot_id;

    cout << "Robot ID: " << robot_id << endl;
    cout << "Pointer Value: " << ptr << endl;
    cout << "Dereferenced Pointer: " << *ptr << endl;

    *ptr = 99;
    cout << "Updated Robot ID: " << robot_id << endl;

    return 0;
}

In this example, we demonstrate how to handle pointers to manipulate data in memory.

First, we declare an integer variable robot_id and assign it the value 42. Then, we declare a pointer variable ptr and initialize it with the address of robot_id using the address-of operator &. The & operator retrieves the memory address of a variable.

We print the value of robot_id, the value of ptr (which is the memory address), and the dereferenced value of ptr using the dereference operator *. The * operator, when used in front of a pointer variable, retrieves the value stored at the memory address pointed to by the pointer. This is called dereferencing.

Next, we use the dereference operator * to modify the value at the memory address pointed to by ptr. 

We assign the value 99 to *ptr, which effectively updates the value of robot_id. By dereferencing ptr and assigning a new value, we are changing the value stored at the memory address pointed to by ptr, which is the memory address of robot_id.

Finally, we print the updated value of robot_id to confirm that it has been modified through the pointer.

Run the code.

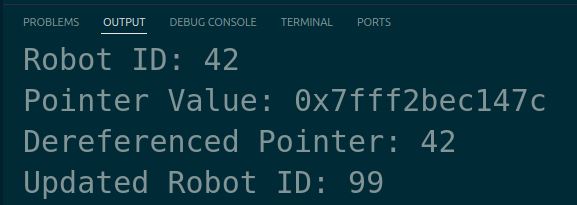
3-robot-pointers

You should see the original robot ID, the pointer value (memory address), the dereferenced pointer value (which is the same as the original robot ID), and the updated robot ID printed in the terminal.

In robotics projects, pointers allow you to directly access and modify data without needing to move or copy it, which makes programs run faster and use less memory.

Managing Exceptions

Let’s learn how to manage exceptions in C++ for robotics applications. Proper exception handling is important for robust and reliable software systems, especially in the field of robotics where errors can have significant consequences.

Let’s start by creating a new C++ file called exception_handling.cpp.

Type the following code into the editor:

#include <iostream>
#include <stdexcept>

double divide(double a, double b) {
    if (b == 0) {
        throw std::runtime_error("Division by zero");
    }
    return a / b;
}

int main() {
    try {
        double result = divide(10, 0);
        std::cout << "Result: " << result << std::endl;
    } catch (const std::exception& e) {
        std::cerr << "Error: " << e.what() << std::endl;
    }
    return 0;
}

In this example, we define a function divide that throws a std::runtime_error exception if the denominator is zero. In the main function, we wrap the call to divide in a try block and handle any potential exceptions in the catch block.

Run the code.

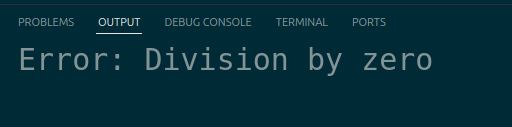
4-exception-handling

You should see the error message “Error: Division by zero” printed in the terminal, as we intentionally passed 0 as the second argument to the divide function.

Proper exception handling is important in robotics applications, where unexpected situations or sensor failures can occur. By using exceptions and handling them appropriately, you can ensure that your code gracefully handles errors and maintains a consistent state, preventing potential damage or safety issues.

Thanks, and I’ll see you in the next tutorial.

Keep building!