Let’s learn how to compile and run C++ code.
Prerequisites
- You have a computer that is running Ubuntu (I’m running Ubuntu Linux inside a virtual machine on Windows).
- You have installed ROS 2.
- You have installed and configured Visual Studio Code for ROS 2 (recommended).
ROS 2 C++ Style Guide
Before we get started, it is important to note that we will be following the ROS 2 C++ Style Guide throughout this tutorial and future tutorials where we use C++. This guide is based on the Google C++ Style Guide:
- 2 spaces for indents
- 100 characters max per line
- Header files should use the .hpp extension
- Implementation files should use the .cpp extension
- snake_case for variable names
- Function naming can use either CamelCase or snake_case
- CamelCase for class names
Adhering to these guidelines will help make sure your code is consistent with ROS 2 projects in the community that use C++.
Create a Folder to Store Your C++ Code
Let’s start by creating a folder to store our C++ code. Open a terminal window, and type:
mkdir -p ~/Documents/cpp_tutorialcd ~/Documents/cpp_tutorialOpen and Configure Visual Studio Code (Recommended)
For those of you who will be using Visual Studio Code for your C++ development, type this:
code .To compile and run C++ code in Visual Studio Code, we need to check if we have a C++ compiler installed. A compiler translates your code into a format that can be run on your computer.
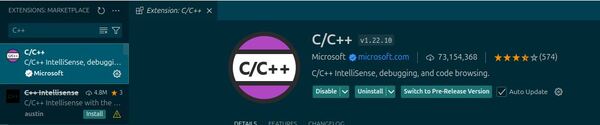
Search for “C++” and install the “C/C++” package by Microsoft.
Go to Terminal -> New Terminal, and write this command:
gcc -v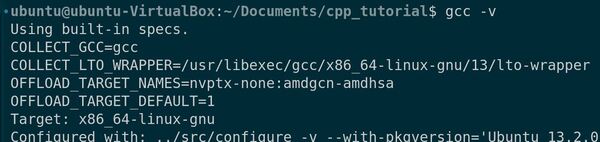
We can see that we have the GNU Compiler Collection already installed.
If GCC is not installed, type these commands to install it:
sudo apt-get updatesudo apt-get install build-essential gdbTo clear the terminal, type:
clearCreating Your First C++ Program
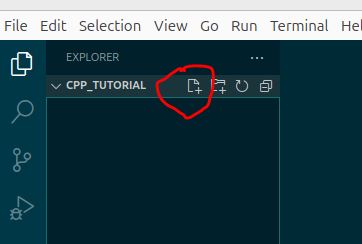
Create a new file by clicking on File > New File in the menu. You can also go to the File Explorer pane on the left and click the new file icon.
Save the file with a meaningful name and the “.cpp” extension, for example, “hello_world.cpp“.
Let’s write a basic C++ program that prints a message related to robotics.
Type the following code into the editor:
#include <iostream>

int main() {
    std::cout << "Hello, Automatic Addison!" << std::endl;
    return 0;
}
Press CTRL + S to save the file, or go to File -> Save.
This code includes the iostream library, which allows us to use std::cout for printing to the console. The main() function is the entry point of the program, and it prints the message “Hello, Automatic Addison!” followed by a new line (std::endl).
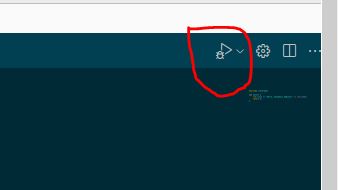
You can now run your C++ code directly from the editor.
Press the play button at the top-right corner of the editor.
Choose g++ build and debug active file from the list of detected compilers on your system.
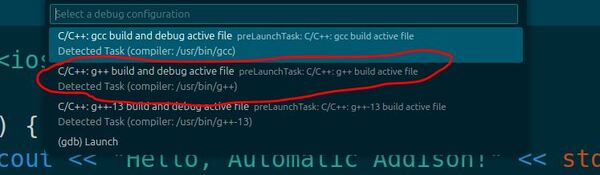
This is the first and only time you will be asked to select a compiler for your C++ code. This compiler will be set as the default compiler in the tasks.json file.
When you run the code, you will see this output on the Terminal tab.

The long string with “/usr/bin/gdb” is debugging-related output that you can ignore – it’s just VS Code’s debugger working in the background.
Now click on the file explorer on the left and open the tasks.json file. When you press the play button, it will read from tasks.json to determine how to build and run your C++ program.
Here is what your tasks.json file should look like:
{
  "tasks": [
    {
      "type": "cppbuild",
      "label": "C/C++: g++ build active file",
      "command": "/usr/bin/g++",
      "args": [
        "-fdiagnostics-color=always",
        "-g",
        "${file}",
        "-o",
        "${fileDirname}/${fileBasenameNoExtension}"
      ],
      "options": {
        "cwd": "${fileDirname}"
      },
      "problemMatcher": [
        "$gcc"
      ],
      "group": {
        "kind": "build",
        "isDefault": true
      },
      "detail": "Task generated by Debugger."
    }
  ],
  "version": "2.0.0"
}
To make life easier for us for all the code we will run, let’s install Code Runner. It has some settings that let you quickly run C++ code.
First go to Extensions.
Click the Extensions icon in the left sidebar (looks like 4 squares).
Type “Code Runner” in the search box.
Look for “Code Runner” by Jun Han (it should be the first result).
Click “Install”
After installation, we need to set it up.
Click “File” in the top menu
Click “Preferences”
Click “Settings”
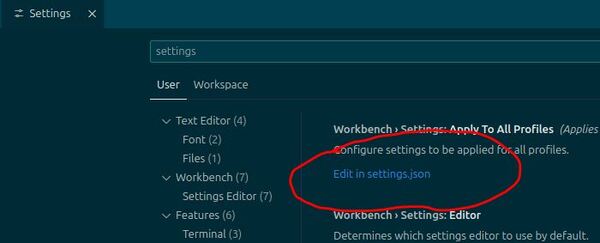
Type “settings” in the settings search box.
Click “Edit settings.json” to open the settings.json file.
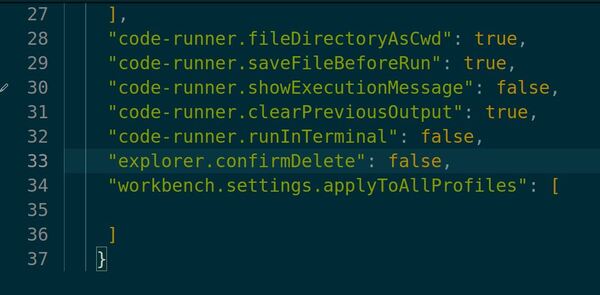
Add these settings at the bottom just above the closing curly bracket:
Go back to your hello_world.cpp file.
Right-click anywhere in your code.
Select Run Code from the menu.
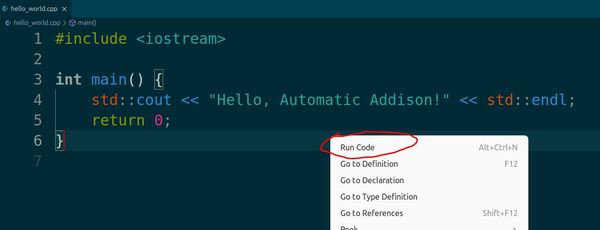
Code Runner will automatically compile and run your code.
Click the OUTPUT tab, and you should see this:
Alternatively, you can run the code manually by typing this into the terminal.
./hello_world
We could have also compiled and ran the code manually:
cd ~/Documents/cpp_tutorialg++ hello_world.cpp -o hello_world ./hello_world Demonstrating Commenting Techniques
Let’s explore the importance of commenting in C++ programming, especially in the context of robotics. Commenting is an important practice that enhances code readability, maintainability, and collaboration. Comments help other developers, including your future self, understand your code’s purpose, functionality, and any important considerations.
Create a new file and save it with a meaningful name, such as robot_commenting.cpp.
Let’s consider a simple example that calculates the distance traveled by a robot.
Type the following code into the editor:
#include <iostream>

int main() {
    // Declare and initialize variables
    double speed = 0.5;    // Speed of the robot in meters per second
    double time = 10.0;    // Time traveled in seconds

    /* Calculate the distance traveled
       distance = speed * time
    */
    double distance = speed * time;

    // Print the result
    std::cout << "The robot traveled " << distance << " meters." << std::endl;

    return 0;
}
In this code, we’ve used two types of comments:
- Single-line comments: These start with // and extend until the end of the line. They’re used for brief explanations or notes, such as describing variables or providing short insights.
- Multi-line comments: These start with /* and end with */. They can span multiple lines and are useful for more detailed explanations or temporarily disabling code blocks. Here, we’ve used a multi-line comment to explain the distance calculation formula.
Now, let’s run this code and see the output.

You should see the message “The robot traveled 5 meters.” printed in the terminal.
That’s it for getting started with C++. Stay tuned for more C++ tutorials.
Keep building!