In this tutorial, we will explore operators and control flow structures in C++, which are essential for creating logic and making decisions in your robotics programs.
Prerequisites
- You have completed this tutorial: How to Use Variables, Data Types, and Input/Output in C++.
- I am assuming you are using Visual Studio Code, but you can use any code editor.
Using Mathematical Operators
Let’s look at an example of using mathematical operators in C++ for performing calculations in robotic projects.
Open a terminal window, and type this:
cd ~/Documents/cpp_tutorialcode .Let’s create a new C++ file and name it robot_basic_math.cpp.
Type the following code into the editor:
#include <iostream>
int main() {
// Basic arithmetic operations
int motor_speed = 100; // Base speed
int speed_increment = 20; // Speed adjustment
// Addition
int increased_speed = motor_speed + speed_increment;
// Subtraction
int decreased_speed = motor_speed - speed_increment;
// Multiplication
int double_speed = motor_speed * 2;
// Division
int half_speed = motor_speed / 2;
// Modulus (remainder)
int remainder = motor_speed % 30;
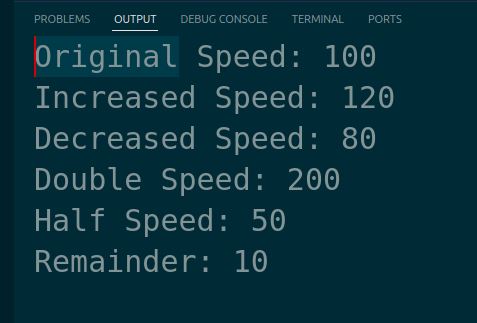
// Output results
std::cout << "Original Speed: " << motor_speed << std::endl;
std::cout << "Increased Speed: " << increased_speed << std::endl;
std::cout << "Decreased Speed: " << decreased_speed << std::endl;
std::cout << "Double Speed: " << double_speed << std::endl;
std::cout << "Half Speed: " << half_speed << std::endl;
std::cout << "Remainder: " << remainder << std::endl;
return 0;
}
In this program, we demonstrate the five basic mathematical operators:
- + for addition
- – for subtraction
- * for multiplication
- / for division
- % for modulus (remainder)
Run the code.
These operators are essential for various calculations in robotics, from adjusting motor speeds to processing sensor data.
Implementing Conditional and Logical Operators
Let’s explore the use of conditional and logical operators in C++ and their relevance to robotics. Conditional and logical operators are essential for making decisions and controlling the flow of your robotic programs.
Let’s create a new C++ file and name it robot_conditions.cpp.
Type the following code into the editor:
#include <iostream>

int main() {
    double battery_level = 0.75;
    bool obstacle_detected = true;

    if (battery_level > 0.5 && !obstacle_detected) {
        std::cout << "Robot is moving forward." << std::endl;
    } else if (battery_level > 0.5 && obstacle_detected) {
        std::cout << "Robot is avoiding the obstacle." << std::endl;
    } else {
        std::cout << "Robot is stopping due to low battery." << std::endl;
    }

    return 0;
}
In this code, we include the iostream header for input/output operations. Inside the main function, we declare variables for battery_level and obstacle_detected, representing the robot’s battery level and whether an obstacle is detected.
We then use conditional and logical operators to make decisions based on these variables. The if statement checks if the battery level is greater than 0.5 (using the > operator) and if no obstacle is detected (using the ! operator for logical NOT). If both conditions are true, the robot moves forward.
The else if statement checks if the battery level is greater than 0.5 and if an obstacle is detected. If both conditions are true, the robot avoids the obstacle.
Finally, the else statement is executed if none of the previous conditions are met, indicating that the robot is stopping due to low battery.
Run the code.

You should see the appropriate message printed in the terminal based on the values of battery_level and obstacle_detected.
This example demonstrates how to use conditional and logical operators in C++ to make decisions based on the robot’s battery level and obstacle detection.
Handling if, else if, and else statements
Let’s learn how to handle if, else if, and else statements in C++. These statements allow you to create complex decision-making structures in your robotic programs.
Let’s create a new C++ file and name it robot_decision_making.cpp.
Type the following code into the editor:
#include <iostream>
int main() {
int distance_to_obstacle = 50;
if (distance_to_obstacle < 30) {
std::cout << "Robot is stopping to avoid collision." << std::endl;
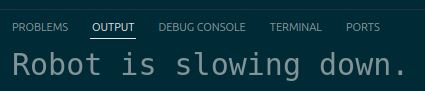
} else if (distance_to_obstacle < 60) {
std::cout << "Robot is slowing down." << std::endl;
} else if (distance_to_obstacle < 100) {
std::cout << "Robot is moving forward cautiously." << std::endl;
} else {
std::cout << "Robot is moving forward at full speed." << std::endl;
}
return 0;
}
In this code, we include the iostream header for input/output operations. Inside the main function, we declare a variable distance_to_obstacle representing the distance between the robot and an obstacle.
We then use a series of if, else if, and else statements to make decisions based on the value of distance_to_obstacle.
The first if statement checks if the distance is less than 30 units. If true, the robot stops to avoid collision.
The first else if statement checks if the distance is less than 60 units. If true, the robot slows down.
The second else if statement checks if the distance is less than 100 units. If true, the robot moves forward cautiously.
Finally, the else statement is executed if none of the previous conditions are met, indicating that the robot can move forward at full speed.
Run the code.
You should see the appropriate message printed in the terminal based on the value of distance_to_obstacle.
Iterating with for loop
Let’s look at a concise example of using the for loop in C++ for iterating in robotic projects.
Let’s create a new C++ file and name it robot_for_loop_short.cpp.
Type the following code into the editor:
#include <iostream>

using namespace std;

int main() {
    int robot_positions[] = {0, 10, 20, 30, 40};

    for (int i = 0; i < 5; i++) {
        cout << "Robot Position: " << robot_positions[i] << endl;
    }

    return 0;
}
In this example, we demonstrate the use of the for loop to iterate over an array of robot positions.
We declare an array robot_positions that stores the positions of a robot at different points in time.
We use a for loop to iterate over each position in the array. The loop starts from 0 and goes up to 4 (since there are 5 elements in the array). Inside the loop, we print the current robot position using cout.
Run the code.

You should see the robot positions printed in the terminal.
Using Ternary Operator
Let’s explore the use of the ternary operator in C++ for making concise conditional statements in robotic projects. The ternary operator allows you to write simple if-else statements in a single line of code.
Let’s create a new C++ file and name it robot_ternary_operator.cpp.
Type the following code into the editor:
#include <iostream>
using namespace std;
int main() {
int battery_level = 75;
int battery_threshold = 20;
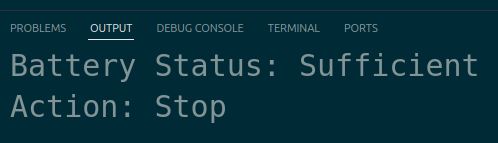
string battery_status = (battery_level > battery_threshold) ? "Sufficient" : "Low";
cout << "Battery Status: " << battery_status << endl;
int distance_to_obstacle = 30;
int safety_distance = 50;
string action = (distance_to_obstacle < safety_distance) ? "Stop" : "Continue";
cout << "Action: " << action << endl;
return 0;
}
In this example, we demonstrate the use of the ternary operator for making conditional statements.
First, we check the battery level of the robot.
We compare the battery_level with the battery_threshold using the ternary operator. If the battery level is greater than the threshold, the ternary operator returns “Sufficient”; otherwise, it returns “Low”. The result is stored in the battery_status variable.
Next, we check the distance to an obstacle. We compare the distance_to_obstacle with the safety_distance using the ternary operator. If the distance to the obstacle is less than the safety distance, the ternary operator returns “Stop”; otherwise, it returns “Continue”. The result is stored in the action variable.
We print the battery status and the action using cout.
Run the code.
You should see the battery status and the action printed in the terminal.
This example demonstrates how the ternary operator can be used to write concise conditional statements in C++ for robotic projects. The ternary operator has the following syntax:
(condition) ? expression1 : expression2
If the condition evaluates to true, expression1 is executed; otherwise, expression2 is executed.
The ternary operator is a convenient way to write simple if-else statements in a single line of code, making your code more readable and concise.
Iterating with while loop
Let’s explore the use of the while loop in C++ for iterating and repeating code blocks in robotic projects. The while loop allows you to execute a block of code repeatedly as long as a specified condition is true.
Let’s create a new C++ file and name it robot_while_loop.cpp.
Type the following code into the editor:
#include <iostream>

using namespace std;

int main() {
    int distance = 0;
    int target_distance = 100;
    int step_size = 10;

    while (distance < target_distance) {
        distance += step_size;
        cout << "Robot moved " << distance << " units" << endl;
    }

    cout << "Robot reached the target distance." << endl;

    int countdown = 5;
    while (countdown > 0) {
        cout << "Countdown: " << countdown << endl;
        countdown--;
    }

    cout << "Countdown finished. Launching the robot!" << endl;

    return 0;
}
In this example, we demonstrate the use of the while loop for iterating and repeating code blocks.
First, we simulate the movement of a robot towards a target distance. We initialize the distance variable to 0 and set the target_distance to 100 units. We also define a step_size of 10 units.
We use a while loop to repeatedly move the robot by the step_size until the distance reaches or exceeds the target_distance. Inside the loop, we increment the distance by the step_size and print the current distance using cout.
Once the robot reaches the target distance, we print a message indicating that the target distance has been reached.
Next, we demonstrate a countdown using the while loop. We initialize the countdown variable to 5 and use a while loop to repeatedly decrement the countdown value and print it using cout. The loop continues until the countdown reaches 0.
After the countdown finishes, we print a message indicating that the countdown is finished and the robot is launching.
Run the code.
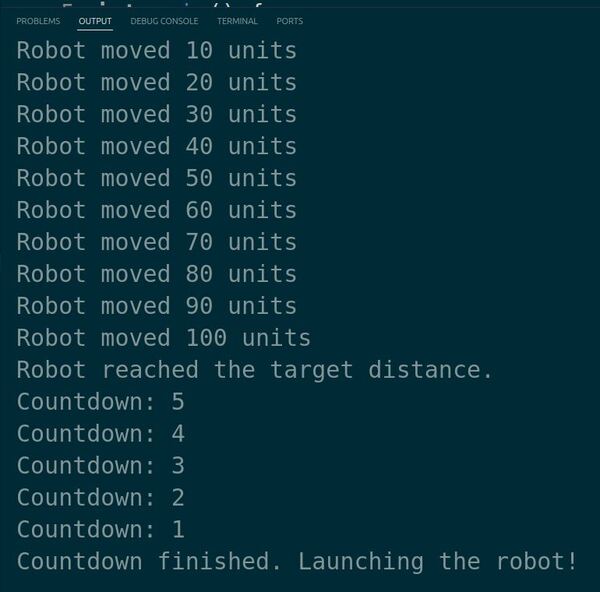
You should see the robot’s movement progress and the countdown sequence printed in the terminal.
This example demonstrates how the while loop can be used to iterate and repeat code blocks in C++ for robotic projects. The while loop continues to execute the code block as long as the specified condition is true. It’s important to ensure that the condition eventually becomes false to avoid an infinite loop.
Using break and continue statements
Let’s look at a concise example of using the break and continue statements in C++ for controlling the flow of loops in robotic projects.
Let’s create a new C++ file and name it robot_break_continue_concise.cpp.
Type the following code into the editor:
#include <iostream>

using namespace std;

int main() {
    int distances[] = {10, 20, 5, 30, 15};
    int max_distance = 25;

    for (int i = 0; i < 5; i++) {
        if (distances[i] > max_distance) {
            cout << "Distance exceeds maximum limit. Stopping robot." << endl;
            break;
        }
        if (distances[i] < 10) {
            cout << "Distance too short. Skipping iteration." << endl;
            continue;
        }
        cout << "Moving robot " << distances[i] << " units." << endl;
    }

    return 0;
}
In this example, we demonstrate the use of break and continue statements in a loop that controls a robot’s movement based on distances.
We define an array of distances that represents the distances the robot needs to move in each iteration.
We also define a max_distance variable to set the maximum allowable distance.
We use a for loop to iterate over the distances. Inside the loop, we first check if the current distance exceeds the max_distance. If it does, we print a message indicating that the maximum distance limit is exceeded and use the break statement to stop the robot and exit the loop.
If the distance is within the maximum limit, we then check if the distance is less than 10 units. If it is, we consider the distance too short and use the continue statement to skip the current iteration and move to the next one.
If the distance is within the acceptable range, we print a message indicating that the robot is moving the specified distance.
Run the code.
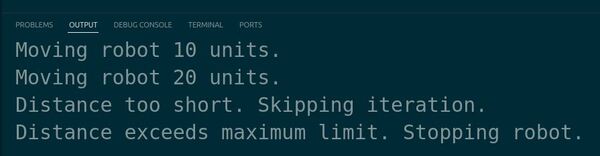
You should see the messages related to the robot’s movement and the effects of the break and continue statements printed in the terminal.
This example demonstrates how the break and continue statements can be used to control the flow of a loop based on specific conditions in a robotics scenario.
The break statement is used to stop the robot’s movement if the distance exceeds the maximum limit, while the continue statement is used to skip iterations where the distance is too short.
These statements allow you to handle different situations and make decisions within the loop, providing flexibility in controlling the robot’s behavior.
Implementing do-while loop
Let’s explore the use of the do-while loop in C++ for robotics. The do-while loop is similar to the while loop, but it guarantees that the code block is executed at least once before checking the loop condition.
Let’s create a new C++ file and name it robot_do_while_loop.cpp.
Type the following code into the editor:
#include <iostream>

using namespace std;

int main() {
    int count = 0;

    do {
        cout << "Robot iteration: " << count << endl;
        count++;
    } while (count < 3);

    return 0;
}
In this example, we demonstrate the use of the do-while loop to iterate a fixed number of times.
We declare a variable count and initialize it to 0. We start the do-while loop, which begins by executing the code block inside the loop. Inside the loop, we print the current iteration number using cout and increment the count variable.
After executing the code block, the loop checks the condition count < 3. If the condition is true, the loop continues to the next iteration. If the condition is false, the loop terminates.
Run the code.
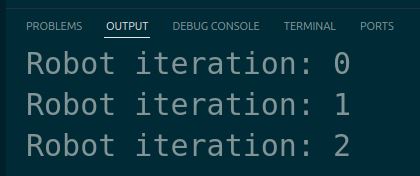
You should see the robot iterations printed in the terminal.
This example demonstrates the basic usage of the do-while loop in C++ for robotics. The do-while loop is useful when you want to ensure that the code block is executed at least once, regardless of the initial condition.
In robotic projects, the do-while loop can be used in scenarios where you want to perform an action or collect data at least once before checking a condition. For example, you might use a do-while loop to ensure that a sensor is read at least once before checking if the reading meets a certain threshold.
That’s it. Thanks, and I’ll see you in the next tutorial.
Keep building!