In this tutorial, we will explore variables, data types, and input and output using C++.
Prerequisites
Defining Variables
Let’s cover how to define variables in C++. Understanding variable types and how to use them effectively is fundamental for programming in robotics, where you need to handle various types of data, from sensor readings to actuator commands.
Open a terminal window, and type this:
cd ~/Documents/cpp_tutorial && code .
Create a new file, and save it as variable_example.cpp. This will be our workspace to explore different types of variables.
Type the following code into the editor:
#include <iostream>

int main() {
    // Integer variable
    int distance = 100; // Distance in centimeters

    // Floating-point variable
    float speed = 5.5; // Speed in meters per second

    // Character variable
    char direction = 'N'; // Direction as a cardinal point

    // Boolean variable
    bool is_active = true; // Status of the robot's motor

    // Output the variables
    std::cout << "Robot Status:" << std::endl;
    std::cout << "Distance: " << distance << " cm" << std::endl;
    std::cout << "Speed: " << speed << " m/s" << std::endl;
    std::cout << "Direction: " << direction << std::endl;
    std::cout << "Motor Active: " << (is_active ? "Yes" : "No") << std::endl;

    return 0;
}
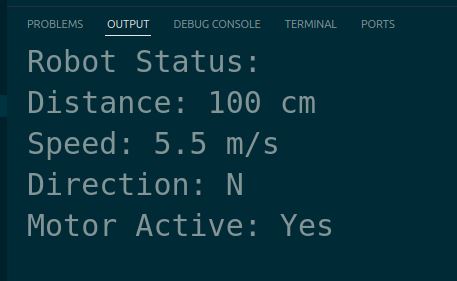
In this program, we have defined four different types of variables:
- An int for integer values like distance.
- A float for floating-point numbers which represent speed with decimal precision.
- A char for characters, here used to indicate a direction.
- A bool for Boolean values, indicating true/false conditions.
These variables help us handle data that the robot might use to operate or make decisions.
When you run the program, the output will display the status of the robot based on the values stored in the variables. This kind of data management is critical when you’re programming robots to interact with the real world.
Understanding how to define and use variables is an important skill in robotics programming. It allows your programs to be dynamic and responsive to sensor data and other inputs.
Managing Global Variables
Let’s explore managing global variables in C++. In robotics, global variables can be used to manage state information that various parts of your program might need to access, like sensor data or system status.
Create a new file, and save it as sensor_status.cpp. We will use this file to manage sensor status across different functions.
Type the following code into the editor:
#include <iostream>

// Global variable for sensor status
bool sensor_triggered = false;

void checkSensor() {
    // Simulate sensor being triggered
    sensor_triggered = true;
}

int main() {
    std::cout << "Sensor initially triggered: " << (sensor_triggered ? "Yes" : "No") << std::endl;
    checkSensor();
    std::cout << "Sensor status after checking: " << (sensor_triggered ? "Yes" : "No") << std::endl;
    return 0;
}
In this example, the global variable sensor_triggered holds the status of a hypothetical sensor.
The checkSensor function simulates the sensor being triggered by setting sensor_triggered to true.
The main function first displays the initial status of the sensor, calls checkSensor, and then displays the updated status.
When you run this program, you’ll see the sensor status before and after the checkSensor function is called. This demonstrates how global variables can be used across different functions to maintain state in a robotics application.
Using global variables effectively requires careful planning to avoid issues with maintainability and debugging.
Declaring Constants
Let’s take a look at how to declare constants in C++. Constants are important in robotics programming to ensure that some values remain unchanged throughout the operation, which can enhance the reliability and clarity of your code.
Create a new file, and save it as constants_example.cpp. This file will help us explore the use of constants effectively.
Type the following code into the editor:
#include <iostream>

// Declare a constant for the maximum speed of the robot
const float MAX_SPEED = 5.0;  // Maximum speed in meters per second

int main() {
    std::cout << "The maximum speed of the robot is: " << MAX_SPEED << " m/s" << std::endl;

    // Attempting to change the constant will cause a compile-time error
    // MAX_SPEED = 6.0;  // Uncommenting this line will result in an error

    return 0;
}
In this code, we define a constant MAX_SPEED using the const keyword. This ensures that the value 5.0, representing the robot’s maximum speed in meters per second, cannot be changed anywhere in the program.
Uncommenting the line where we try to change MAX_SPEED will lead to a compile-time error, demonstrating the immutable nature of constants.
When you run this program, the output will display the maximum speed of the robot. This use of constants can prevent accidental changes to important parameters, which is especially important in a dynamic and potentially unpredictable field like robotics.
Using constants is a best practice that can help avoid many common errors in programming. They ensure that key values remain unchanged, making your code safer and more reliable.
Exploring Data Types
Let’s explore the various data types available in C++ and understand their applications in robotics programming. Properly using data types is essential for handling different kinds of information, such as sensor readings, motor commands, and navigational coordinates.
Create a new file, and save it as data_types_example.cpp. This will serve as our playground to experiment with different data types.
Type the following code into the editor:
#include <iostream>
#include <string>

int main() {
    // Integer type for counting or indexing
    int encoder_ticks = 720;

    // Floating-point type for precise measurements
    double battery_voltage = 12.7;

    // Character type for simple commands
    char motor_direction = 'F'; // 'F' for forward, 'B' for backward

    // Boolean type for status checks
    bool is_sensor_active = true;

    // String type for messages
    std::string robot_name = "AutomaticAddisonBot";

    // Displaying values
    std::cout << "Encoder Ticks: " << encoder_ticks << std::endl;
    std::cout << "Battery Voltage: " << battery_voltage << " V" << std::endl;
    std::cout << "Motor Direction: " << motor_direction << std::endl;
    std::cout << "Sensor Active: " << (is_sensor_active ? "Yes" : "No") << std::endl;
    std::cout << "Robot Name: " << robot_name << std::endl;

    return 0;
}
In this example, we use:
- int for encoder ticks, which are whole numbers.
- double is used for the battery voltage to ensure precision with decimals.
- char is ideal for storing single characters, useful for directions or simple commands.
- bool for true/false conditions, important for logic controls in robotics.
- std::string for more complex data that involves text.
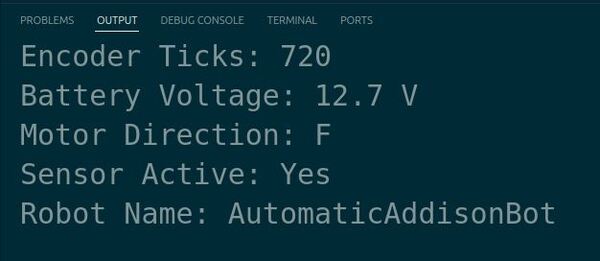
When you run the program, you will see the values of these various data types printed out, demonstrating how each type can be used to handle specific kinds of data in robotics.
Specifying Float Precision
Let’s learn how to specify float precision in C++. This is particularly important in robotics, where precision in calculations can affect everything from navigation to sensor readings.
Create a new file, and save it as float_precision.cpp. This file will help us learn how to format the output of floating-point numbers accurately.
Type the following code into the editor:
#include <iostream>
#include <iomanip>

int main() {
    // Floating-point number without specified precision
    double sensor_value = 123.456789;

    // Output the default precision
    std::cout << "Default precision: " << sensor_value << std::endl;

    // Set precision to 2 decimal places
    std::cout << std::fixed << std::setprecision(2);
    std::cout << "Precision set to 2 decimal places: " << sensor_value << std::endl;

    // Set precision to 5 decimal places
    std::cout << std::setprecision(5);
    std::cout << "Precision set to 5 decimal places: " << sensor_value << std::endl;

    return 0;
}
In this example, we include <iomanip> to use std::setprecision, which allows us to specify the number of decimal places.
The std::fixed manipulator ensures that the number is printed in fixed-point notation.
We demonstrate changing the precision from the default to 2 decimal places, and then to 5, showing how this can affect the display of sensor readings or other precise measurements.
When you run the program, you’ll see the same number displayed with different levels of precision. This capability is important when you need precise control over the formatting of numerical outputs, such as in reporting sensor data or calibrating equipment.
Using printf Function
Let’s explore the use of the printf function in C++ for formatting and outputting data in robotic projects. The printf function provides a flexible way to display information with specific formatting options.
Let’s create a new C++ file and name it robot_printf.cpp.
Type the following code into the editor:
#include <cstdio>

int main() {
    const char* robot_name = "RoboMate";
    float battery_percentage = 75.5f;
    int x_coordinate = 10;
    int y_coordinate = 20;

    printf("Robot Name: %s\n", robot_name);
    printf("Battery Level: %.2f%%\n", battery_percentage);
    printf("Robot Position: (%d, %d)\n", x_coordinate, y_coordinate);

    printf("Sending command to the robot...\n");

    // Simulating command execution
    printf("Command executed successfully!\n");

    return 0;
}
In this code, we include the cstdio header, which provides the printf function.
Inside the main function, we declare variables for robot_name, battery_percentage, x_coordinate, and y_coordinate, representing various aspects of the robot.
We use the printf function to output the robot’s name, battery level, and position.
The printf function takes a format string as its first argument, which specifies how the data should be displayed.
The format specifiers %s, %.2f, and %d are used for strings, floating-point numbers with two decimal places, and integers, respectively.
Next, we simulate sending a command to the robot by outputting messages using printf.
Run the code.
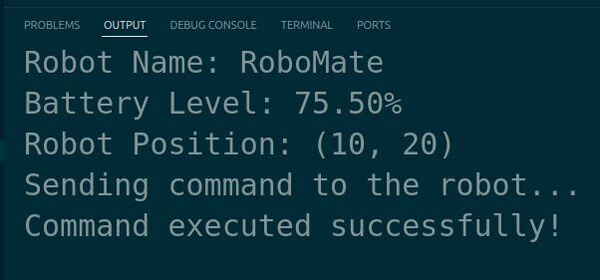
You should see the robot’s name, battery level, position, and command execution messages printed in the terminal.
Using printf can be particularly useful when you need more control over the formatting of the output or when working with legacy codebases that rely on printf instead of cout.
Employing auto Keyword
Let’s learn how to use the auto keyword in C++, and how it can simplify your coding process in robotics.
The auto keyword allows the compiler to automatically deduce the type of a variable from its initializer, which can make your code cleaner and less prone to errors when types are complex.
Let’s start by creating a file named auto_keyword_example.cpp.
Type the following code into the editor:
#include <iostream>
#include <vector>

int main() {
    std::vector<int> numbers {1, 2, 3, 4, 5};

    // Traditional iterator type
    for (std::vector<int>::iterator it = numbers.begin(); it != numbers.end(); ++it) {
        std::cout << "Traditional: " << *it << std::endl;
    }

    // Using auto keyword
    for (auto it = numbers.begin(); it != numbers.end(); ++it) {
        std::cout << "Auto: " << *it << std::endl;
    }

    return 0;
}
In this example, we first include the necessary headers: iostream for input/output operations and vector for using the vector container. We define a vector of integers named numbers and initialize it with values from 1 to 5.
We use a traditional for-loop with an explicit iterator type to iterate over the vector and print each element. Then, we do the same with the auto keyword, allowing the compiler to determine the type of the iterator automatically.
Run the code.
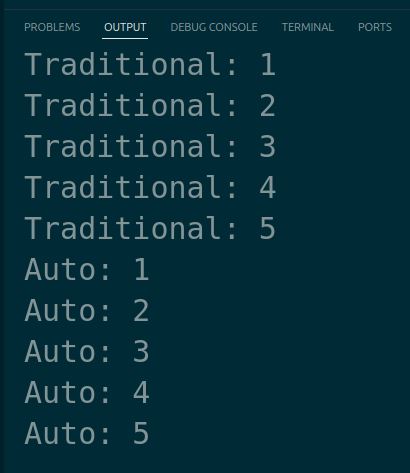
You should see the numbers printed twice, first with the traditional iterator and then using the auto keyword.
Using cin for Input
Let’s learn how to use cin for user input in C++ within a robotics context. This will allow us to receive real-time parameters from users, such as controlling a robot’s speed or direction.
Create a file named robot_speed_control.cpp.
Type the following code into the editor:
#include <iostream>

int main() {
    double speed;

    std::cout << "Enter the robot's speed (m/s): ";
    std::cin >> speed;
    if (!std::cin) { // Check for input failure
        std::cerr << "Error: Please enter a valid number for speed." << std::endl;
        return 1; // Exit with error code
    }

    std::cout << "Setting robot speed to " << speed << " m/s." << std::endl;

    // Code to set the robot speed would go here

    return 0;
}
In this example, we use std::cout to ask the user to enter the robot’s speed. We then use std::cin to read this value into the speed variable. We also include a simple error check to ensure the input is a valid number. This process can be integral for interactive applications where user input directly affects robot operations.
Run the code in the terminal.
g++ robot_speed_control.cpp -o robot_speed_control
./robot_speed_control
After entering a speed, you should see a confirmation message displaying the speed you set for the robot.
Performing Type Casting
Let’s explore type casting in C++, an important concept when you need to convert data types explicitly in your robotics programming. Understanding and using type casting appropriately can help ensure your robot behaves predictably when processing numerical data.
Create a new file called type_casting_example.cpp.
Type the following code into the editor:
#include <iostream>

int main() {
    int sensor_value = 527;
    double voltage;

    voltage = sensor_value * 5.0 / 1023; // Implicit conversion of int to double
    std::cout << "Voltage (implicit casting): " << voltage << " V" << std::endl;

    voltage = (double)sensor_value * 5.0 / 1023; // Explicit casting using C-style cast
    std::cout << "Voltage (C-style casting): " << voltage << " V" << std::endl;

    voltage = static_cast<double>(sensor_value) * 5.0 / 1023; // Explicit casting using C++ style cast
    std::cout << "Voltage (C++ style casting): " << voltage << " V" << std::endl;

    return 0;
}
In this example, we start by declaring an integer sensor_value which represents a raw sensor reading.
We then calculate the voltage by scaling the sensor value.
We do an implicit conversion where sensor_value is automatically converted to a double.
Then, we show two methods of explicit casting: the older C-style cast and the more robust C++ style cast with static_cast<double>(). This ensures precise control over the conversion process, which is important in scenarios where data type precision impacts the robot’s performance.
Run the code.
You should see the voltage output for each type of casting, illustrating how the value remains consistent across different casting methods but how the syntax can vary.
Using string stream
Let’s learn how to use stringstream in C++, a tool for string manipulation and data processing in robotics.
stringstream is particularly useful for constructing complex strings from various data types or parsing strings into different data types, which can be essential in data logging or protocol communication in robotics.
Create a new file called stringstream_robotics_example.cpp.
Type the following code into the editor:
#include <iostream>
#include <sstream>
#include <string>

int main() {
    std::stringstream ss;
    int  motor_speed = 150;
    double battery_level = 12.5;

    // Using stringstream to create a diagnostic log entry
    ss << "Motor Speed: " <<  motor_speed << " RPM, Battery Level: " << battery_level << " Volts";

    // Converting stringstream to string for output
    std::string log_entry = ss.str();
    std::cout << "Log Entry: " << log_entry << std::endl;

    return 0;
}
In this example, we include the necessary headers and then use a stringstream to concatenate text with numeric data types, which forms a string that could represent a log entry in a robot’s diagnostic system.
We declare a stringstream object called ss, and then we input the motor speed and battery level into the stream. Finally, we convert the stringstream to a string for easy output or logging.
Run the code.
You should see the output showing the motor speed and battery level formatted neatly in a single log entry, demonstrating how stringstream can be used to easily manage and format diverse data types.
Handling Input with getline
Let’s learn how to use the getline function in C++ to handle user input, which is particularly useful in robotics for capturing full commands or sentences that include spaces.
Create a new file called getline_robot_command.cpp.
Type the following code into the editor:
#include <iostream>
#include <string>

int main() {
    std::string command;

    std::cout << "Enter robot command: ";
    std::getline(std::cin, command);

    std::cout << "Command received: " << command << std::endl;

    // Further processing of the command can be implemented here
    return 0;
}
In this example, we include <iostream> for input and output streams and <string> to utilize the string class.
We create a string variable named command to store the user input.
We then prompt the user to enter a command for the robot, using getline to read the entire line of input, which allows the input to include spaces without prematurely ending the input process. This is especially useful in robotics where commands may consist of multiple words, like “move forward 10 meters”.
Run the code.
g++ getline_robot_command.cpp -o getline_robot_command
./getline_robot_command
After you enter a command, it will be displayed back to you, confirming what was entered.
That’s it for variables, data types, and input and output. You now have a solid understanding of these fundamentals.
Thanks, and I’ll see you in the next tutorial.
Keep building!
