In this tutorial, we will explore functions and pointers in C++.
Prerequisites
- You have completed this tutorial: How to Use Arrays, Vectors, and Strings in C++.
- I am assuming you are using Visual Studio Code, but you can use any code editor.
Using Mathematical Functions
Let’s explore how to use mathematical functions in C++ for robotics. Mathematical functions are essential for performing various calculations in robotic applications.
Open a terminal window, and type this:
cd ~/Documents/cpp_tutorial
code .
Let’s create a new C++ file and name it robot_math_functions.cpp.
Type the following code into the editor:
#include <iostream>
#include <cmath>

using namespace std;

int main() {
    double angle = 45.0;
    double radians = angle * M_PI / 180.0;

    double sine = sin(radians);
    double cosine = cos(radians);

    cout << "Sine: " << sine << endl;
    cout << "Cosine: " << cosine << endl;

    return 0;
}
In this example, we demonstrate how to use mathematical functions to calculate the sine and cosine of an angle.
First, we include the <cmath> header to use the mathematical functions. Then, we declare a double variable angle and assign it the value 45.0, representing an angle in degrees.
To convert the angle from degrees to radians, we multiply it by M_PI (which represents the mathematical constant pi) and divide by 180.0. We store the result in the radians variable.
To calculate the sine and cosine of the angle, we use the sin() and cos() functions, respectively. These functions expect the angle to be in radians.
We pass the radians variable as an argument to these functions and store the results in the sine and cosine variables.
Finally, we print the values of sine and cosine using cout.
Run the code.
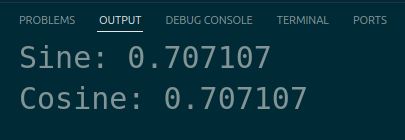
You should see the values of sine and cosine printed in the terminal.
In robotic projects, mathematical functions are commonly used for tasks such as calculating robot positions, orientations, sensor data processing, control algorithms, and motion planning.
Implementing Functions
Let’s explore how to implement functions in C++ for robotics. Functions are essential for organizing and reusing code in robotic applications.
Let’s create a new C++ file and name it robot_functions.cpp.
Type the following code into the editor:
#include <iostream>
#include <cmath>  // Added header for sqrt()
using namespace std;

// Function declaration
double calculate_distance(double x1, double y1, double x2, double y2);

int main() {
    double distance = calculate_distance(0, 0, 3, 4);
    cout << "Distance: " << distance << endl;
    return 0;
}

// Function definition
double calculate_distance(double x1, double y1, double x2, double y2) {
    double dx = x2 - x1;
    double dy = y2 - y1;
    double distance = sqrt(dx * dx + dy * dy);
    return distance;
}
In this example, we demonstrate how to implement a function to calculate the distance between two points.
First, we declare the calculate_distance function before the main function. The function takes four parameters: x1, y1, x2, and y2, representing the coordinates of two points. It returns a double value, which is the calculated distance.
In the main function, we call the calculate_distance function with the coordinates (0, 0) and (3, 4). The returned distance is stored in the distance variable and then printed using cout.
After the main function, we provide the function definition for calculate_distance. Inside the function, we calculate the differences in x and y coordinates (dx and dy).
Then, we use the distance formula (Pythagorean theorem) to calculate the distance between the points.
Finally, we return the calculated distance.
Run the code.
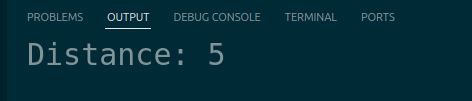
You should see the calculated distance printed in the terminal.
In robotic projects, you can use functions for various purposes, such as calculating sensor data, controlling robot movements, implementing algorithms, and more.
Handling Pointers
Let’s explore how to handle pointers in C++ for robotics. Pointers are variables that store memory addresses and allow you to manipulate data directly in memory.
Let’s create a new C++ file and name it robot_pointers.cpp.
Type the following code into the editor:
#include <iostream>

using namespace std;

int main() {
    int robot_id = 42;
    int* ptr = &robot_id;

    cout << "Robot ID: " << robot_id << endl;
    cout << "Pointer Value: " << ptr << endl;
    cout << "Dereferenced Pointer: " << *ptr << endl;

    *ptr = 99;
    cout << "Updated Robot ID: " << robot_id << endl;

    return 0;
}
In this example, we demonstrate how to handle pointers to manipulate data in memory.
First, we declare an integer variable robot_id and assign it the value 42. Then, we declare a pointer variable ptr and initialize it with the address of robot_id using the address-of operator &. The & operator retrieves the memory address of a variable.
We print the value of robot_id, the value of ptr (which is the memory address), and the dereferenced value of ptr using the dereference operator *. The * operator, when used in front of a pointer variable, retrieves the value stored at the memory address pointed to by the pointer. This is called dereferencing.
Next, we use the dereference operator * to modify the value at the memory address pointed to by ptr.
We assign the value 99 to *ptr, which effectively updates the value of robot_id. By dereferencing ptr and assigning a new value, we are changing the value stored at the memory address pointed to by ptr, which is the memory address of robot_id.
Finally, we print the updated value of robot_id to confirm that it has been modified through the pointer.
Run the code.
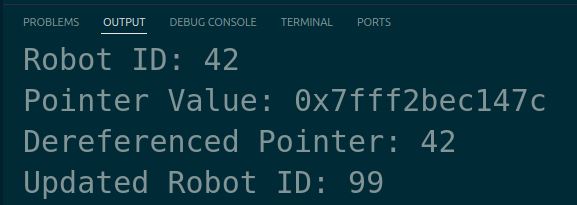
You should see the original robot ID, the pointer value (memory address), the dereferenced pointer value (which is the same as the original robot ID), and the updated robot ID printed in the terminal.
In robotics projects, pointers allow you to directly access and modify data without needing to move or copy it, which makes programs run faster and use less memory.
Managing Exceptions
Let’s learn how to manage exceptions in C++ for robotics applications. Proper exception handling is important for robust and reliable software systems, especially in the field of robotics where errors can have significant consequences.
Let’s start by creating a new C++ file called exception_handling.cpp.
Type the following code into the editor:
#include <iostream>
#include <stdexcept>

double divide(double a, double b) {
    if (b == 0) {
        throw std::runtime_error("Division by zero");
    }
    return a / b;
}

int main() {
    try {
        double result = divide(10, 0);
        std::cout << "Result: " << result << std::endl;
    } catch (const std::exception& e) {
        std::cerr << "Error: " << e.what() << std::endl;
    }
    return 0;
}
In this example, we define a function divide that throws a std::runtime_error exception if the denominator is zero. In the main function, we wrap the call to divide in a try block and handle any potential exceptions in the catch block.
Run the code.

You should see the error message “Error: Division by zero” printed in the terminal, as we intentionally passed 0 as the second argument to the divide function.
Proper exception handling is important in robotics applications, where unexpected situations or sensor failures can occur. By using exceptions and handling them appropriately, you can ensure that your code gracefully handles errors and maintains a consistent state, preventing potential damage or safety issues.
Thanks, and I’ll see you in the next tutorial.
Keep building!