

DDS and the ROS_DOMAIN_ID are important when you have more than one robot using the same WiFi network. In this tutorial, I cover these two fundamental concepts.
If you prefer learning through video rather than text, check out the YouTube video below where I walk you through the entire tutorial step by step. Otherwise, keep reading.
How DDS Works?
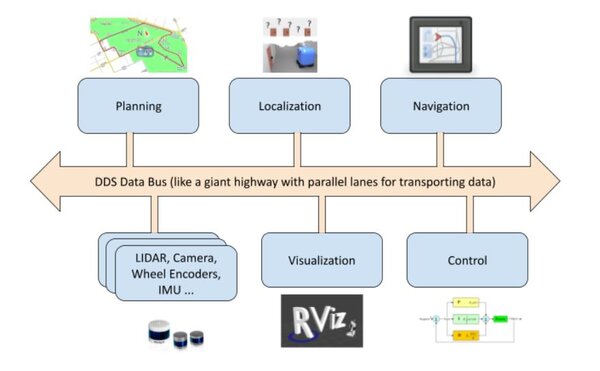
When you’re working with robots, you need a way for all the different parts of the robot to talk to each other. That’s where something called DDS comes in. DDS stands for Data Distribution Service, and it’s like a super-advanced messaging system for robots and computers.
Think of it like this: imagine you have a bunch of robots in a factory, and they all need to work together to build cars. Each robot has a specific job, like welding doors or painting bumpers. To do their jobs, they need to be able to send messages to each other, like “I’ve finished welding this door” or “I need more paint over here!”
DDS is what makes this communication possible. It is a set of rules that all the robots agree to follow so they can send messages quickly and reliably. It is kind of like a big chat room where robots can post and read messages, but instead of just being for fun, these messages contain important information that the robots need to do their jobs.
ROS 2 uses DDS under the hood to help all the different parts of a robot communicate. You can think of DDS as the glue that holds everything together in a ROS 2 system.
What is the ROS_DOMAIN_ID?
Now, here’s where something called the ROS_DOMAIN_ID comes in. In a DDS system, you can have multiple “chat rooms,” each with its own ID number. These “chat rooms” are called domains in DDS language. The ROS_DOMAIN_ID is just a number that tells ROS which domain to use.
By default, ROS uses 0 for the ROS_DOMAIN_ID. It is fine if we keep the default since we are working in simulation. However, in the real world, you might have a facility with multiple robots, all running ROS 2. If all these robots use the default settings, they’ll all be talking in the same “chat room” – domain 0.
This is fine if you want all your robots to be able to communicate with each other. But let’s say you have two different teams of robots in your factory, and you don’t want them to get confused by hearing each other’s messages. You could put one team in domain 1 and the other team in domain 2. They’re all still using DDS to communicate, but the two teams can’t hear each other because they’re in different domains.
The easiest way to choose a ROS_DOMAIN_ID is to pick a number between 0 and 101, or between 215 and 232. These numbers are less likely to conflict with other programs that might be using DDS.
In my tutorials, we’ll be sticking with the default ROS_DOMAIN_ID of 0. This means all our robots will be able to communicate with each other. But if you ever need to work with multiple groups of robots that shouldn’t be talking to each other, remember that you can use different ROS_DOMAIN_IDs to keep their conversations separate.
If you did want to change the ROS_DOMAIN_ID, you can do it by typing this command:
export ROS_DOMAIN_ID=<your_chosen_number>Replace <your_chosen_number> with the ROS_DOMAIN_ID you want to use. For example, if you want to use a ROS_DOMAIN_ID of 42, you would add in the terminal window before the commands you want to run:
export ROS_DOMAIN_ID=42Remember, if you have multiple robots on the same WiFi network and you want them to be able to talk to each other, they should all have the same ROS_DOMAIN_ID. But if you have groups of robots that shouldn’t be communicating, give each group its own ROS_DOMAIN_ID.
Example
Let’s look at an example:
Open a new terminal, and type this:
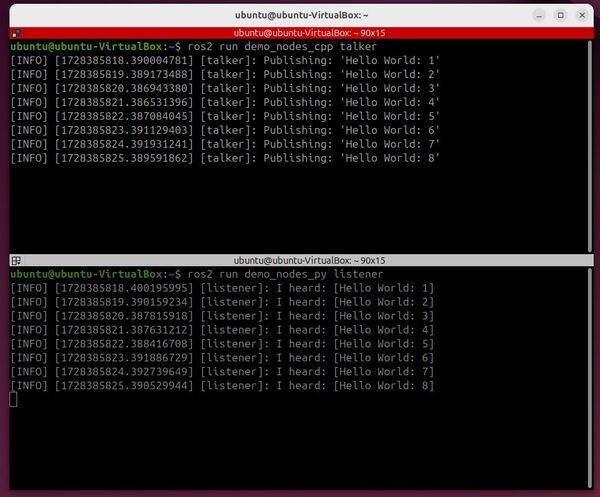
ros2 run demo_nodes_cpp talkerThis “talker” program publishes messages to the ROS 2 system.
Open another terminal window, and type:
ros2 run demo_nodes_py listenerYou can see both programs are able to talk to each other freely because they have the same ROS_DOMAIN_IDs.
Now close both nodes by pressing CTRL+C in both terminal windows.
Now in a the first terminal window, type this:
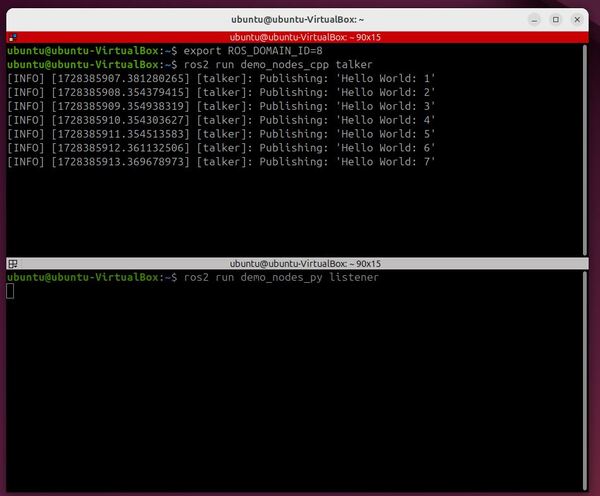
export ROS_DOMAIN_ID=8In that same terminal window, type:
ros2 run demo_nodes_cpp talkerNow in your second terminal window, type:
ros2 run demo_nodes_py listenerYou can see this node can’t receive messages from the other node.
You can now close this listener using CTRL + C.
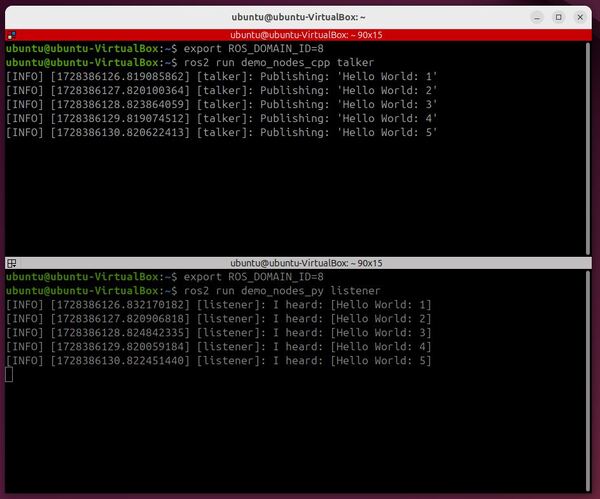
Now set the ROS_DOMAIN_ID to match our publisher node.
export ROS_DOMAIN_ID=8ros2 run demo_nodes_py listenerYou can see now that, since these nodes have the same ROS_DOMAIN_ID, they can now communicate with each other.
That’s it. I’ll see you in the next tutorial. Keep building!