How to Write Loops in Python

In this tutorial, we are going to learn how to write loops in Python. Loops are a key tool for iterating over sequences and automating repetitive tasks.

Prerequisites

You have completed this tutorial: How to Use Python’s Most Common Data Structures.

Writing For Loops

Let’s create a new file named writing_for_loops.py inside the following folder: ~/Documents/python_tutorial.

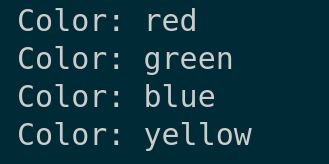
First, let’s demonstrate a simple for loop with a list of colors.

Type the following code into the editor:

# Simple for loop with a list
colors = ['red', 'green', 'blue', 'yellow']
for color in colors:
    print("Color:", color)

This loop prints each color in our list, showing how for loops process elements one by one.

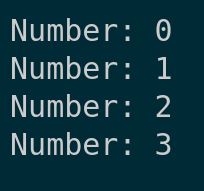
Next, we’ll use a for loop with the range() function, which generates a sequence of numbers.

# For loop with range
for i in range(4):  # Generates numbers from 0 to 3
    print("Number:", i)

Here, range(4) produces numbers from 0 to 3, and we print each one.

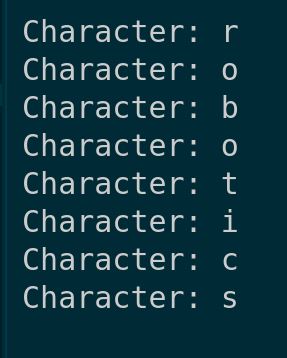
For loops can also iterate over strings, treating each character as an item.

# Iterating over a string
for char in 'robotics':
    print("Character:", char)

This prints each character in ‘robotics’.

Next, let’s loop through a dictionary of robot parts.

# Looping through a dictionary
robot_parts = {'wheels': 4, 'motors': 2, 'sensors': 5}
for part, quantity in robot_parts.items():
    print("Part:", part, "Quantity:", quantity)

Using .items() allows us to print both keys and values.

Lastly, we’ll explore nested for loops, useful for processing multi-dimensional data.

# Nested for loops
for outer in range(3):
    for inner in range(3):
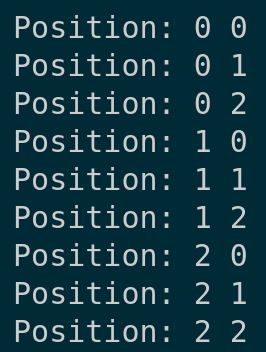
        print("Position:", outer, inner)

This generates a grid of positions from (0, 0) to (2, 2).

Save your file, and let’s run it to see these for loops in action.

1-writing-for-loops-1
2-writing-for-loops-2
3-writing-for-loops-3
4-writing-for-loops-4
5-writing-for-loops-5

You can see how for loops effectively handle various data structures.

Writing While loops

Let’s explore how to effectively use while loops in Python. These loops are essential for executing code repeatedly based on a condition.

Open your code editor and start a new file, writing_while_loops.py inside the following folder: ~/Documents/python_tutorial.

First, let’s look at a basic while loop that prints numbers from 0 to 4.

# Basic while loop
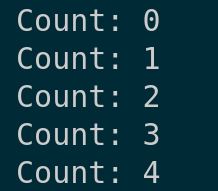
count = 0
while count < 5:
    print("Count:", count)
    count += 1

This loop increments ‘count’ each time, stopping when it reaches 5.

Next, we’ll use a while loop to handle user input. This loop will continue until ‘quit’ is entered.

# While loop with user input
user_input = ""
while user_input.lower() != 'quit':
    user_input = input("Enter 'quit' to exit: ")
    print("You entered:", user_input)

This demonstrates a loop that runs based on user interaction.

Finally, let’s use the ‘break’ statement to exit a loop prematurely.

# Using break in a while loop
count = 0
while True:
    if count == 5:
        break
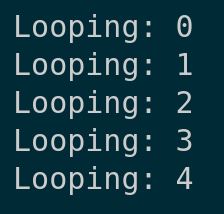
    print("Looping:", count)
    count += 1

print("")

This loop runs indefinitely but breaks when ‘count’ reaches 5.

Save your file, and then let’s run the script to see these while loops in action.

6-writing-while-loops-1
writing-while-loops-2
writing-while-loops-3

You’ll see how each while loop works, demonstrating their versatility and power in handling different types of data structures.

We’ve covered basic to advanced uses of while loops, showing how they control flow in programs. Thanks, and I’ll see you in the next tutorial.

Keep building!

How to Use Python’s Most Common Data Structures

In this tutorial, we will focus on lists in Python, a versatile data structure that is especially useful in robotics for handling collections of items like sensor readings or robotic commands.

Prerequisites

Working with Lists

Let’s create a new file named robotics_lists.py inside the following folder: ~/Documents/python_tutorial.

cd ~/Documents/python_tutorial
code .

First, let’s define a list to store sensor data.

# Sensor data list
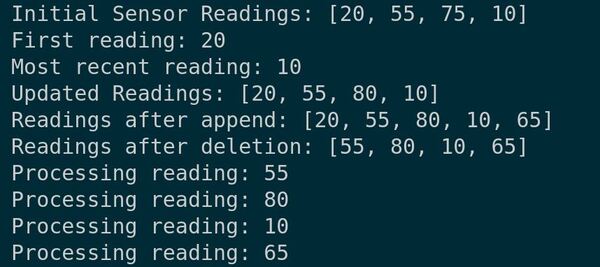
sensor_readings = [20, 55, 75, 10]
print("Initial Sensor Readings:", sensor_readings)

This list holds some dummy sensor readings.

To access an element, use its index. Here’s how you access the first and the last reading:

# Accessing elements
print("First reading:", sensor_readings[0])  # 20
print("Most recent reading:", sensor_readings[-1])  # 10

Suppose a sensor is recalibrated, and you need to update its reading:

# Updating a sensor reading
sensor_readings[2] = 80
print("Updated Readings:", sensor_readings)

Adding new sensor data as it comes can be achieved with append:

# Adding a new sensor reading
sensor_readings.append(65)
print("Readings after append:", sensor_readings)

If a sensor malfunctions, you might need to remove its data:

# Removing a sensor reading
del sensor_readings[0]  # Removing the first reading
print("Readings after deletion:", sensor_readings)

To handle each reading, say for analysis or adjustment, iterate through the list:

# Iterating through sensor readings
for reading in sensor_readings:
    print("Processing reading:", reading)

Now run the code.

1-lists

Creating a Set

Now let’s explore sets in Python. Sets are perfect for managing unique items in robotics, like tracking visited locations or unique sensor IDs.”

Create a new file named robotics_sets.py inside the following folder: ~/Documents/python_tutorial.

Type the following code into the editor.

# Creating a set of unique sensor IDs
sensor_ids = {101, 102, 103, 104}
print("Unique Sensor IDs:", sensor_ids)

Here we define a set with unique sensor IDs. Sets are great because they automatically handle uniqueness.

Now, let’s see what happens when we try to add duplicates.

# Attempting to add duplicate sensor IDs
sensor_ids.update([102, 103, 105])
print("Updated Sensor IDs:", sensor_ids)

Notice how it ignores duplicates but adds new unique items.

To add new sensor data or remove outdated ones, we use add() and discard().

# Managing sensor data
sensor_ids.add(106)
print("After adding:", sensor_ids)

sensor_ids.discard(101)
print("After discarding:", sensor_ids)

discard() is safe to use because it won’t cause an error if the item doesn’t exist, unlike remove().

We can also perform set operations like unions and intersections, useful for comparing sensor data across different sets.

# Set operations with sensor data
another_set = {104, 105, 107}
print("Union:", sensor_ids.union(another_set))
print("Intersection:", sensor_ids.intersection(another_set))

These operations help determine overlaps or combining data from multiple sensor sets.

Run the script.

2-sets

You’ll observe how sets efficiently manage unique items and perform operations that are important in robotics for data handling.

Creating a Tuple

Let’s dive into tuples in Python. Tuples are immutable collections, meaning once created, you can’t change their elements, making them ideal for data that should remain constant.

Let’s create a new file named using_tuples.py inside the following folder: ~/Documents/python_tutorial.

Tuples are defined by enclosing elements in parentheses. Let’s create one now.

# Creating a tuple
coordinates = (10, 20, 30)
print("Coordinates:", coordinates)

This tuple could represent coordinates in 3D space, for example.

Tuples are great for accessing elements by index:

# Accessing tuple elements
print("X-coordinate:", coordinates[0])
print("Z-coordinate:", coordinates[-1])

Tuples can also hold mixed data types and can be unpacked into separate variables, which is very handy in many situations.

# Tuple with mixed data types and unpacking
info_tuple = ("Item", 150, 23.99)
name, quantity, price = info_tuple
print("Unpacked:", name, quantity, price)

Save your file, and let’s run it to demonstrate these tuple features.

3-tuples

You can see how we use tuples to store and handle data securely and efficiently.

Creating a Dictionary

Let’s explore how to create and use dictionaries in Python. Dictionaries are a fundamental data structure for storing key-value pairs, which is useful for managing complex information.

Let’s start by creating a new file named creating_a_dictionary.py inside the following folder: ~/Documents/python_tutorial.

Here’s how to define a dictionary with curly braces, using keys and values.

Type the following code into the editor:

# Creating a dictionary
robot_parts = {'wheels': 4, 'motors': 2, 'sensors': 5}
print("Robot Parts Dictionary:", robot_parts)
print("")

This example creates a dictionary to track robot components.

Now, let’s make a more complex dictionary, including lists and other dictionaries as values.

# Dictionary with various data types
robot_specs = {
    'name': 'AutomaticAddison Robot',
    'parts': robot_parts,
    'features': ['autonomous', 'solar-powered', 'waterproof'],
    'dimensions': {'height': 120, 'width': 75, 'weight': 150}
}
print("Robot Specifications Dictionary:", robot_specs)
print("")

To access or modify dictionary data, reference the keys.

# Accessing and modifying dictionary values
print("Robot Height:", robot_specs['dimensions']['height'])
print("")
robot_specs['speed'] = '25 km/h'
print("Updated Robot Specifications:", robot_specs)
print("")

# Removing an item
del robot_specs['speed']
print("After deletion:", robot_specs)
print("")

Finally, dictionaries can be traversed using loops to access all keys, values, or both.

# Looping through a dictionary
for key, value in robot_specs.items():
    print(key, ":", value)

Now, let’s run the script to see how dictionaries function.

4-dictionary-1
4-dictionary-2
4-dictionary-3

You’ll observe how effectively dictionaries store and manage complex data.

That’s a quick guide on creating and using dictionaries in Python. 

Thanks for following along with me, and I’ll see you in the next tutorial.

Keep building!

How to Make Decisions in Code Using Python

In this tutorial, we are going to learn how to use if-else statements in Python to make decisions. This is a core concept in robotics, where your robot needs to decide its actions based on sensor inputs and internal states. 

Prerequisites

Working with if-else Statements

Let’s get started by opening your code editor and creating a new file named robot_decision_making.py inside the following folder: ~/Documents/python_tutorial.

Type the following code:

# if-else statement for robot movement
obstacle_detected = True

if obstacle_detected:
    print("Stop or change direction.")
else:
    print("Continue moving forward.")

In this script, our robot checks if there’s an obstacle. If obstacle_detected is True, the robot will stop or change direction. Otherwise, it will keep moving forward.

1-obstacle-detected

Now, let’s simulate more complex decision-making with an elif statement, useful for handling different types of sensors.

# Using elif for sensor-based conditions
sensor_reading = 'low_battery'

if sensor_reading == 'obstacle':
    print("Avoid obstacle.")
elif sensor_reading == 'low_battery':
    print("Return to charging station.")
else:
    print("Normal operation.")

This script helps a robot decide actions based on its sensor readings, whether to avoid obstacles, recharge, or proceed with normal tasks.

2-return-to-charging-station

We can also nest if-else statements to handle hierarchical decisions.

# Nested if-else for more detailed decision-making
if sensor_reading == 'obstacle':
    distance = 5  # distance to obstacle in meters
    if distance < 1:
        print("Immediate stop.")
    else:
        print("Prepare to change direction.")
else:
    print("Continue exploration.")

This approach lets our robot make more nuanced decisions based on the distance to an obstacle.

3-continue-exploration

To manage multiple conditions simultaneously, like combining sensor checks and operational states, we use logical operators.

# Logical operators for complex conditions
battery_level = 20  # percentage
if sensor_reading == 'obstacle' and battery_level > 50:
    print("Navigate around the obstacle.")
elif sensor_reading == 'obstacle' and battery_level <= 50:
    print("Return to base for recharge.")
else:
    print("Continue on current path.")

This script demonstrates how our robot can decide whether to navigate around obstacles or return to base for a recharge based on its battery level.

4-continue-on-current-path

Working with if-elif Statements

In this tutorial, we’re going to dive deeper into using if-elif statements in Python to handle multiple conditions more efficiently. This is important for making your programs smarter and more responsive to a range of inputs.

Let’s start by creating a new file called robot_decision_system.py inside the following folder: ~/Documents/python_tutorial.

If-elif statements allow our robots to evaluate multiple conditions and react appropriately, which is important for tasks like navigation and interaction.

Here is an example with a robot deciding how to move based on sensor data.

# Robot movement decision system
obstacle_type = 'wall'

if obstacle_type == 'wall':
    print("Turn around")
elif obstacle_type == 'small object':
    print("Go over")
elif obstacle_type == 'gap':
    print("Stop and find another path")
else:
    print("Clear path, continue moving")

In this script, the robot checks the type of obstacle and decides its action. The if-elif chain stops checking after it finds a true condition.

5-turn-around

To add more complexity, we’ll integrate a power check.

# Power-aware robot decision system
battery_level = 20  # percentage

if obstacle_type == 'wall' and battery_level > 20:
    print("Turn around")
elif obstacle_type == 'small object' and battery_level > 10:
    print("Go over")
elif obstacle_type == 'gap':
    print("Stop and find another path")
else:
    print("Low power: Return to base")

You can see how the robot’s decision-making adjusts based on the obstacle type and battery level. This method is efficient for guiding a robot’s actions.

6-low-power-return-to-base

Implementing Comparison Operators

Let’s open your code editor and create a new file named comparison_operators.py inside the following folder: ~/Documents/python_tutorial.

Comparison operators compare two values and return a Boolean value, either True or False. They’re useful for directing the flow of logic in programs, particularly in if statements.

Let’s take a look at each of the primary comparison operators.

# Equal to
print("10 == 10:", 10 == 10)  # Outputs True

# Equal to
print("10 == 5:", 10 == 5)  # Outputs False

# Not equal to
print("10 != 5:", 10 != 5)    # Outputs True

# Less than
print("5 < 10:", 5 < 10)      # Outputs True

# Greater than
print("10 > 5:", 10 > 5)      # Outputs True

# Less than or equal to
print("5 <= 5:", 5 <= 5)      # Outputs True

# Greater than or equal to
print("10 >= 5:", 10 >= 5)    # Outputs True
7-implementing-comparison

These examples show how we can evaluate basic numerical comparisons.

Let’s apply these in a practical scenario, like a robotic sensor reading that determines if an action is needed.

# Robot sensor threshold check
sensor_threshold = 10
sensor_reading = 12

if sensor_reading >= sensor_threshold:
    print("Sensor threshold exceeded, take action.")
else:
    print("Sensor levels normal, no action required.")

In this script, we check if a sensor reading exceeds a set threshold, a common task in robotic programming.

8-take-action

Comparison operators aren’t limited to numbers. Let’s look at how they work with strings.

# String comparison
print("'abc' < 'def':", 'abc' < 'def')  # Outputs True
9-compare-string

This example demonstrates that ‘abc’ is less than ‘def’ based on alphabetical order, similar to how words are ordered in a dictionary.

That’s it! Keep building!