
In this tutorial, we’ll explore how to create reusable motion plans for robotic arms using the MoveIt Task Constructor. We’ll build an application from scratch that demonstrates how to define a series of modular movements that can be combined and reused. This approach allows for more flexible and maintainable robot motion planning, especially useful in scenarios where similar motion sequences are repeated or slightly modified.
Here is what you will develop:
Our application will showcase:
- Creation of a reusable module containing a sequence of movements
- Combining multiple instances of this module into a larger task
- Use of both Cartesian and joint space planning
- Integration with ROS 2 and logging of the planning process
By the end of this tutorial, you’ll have a deep understanding of how to structure complex motion plans using the MoveIt Task Constructor, making your robotics applications more modular and easier to maintain.
Here’s a high-level overview of what our program will do:
- Define a reusable module that includes:
- Moving 5 cm in the positive X direction
- Moving 2 cm in the negative Y direction
- Rotating -18 degrees around the Z axis
- Moving to a predefined “ready” position
- Create a main task that:
- Starts from the current state
- Moves to the “ready” position
- Executes the reusable module five times in succession
- Finishes by moving to the “home” position
- Plan and execute the task, providing detailed feedback on each stage
Real-World Use Cases
The reusable motion planning approach for robotic arms that you’ll develop in this tutorial has several practical applications:
- Manufacturing and Assembly
- Create modular motion sequences for pick-and-place tasks or component assembly
- Optimize arm movements for repetitive operations, reducing cycle times (Cycle time is the total time it takes to complete one full operation, from start to finish)
- Bin Picking and Sorting
- Develop flexible routines for grabbing objects from bins with varying contents
- Combine basic movement modules to handle different object shapes and orientations
- Welding and Surface Treatment
- Build libraries of arm motions for welding or spray painting different part shapes
By mastering these techniques, you’ll be able to create more flexible and efficient robotic arm systems. This modular approach allows you to more efficiently develop and adapt arm motions for various industries.
Prerequisites
- You have completed this tutorial.
All the code is here on my GitHub repository. Note that I am working with ROS 2 Iron, so the steps might be slightly different for other versions of ROS 2.
Create the Code
Open a new terminal window, and type:
cd ~/ros2_ws/src/mycobot_ros2/hello_moveit_task_constructor/src/gedit modular.cppAdd this code.
/**
 * @file modular.cpp
 * @brief Demonstrates the use of MoveIt Task Constructor for robot motion planning.
 *
 * This program creates a reusable task for a robot arm using MoveIt Task Constructor.
 * It defines a series of movements including Cartesian paths and joint space motions.
 *
 * Key Concept:
 *   SerialContainer: This is a type of container in MoveIt Task Constructor that holds
 *     multiple movement stages. These stages are executed in sequence, one after another.
 *     Think of it like a to-do list for the robot, where each item must be completed
 *     before moving on to the next one.
 *
 * @author Addison Sears-Collins
 * @date August 20, 2024
 */

// Include necessary headers
#include <moveit/task_constructor/task.h>
#include <moveit/task_constructor/stages/current_state.h>
#include <moveit/task_constructor/solvers/cartesian_path.h>
#include <moveit/task_constructor/solvers/joint_interpolation.h>
#include <moveit/task_constructor/stages/move_to.h>
#include <moveit/task_constructor/stages/move_relative.h>
#include <moveit/task_constructor/stages/connect.h>
#include <moveit/task_constructor/container.h>
#include <rclcpp/rclcpp.hpp>
#include <moveit/planning_scene/planning_scene.h>

// Use the moveit::task_constructor namespace for convenience
using namespace moveit::task_constructor;

/**
 * @brief Creates a reusable module for robot movement.
 *
 * @param group The name of the robot group to move.
 * @return std::unique_ptr<SerialContainer> A container with a series of movement stages.
 */
std::unique_ptr<SerialContainer> createModule(const std::string& group) {
  // Create a new SerialContainer to hold our movement stages
  auto c = std::make_unique<SerialContainer>("Cartesian Path");
  c->setProperty("group", group);

  RCLCPP_INFO(rclcpp::get_logger("modular_demo"), "Creating module for group: %s", group.c_str());

  // Create solvers for Cartesian and joint space planning
  auto cartesian = std::make_shared<solvers::CartesianPath>();
  auto joint_interpolation = std::make_shared<solvers::JointInterpolationPlanner>();

  // Stage 1: Move 5 cm in the positive X direction
  {
    auto stage = std::make_unique<stages::MoveRelative>("x +0.05", cartesian);
    stage->properties().configureInitFrom(Stage::PARENT, { "group" });
    geometry_msgs::msg::Vector3Stamped direction;
    direction.header.frame_id = "base_link";
    direction.vector.x = 0.05;
    stage->setDirection(direction);
    c->insert(std::move(stage));
    RCLCPP_INFO(rclcpp::get_logger("modular_demo"), "Added stage: Move 5 cm in +X direction");
  }

  // Stage 2: Move 2 cm in the negative Y direction
  {
    auto stage = std::make_unique<stages::MoveRelative>("y -0.02", cartesian);
    stage->properties().configureInitFrom(Stage::PARENT);
    geometry_msgs::msg::Vector3Stamped direction;
    direction.header.frame_id = "base_link";
    direction.vector.y = -0.02;
    stage->setDirection(direction);
    c->insert(std::move(stage));
    RCLCPP_INFO(rclcpp::get_logger("modular_demo"), "Added stage: Move 2 cm in -Y direction");
  }

  // Stage 3: Rotate -18 degrees around the Z axis
  {
    auto stage = std::make_unique<stages::MoveRelative>("rz -18°", cartesian);
    stage->properties().configureInitFrom(Stage::PARENT);
    geometry_msgs::msg::TwistStamped twist;
    twist.header.frame_id = "base_link";
    twist.twist.angular.z = -M_PI / 10.; // 18 degrees in radians
    stage->setDirection(twist);
    c->insert(std::move(stage));
    RCLCPP_INFO(rclcpp::get_logger("modular_demo"), "Added stage: Rotate -18 degrees around Z axis");
  }

  // Stage 4: Move to the "ready" position
  {
    auto stage = std::make_unique<stages::MoveTo>("moveTo ready", joint_interpolation);
    stage->properties().configureInitFrom(Stage::PARENT);
    stage->setGoal("ready");
    c->insert(std::move(stage));
    RCLCPP_INFO(rclcpp::get_logger("modular_demo"), "Added stage: Move to 'ready' position");
  }

  RCLCPP_INFO(rclcpp::get_logger("modular_demo"), "Module creation completed with 4 stages");
  return c;
}

/**
 * @brief Creates the main task for robot movement.
 *
 * @param node The ROS2 node to use for loading the robot model.
 * @return Task The complete task for robot movement.
 */
Task createTask(const rclcpp::Node::SharedPtr& node) {
  Task t;
  t.loadRobotModel(node);
  t.stages()->setName("Reusable Containers");

  RCLCPP_INFO(node->get_logger(), "Creating task: %s", t.stages()->name().c_str());

  // Add the current state as the starting point
  t.add(std::make_unique<stages::CurrentState>("current"));
  RCLCPP_INFO(node->get_logger(), "Added current state as starting point");

  // Define the robot group to move
  const std::string group = "arm";

  // Add a stage to move to the "ready" position
  {
    auto stage = std::make_unique<stages::MoveTo>("move to ready", std::make_shared<solvers::JointInterpolationPlanner>());
    stage->setGroup(group);
    stage->setGoal("ready");
    t.add(std::move(stage));
    RCLCPP_INFO(node->get_logger(), "Added stage: Move to 'ready' position");
  }

  // Add five instances of our reusable module
  // This creates a sequence of movements that the robot will perform,
  // repeating the same set of actions five times in a row.
  RCLCPP_INFO(node->get_logger(), "Adding 5 instances of the reusable module");
  for (int i = 1; i <= 5; ++i) {
    t.add(createModule(group));
    RCLCPP_INFO(node->get_logger(), "Added module instance %d", i);
  }

  // Add a stage to move to the "home" position
  {
    auto stage = std::make_unique<stages::MoveTo>("move to home", std::make_shared<solvers::JointInterpolationPlanner>());
    stage->setGroup(group);
    stage->setGoal("home");
    t.add(std::move(stage));
    RCLCPP_INFO(node->get_logger(), "Added stage: Move to 'home' position");
  }

  RCLCPP_INFO(node->get_logger(), "Task creation completed with 5 module instances");
  return t;
}

/**
 * @brief Main function to set up and execute the robot task.
 *
 * @param argc Number of command-line arguments.
 * @param argv Array of command-line arguments.
 * @return int Exit status of the program.
 */
int main(int argc, char** argv) {
  // Initialize ROS2
  rclcpp::init(argc, argv);
  auto node = rclcpp::Node::make_shared("modular_demo");
  auto logger = node->get_logger();

  RCLCPP_INFO(logger, "Starting modular demo");

  // Start a separate thread for ROS2 spinning
  std::thread spinning_thread([node] { rclcpp::spin(node); });

  // Create and plan the task
  auto task = createTask(node);
  try {
    RCLCPP_INFO(logger, "Starting task planning");

    // Plan the task
    moveit::core::MoveItErrorCode error_code = task.plan();

    // Log the planning result
    if (error_code == moveit::core::MoveItErrorCode::SUCCESS) {
      RCLCPP_INFO(logger, "Task planning completed successfully");
      RCLCPP_INFO(logger, "Found %zu solutions", task.numSolutions());

      // Use printState to log the task state
      std::ostringstream state_stream;
      task.printState(state_stream);
      RCLCPP_INFO(logger, "Task state:\n%s", state_stream.str().c_str());

      // If planning succeeds, publish the solution
      task.introspection().publishSolution(*task.solutions().front());
      RCLCPP_INFO(logger, "Published solution");
    } else {
      RCLCPP_ERROR(logger, "Task planning failed with error code: %d", error_code.val);

      // Use explainFailure to log the reason for failure
      std::ostringstream failure_stream;
      task.explainFailure(failure_stream);
      RCLCPP_ERROR(logger, "Failure explanation:\n%s", failure_stream.str().c_str());
    }

    // Log a simple summary of each stage
    RCLCPP_INFO(logger, "Stage summary:");
    for (size_t i = 0; i < task.stages()->numChildren(); ++i) {
      const auto* stage = task.stages()->operator[](i);
      RCLCPP_INFO(logger, "  %s: %zu solutions, %zu failures",
                  stage->name().c_str(), stage->solutions().size(), stage->failures().size());
    }

  } catch (const InitStageException& ex) {
    RCLCPP_ERROR(logger, "InitStageException caught during task planning: %s", ex.what());
    std::ostringstream oss;
    oss << task;
    RCLCPP_ERROR(logger, "Task details:\n%s", oss.str().c_str());
  }

  RCLCPP_INFO(logger, "Modular demo completed");

  // Wait for the spinning thread to finish
  spinning_thread.join();

  return 0;
}
Save the file, and close it.
Build the Code
cd ~/ros2_ws/colcon buildsource ~/.bashrc
OR source ~/ros2_ws/install/setup.bash if you haven’t set up your bashrc file to source your ROS distribution automatically with “source ~/ros2_ws/install/setup.bash”)Launch
Open two terminal windows, and run the following commands to launch our standard MoveIt 2 environment:
ros2 launch mycobot_gazebo mycobot_280_arduino_bringup_ros2_control_gazebo.launch.py use_rviz:=falseros2 launch hello_moveit_task_constructor demo.launch.pyNow run the demo:
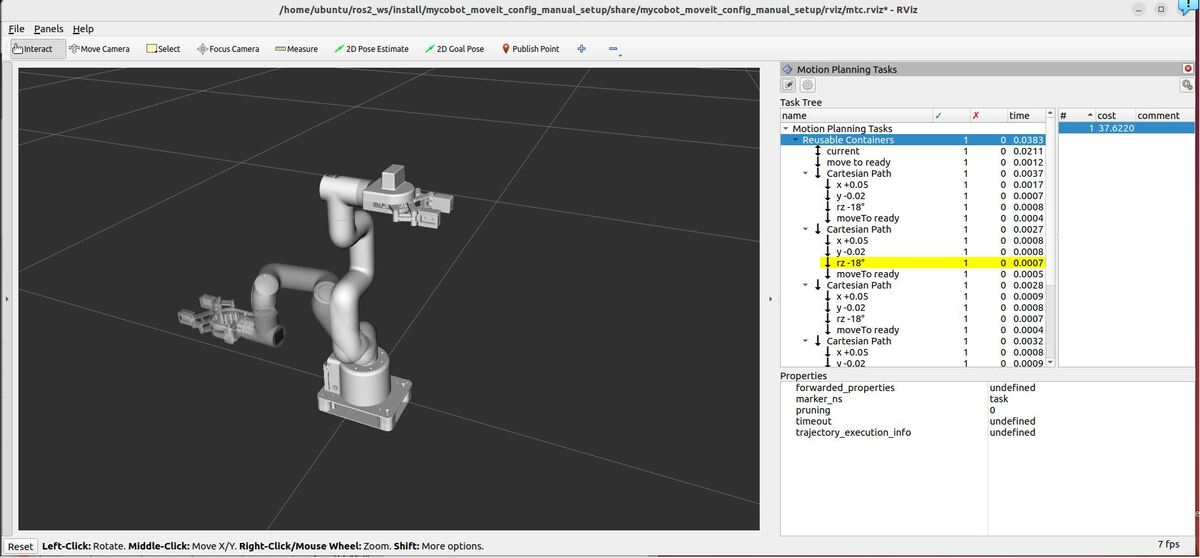
ros2 launch hello_moveit_task_constructor run.launch.py exe:=modularHere is what you should see:
Understanding the Motion Planning Results
RViz – “Motion Planning Tasks” Panel
The “Motion Planning Tasks” panel in RViz provides a detailed breakdown of our reusable motion planning task. It presents a hierarchical view with “Motion Planning Tasks” at the root, followed by “Reusable Containers”.
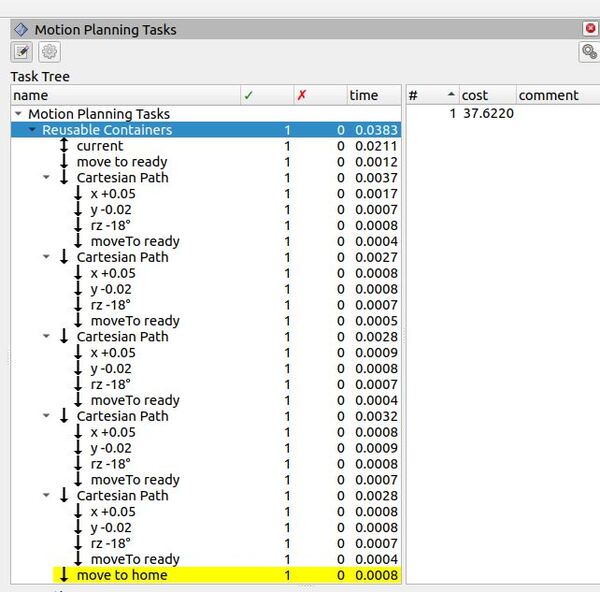
Under “Reusable Containers“, we can see the following stages:
- “current“: This represents the initial state of the robot.
- “move to ready“: The first movement to get the robot into a ready position.
- Five “Cartesian Path” stages: These correspond to our reusable module, each containing:
- “x +0.05”: Moving 5cm in the positive X direction
- “y -0.02”: Moving 2cm in the negative Y direction
- “rz -18°”: Rotating -18 degrees around the Z axis
- “moveTo ready”: Returning to the ready position
- “move to home“: The final movement to return the robot to its home position.
The second column shows green checkmarks and the number “1” for each stage, indicating that every step of the plan was successfully computed with one solution.
The “time” column displays the computational time for each component. We can see that the entire “Reusable Containers” task took 0.0383 seconds to compute, with individual stages taking milliseconds.
The “cost” column in this context represents a metric used by the motion planner. For most stages, it’s a very small value (0.0004 to 0.0017), meaning these movements are considered efficient or low-cost by the planner.
The “#” column consistently shows “1”, indicating that each stage has one solution.
The yellow highlighting on the “move to home” stage indicates that this is the currently selected or focused stage in the RViz interface.
This breakdown allows us to verify that our reusable module is indeed being repeated five times as intended, and that the overall motion plan is structured correctly with initial and final movements to ready and home positions.
Terminal Window – Planning Results
If you look at the terminal window, you’ll see the detailed planning results. Let’s interpret these outputs.
MoveIt Task Constructor uses a hierarchical planning approach. This means it breaks down the overall task into smaller, manageable stages and plans each stage individually while considering the connections between them.
- Stage Creation: The terminal output shows each stage being added to the task, including the creation of the reusable module and its five instances.
- Planning Process: After all stages are added, the planning process begins.
Arrow Interpretation in the Task State:
- → (Right Arrow): Represents the forward flow of results from one stage to the next. This means that a stage has successfully generated a result, and it is passing that result to the next stage for further processing.
- ← (Left Arrow): Indicates a backward flow of results. In MTC, some stages may require feedback from later stages to adjust their own results or to optimize the plan.
- – (Dash): A dash indicates no information flowed in that direction.
Let’s analyze the task state output:
- The root “Reusable Containers” stage shows 1 – ← 1 → – 1, indicating one solution was found and propagated both forward and backward.
- For each stage, we see a pattern like this: – 0 → 1 → – 0 or – 0 → 1 → – 1
- The first “0” means no solutions were propagated backward to this stage.
- The “1” in the middle indicates one solution was found for this stage.
- The last number (0 or 1) shows whether this solution was propagated forward to the next stage.
- The “Cartesian Path” stages, representing our reusable module, each show – 1 → 1 → – 1, meaning they received a solution from the previous stage, found their own solution, and passed it to the next stage.
- The individual movement stages (x +0.05, y -0.02, rz -18°) within each Cartesian Path show – 0 → 1 → – 0, indicating they found a solution but didn’t need to propagate it directly.
- The “moveTo ready” stages at the end of each Cartesian Path show – 0 → 1 → – 1, meaning they found a solution and passed it forward to the next module or final stage.
These results demonstrate that our planner effectively generated solutions for each stage of the task, including five repetitions of our reusable module. The hierarchical structure allowed the planner to solve each small part of the problem independently while maintaining the overall sequence of movements.
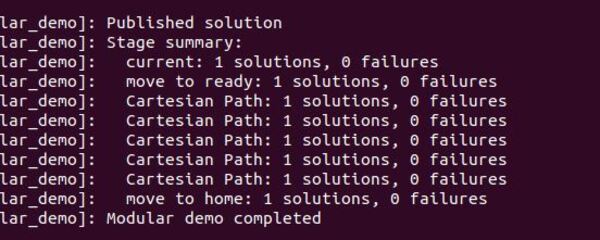
The Stage summary at the end confirms that each major stage (current, move to ready, five Cartesian Paths, and move to home) found one solution with no failures. This indicates a successful planning process for our entire reusable motion sequence.
By examining these results, we can see how the modular approach allows for efficient planning of complex, repetitive tasks. Each instance of the reusable module is planned independently, but within the context of the overall task, ensuring a cohesive and executable motion plan for the robot arm.
Analysis of the Results
Let’s break down what we did and what we learned from this project.
Our Modular Approach
We created a reusable module consisting of four stages:
- Move 5 cm in +X direction
- Move 2 cm in -Y direction
- Rotate -18 degrees around Z axis
- Move to ‘ready’ position
This module was then repeated five times in our overall task, bookended by initial and final movements.
The Results: A Stage-by-Stage Breakdown
Looking at our terminal output and RViz Motion Planning Tasks panel, here’s what we observed:
Task Creation:
- Successfully added all stages, including five instances of our reusable module
- Each module creation was completed with 4 stages as designed
Planning Process:
- The task planning completed successfully
- Found 1 solution for the entire task
Detailed Task State:
- Root “Reusable Containers”: 1 – ← 1 → – 1
- Indicates one solution was found and propagated both ways
- Individual Stages:
- “current” and “move to ready”: – 0 → 1 → – 1
- Successfully found a solution and passed it forward
- Cartesian Path (reusable module): – 1 → 1 → – 1
- Received a solution, found its own, and passed it forward
- Individual movements (x, y, rz): – 0 → 1 → – 0
- Found solutions but didn’t need to propagate directly
- “moveTo ready” within modules: – 0 → 1 → – 1
- Found a solution and passed it to the next stage
- “current” and “move to ready”: – 0 → 1 → – 1
- Final “move to home”: – 0 → 1 → – 1
- Successfully planned the final movement
Stage Summary
- All stages (current, move to ready, five Cartesian Paths, move to home) found 1 solution with 0 failures.
The Big Picture
This experiment demonstrates several key advantages of our modular approach:
- Reusability: We successfully created a module that could be repeated multiple times within the larger task. This showcases the power of modular design in robotic motion planning.
- Efficiency: Each instance of our reusable module was planned independently, yet within the context of the overall task. This allows for efficient planning of complex, repetitive tasks.
- Robustness: The successful planning of all stages with no failures indicates that our modular approach is robust and can handle multiple repetitions of the same movement sequence.
- Flexibility: By breaking down the task into smaller, reusable components, we create a system that isadaptable. New movements or sequences can be added or modified without redesigning the entire task.
- Scalability: The ability to repeat our module five times without issues suggests that this approach could scale to even more complex sequences of movements.
By structuring our motion planning this way, we achieve a balance of simplicity and power. The reusable modules allow for faster development of complex tasks, while the hierarchical planning ensures that each part fits smoothly into the whole.
Detailed Code Walkthrough
Now for the C++ part. Let’s go through each piece of this code, step by step.
cd ~/ros2_ws/src/mycobot_ros2/hello_moveit_task_constructor/src/gedit modular.cppFile Header and Includes
The code begins with a comprehensive comment block outlining the file’s purpose: demonstrating the use of MoveIt Task Constructor for robot motion planning. It introduces the key concept of SerialContainer, which is used to create reusable modules of movement stages. The file includes necessary headers for ROS 2, MoveIt, and the Task Constructor library, establishing the foundation for our modular motion planning demo.
createModule Function
This function creates a reusable module for robot movement:
It sets up a SerialContainer named “Cartesian Path” and configures it with four stages:
- Move 5 cm in the positive X direction
- Move 2 cm in the negative Y direction
- Rotate -18 degrees around the Z axis
- Move to the “ready” position
Each stage is created using either stages::MoveRelative or stages::MoveTo, configured with the appropriate movement parameters, and added to the container.
createTask Function
This function creates the main task for robot movement:
It sets up the task with the following structure:
- Add the current state as the starting point
- Move to the “ready” position
- Add five instances of the reusable module created by createModule
- Move to the “home” position
This structure creates a sequence of movements that the robot will perform, repeating the same set of actions five times in a row.
Main Function
The main function orchestrates the entire demo.
ROS 2 Initialization and Node Setup
ROS 2 is initialized, and a node named “modular_demo” is created.
Spinning Thread
A separate thread is created to handle ROS 2 callbacks, allowing the node to process incoming messages and services.
Task Creation and Execution
The task is created using the createTask function. The code then attempts to plan the task.
Result Handling and Logging
The code includes comprehensive logging of the planning results, including the number of solutions found, the task state, and a summary of each stage’s performance.
Error Handling
The code includes error handling to catch and report any exceptions that occur during the planning process, including detailed task information in case of failure.
Completion
The program waits for the ROS 2 spinning thread to finish before exiting.
That’s it. Keep building!