In this tutorial, we are going to learn how to use Python databases and other advanced features.
Prerequisites
- You have completed this tutorial: How to Use Python Multithreading and Regular Expressions.
Connecting to a Database
Managing database connections is important for logging sensor data, storing robot configurations, or even tracking operational data in real-time robotics applications.
Create a new file called database_connection.py inside the following folder: ~/Documents/python_tutorial.
We’ll use sqlite3, which is a built-in Python library that allows you to interact with SQLite databases. This makes it a good choice for demonstration purposes and smaller projects.
import sqlite3

def create_connection(db_file):
    """ Create a database connection to the SQLite database specified by db_file """
    conn = None
    try:
        conn = sqlite3.connect(db_file)
        print("SQLite database version:", sqlite3.sqlite_version)
    except sqlite3.Error as e:
        print(e)
    finally:
        if conn:
            conn.close()

if __name__ == "__main__":
    create_connection("example.db")
This script attempts to connect to an SQLite database specified by the filename. If example.db doesn’t exist, SQLite will create it automatically when we try to connect. The connection is closed immediately after being opened to ensure there are no loose ends.
Let’s run this script to test our database connection.

You should see the SQLite database version printed, indicating that the connection was successfully established. If there’s an error, it will be printed instead.
Working with Recursive Functions
Let’s dive into recursive functions—a technique that can help you solve problems that involve nested structures or repetitive tasks.
We’ll demonstrate recursion with a robotics-related example: navigating a robot hierarchy.
Let’s say we have a robot structure where each robot can have multiple sub-robots. Our task is to calculate the total number of all robots and sub-robots within this hierarchy.
Create a file named recursive_robotics.py inside the following folder: ~/Documents/python_tutorial.
class Robot:
    def __init__(self, name):
        self.name = name
        self.sub_robots = []

    def add_sub_robot(self, sub_robot):
        self.sub_robots.append(sub_robot)

def count_robots(robot):
    """ Return the total count of robots in the hierarchy using recursion """
    total = 1  # Start with the current robot
    for sub_robot in robot.sub_robots:
        total += count_robots(sub_robot)  # Recursive call for each sub-robot
    return total
Here, we define a Robot class with a method to add sub-robots. The count_robots function starts counting with the current robot, then recursively counts each sub-robot in the sub_robots list.
Let’s create a robot hierarchy to test our recursive function:
root_robot = Robot("Root")
child_robot1 = Robot("Child1")
child_robot2 = Robot("Child2")
sub_child_robot1 = Robot("SubChild1")

root_robot.add_sub_robot(child_robot1)
root_robot.add_sub_robot(child_robot2)
child_robot1.add_sub_robot(sub_child_robot1)

print("Total number of robots:", count_robots(root_robot))
Run the script.

You will see the total count of robots in the hierarchy, which includes the root robot, its children, and sub-children.
Working with Modules
Let’s explore how to work with modules in Python—a fundamental concept that allows you to organize your code better, making it more readable, maintainable, and reusable. For robotics engineers, using modules can help structure control systems, sensor integration, and interaction logic into separate components.
Create a new file called robot_modules.py inside the following folder: ~/Documents/python_tutorial.
Save it.
Now let’s create a module that we’ll use as a utility for our robotic operations. This module will include functions to calculate the area of different shapes which could, for example, be useful in path planning or space management in robotics applications.
Create another file in the same directory named geometry.py and type in the following code:
def rectangle_area(length, width):
    return length * width

def circle_area(radius):
    from math import pi
    return pi * radius ** 2
Now, in your robot_modules.py file, let’s write this code:
import geometry

def main():
    rect_area = geometry.rectangle_area(5, 3)
    circ_area = geometry.circle_area(7)
    print(f"Area of the rectangle: {rect_area}")
    print(f"Area of the circle: {circ_area}")

if __name__ == "__main__":
    main()
Here, we have imported the geometry module, which contains our area calculation functions. We can now use these functions in our main program to calculate the area of a rectangle and a circle.
Let’s run our script to see modules in action.

You will see the areas of the rectangle and circle printed out, showcasing how our main program can use functions defined in another module.
Creating a GUI
Let’s learn how to create a graphical user interface, or GUI, using Python. This skill is helpful when you need to create an interface for interacting with robots, such as controlling movements or monitoring sensor data.
Create a new file called robot_gui.py inside the following folder: ~/Documents/python_tutorial.
We’ll use tkinter, the standard GUI library for Python, to create a basic interface. It’s included with Python, so you don’t need to install anything extra.
import tkinter as tk
from tkinter import simpledialog

def main():
    root = tk.Tk()
    root.title("Robot Control Panel")

    def handle_command():
        response = simpledialog.askstring("Input", "Enter a command for the robot:")
        print(f"Command received: {response}")

    command_button = tk.Button(root, text="Send Command", command=handle_command)
    command_button.pack(pady=20)

    exit_button = tk.Button(root, text="Exit", command=root.destroy)
    exit_button.pack(pady=20)

    root.mainloop()

if __name__ == "__main__":
    main()
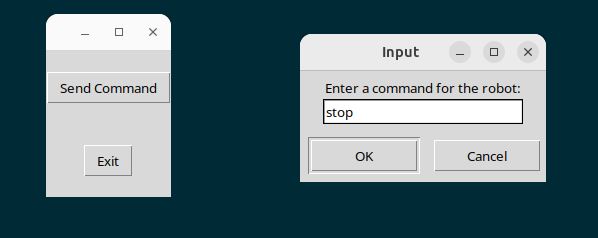
In this script, we create a basic window with a button. When clicked, this button prompts the user to enter a command, which could hypothetically be sent to a robot. The mainloop() method keeps the window open and waits for user interaction.
Now, run the script.


A window titled “Robot Control Panel” should appear with a button labeled “Send Command”. Clicking the button will open a dialog box asking for a command input.
Click Exit when you are finished.
And there you have it—a basic GUI for controlling a robot using Python and tkinter.
This concludes the Python for Robotics course. Thank you for following along.
Keep building!

