
In this tutorial, we will create a basic “Hello World” project to get your feet wet with C++ and MoveIt 2. I will show you how to move the end of the robotic arm (where the gripper is located) to a desired position and orientation.
The official instructions are on this page, but we will walk through everything together, step by step.
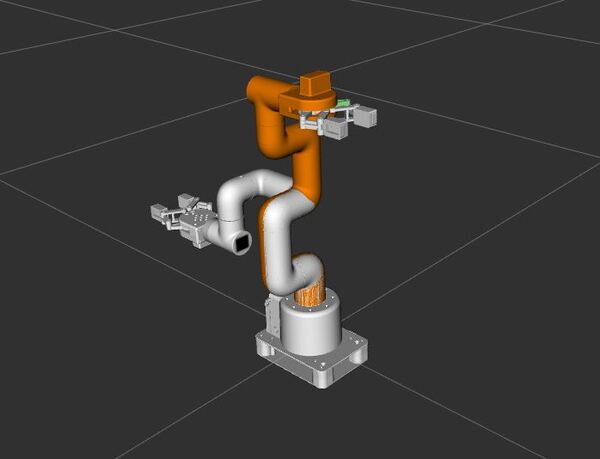
By the end of this tutorial, you will be able to create this:
Prerequisites
- You have completed this tutorial.
All my code for this project is located here on GitHub.
Create a Package
Let’s start by creating a new package for our project. Open a terminal and navigate to the mycobot_ros2 directory in your ROS 2 workspace:
cd ~/ros2_ws/src/mycobot_ros2/Now, let’s create a new package using the ROS 2 command line tools:
ros2 pkg create --build-type ament_cmake --dependencies moveit_ros_planning_interface rclcpp --node-name hello_moveit_v1 --license BSD-3-Clause hello_moveitThis command creates a new package named “hello_moveit” with the necessary dependencies and a node named “hello_moveit_v1”. The package will be created inside the mycobot_ros2 directory.
Next, let’s move into our newly created package:
cd hello_moveitCreate a ROS Node and Executor
Now that we have our package in place, let’s set up our C++ file to work with MoveIt 2. We’ll start by editing the main source file.
Open the new source code file you created.
cd srcgedit hello_moveit_v1.cppReplace the existing content with the following code:
/**
 * @file hello_moveit_v1.cpp
 * @brief A simple program that sets up a ROS 2 node to work with MoveIt for robot control.
 *
 * This program creates a basic setup for controlling a robot using ROS 2 and MoveIt.
 * It doesn't actually move the robot yet, but it prepares everything we need to start
 * planning robot movements in future steps.
 *
 * @author Addison Sears-COllins
 * @date August 07, 2024
 */

#include <memory>
#include <rclcpp/rclcpp.hpp>
#include <moveit/move_group_interface/move_group_interface.h>

/**
 * @brief The main function that starts our program.
 *
 * This function sets up our ROS 2 environment and prepares it for robot control.
 *
 * @param argc The number of input arguments our program receives.
 * @param argv The list of input arguments our program receives.
 * @return int A number indicating if our program finished successfully (0) or not.
 */
int main(int argc, char * argv[])
{
  // Start up ROS 2
  rclcpp::init(argc, argv);

  // Creates a node named "hello_moveit". The node is set up to automatically
  // handle any settings (parameters) we might want to change later without editing the code.
  auto const node = std::make_shared<rclcpp::Node>(
    "hello_moveit",
    rclcpp::NodeOptions().automatically_declare_parameters_from_overrides(true)
  );

  // Creates a "logger" that we can use to print out information or error messages
  // as our program runs.
  auto const logger = rclcpp::get_logger("hello_moveit");

  // We'll add code here later to actually plan robot movements
  RCLCPP_INFO(logger, "We'll add code here later to actually plan robot movements");

  // Shut down ROS 2 cleanly when we're done
  rclcpp::shutdown();
  return 0;
}
This code sets up the basic structure we need to work with MoveIt 2. It initializes ROS 2, creates a node, sets up logging, and creates a MoveGroupInterface for our robot’s arm.
Let’s compile our code to make sure everything is set up correctly. Go back to your workspace directory:
cd ~/ros2_wsTo build the package with debug information, we’ll use the following command:
colcon build --packages-select hello_moveitThis command builds only our hello_moveit package.
After the build completes successfully, open a new terminal and source your workspace:
source ~/.bashrcNow you can run your program:
ros2 run hello_moveit hello_moveit_v1At this point, the program should run and exit without any errors, though it won’t perform any robot movements yet. This step simply confirms that our basic setup is working correctly.

Plan and Execute Using MoveGroupInterface
Now that we’ve confirmed our basic setup is working, let’s add the code to plan and execute a motion for our robotic arm.
Create a new file called hello_moveit_v2.cpp
cd ~/ros2_ws/src/mycobot_ros2/hello_moveit/srcgedit hello_moveit_v2.cppAdd the following code:
/**
 * @file hello_moveit_v2.cpp
 * @brief A simple ROS 2 and MoveIt 2 program to control a robot arm
 *
 * This program demonstrates how to use ROS 2 and MoveIt 2 to control a robot arm.
 * It sets up a node, creates a MoveGroupInterface for the arm, sets a target pose for the gripper_base,
 * plans a trajectory, and executes the planned motion.
 *
 * @author Addison Sears-Collins
 * @date August 07, 2024
 */

#include <geometry_msgs/msg/pose_stamped.hpp>
#include <memory>
#include <rclcpp/rclcpp.hpp>
#include <moveit/move_group_interface/move_group_interface.h>

/**
 * @brief The main function that starts our program.
 *
 * This function sets up our ROS 2 environment and prepares it for robot control.
 *
 * @param argc The number of input arguments our program receives.
 * @param argv The list of input arguments our program receives.
 * @return int A number indicating if our program finished successfully (0) or not.
 */
int main(int argc, char * argv[])
{
  // Start up ROS 2
  rclcpp::init(argc, argv);

  // Creates a node named "hello_moveit". The node is set up to automatically
  // handle any settings (parameters) we might want to change later without editing the code.
  auto const node = std::make_shared<rclcpp::Node>(
    "hello_moveit",
    rclcpp::NodeOptions().automatically_declare_parameters_from_overrides(true)
  );

  // Creates a "logger" that we can use to print out information or error messages
  // as our program runs.
  auto const logger = rclcpp::get_logger("hello_moveit");

  // Create the MoveIt MoveGroup Interfaces
  // These interfaces are used to plan and execute movements, set target poses,
  // and perform other motion-related tasks for each respective part of the robot.
  // The use of auto allows the compiler to automatically deduce the type of variable.
  // Source: https://github.com/moveit/moveit2/blob/main/moveit_ros/planning_interface/move_group_interface/include/moveit/move_group_interface/move_group_interface.h
  using moveit::planning_interface::MoveGroupInterface;
  auto arm_group_interface = MoveGroupInterface(node, "arm");

  // Specify a planning pipeline to be used for further planning
  arm_group_interface.setPlanningPipelineId("ompl");

  // Specify a planner to be used for further planning
  arm_group_interface.setPlannerId("RRTConnectkConfigDefault");

  // Specify the maximum amount of time in seconds to use when planning
  arm_group_interface.setPlanningTime(1.0);

  // Set a scaling factor for optionally reducing the maximum joint velocity. Allowed values are in (0,1].
  arm_group_interface.setMaxVelocityScalingFactor(1.0);

  //  Set a scaling factor for optionally reducing the maximum joint acceleration. Allowed values are in (0,1].
  arm_group_interface.setMaxAccelerationScalingFactor(1.0);

  // Display helpful logging messages on the terminal
  RCLCPP_INFO(logger, "Planning pipeline: %s", arm_group_interface.getPlanningPipelineId().c_str());
  RCLCPP_INFO(logger, "Planner ID: %s", arm_group_interface.getPlannerId().c_str());
  RCLCPP_INFO(logger, "Planning time: %.2f", arm_group_interface.getPlanningTime());

  // Set a target pose for the end effector of the arm
  auto const arm_target_pose = [&node]{
    geometry_msgs::msg::PoseStamped msg;
    msg.header.frame_id = "base_link";
    msg.header.stamp = node->now();
    msg.pose.position.x = 0.061;
    msg.pose.position.y = -0.176;
    msg.pose.position.z = 0.168;
    msg.pose.orientation.x = 1.0;
    msg.pose.orientation.y = 0.0;
    msg.pose.orientation.z = 0.0;
    msg.pose.orientation.w = 0.0;
    return msg;
  }();
  arm_group_interface.setPoseTarget(arm_target_pose);

  // Create a plan to that target pose
  // This will give us two things:
  // 1. Whether the planning was successful (stored in 'success')
  // 2. The actual motion plan (stored in 'plan')
  auto const [success, plan] = [&arm_group_interface] {
    moveit::planning_interface::MoveGroupInterface::Plan msg;
    auto const ok = static_cast<bool>(arm_group_interface.plan(msg));
    return std::make_pair(ok, msg);
  }();

  // Try to execute the movement plan if it was created successfully
  // If the plan wasn't successful, report an error
  // Execute the plan
  if (success)
  {
    arm_group_interface.execute(plan);
  }
    else
  {
    RCLCPP_ERROR(logger, "Planning failed!");
  }

  // Shut down ROS 2 cleanly when we're done
  rclcpp::shutdown();
  return 0;
}
This code does the following:
- Sets a target pose for the end effector (gripper_base) of the robotic arm.
- Plans a path to reach that target pose.
- Executes the plan if it was successful, or logs an error if planning failed.
Now, let’s build our updated code.
Go to CMakeLists.txt
cd ~/ros2_ws/src/mycobot_ros2/hello_moveit/gedit CMakeLists.txtUpdate the file with the hello_moveit_v2.cpp code.
Save the file, and close it.
cd ~/ros2_wscolcon buildsource ~/.bashrcLaunch the controller and Gazebo:
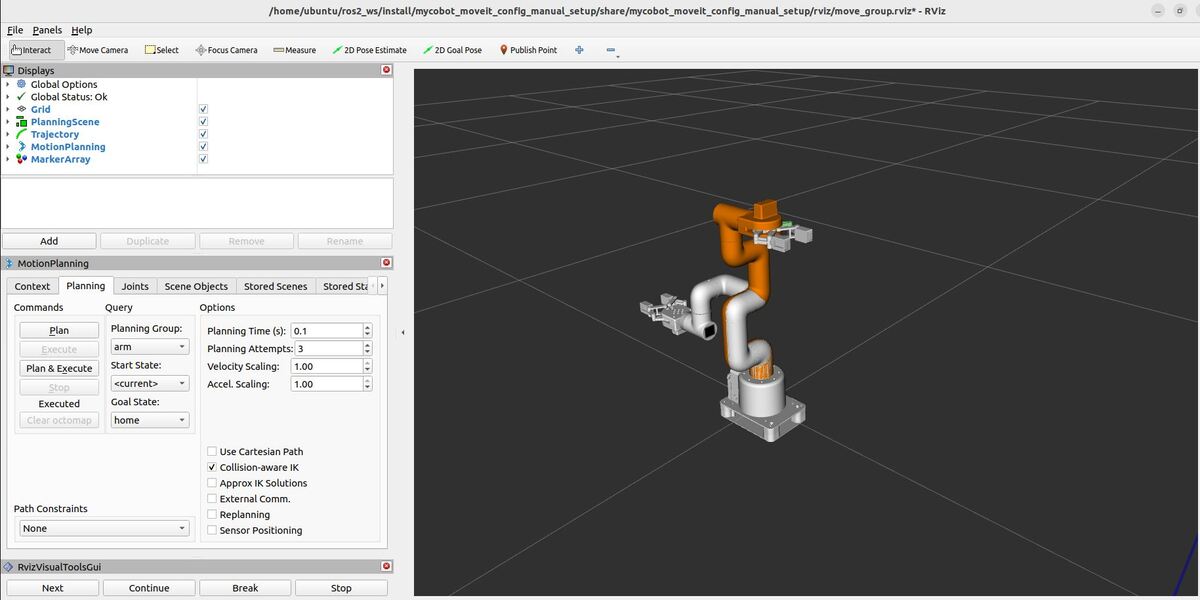
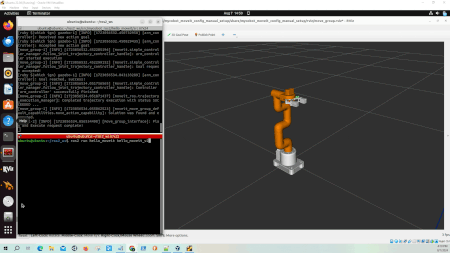
ros2 launch mycobot_gazebo mycobot_280_arduino_bringup_ros2_control_gazebo.launch.py use_rviz:=falseStart the MoveGroup with RViz.
ros2 launch mycobot_moveit_config_manual_setup move_group.launch.pyIn another terminal, run your program to move the robotic arm from one place to another:
ros2 run hello_moveit hello_moveit_v2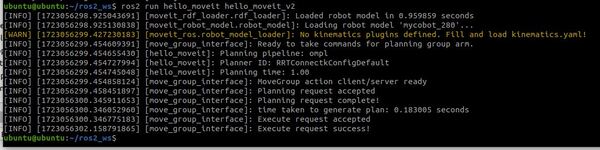
You can safely ignore this warning:
[moveit_ros.robot_model_loader]: No kinematics plugins defined. Fill and load kinematics.yaml!
If everything is set up correctly, you should see the robot’s gripper move in RViz to the specified pose.
You can confirm the gripper is in the correct pose by typing the following command and comparing it to the pose you set in your hello_moveit_v2.cpp file.
ros2 run tf2_ros tf2_echo base_link gripper_baseNote: If you run the hello_moveit_v2 node without first launching the demo launch file, it will wait for 10 seconds and then exit with an error message. This is because the MoveGroupInterface looks for a node publishing the robot description topic, which is provided by the demo launch file.
Let’s break down the key components of our hello_moveit_v2.cpp file to understand how it works with MoveIt 2 for controlling the arm.
MoveGroupInterface Creation:
This part sets up a control interface for the robot’s arm. It’s like creating a special remote control that lets us send commands to move the arm.
Setting the Target Pose:
Here, we’re telling the arm where we want it to go.
Planning the Motion:
This is where the robot figures out how to move from its current position to the target we set. It’s like planning a route on a map – the robot calculates all the steps needed to get from point A to point B safely.
Executing the Plan:
Finally, if the planning was successful, we tell the robot to actually perform the movement we planned. If the planning failed for some reason, we just report an error instead of trying to move.
These steps work together to allow us to control the robot arm in a safe and precise manner, moving it to exactly where we want it to go.
That’s it! Keep building.