How to Create an Action – ROS 2 Lyrical

In this tutorial, we will create a ROS 2 action. A ROS 2 action is a communication interface that allows a node to send a goal to another node to perform a long-running task and receive feedback while the task is in progress and a result when the task is completed.

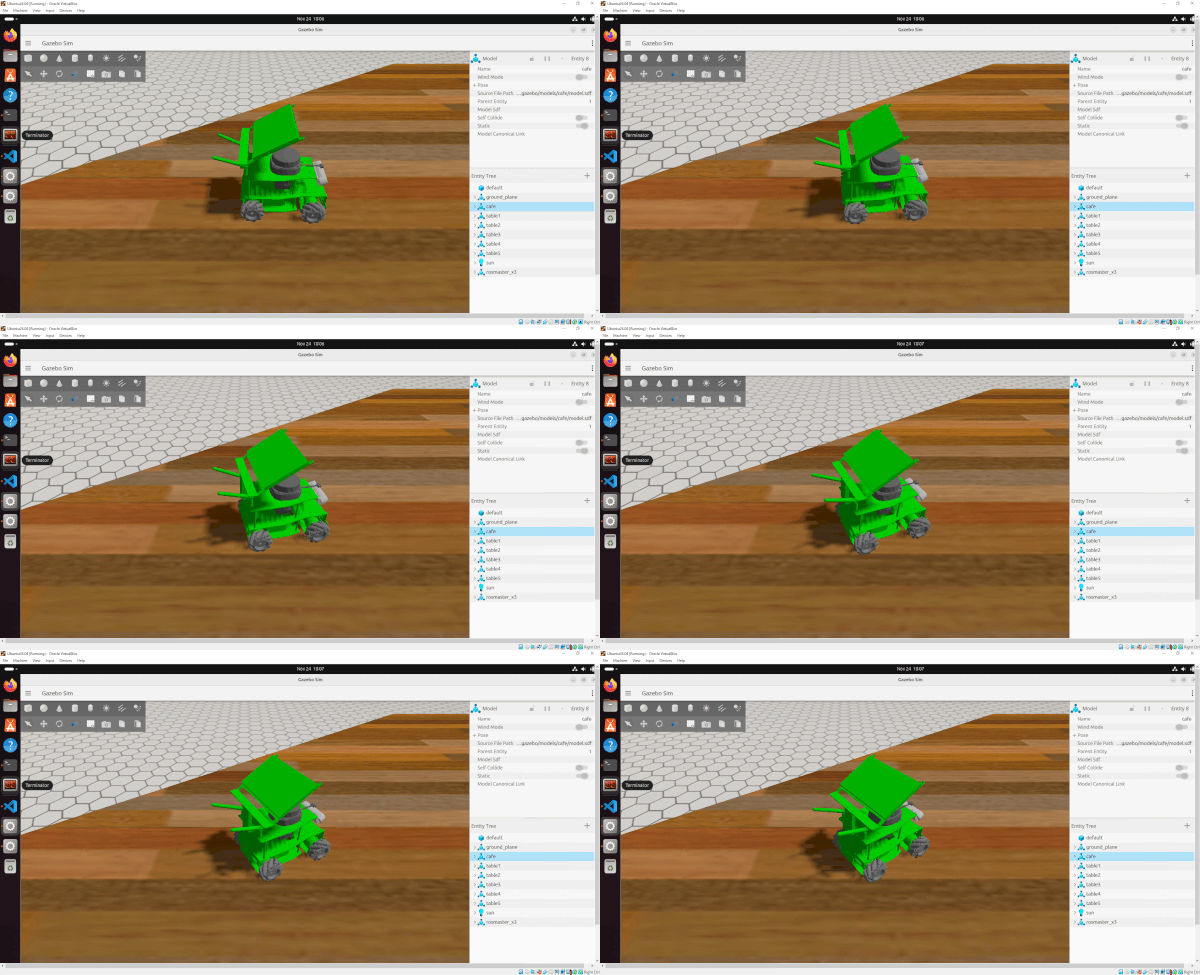
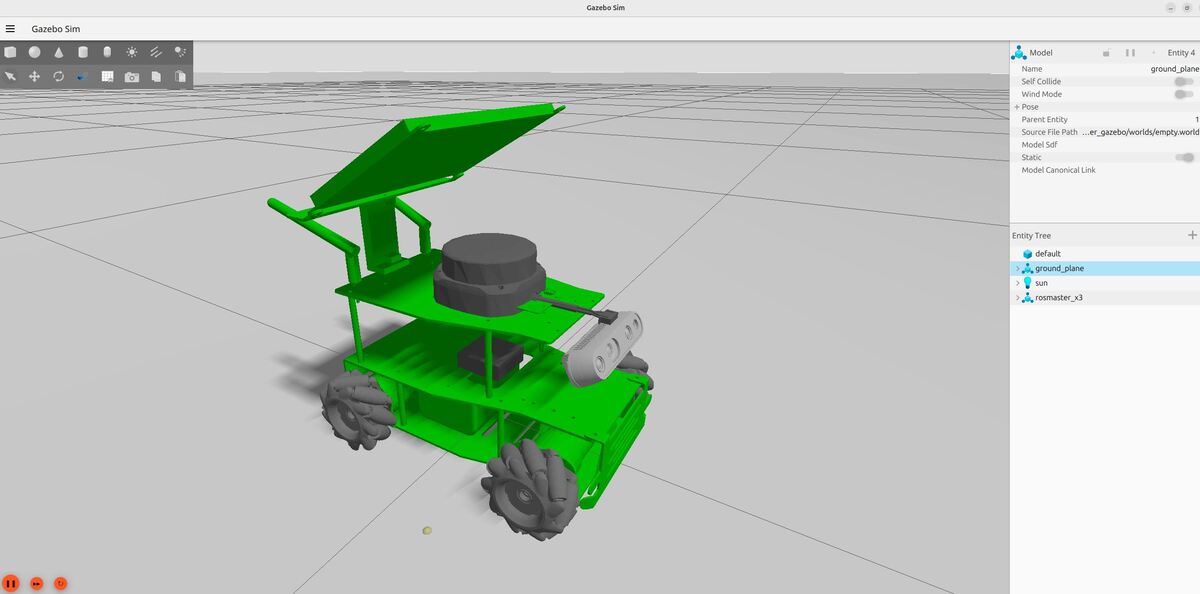
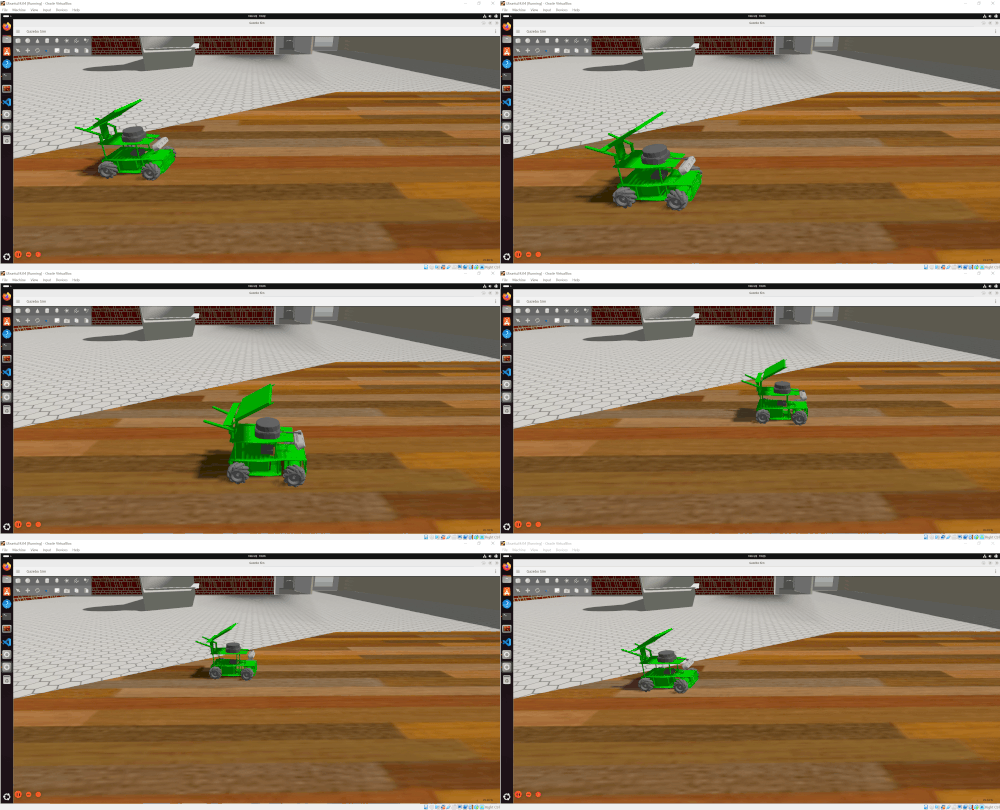
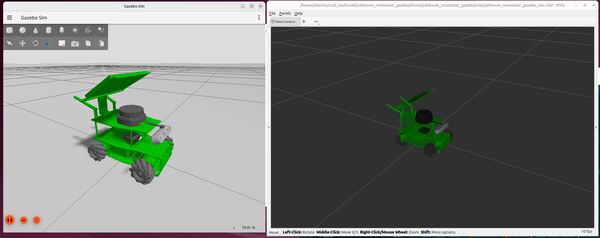
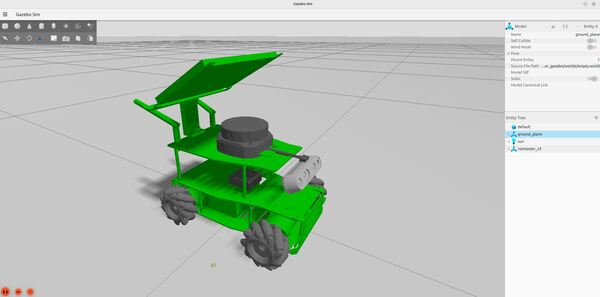
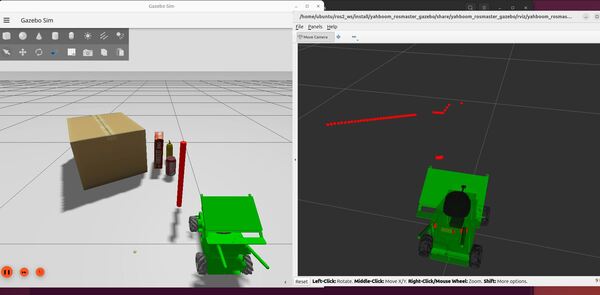
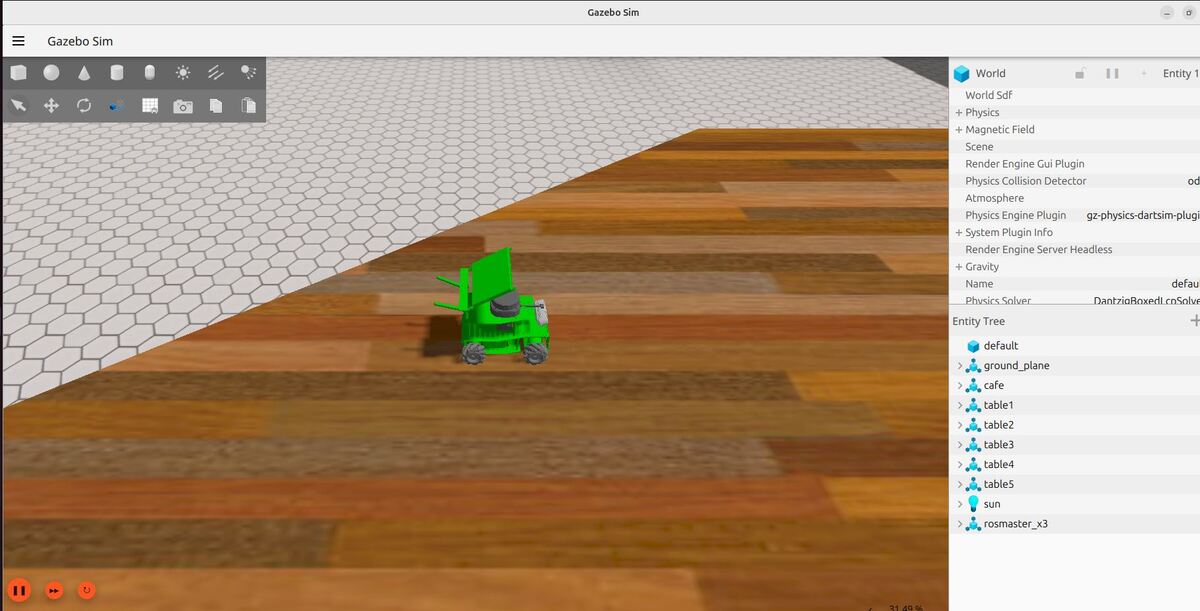
You will build this by the end of this tutorial:
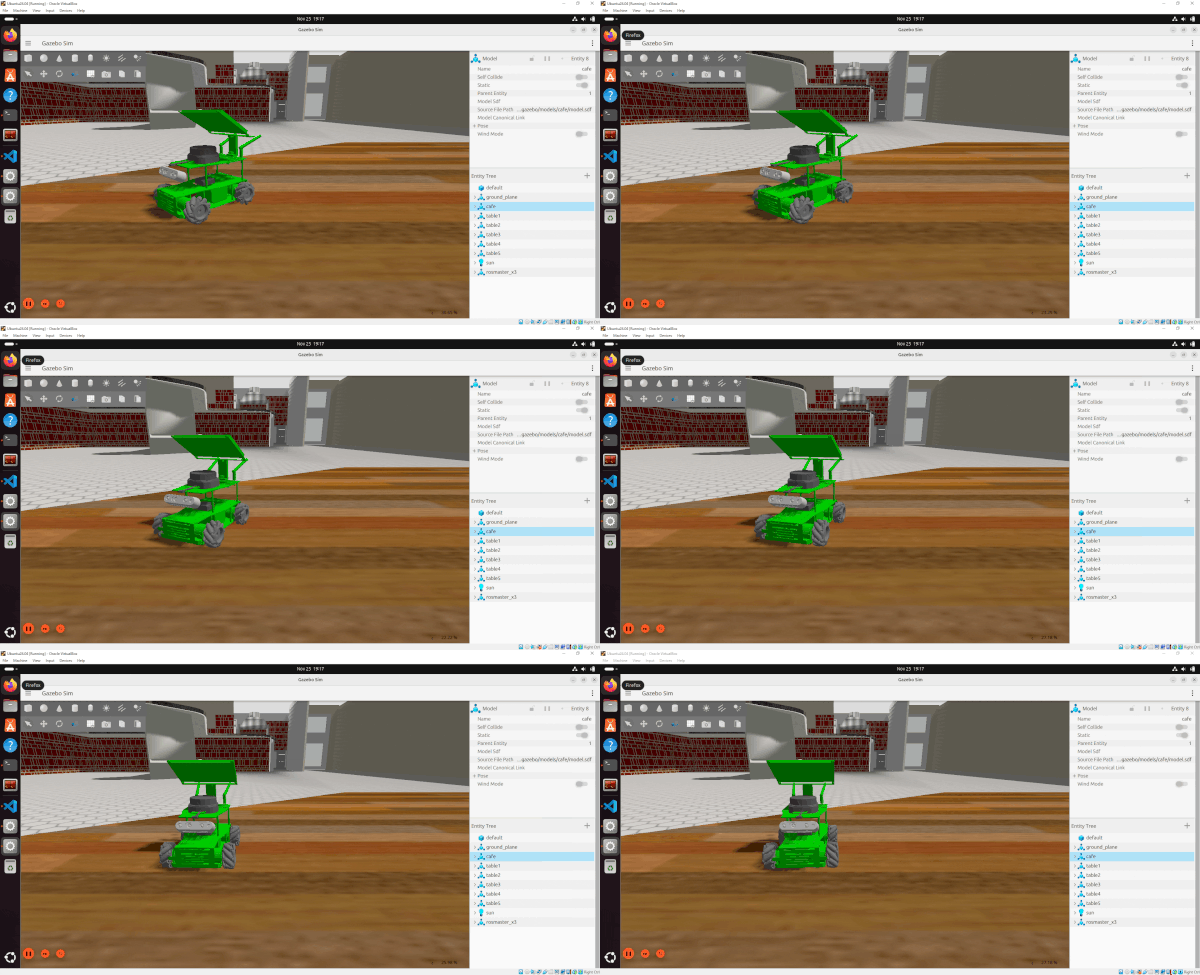
rotating-mecanum-wheel-robot-gazebo

A ROS 2 action is useful for tasks that take a while to complete and where you want to know the progress and be able to cancel the task if needed. Let’s take a look at some real-world examples.

Real-World Applications

  • Robot Vacuum Cleaner: Consider a robot vacuum cleaner. Instead of just starting to clean, let’s say we want to clean a specific room. This might take some time, and we want to get updates on the cleaning progress. We create an action called clean_room. This action will give us updates like “10% complete”, “50% complete”, and “finished”, and we can even cancel the cleaning if we change our mind.
  • Autonomous Docking to a Charging Station: Consider a mobile robot that needs to autonomously dock to recharge its batteries. This process involves multiple steps and precise positioning. We create an action called dock_to_charger. The action provides continuous feedback about the robot’s progress, such as “approaching charging station”, “aligning with dock”, “making final approach”, and “charging connection established”. The operation can be cancelled if obstacles are detected or if alignment fails. This is particularly useful because docking requires careful coordination and monitoring – the robot needs to detect the charging station, align itself precisely, and verify a successful connection, all while providing status updates and handling potential failures.
  • Kitchen Robot Chef: Imagine a mobile robot with an arm that prepares meals in a kitchen. The robot needs to move around, grab ingredients, and use cooking equipment. We create an action called prepare_dish. This action provides feedback like “getting ingredients”, “chopping vegetables”, “stirring pot”, and “plating food”. The cooking process can be cancelled if ingredients are missing or if safety limits are exceeded.

When to Use Actions vs. Publishers and Subscribers?

Publishers and subscribers are the basic tools for continuous, one-way communication in ROS 2. For example, a temperature sensor constantly publishing the current temperature or a motor constantly receiving speed commands. 

However, sometimes we need to monitor the progress of a long-running task and have the ability to cancel it if needed. ROS 2 actions work well for this use case.

Prerequisites

All my code for this project is located here on GitHub.

Create a Package

Navigate to the ~/ros2_ws/src/yahboom_rosmaster directory and create the yahboom_rosmaster_msgs package.

cd ~/ros2_ws/src/yahboom_rosmaster
ros2 pkg create --build-type ament_cmake \
                --license BSD-3-Clause \
                --maintainer-name ubuntu \
                --maintainer-email automaticaddison@todo.com \
                yahboom_rosmaster_msgs

Format of an Action

In ROS 2, an action is defined in a .action file, which consists of three parts: 

  • The goal (what you want to happen)
  • The result (what happened in the end)
  • The feedback (updates while it’s happening)

Each part is separated by a line with three dashes (—).

# Goal (Request)
---
# Result
---
# Feedback

The first part, the goal message, describes exactly what you want the robot or system to do. Think of it like giving instructions to someone – you need to be clear about what you want.

The second part, the result message, tells you what happened after everything is done. It’s like getting a report card after finishing a task – it shows the final outcome.

The third part, the feedback message, gives you regular updates while the action is running. Imagine tracking a package delivery – you get updates like “package picked up”, “in transit”, “out for delivery”.

When you use an action, it works like this: First, you (the action client) send your request (goal). Then, the system that handles the task (action server) starts working on it and sends you progress updates (feedback) so you know what’s happening. When it’s all done, you get the final report (result) telling you how everything went.

Define the Action

Let’s create a file called TimedRotation.action that defines an action for performing a timed rotation (of a mobile robot) with a specified angular velocity and duration, providing feedback on the progress and status of the rotation, and returning the result indicating the success and actual duration of the rotation.

Open a terminal window, and type:

cd ~/ros2_ws/src/yahboom_rosmaster/yahboom_rosmaster_msgs
mkdir action && cd action

Within the action directory, create a file called TimedRotation.action with the following contents:

# Request parameters for the timed rotation
float64 angular_velocity    # Desired angular velocity in rad/s (positive for counterclockwise, negative for clockwise)
float64 duration           # Desired duration of the rotation in seconds
---
# Result of the completed rotation
bool success               # Indicates if the rotation was completed successfully
float64 actual_duration    # Actual duration of the rotation in seconds
---
# Continuous feedback during rotation
float64 elapsed_time  # Elapsed time since the start of the rotation in seconds
string status         # Current status of the rotation:
                      # GOAL_RECEIVED: The action server has received a goal
                      # ROTATING: The rotation is in progress
                      # GOAL_SUCCEEDED: The rotation has been completed successfully
                      # GOAL_ABORTED: The rotation has been aborted due to an error or exceptional condition
                      # GOAL_CANCELED: The client has canceled the rotation goal

The goal message includes the desired angular velocity (in radians per second) and the duration of the rotation (in seconds).

The feedback message provides information about the progress of the rotation, including the elapsed time since the start of the rotation and the current status of the rotation, which can be one of the following: GOAL_RECEIVED, ROTATING, GOAL_SUCCEEDED, GOAL_ABORTED, or GOAL_CANCELED.

The result message indicates whether the rotation was completed successfully and provides the actual duration of the rotation.

Edit CMakeLists.txt

Here’s the complete CMakeLists.txt file with the necessary additions to include the TimedRotation.action in your ROS 2 package:

cmake_minimum_required(VERSION 3.20)
project(yahboom_rosmaster_msgs)

if(CMAKE_COMPILER_IS_GNUCXX OR CMAKE_CXX_COMPILER_ID MATCHES "Clang")
  add_compile_options(-Wall -Wextra -Wpedantic)
endif()

# find dependencies
find_package(ament_cmake REQUIRED)
find_package(rosidl_default_generators REQUIRED)

rosidl_generate_interfaces(${PROJECT_NAME}
  "action/TimedRotation.action"
)

if(BUILD_TESTING)
  find_package(ament_lint_auto REQUIRED)
  # the following line skips the linter which checks for copyrights
  # comment the line when a copyright and license is added to all source files
  set(ament_cmake_copyright_FOUND TRUE)
  # the following line skips cpplint (only works in a git repo)
  # comment the line when this package is in a git repo and when
  # a copyright and license is added to all source files
  set(ament_cmake_cpplint_FOUND TRUE)
  ament_lint_auto_find_test_dependencies()
endif()

ament_package()

Edit package.xml

Add the necessary dependencies to your package.xml file:

<?xml version="1.0"?>
<?xml-model href="http://download.ros.org/schema/package_format3.xsd" schematypens="http://www.w3.org/2001/XMLSchema"?>
<package format="3">
  <name>yahboom_rosmaster_msgs</name>
  <version>0.0.0</version>
  <description>Custom messages, services, and actions for the Yahboom ROSMaster robot</description>
  <maintainer email="automaticaddison@todo.com">ubuntu</maintainer>
  <license>BSD-3-Clause</license>

  <buildtool_depend>ament_cmake</buildtool_depend>
  <buildtool_depend>rosidl_default_generators</buildtool_depend>

  <exec_depend>rosidl_default_runtime</exec_depend>

  <test_depend>ament_lint_auto</test_depend>
  <test_depend>ament_lint_common</test_depend>

  <member_of_group>rosidl_interface_packages</member_of_group>

  <export>
    <build_type>ament_cmake</build_type>
  </export>
</package>

Build the action

Open a terminal window, and type:

cd ~/ros2_ws
rosdep install --from-paths src --ignore-src -y
colcon build && source ~/.bashrc

Or you can type the following command if you have been following my tutorials:

build 

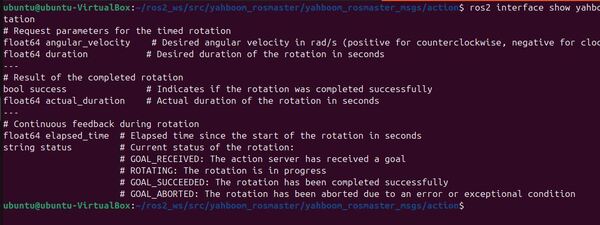
Check the action definition exists:

ros2 interface show yahboom_rosmaster_msgs/action/TimedRotation
1-show-ros2-action-interface

If the action definition exists and is properly generated, the command will display the contents of the TimedRotation.action file, like this:

If the action definition doesn’t exist or is not properly generated, you will see an error message indicating that the interface could not be found.

Writing an Action Server

Let’s write an action server node in C++. This node will handle long-running tasks with feedback and the ability to cancel the task while it’s running. We will follow the official ROS 2 examples.

The server should publish to the /mecanum_drive_controller/cmd_vel topic to control the robot’s rotation. The action server receives the goal from the action client, which specifies the desired angular velocity and duration for the rotation.

The server then publishes velocity commands to the /mecanum_drive_controller/cmd_vel topic to execute the rotation. Here’s an explanation of the action server’s behavior:

  1. The action server subscribes to the action topic to receive goals from the action client.
  2. When a goal is received, the action server extracts the desired angular velocity and duration from the goal message.
  3. The action server publishes velocity commands to the /mecanum_drive_controller/cmd_vel topic to initiate and maintain the robot’s rotation. It sets the linear velocities (in both the x and y directions) to zero and the angular velocity around z to the specified value from the goal.
  4. While the rotation is in progress, the action server publishes feedback messages to the action topic, providing the elapsed time since the start of the rotation and the status.
  5. The action server continues publishing velocity commands to the /mecanum_drive_controller/cmd_vel topic until the specified duration is reached.
  6. Once the duration is reached, the action server stops publishing velocity commands and sends a result message to the action topic, indicating the success of the rotation and the actual duration of the rotation.
  7. If any errors occur during the rotation, the action server stops publishing velocity commands and sends a result message indicating the failure.

Open a terminal window, and type:

cd ~/ros2_ws/src/yahboom_rosmaster/yahboom_rosmaster_system_tests/src

Create a new file called timed_rotation_action_server.cpp.

Add the following code:

/**
 * @file timed_rotation_action_server.cpp
 * @brief This ROS 2 node implements an action server for the TimedRotation action.
 *
 * This program implements a ROS 2 action server that executes timed rotation actions for the Yahboom RosMaster robot.
 * It receives goals from action clients, publishes timestamped velocity commands to rotate the robot,
 * and provides feedback on the rotation progress.
 *
 * Subscription Topics:
 *   None
 *
 * Publishing Topics:
 *   /mecanum_drive_controller/cmd_vel (geometry_msgs/TwistStamped):
 *     Timestamped velocity command for the robot:
 *     - header.stamp: Current ROS time when command is published
 *     - header.frame_id: "base_link" (robot's base frame)
 *     - twist.linear.x: Always 0 (no forward/backward motion)
 *     - twist.linear.y: Always 0 (no left/right motion)
 *     - twist.angular.z: Rotation speed in radians/second (positive=counterclockwise, negative=clockwise)
 *
 * Action Server:
 *   timed_rotation (yahboom_rosmaster_msgs/action/TimedRotation):
 *     Executes timed rotation actions with the following:
 *     - Goal: angular_velocity (rad/s) and duration (seconds)
 *     - Feedback: elapsed_time and status updates
 *     - Result: success flag and actual_duration
 *
 * @author Addison Sears-Collins
 * @date August 26, 2026
 */

#include <memory>
#include <thread>
#include <chrono>

#include "rclcpp/rclcpp.hpp"
#include "rclcpp_action/rclcpp_action.hpp"
#include "yahboom_rosmaster_msgs/action/timed_rotation.hpp"
#include "geometry_msgs/msg/twist_stamped.hpp"

using namespace std::chrono_literals;
using TimedRotation = yahboom_rosmaster_msgs::action::TimedRotation;
using GoalHandleTimedRotation = rclcpp_action::ServerGoalHandle<TimedRotation>;

/**
 * @class TimedRotationActionServer
 * @brief ROS 2 action server for the TimedRotation action.
 *
 * This class implements the action server functionality for the TimedRotation action.
 * It receives goals from an action client, executes the timed rotation, provides feedback,
 * and handles goal cancellation requests. The server maintains rotation by continuously
 * publishing timestamped velocity commands until the specified duration is reached or the goal is canceled.
 */
class TimedRotationActionServer : public rclcpp::Node
{
public:
  /**
   * @brief Constructor for the TimedRotationActionServer class.
   *
   * Initializes the action server and the timestamped velocity command publisher.
   * Sets up callback bindings for handling goals, cancellation requests,
   * and accepted goals.
   */
  TimedRotationActionServer()
  : Node("timed_rotation_action_server_cpp")
  {
    using namespace std::placeholders;

    // Create the action server with callbacks for goal handling, cancellation, and execution
    action_server_ = rclcpp_action::create_server<TimedRotation>(
      this,
      "timed_rotation",
      std::bind(&TimedRotationActionServer::handle_goal, this, _1, _2),
      std::bind(&TimedRotationActionServer::handle_cancel, this, _1),
      std::bind(&TimedRotationActionServer::handle_accepted, this, _1));

    // Create publisher for timestamped velocity commands
    cmd_vel_publisher_ = this->create_publisher<geometry_msgs::msg::TwistStamped>(
      "/mecanum_drive_controller/cmd_vel",
      10);  // Queue size of 10 messages
  }

private:
  // Class member variables
  rclcpp_action::Server<TimedRotation>::SharedPtr action_server_;  ///< The action server instance
  rclcpp::Publisher<geometry_msgs::msg::TwistStamped>::SharedPtr cmd_vel_publisher_;  ///< Publisher for timestamped velocity commands

  /**
   * @brief Callback function for handling new goal requests.
   *
   * This function is called when a new goal is received from an action client.
   * Currently accepts all goals without any validation.
   *
   * @param uuid Unique identifier for the goal request.
   * @param goal The goal request message containing angular_velocity and duration.
   * @return rclcpp_action::GoalResponse indicating if the goal is accepted or rejected.
   */
  rclcpp_action::GoalResponse handle_goal(
    const rclcpp_action::GoalUUID & uuid,
    [[maybe_unused]] std::shared_ptr<const TimedRotation::Goal> goal)
  {
    RCLCPP_INFO(this->get_logger(), "Received goal request for a timed rotation action");
    (void)uuid;
    return rclcpp_action::GoalResponse::ACCEPT_AND_EXECUTE;
  }

  /**
   * @brief Callback function for handling cancel requests.
   *
   * This function is called when a client requests to cancel an ongoing goal.
   * Currently accepts all cancellation requests.
   *
   * @param goal_handle The goal handle associated with the goal to be canceled.
   * @return rclcpp_action::CancelResponse indicating if the cancellation is accepted.
   */
  rclcpp_action::CancelResponse handle_cancel(
    const std::shared_ptr<GoalHandleTimedRotation> goal_handle)
  {
    RCLCPP_INFO(this->get_logger(), "Received cancel request for timed rotation action");
    (void)goal_handle;
    return rclcpp_action::CancelResponse::ACCEPT;
  }

  /**
   * @brief Callback function for handling accepted goals.
   *
   * This function is called when a goal has been accepted and needs to be executed.
   * Spawns a new thread to execute the goal to avoid blocking the main thread.
   *
   * @param goal_handle The goal handle associated with the accepted goal.
   */
  void handle_accepted(const std::shared_ptr<GoalHandleTimedRotation> goal_handle)
  {
    // Create a new thread using proper bind syntax
    std::thread{
      [this, goal_handle]() {
        this->execute(goal_handle);
      }
    }.detach();
  }

  /**
   * @brief Executes the timed rotation action.
   *
   * This function runs in a separate thread and performs the following:
   * 1. Publishes initial feedback with GOAL_RECEIVED status
   * 2. Creates and sends timestamped velocity commands based on goal parameters
   * 3. Continuously publishes feedback during rotation
   * 4. Handles cancellation requests during execution
   * 5. Stops rotation and publishes final result
   *
   * @param goal_handle The goal handle associated with the goal to be executed.
   */
  void execute(const std::shared_ptr<GoalHandleTimedRotation> goal_handle)
  {
    RCLCPP_INFO(this->get_logger(), "Executing goal for timed rotation action...");

    // Get the goal message
    const auto goal = goal_handle->get_goal();

    // Create result and feedback messages
    auto result = std::make_shared<TimedRotation::Result>();
    auto feedback = std::make_shared<TimedRotation::Feedback>();

    // Send initial feedback
    feedback->status = "GOAL_RECEIVED";
    goal_handle->publish_feedback(feedback);

    // Create timestamped velocity command message
    geometry_msgs::msg::TwistStamped twist_stamped_msg;
    twist_stamped_msg.twist.angular.z = goal->angular_velocity;  // Set rotation speed
    twist_stamped_msg.header.frame_id = "base_link";  // Set the reference frame
    // linear.x and linear.y are automatically initialized to 0

    // Record start time for duration tracking
    auto start_time = this->now();

    // Main execution loop
    while (rclcpp::ok())
    {
      // Check for cancellation requests
      if (goal_handle->is_canceling())
      {
        goal_handle->canceled(result);
        RCLCPP_INFO(this->get_logger(), "Goal canceled");
        feedback->status = "GOAL_CANCELED";
        goal_handle->publish_feedback(feedback);

        // Stop the robot with timestamped command
        twist_stamped_msg.twist.angular.z = 0.0;
        twist_stamped_msg.header.stamp = this->now();
        cmd_vel_publisher_->publish(twist_stamped_msg);
        return;
      }

      // Update timestamp and publish velocity command
      twist_stamped_msg.header.stamp = this->now();
      cmd_vel_publisher_->publish(twist_stamped_msg);

      // Calculate elapsed time
      auto elapsed_time = (this->now() - start_time).seconds();

      // Publish feedback
      feedback->elapsed_time = elapsed_time;
      feedback->status = "ROTATING";
      goal_handle->publish_feedback(feedback);

      // Check if we've reached the desired duration
      if (elapsed_time >= goal->duration)
      {
        break;
      }

      // Sleep to control update rate (5Hz)
      std::this_thread::sleep_for(200ms);
    }

    // Stop the robot with final timestamped command
    twist_stamped_msg.twist.angular.z = 0.0;
    twist_stamped_msg.header.stamp = this->now();
    cmd_vel_publisher_->publish(twist_stamped_msg);

    // Set and send result
    result->success = true;
    result->actual_duration = (this->now() - start_time).seconds();

    // Mark the goal as succeeded
    goal_handle->succeed(result);

    // Send final feedback
    feedback->status = "GOAL_SUCCEEDED";
    goal_handle->publish_feedback(feedback);

    RCLCPP_INFO(this->get_logger(), "Goal succeeded");
  }
};

/**
 * @brief Main function for the timed rotation action server node.
 *
 * Initializes ROS 2, creates an instance of the TimedRotationActionServer,
 * and spins the node to process callbacks.
 *
 * @param argc Number of command-line arguments.
 * @param argv Array of command-line arguments.
 * @return int Exit status of the program.
 */
int main(int argc, char ** argv)
{
  rclcpp::init(argc, argv);
  auto action_server = std::make_shared<TimedRotationActionServer>();
  rclcpp::spin(action_server);
  rclcpp::shutdown();
  return 0;
}

Save the code and close the editor.

Edit your package.xml file.

cd ~/ros2_ws/src/yahboom_rosmaster/yahboom_rosmaster_system_tests

Open the package.xml file.

Add these dependencies:

  <depend>rclcpp_action</depend>
  <depend>yahboom_rosmaster_msgs</depend>

Save the file and close the editor.

Open CMakeLists.txt.

Add this code:

# find dependencies
find_package(rclcpp_action REQUIRED)
find_package(yahboom_rosmaster_msgs REQUIRED)

# Add the timed rotation action server executable
add_executable(timed_rotation_action_server
  src/timed_rotation_action_server.cpp
)

# Specify dependencies for the timed rotation action server
target_link_libraries(timed_rotation_action_server
  ${rclcpp_TARGETS}
  rclcpp_action::rclcpp_action
  ${geometry_msgs_TARGETS}
  ${yahboom_rosmaster_msgs_TARGETS}
)

# Install the executable
install(TARGETS
  timed_rotation_action_server
  DESTINATION lib/${PROJECT_NAME}
)

Save the file, and close the editor.

Build the workspace:

build

Testing the Action Server

Now let’s launch the mobile robot.

Open a terminal window, and type the following command:

x3 

or

bash ~/ros2_ws/src/yahboom_rosmaster/yahboom_rosmaster_bringup/scripts/rosmaster_x3_gazebo.sh

Now, let’s launch the action server. Open a new terminal window, and type:

ros2 run yahboom_rosmaster_system_tests timed_rotation_action_server 

To see the list of actions a node provides, /timed_rotation_action_server  in this case, open a new terminal and run the command:

ros2 node info /timed_rotation_action_server_cpp

Which will return a list of /timed_rotation_action_server_cpp’s subscribers, publishers, services, action servers and action clients:

Let’s see all the active actions:

ros2 action list -t

2-active-actions

If you want to check the action type for the action, run the command:

ros2 action type /timed_rotation

Take a closer look at the action with this command:

ros2 action info /timed_rotation
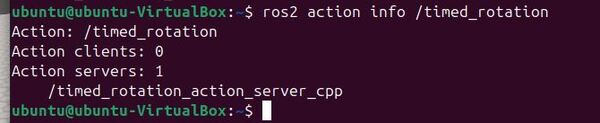
3-ros2-action-info

To send a goal to the server and receive feedback, type:.

ros2 action send_goal /timed_rotation yahboom_rosmaster_msgs/action/TimedRotation "{duration: 15.0, angular_velocity: -0.25}" --feedback
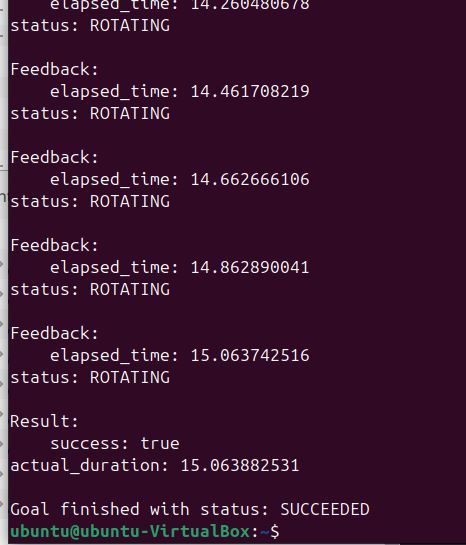
4-rotate-with-feedback

Observe the velocity messages:

ros2 topic echo /mecanum_drive_controller/cmd_vel

The robot will rotate for 15 seconds.

Press CTRL + C in all windows to close everything.

Writing an Action Client

Now that we’ve created and tested our action server for controlling the robot’s rotation, let’s create an action client that can send goals to it. The action client will allow us to programmatically request timed rotations, monitor their progress through feedback, and receive the final results. This is particularly useful when you want to integrate the rotation behavior into a larger automated system or control sequence.

Open a terminal window and navigate to the src directory of your package:

cd ~/ros2_ws/src/yahboom_rosmaster/yahboom_rosmaster_system_tests/src

Create a new file named timed_rotation_action_client.cpp and open it in your preferred text editor:

Add the following code to timed_rotation_action_client.cpp:

/**
 * @file timed_rotation_action_client.cpp
 * @brief ROS 2 action client node for sending timed rotation goals.
 *
 * This program implements a ROS 2 action client node that sends timed rotation goals
 * to a corresponding action server. It subscribes to the /timed_rotation_mode topic
 * to determine when to send or cancel goals.
 *
 * Subscription Topics:
 *   /timed_rotation_mode (std_msgs/Bool): Topic indicating whether timed rotation mode is active
 *
 * Publishing Topics:
 *   None
 *
 * Action Client:
 *   timed_rotation (yahboom_rosmaster_msgs/action/TimedRotation):
 *     Sends goals for timed rotation and receives feedback and results:
 *     - Goal: angular_velocity (rad/s) and duration (seconds)
 *     - Feedback: elapsed_time (seconds) and status string
 *     - Result: success flag and actual_duration (seconds)
 *
 * @author Addison Sears-Collins
 * @date August 26, 2026
 */

#include <memory>
#include <thread>

#include "rclcpp/rclcpp.hpp"
#include "rclcpp_action/rclcpp_action.hpp"
#include "yahboom_rosmaster_msgs/action/timed_rotation.hpp"
#include "std_msgs/msg/bool.hpp"

using TimedRotation = yahboom_rosmaster_msgs::action::TimedRotation;
using GoalHandleTimedRotation = rclcpp_action::ClientGoalHandle<TimedRotation>;

/**
 * @class TimedRotationActionClient
 * @brief ROS 2 action client node for sending timed rotation goals.
 *
 * This class implements a ROS 2 action client that sends timed rotation goals and
 * processes feedback and results from the action server. It can be controlled via
 * a boolean topic to start and stop rotations.
 */
class TimedRotationActionClient : public rclcpp::Node
{
public:
  using TimedRotation = yahboom_rosmaster_msgs::action::TimedRotation;
  using GoalHandleTimedRotation = rclcpp_action::ClientGoalHandle<TimedRotation>;

  /**
   * @brief Constructor for the TimedRotationActionClient class.
   * @param options ROS 2 node options.
   */
  explicit TimedRotationActionClient(const rclcpp::NodeOptions& options)
  : Node("timed_rotation_action_client_cpp", options)
  {
    // Create the action client
    action_client_ = rclcpp_action::create_client<TimedRotation>(
      this,
      "timed_rotation"
    );

    // Create subscription to control rotation mode
    timed_rotation_mode_sub_ = create_subscription<std_msgs::msg::Bool>(
      "/timed_rotation_mode",
      10,
      std::bind(&TimedRotationActionClient::timed_rotation_mode_callback, this, std::placeholders::_1)
    );

    // Declare parameters with default values
    this->declare_parameter("angular_velocity", 0.5);  // rad/s
    this->declare_parameter("duration", 10.0);         // seconds
  }

private:
  /**
   * @brief Callback function for the /timed_rotation_mode topic.
   *
   * Controls the action client based on the received boolean value:
   * - True: Starts a new rotation if none is active
   * - False: Cancels the current rotation if one is active
   *
   * @param msg The received boolean message.
   */
  void timed_rotation_mode_callback(const std_msgs::msg::Bool::SharedPtr msg)
  {
    if (!timed_rotation_mode_ && msg->data)
    {
      // Transition from False to True - Start rotation
      send_goal();
    }
    else if (timed_rotation_mode_ && !msg->data)
    {
      // Transition from True to False - Cancel if active
      if (goal_handle_ && goal_handle_->get_status() == rclcpp_action::GoalStatus::STATUS_ACCEPTED)
      {
        cancel_goal();
      }
    }
    timed_rotation_mode_ = msg->data;
  }

  /**
   * @brief Callback function for goal response.
   * @param goal_handle The goal handle returned by the action server.
   */
  void goal_response_callback(const GoalHandleTimedRotation::SharedPtr& goal_handle)
  {
    if (!goal_handle)
    {
      RCLCPP_ERROR(get_logger(), "Goal was rejected by server");
      return;
    }

    goal_handle_ = goal_handle;
    RCLCPP_INFO(get_logger(), "Goal accepted by server");
  }

  /**
   * @brief Callback function for feedback.
   * @param goal_handle The goal handle associated with the feedback.
   * @param feedback The feedback message received from the action server.
   */
  void feedback_callback(
    const GoalHandleTimedRotation::SharedPtr& goal_handle,
    const std::shared_ptr<const TimedRotation::Feedback>& feedback)
  {
    (void)goal_handle;  // Unused parameter
    RCLCPP_INFO(get_logger(), "Feedback received - Elapsed time: %.2f seconds, Status: %s",
                feedback->elapsed_time,
                feedback->status.c_str());
  }

  /**
   * @brief Callback function for getting the result.
   * @param result The result message received from the action server.
   */
  void get_result_callback(const GoalHandleTimedRotation::WrappedResult& result)
  {
    switch (result.code)
    {
      case rclcpp_action::ResultCode::SUCCEEDED:
        RCLCPP_INFO(get_logger(), "Goal succeeded! Actual duration: %.2f seconds",
                    result.result->actual_duration);
        break;
      case rclcpp_action::ResultCode::ABORTED:
        RCLCPP_ERROR(get_logger(), "Goal was aborted");
        return;
      case rclcpp_action::ResultCode::CANCELED:
        RCLCPP_INFO(get_logger(), "Goal was canceled");
        return;
      default:
        RCLCPP_ERROR(get_logger(), "Unknown result code");
        return;
    }
  }

  /**
   * @brief Cancel the current goal.
   *
   * Attempts to cancel the currently executing goal. Checks for a valid goal handle
   * and waits for the cancellation response from the server.
   */
  void cancel_goal()
  {
    RCLCPP_INFO(get_logger(), "Requesting to cancel goal");
    if (!goal_handle_)
    {
        RCLCPP_ERROR(get_logger(), "Goal handle is null");
        return;
    }

    auto future = action_client_->async_cancel_goal(goal_handle_);

    if (rclcpp::spin_until_future_complete(this->get_node_base_interface(), future) !=
        rclcpp::FutureReturnCode::SUCCESS)
    {
        RCLCPP_ERROR(get_logger(), "Failed to cancel goal");
        return;
    }
    RCLCPP_INFO(get_logger(), "Goal cancellation request sent");
  }

  /**
   * @brief Send a goal to the action server.
   *
   * Sends a new rotation goal using parameters from the parameter server.
   * If the server isn't available, it will wait for it to become available.
   */
  void send_goal()
  {
    RCLCPP_INFO(get_logger(), "Waiting for action server...");
    if (!action_client_->wait_for_action_server(std::chrono::seconds(5)))
    {
      RCLCPP_ERROR(get_logger(), "Action server not available after 5 seconds");
      return;
    }

    // Get parameters for the goal
    auto angular_velocity = this->get_parameter("angular_velocity").as_double();
    auto duration = this->get_parameter("duration").as_double();

    auto goal_msg = TimedRotation::Goal();
    goal_msg.angular_velocity = angular_velocity;
    goal_msg.duration = duration;

    RCLCPP_INFO(get_logger(),
                "Sending goal: angular_velocity=%.2f rad/s, duration=%.2f seconds",
                angular_velocity, duration);

    auto send_goal_options = rclcpp_action::Client<TimedRotation>::SendGoalOptions();
    send_goal_options.goal_response_callback =
      std::bind(&TimedRotationActionClient::goal_response_callback, this, std::placeholders::_1);
    send_goal_options.feedback_callback =
      std::bind(&TimedRotationActionClient::feedback_callback, this, std::placeholders::_1, std::placeholders::_2);
    send_goal_options.result_callback =
      std::bind(&TimedRotationActionClient::get_result_callback, this, std::placeholders::_1);

    action_client_->async_send_goal(goal_msg, send_goal_options);
  }

  // Class member variables
  rclcpp_action::Client<TimedRotation>::SharedPtr action_client_;        ///< Action client for timed rotation
  rclcpp::Subscription<std_msgs::msg::Bool>::SharedPtr timed_rotation_mode_sub_;  ///< Subscription to timed rotation mode
  bool timed_rotation_mode_{false};                                      ///< Current state of timed rotation mode
  GoalHandleTimedRotation::SharedPtr goal_handle_;                      ///< Handle for the current goal
};

/**
 * @brief Main function for the timed rotation action client node.
 *
 * Initializes ROS 2, creates an instance of the TimedRotationActionClient,
 * and spins the node to process callbacks.
 *
 * @param argc Number of command-line arguments.
 * @param argv Array of command-line arguments.
 * @return int Exit status of the program.
 */
int main(int argc, char** argv)
{
  rclcpp::init(argc, argv);
  auto action_client = std::make_shared<TimedRotationActionClient>(rclcpp::NodeOptions());
  rclcpp::spin(action_client);
  rclcpp::shutdown();
  return 0;
}

Save the code and close the file.

Edit your CMakeLists.txt file to add the new executable:

cd ~/ros2_ws/src/yahboom_rosmaster/yahboom_rosmaster_system_tests/

Open CMakeLists.txt.

Add your new node:

# Add the timed rotation action client executable
add_executable(timed_rotation_action_client
  src/timed_rotation_action_client.cpp
)

# Specify dependencies for the timed rotation action client
target_link_libraries(timed_rotation_action_client
  ${rclcpp_TARGETS}
  rclcpp_action::rclcpp_action
  ${std_msgs_TARGETS}
  ${yahboom_rosmaster_msgs_TARGETS}
)

# Install the executable
install(TARGETS
  timed_rotation_action_client
  DESTINATION lib/${PROJECT_NAME}
)

Save the file, and close it.

Open a terminal window and build the package:

build

Testing the Action Client – C++

Now let’s launch the mobile robot.

Open a terminal window, and type the following command:

x3 

or

bash ~/ros2_ws/src/yahboom_rosmaster/yahboom_rosmaster_bringup/scripts/rosmaster_x3_gazebo.sh

Now, let’s launch the action server. Open a new terminal window, and type:

ros2 run yahboom_rosmaster_system_tests timed_rotation_action_server 

Launch the action client in another terminal window.

ros2 run yahboom_rosmaster_system_tests timed_rotation_action_client

To see how many servers and clients you have on the /timed_rotation action, type:

ros2 action info /timed_rotation

Check out the topics.

ros2 topic list

You will see a topic called /timed_rotation_mode. This is the topic we will use to trigger the timed rotation action.

Trigger this action using the following command:

ros2 topic pub /timed_rotation_mode std_msgs/msg/Bool "data: true" -1

Observe the velocity messages:

ros2 topic echo /mecanum_drive_controller/cmd_vel

Once that finishes, trigger it again:

ros2 topic pub /timed_rotation_mode std_msgs/msg/Bool "data: false" -1
ros2 topic pub /timed_rotation_mode std_msgs/msg/Bool "data: true" -1

To stop the timed rotation before it completes, you can publish a message with the value set to False:

ros2 topic pub /timed_rotation_mode std_msgs/msg/Bool "data: false" -1

This will cause the action client to send a cancellation request to the action server if the rotation is currently in progress.

Press CTRL + C in all windows to close everything.

Congratulations! You have created a ROS 2 action. 

That’s it! Keep building!
Customize Your Robot with Parameters in C++ – ROS 2 Lyrical

In this tutorial, we’ll explore the power of parameters in ROS 2. Parameters are important for creating flexible and dynamic robot software. 

By the end of this tutorial, you will be able to use parameters to make your robot move like this:

mecanum-robot-rotate-counter-clockwise

You’ll learn how to define, access, and use parameters within your nodes, enabling you to customize your robot’s behavior without altering its code. 

Join me as we dive into the essentials of parameters, setting the foundation for more complex robotics applications.

Real-World Applications

Here are some real-world examples of how ROS 2 parameters can be used in robotic applications:

  • Joint Limits and Velocities: Parameters can be used to define the safe operating range (minimum and maximum) for each joint of the arm in terms of angles or positions. 
  • Payload Capacity: This parameter specifies the maximum weight the arm can safely carry while maintaining stability and avoiding damage to its motors or gears. 
  • Path Planning Parameters: These parameters influence how the arm plans its trajectory to reach a target point. 
  • End-effector Calibration: Parameters can store calibration data for the gripper or any tool attached to the end of the arm.

Pretty much any variable that applies to your robot can be declared as a parameter in ROS 2. Parameters are used to configure nodes at startup (and during runtime), without changing the code.

Remember, a ROS 2 node is a mini-program (written in either Python or C++) that performs a specific task within a robot system. 

Prerequisites

All my code for this project is located here on GitHub.

Write the Code

Let’s start by creating a ROS 2 node that declares four parameters: 

  • robot_name (string): Represents the name of the robot.
  • robot_id (integer): The unique ID number of the robot
  • target_linear_velocity (floating-point value): How fast we want the robot to move forward or sideways in meters per second.
  • target_angular_velocity (floating-point value): How fast we want the robot to rotate in radians per second.

This node will include a function that executes any time one of the parameters changes. The node will also publish velocity messages (geometry_msgs/msg/TwistStamped message) to the /mecanum_drive_controller/cmd_vel topic that has as inputs the target_linear_velocity (in the x and y direction) and target_angular_velocity (rotation around the z-axis) parameters. 

This publisher publishes a new velocity message at a rate of 2 Hz (two times per second), and the default velocity is 0 meters per second (for linear velocities) and 0 radians per second (for angular velocity).  

Because we are parameterizing the velocity values, you can change the linear and angular velocity parameters at runtime, and the values will automatically update.

Open a new terminal window, and type:

cd ~/ros2_ws/src/yahboom_rosmaster/yahboom_rosmaster_system_tests/src

Create a new file called mecanum_parameters_node.cpp.

Type the following code inside mecanum_parameters_node.cpp:

/**
 * @file mecanum_parameters_node.cpp
 * @brief This ROS 2 node demonstrates how to declare parameters and publish velocity messages.
 *
 * This program implements a ROS 2 node that declares parameters for a mecanum wheel robot 
 * and publishes velocity commands. It demonstrates parameter declaration, callback
 * registration for parameter changes, and publishing to the velocity topic.
 *
 * Subscription Topics:
 *   None
 *
 * Publishing Topics:
 *   /mecanum_drive_controller/cmd_vel (geometry_msgs/TwistStamped): Velocity command for the robot
 *   (linear.x, linear.y, and angular.z)
 *
 * Parameters:
 *   robot_name (string): The name of the robot
 *   robot_id (int): The unique ID number of the robot
 *   target_linear_velocity_x (double): Target linear velocity in x direction (m/s)
 *   target_linear_velocity_y (double): Target linear velocity in y direction (m/s)
 *   target_angular_velocity (double): Target angular velocity in radians per second
 *
 * @author Addison Sears-Collins
 * @date August 26, 2026
 */

#include <rclcpp/rclcpp.hpp>
#include <rcl_interfaces/msg/parameter_descriptor.hpp>
#include <rcl_interfaces/msg/set_parameters_result.hpp>
#include <geometry_msgs/msg/twist_stamped.hpp>

/**
 * @class MecanumParameters
 * @brief A ROS 2 node that demonstrates parameter handling and velocity publishing.
 */
class MecanumParameters : public rclcpp::Node
{
public:
  /**
   * @brief Constructor for the MecanumParameters node.
   *
   * Initializes the node, declares parameters, sets up parameter change callback,
   * and creates a publisher and timer for velocity messages.
   */
  MecanumParameters() : Node("mecanum_parameters_node")
  {
    // Describe parameters
    rcl_interfaces::msg::ParameterDescriptor robot_name_descriptor;
    robot_name_descriptor.description = "The name of the robot";
    rcl_interfaces::msg::ParameterDescriptor robot_id_descriptor;
    robot_id_descriptor.description = "The unique ID number of the robot";
    rcl_interfaces::msg::ParameterDescriptor target_linear_velocity_x_descriptor;
    target_linear_velocity_x_descriptor.description = "Target linear velocity in x direction (meters per second)";
    rcl_interfaces::msg::ParameterDescriptor target_linear_velocity_y_descriptor;
    target_linear_velocity_y_descriptor.description = "Target linear velocity in y direction (meters per second)";
    rcl_interfaces::msg::ParameterDescriptor target_angular_velocity_descriptor;
    target_angular_velocity_descriptor.description = "Target angular velocity in radians per second";

    // Declare parameters using declare_parameter()
    this->declare_parameter("robot_name", "Automatic Addison Bot", robot_name_descriptor);
    this->declare_parameter("robot_id", 1, robot_id_descriptor);
    this->declare_parameter("target_linear_velocity_x", 0.0, target_linear_velocity_x_descriptor);
    this->declare_parameter("target_linear_velocity_y", 0.0, target_linear_velocity_y_descriptor);
    this->declare_parameter("target_angular_velocity", 0.0, target_angular_velocity_descriptor);

    // Register a callback function for parameter changes using the newer method
    param_callback_handle_ = this->add_on_set_parameters_callback(
      std::bind(&MecanumParameters::parameter_change_callback, this, std::placeholders::_1));

    // Create a publisher for the /mecanum_drive_controller/cmd_vel topic
    velocity_publisher_ = this->create_publisher<geometry_msgs::msg::TwistStamped>("/mecanum_drive_controller/cmd_vel", 10);

    // Create a timer that will call the publish_velocity function every 0.5 seconds (2 Hz)
    timer_ = this->create_wall_timer(std::chrono::milliseconds(500), std::bind(&MecanumParameters::publish_velocity, this));
  }

private:
  /**
   * @brief Callback function for parameter changes.
   *
   * @param params A vector of rclcpp::Parameter objects representing the parameters that are
   *               being attempted to change.
   * @return rcl_interfaces::msg::SetParametersResult Object indicating whether the change was successful.
   */
  rcl_interfaces::msg::SetParametersResult parameter_change_callback(const std::vector<rclcpp::Parameter> & params)
  {
    rcl_interfaces::msg::SetParametersResult result;
    result.successful = true;

    for (const auto & param : params)
    {
      if (param.get_name() == "robot_name" && param.get_type() == rclcpp::ParameterType::PARAMETER_STRING)
      {
        RCLCPP_INFO(this->get_logger(), "Parameter robot_name has changed. The new value is: %s", param.as_string().c_str());
      }
      else if (param.get_name() == "robot_id" && param.get_type() == rclcpp::ParameterType::PARAMETER_INTEGER)
      {
        RCLCPP_INFO(this->get_logger(), "Parameter robot_id has changed. The new value is: %ld", param.as_int());  // Changed %d to %ld
      }
      else if (param.get_name() == "target_linear_velocity_x" && param.get_type() == rclcpp::ParameterType::PARAMETER_DOUBLE)
      {
        RCLCPP_INFO(this->get_logger(), "Parameter target_linear_velocity_x has changed. The new value is: %f", param.as_double());
      }
      else if (param.get_name() == "target_linear_velocity_y" && param.get_type() == rclcpp::ParameterType::PARAMETER_DOUBLE)
      {
        RCLCPP_INFO(this->get_logger(), "Parameter target_linear_velocity_y has changed. The new value is: %f", param.as_double());
      }
      else if (param.get_name() == "target_angular_velocity" && param.get_type() == rclcpp::ParameterType::PARAMETER_DOUBLE)
      {
        RCLCPP_INFO(this->get_logger(), "Parameter target_angular_velocity has changed. The new value is: %f", param.as_double());
      }
      else
      {
        result.successful = false;
        result.reason = "Unknown parameter: " + param.get_name();
        break;
      }
    }
    return result;
  }

  /**
   * @brief Publishes velocity messages to the /mecanum_drive_controller/cmd_vel topic.
   *
   * This function is called periodically by the timer to publish the current
   * target linear and angular velocities.
   */
  void publish_velocity()
  {
    double target_linear_velocity_x = this->get_parameter("target_linear_velocity_x").as_double();
    double target_linear_velocity_y = this->get_parameter("target_linear_velocity_y").as_double();
    double target_angular_velocity = this->get_parameter("target_angular_velocity").as_double();

    geometry_msgs::msg::TwistStamped velocity_msg;
    velocity_msg.header.stamp = this->get_clock()->now();
    velocity_msg.header.frame_id = "base_link";
    velocity_msg.twist.linear.x = target_linear_velocity_x;
    velocity_msg.twist.linear.y = target_linear_velocity_y;
    velocity_msg.twist.angular.z = target_angular_velocity;

    velocity_publisher_->publish(velocity_msg);
  }

  rclcpp::Publisher<geometry_msgs::msg::TwistStamped>::SharedPtr velocity_publisher_;  ///< Publisher for velocity commands
  rclcpp::TimerBase::SharedPtr timer_;  ///< Timer for periodic velocity publishing
  OnSetParametersCallbackHandle::SharedPtr param_callback_handle_;  ///< Handle for the parameter callback
};

/**
 * @brief Main function to start the ROS 2 node.
 *
 * Initializes ROS 2, creates an instance of the MecanumParameters node,
 * and keeps it running to process callbacks and publish messages.
 *
 * @param argc Number of command-line arguments.
 * @param argv Array of command-line argument strings.
 * @return int Return code (0 for normal exit).
 */
int main(int argc, char ** argv)
{
  rclcpp::init(argc, argv);
  auto mecanum_parameters_node = std::make_shared<MecanumParameters>();
  rclcpp::spin(mecanum_parameters_node);
  rclcpp::shutdown();
  return 0;
}

Save the file, and close it.

Edit package.xml

Now let’s modify our package.xml file to update the package dependencies. Type this:

cd ~/ros2_ws/src/yahboom_rosmaster/yahboom_rosmaster_system_tests/
gedit package.xml

Add this line in the dependencies section:

<depend>rcl_interfaces</depend>

Save the file, and close it.

Update CMakeLists.txt

Now we need to edit the CMakeLists.txt file. 

Open CMakeLists.txt, and make sure it looks like this:

Be sure to add the mecanum_parameters_node.cpp program.

cmake_minimum_required(VERSION 3.20)
project(yahboom_rosmaster_system_tests)

if(CMAKE_COMPILER_IS_GNUCXX OR CMAKE_CXX_COMPILER_ID MATCHES "Clang")
  add_compile_options(-Wall -Wextra -Wpedantic)
endif()

# find dependencies
find_package(ament_cmake REQUIRED)
find_package(rclcpp REQUIRED)
find_package(geometry_msgs REQUIRED)
find_package(std_msgs REQUIRED)
find_package(rcl_interfaces REQUIRED)

# Copy necessary files to designated locations in the project
install (
  DIRECTORY config launch
  DESTINATION share/${PROJECT_NAME}
)

# Add the square mecanum controller executable
add_executable(square_mecanum_controller
  src/square_mecanum_controller.cpp
)

# Add the mecanum parameters node executable
add_executable(mecanum_parameters_node
  src/mecanum_parameters_node.cpp
)

# Specify dependencies for the target
target_link_libraries(square_mecanum_controller
  ${rclcpp_TARGETS}
  ${geometry_msgs_TARGETS}
  ${std_msgs_TARGETS}
)

# Specify dependencies for the mecanum parameters node
target_link_libraries(mecanum_parameters_node
  ${rclcpp_TARGETS}
  ${geometry_msgs_TARGETS}
  ${std_msgs_TARGETS}
  ${rcl_interfaces_TARGETS}
)

# Install the executables
install(TARGETS
  square_mecanum_controller
  mecanum_parameters_node
  DESTINATION lib/${PROJECT_NAME}
)

if(BUILD_TESTING)
  find_package(ament_lint_auto REQUIRED)
  # the following line skips the linter which checks for copyrights
  # comment the line when a copyright and license is added to all source files
  set(ament_cmake_copyright_FOUND TRUE)
  # the following line skips cpplint (only works in a git repo)
  # comment the line when this package is in a git repo and when
  # a copyright and license is added to all source files
  set(ament_cmake_cpplint_FOUND TRUE)
  ament_lint_auto_find_test_dependencies()
endif()

ament_package()

Save the file, and close it.

Build the Workspace

Open a terminal window, and type:

cd ~/ros2_ws/
colcon build && source ~/.bashrc

Or you can type my alias:

build

Launch the Robot

Now let’s launch the mobile robot.

Open a terminal window, and type the following command:

x3 

or

bash ~/ros2_ws/src/yahboom_rosmaster/yahboom_rosmaster_bringup/scripts/rosmaster_x3_gazebo.sh

Run the node you created earlier. Open a new terminal and type:

ros2 run yahboom_rosmaster_system_tests mecanum_parameters_node

Now, press Enter.

Open a new terminal window.

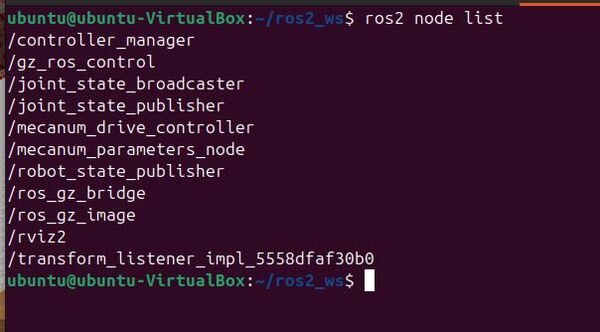
What are the currently active nodes?

ros2 node list
1-ros2-node-list

List all the parameters for all nodes in the ROS2 system.

ros2 param list

Retrieve the value of a specific parameter for a node.

ros2 param get /mecanum_parameters_node robot_name

String value is: Automatic Addison Bot

ros2 param get /mecanum_parameters_node robot_id

Integer value is: 1

ros2 param get /mecanum_parameters_node target_linear_velocity_x

Double value is: 0.0

ros2 param get /mecanum_parameters_node target_linear_velocity_y

Double value is: 0.0

ros2 param get /mecanum_parameters_node target_angular_velocity

Double value is: 0.0

Let’s change the name of the robot:

ros2 param set /mecanum_parameters_node robot_name "New Automatic Addison Bot"

Set parameter successful

Double check the new value:

ros2 param get /mecanum_parameters_node robot_name

String value is: New Automatic Addison Bot

Let’s make the robot rotate clockwise:

ros2 param set /mecanum_parameters_node target_angular_velocity -0.5
ros2 param get /mecanum_parameters_node target_angular_velocity

Double value is: -0.5

Now go back to the terminals where your scripts are running and press CTRL + C to stop the execution.

To clear the terminal window, type:

clear

Create Your Own YAML File to Set Parameters in a Launch File

Now we will create a YAML file containing our desired parameters. We will then import that YAML file into a launch file and launch the robot in Gazebo.

Create the Launch File

Go to this folder:

cd ~/ros2_ws/src/yahboom_rosmaster/yahboom_rosmaster_system_tests/
mkdir launch
cd launch

Create a new file called mecanum_parameters.launch.py.

Open a new terminal window, and type the following code:

#!/usr/bin/env python3
"""
Launch file for mecanum_parameters_node.

This launch file launches the mecanum_parameters_node with configurable parameters.

:author: Addison Sears-Collins
:date: August 26, 2026
"""

import os
from launch import LaunchDescription
from launch.actions import DeclareLaunchArgument
from launch.substitutions import LaunchConfiguration
from launch_ros.actions import Node
from launch_ros.substitutions import FindPackageShare


def generate_launch_description():
    """
    Generate a launch description for the mecanum_parameters_node.

    :return: A LaunchDescription object containing the actions to execute.
    :rtype: LaunchDescription
    """

    # Constants for paths to different files and folders
    package_name_system_tests = 'yahboom_rosmaster_system_tests'

    mecanum_params_path = 'config/mecanum_parameters.yaml'

    # Set the path to different files and folders
    pkg_share_system_tests = FindPackageShare(
        package=package_name_system_tests).find(package_name_system_tests)

    mecanum_params_path = os.path.join(pkg_share_system_tests, mecanum_params_path)

    # Launch configuration variables
    mecanum_params = LaunchConfiguration('mecanum_params')

    # Declare the launch arguments
    declare_mecanum_params_cmd = DeclareLaunchArgument(
        name='mecanum_params',
        default_value=mecanum_params_path,
        description='Full path to parameters for the parameters file.')

    # Launch the mecanum_parameters_node
    start_mecanum_parameters_node_cmd = Node(
        package=package_name_system_tests,
        executable='mecanum_parameters_node',
        parameters=[mecanum_params],
        output='screen')

    # Create the launch description and populate it
    ld = LaunchDescription()

    # Declare the launch options
    ld.add_action(declare_mecanum_params_cmd)

    # Add actions to the launch description
    ld.add_action(start_mecanum_parameters_node_cmd)

    return ld

Save the file, and close it.

Create the YAML File

Now let’s create the configuration file.

cd ~/ros2_ws/src/yahboom_rosmaster/yahboom_rosmaster_system_tests/
mkdir config
cd config

Create a new file called mecanum_parameters.yaml.

# Desired parameter values
/mecanum_parameters_node:
  ros__parameters:
    robot_name: "New Automatic Addison Bot"
    robot_id: 82
    target_linear_velocity_x: 0.0
    target_linear_velocity_y: 0.0
    target_angular_velocity: 0.23

Save the file, and close it.

Update CMakeLists.txt

Update your CMakeLists.txt with the new launch and config folders.

# Copy necessary files to designated locations in the project
install (
  DIRECTORY config launch
  DESTINATION share/${PROJECT_NAME}
)

Build the Workspace

Open a terminal window, and type:

build

(Note this “build” is my alias for “cd ~/ros2_ws/ && colcon build && source ~/.bashrc)

Launch the Robot Again

To launch the robot with the default parameter values, you can do this:

x3

In another terminal window, type:

ros2 launch yahboom_rosmaster_system_tests mecanum_parameters.launch.py

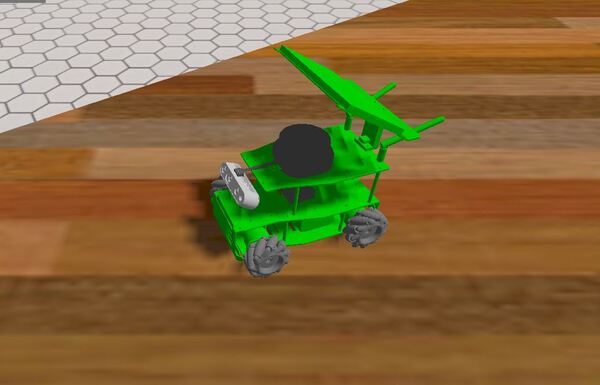
The robot should start to rotate counter-clockwise.

2-robot-rotate

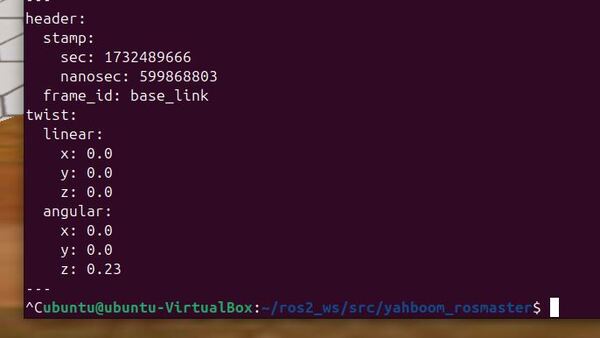
Let’s check the velocity values:

ros2 topic echo /mecanum_drive_controller/cmd_vel
3-check-velocity-values

Press CTRL + C to stop the robot.

That’s it! Keep building!
How to Simulate a Mobile Robot in Gazebo – ROS 2 Lyrical

In this tutorial, we will simulate and control a mobile robot in Gazebo. I will show you how to set up and control a mecanum wheel robot using ROS 2 Control and Gazebo

By the end of this tutorial, you will be able to build this:

gazebo-500-square-mecanum-controller

Prerequisites

All my code for this project is located here on GitHub.

Create Packages

Navigate to your workspace, and create the following packages. You can replace the maintainer-name and maintainer email with your own information.

cd ~/ros2_ws/src/yahboom_rosmaster/
ros2 pkg create --build-type ament_cmake \
                --license BSD-3-Clause \
                --maintainer-name ubuntu \
                --maintainer-email automaticaddison@todo.com \
                yahboom_rosmaster_bringup
ros2 pkg create --build-type ament_cmake \
                --license BSD-3-Clause \
                --maintainer-name ubuntu \
                --maintainer-email automaticaddison@todo.com \
               yahboom_rosmaster_gazebo
ros2 pkg create --build-type ament_cmake \
                --license BSD-3-Clause \
                --maintainer-name ubuntu \
                --maintainer-email automaticaddison@todo.com \
                yahboom_rosmaster_system_tests

Update the package.xml files for all packages, including the metapackage. Be sure to add a good description line for each.

You can also update the metapackage with the new packages you just created.

cd yahboom_rosmaster
gedit package.xml
<?xml version="1.0"?>
<?xml-model href="http://download.ros.org/schema/package_format3.xsd" schematypens="http://www.w3.org/2001/XMLSchema"?>
<package format="3">
  <name>yahboom_rosmaster</name>
  <version>0.0.0</version>
  <description>ROSMASTER series robots by Yahboom (metapackage).</description>
  <maintainer email="automaticaddison@todo.todo">ubuntu</maintainer>
  <license>BSD-3-Clause</license>

  <buildtool_depend>ament_cmake</buildtool_depend>

  <exec_depend>yahboom_rosmaster_bringup</exec_depend>
  <exec_depend>yahboom_rosmaster_description</exec_depend>
  <exec_depend>yahboom_rosmaster_gazebo</exec_depend>
  <exec_depend>yahboom_rosmaster_system_tests</exec_depend>

  <test_depend>ament_lint_auto</test_depend>
  <test_depend>ament_lint_common</test_depend>

  <export>
    <build_type>ament_cmake</build_type>
  </export>
</package>

Edit package.xml

Now let’s make sure some key packages are installed to handle the integration between ROS 2 and Gazebo. One important package is ros_gz. Here is the GitHub repository, and here are the official installation instructions. Let’s walk through this together.

Open a terminal window, and go to your package.xml folder inside the yahboom_rosmaster_gazebo package.

cd ~/ros2_ws/src/yahboom_rosmaster/yahboom_rosmaster_gazebo

Open the package.xml file.

Make sure it has this block:

<depend>controller_manager</depend>
<depend>gz_ros2_control</depend>
<depend>python3-numpy</depend>
<depend>rclcpp</depend>
<depend>ros_gz</depend>
<depend>ros_gz_bridge</depend>
<depend>ros_gz_image</depend>
<depend>ros_gz_sim</depend>
<depend>ros2_control</depend>
<depend>ros2_controllers</depend>
<depend>trajectory_msgs</depend>
<depend>xacro</depend>
<exec_depend>gz_ros2_control_demos</exec_depend>
<exec_depend>rqt_robot_steering</exec_depend>
<exec_depend>rviz_imu_plugin</exec_depend>

Edit CMakeLists.txt

Now open the CMakeLists.txt file, and add this block:

find_package(ament_cmake REQUIRED)
find_package(controller_manager REQUIRED)
find_package(gz_ros2_control REQUIRED)
find_package(rclcpp REQUIRED)
find_package(ros_gz REQUIRED)
find_package(ros_gz_bridge REQUIRED)
find_package(ros_gz_image REQUIRED)
find_package(ros_gz_sim REQUIRED)
find_package(ros2_control REQUIRED)
find_package(ros2_controllers REQUIRED)
find_package(trajectory_msgs REQUIRED)
find_package(xacro REQUIRED)

Build the Workspace

Now let’s build our workspace.

cd ~/ros2_ws/
rosdep install -i --from-path src --rosdistro $ROS_DISTRO -y
colcon build && source ~/.bashrc

Open a terminal window, and type:

echo "alias build='cd ~/ros2_ws/ && colcon build && source ~/.bashrc'" >> ~/.bashrc

Now going forward, any time you want to build you workspace, just type:

build

Test Your Installation

Let’s test to see if Gazebo and ROS 2 Control are working properly:

ros2 launch gz_ros2_control_demos diff_drive_example.launch.py

To move the robot from the terminal window, you can type:

ros2 topic pub /diff_drive_base_controller/cmd_vel geometry_msgs/msg/TwistStamped "{header: {stamp: now, frame_id: 'base_link'}, twist: {linear: {x: 0.2, y: 0.0, z: 0.0}, angular: {x: 0.0, y: 0.0, z: 0.5}}}" --rate 5

To stop the robot:

CTRL + C

ros2 topic pub /diff_drive_base_controller/cmd_vel geometry_msgs/msg/TwistStamped "{header: {stamp: now, frame_id: 'base_link'}, twist: {linear: {x: 0.0, y: 0.0, z: 0.0}, angular: {x: 0.0, y: 0.0, z: 0.0}}}" --rate 5

Create World Files

Now we will create an environment for our simulated robot.

Open a terminal window, and type:

cd ~/ros2_ws/src/yahboom_rosmaster/yahboom_rosmaster_gazebo/

Create a worlds folder and other folders we will need later:

mkdir -p worlds launch models

Now let’s create our world. The first world we will create is an empty world.

cd worlds
gedit empty.world

Add this code.

Save the file, and close it.

Now launch your Gazebo world:

cd ~/ros2_ws/src/mycobot_ros2/mycobot_gazebo/worlds/
gz sim empty.world

Press CTRL + C to close everything.

Now let’s create a world called pick_and_place_demo.world.

gedit pick_and_place_demo.world

Add this code.

Now let’s create a world called house.world.

gedit house.world

Add this code.

Save the file, and close it.

Now let’s create a world called cafe.world.

gedit cafe.world

Add this code.

Save the file, and close it.

Add all these models to your models folder. 

Create a Mecanum Drive Controller

We need to create a controller for a mobile robot with mecanum omnidirectional wheels since none exists in the official ros2_controllers package. The official instructions for creating a new controller are on this page. We will adapt these instructions to your use case.

Create a Package

cd ~/ros2_ws/src/yahboom_rosmaster/
ros2 pkg create --build-type ament_cmake \
                --license BSD-3-Clause \
                --maintainer-name ubuntu \
                --maintainer-email automaticaddison@todo.com \
                mecanum_drive_controller

Now let’s prepare our source files. Move into the new package directory and create the necessary folders:

cd mecanum_drive_controller
mkdir -p test config

Prepare Files

Let’s create the header files:

touch include/mecanum_drive_controller/mecanum_drive_controller.hpp
touch include/mecanum_drive_controller/odometry.hpp
touch include/mecanum_drive_controller/speed_limiter.hpp
touch include/mecanum_drive_controller/visibility_control.h

Next, create the source files we need to implement:

touch src/mecanum_drive_controller.cpp
touch src/mecanum_drive_controller_parameter.yaml
touch src/odometry.cpp
touch src/speed_limiter.cpp

Create the test files we need to create:

mkdir -p test/config/
touch test/config/test_mecanum_drive_controller.yaml
touch test/test_mecanum_drive_controller.cpp
touch test/test_load_mecanum_drive_controller.cpp

Create other files we need to implement:

touch mecanum_drive_plugin.xml

Add Declarations into the Header File

Open mecanum_drive_controller.hpp inside the include/mecanum_drive_controller folder.

Add this code.

Save the file, and close it.

Open odometry.hpp inside the include/mecanum_drive_controller folder.

Add this code.

Save the file, and close it.

Open speed_limiter.hpp inside the include/mecanum_drive_controller folder.

Add this code.

Save the file, and close it.

Open visibility_control.h inside the include/mecanum_drive_controller folder.

Add this code.

Save the file, and close it.

Mecanum Wheel Forward and Inverse Kinematics

Before we write our source code, let’s dive into the mathematics that make omnidirectional movement possible. This foundation will be important when we implement our controller in the next section.

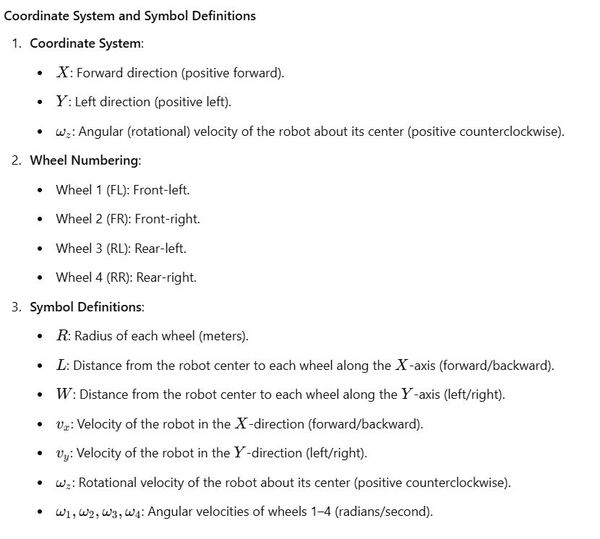
1-mecanum-wheel-symbol-definitions

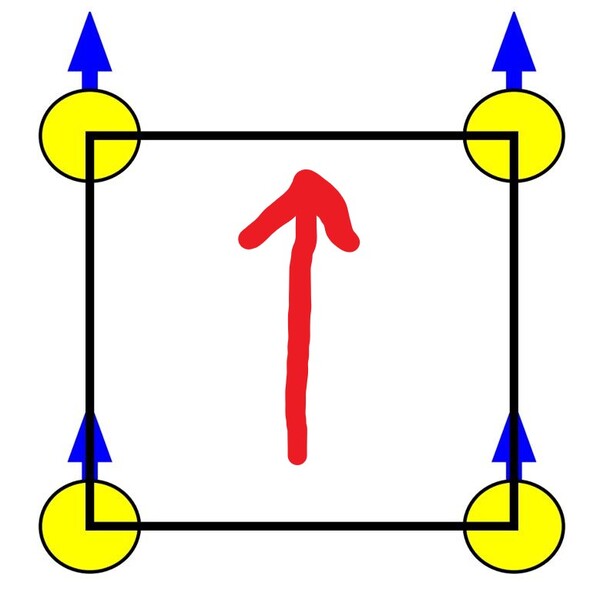
The coordinate system for our robot follows ROS 2 conventions. The base frame’s X-axis points forward, Y-axis points left, and rotations follow the right-hand rule with positive counterclockwise rotation. We number our wheels starting from the front-left as Wheel 1 (FL), moving clockwise to Wheel 2 (FR), Wheel 3 (RL), and Wheel 4 (RR).

Understanding Wheel Rotation Direction

Before diving into the kinematics equations, we need to understand how wheel rotations are defined in our system. 

Each wheel’s rotation axis aligns with its positive y-axis, which runs parallel to the robot base’s y-axis. You can see this in the mecanum_wheel.urdf.xacro file. A positive wheel velocity value indicates counterclockwise rotation when viewed down this y-axis (imagine looking at the wheel from its side with the y-axis pointing towards you).

This convention has practical implications. For example, when commanding the robot to move forward, each wheel rotates counterclockwise around its y-axis, creating a positive velocity value. Think of the wheel’s 2D plane (formed by its positive z and x axes) rotating counterclockwise around the y-axis. This coordinated motion drives the robot base forward.

Forward Kinematics: From Wheel Speeds to Robot Motion

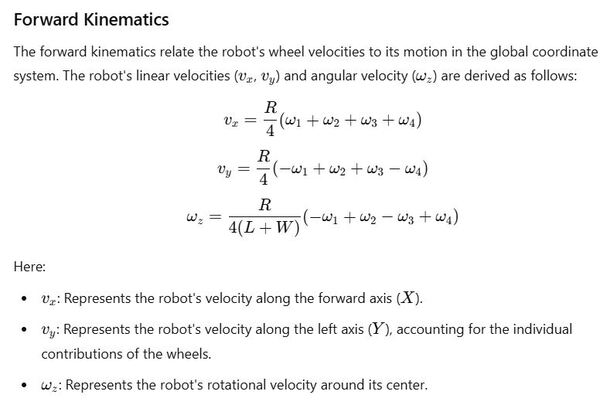
2-mecanum-wheel-forward-kinematics

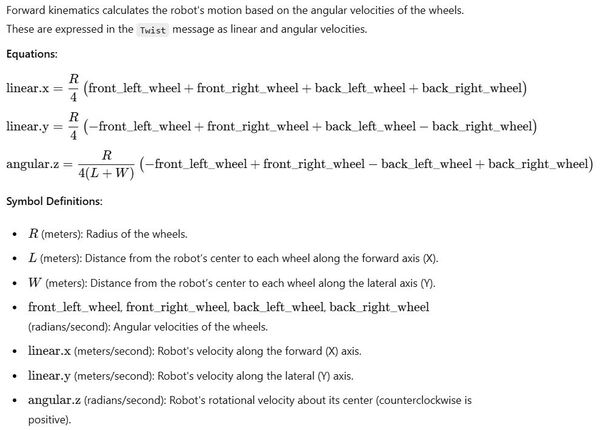
The forward kinematics equations tell us how individual wheel velocities combine to create the robot’s overall motion. These equations are particularly useful when we need to estimate the robot’s actual movement based on wheel encoder feedback.

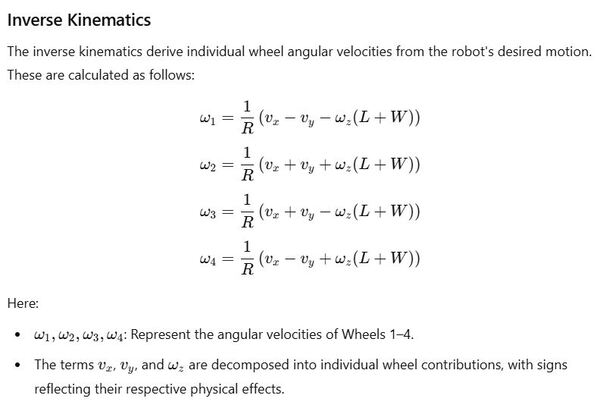
Looking at the equations, we can see how each wheel contributes to the robot’s linear velocities (vx and vy) and angular velocity (ωz). The wheel radius R scales the contribution of each wheel’s angular velocity (ω1 through ω4).

Inverse Kinematics for Motion Control

3-mecanum-wheel-inverse-kinematics

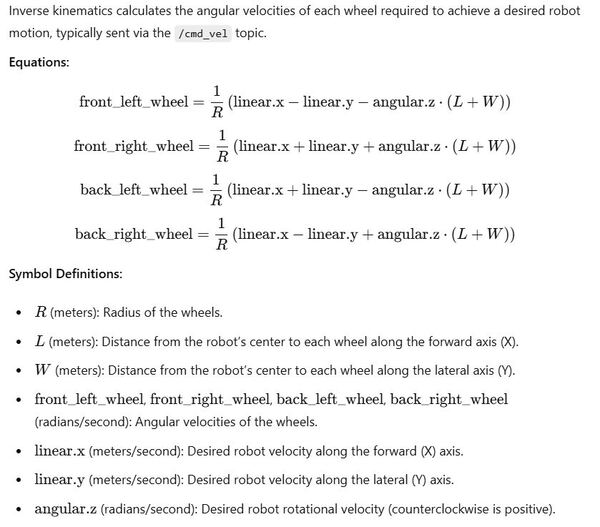
In our ROS 2 controller, we’ll primarily use inverse kinematics. These equations help us calculate the required wheel velocities to achieve desired robot motion. When we receive velocity commands (typically from the /cmd_vel topic), we’ll use these equations to determine appropriate wheel speeds.

The inverse kinematics equations consider:

  • The robot’s desired linear velocities (vx and vy)
  • The desired angular velocity (ωz)
  • The robot’s physical dimensions (L and W)
  • The wheel radius (R)

In our mecanum drive controller we transform velocity commands into actual wheel motions. We also handle odometry feedback using the forward kinematics equations to provide accurate motion estimation of the full robot.

Mecanum Wheel Kinematics in ROS 2: Translating Equations into Code

Now that we understand the mathematics behind forward and inverse kinematics, let’s map these equations to ROS 2 concepts. This step bridges the gap between theory and implementation, ensuring a smooth transition into developing a functional mecanum drive controller.

Forward Kinematics in ROS 2

4-forward-kinematics-mecanum-wheel

These equations estimate the robot’s motion based on wheel encoder feedback, providing odometry as linear and angular velocities in meters per second and radians per second.

Inverse Kinematics in ROS 2

5-inverse-kinematics-mecanum-wheel

These equations allow us to translate velocity commands into individual wheel speeds.

Create Source Files

Now let’s create the source files.

cd ~/ros2_ws/src/yahboom_rosmaster/mecanum_drive_controller/

Open speed_limiter.cpp inside the src folder.

Add this code.

Save the file, and close it.

Open mecanum_drive_controller_parameter.yaml inside the src folder.

Add this code.

Save the file, and close it.

Open odometry.cpp inside the src folder.

Add this code.

Save the file, and close it.

Open mecanum_drive_controller.cpp inside the src folder.

Add this code.

Save the file, and close it.

Write Export Definition for Pluginlib

Now we need to create the pluginlib XML file in the package root.

cd ~/ros2_ws/src/yahboom_rosmaster/mecanum_drive_controller/

Open mecanum_drive_plugin.xml

Add this code.

Save the file, and close it.

Write a Test to Check if the Controller Can Be Found and Loaded

Now we are going to write tests to confirm the controller can be found and loaded.

cd ~/ros2_ws/src/yahboom_rosmaster/mecanum_drive_controller/test

Open test_mecanum_drive_controller.yaml.

Add this code.

Save the file, and close it.

We are not going to use this yaml file. I just put it there as a reference to list all the available parameters for this controller.

Now let’s write the code to test if the mecanum drive controller can be loaded into the ROS 2 Control framework.

Open test_load_mecanum_drive_controller.cpp.

Add this code.

Save the file, and close it.

Add Dependencies into package.xml File

Now we need to update our package dependencies.

cd ~/ros2_ws/src/yahboom_rosmaster/mecanum_drive_controller/

Open the package.xml file.

Add this code.

Save the file, and close it.

Add Compile Directives into the CMakeLists.txt File

Now we need to update our CMakeLists.txt file.

cd ~/ros2_ws/src/yahboom_rosmaster/mecanum_drive_controller/

Open the CMakeLists.txt file.

Add this code.

Save the file, and close it.

Compile and Test the Controller

Let’s build our package to make sure everything is set up correctly:

cd ~/ros2_ws
rosdep install --from-paths src --ignore-src -r -y
colcon build --packages-select mecanum_drive_controller
source ~/.bashrc

Finally, let’s run the tests to ensure our controller can be found and loaded:

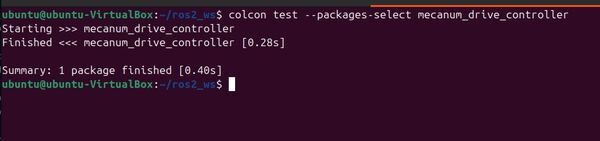
colcon test --packages-select mecanum_drive_controller
6-mecanum-controller-build-and-loaded

OR (for detailed output)

colcon test --packages-select mecanum_drive_controller --event-handlers console_direct+

You can also see your new controller if you type:

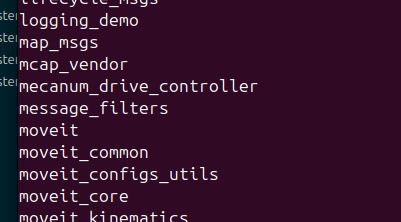
ros2 pkg list
7-ros2-mecanum-drive-controller

Connect Gazebo to ROS 2 Control 

Create a YAML Configuration File for the Controller Manager

After setting up our simulation environment in Gazebo, we need to tell ROS 2 Control how to manage our robot’s movements in this virtual world. Let’s create a configuration file that defines how our robot’s wheels should be controlled.

Open a terminal window, and type:

cd ~/ros2_ws/src/yahboom_rosmaster/yahboom_rosmaster_description/
mkdir -p config/rosmaster_x3/

Create a new file inside the config/rosmaster_x3 directory called:

ros2_controllers.yaml

Add this code:

# controller_manager provides the necessary infrastructure to manage multiple controllers
# efficiently and robustly using ROS 2 Control.
controller_manager:
 ros__parameters:
   update_rate: 50  # Hz

   # Declare the controllers
   joint_state_broadcaster:
     type: joint_state_broadcaster/JointStateBroadcaster

   mecanum_drive_controller:
     type: mecanum_drive_controller/MecanumDriveController

# Parameters for the mecanum drive controller
mecanum_drive_controller:
 ros__parameters:
   # Joint names
   front_left_joint_name: front_left_wheel_joint
   front_right_joint_name: front_right_wheel_joint
   back_left_joint_name: back_left_wheel_joint
   back_right_joint_name: back_right_wheel_joint

   # Robot physical parameters
   wheel_base: 0.16
   wheel_separation: 0.169
   wheel_radius: 0.0325
   wheel_separation_multiplier: 1.0
   front_left_wheel_radius_multiplier: 1.0
   front_right_wheel_radius_multiplier: 1.0
   back_left_wheel_radius_multiplier: 1.0
   back_right_wheel_radius_multiplier: 1.0

   # TF configuration
   tf_frame_prefix_enable: false
   tf_frame_prefix: ""
   odom_frame_id: odom
   base_frame_id: base_footprint

   # Odometry parameters
   pose_covariance_diagonal: [0.0, 0.0, 0.0, 0.0, 0.0, 0.0]
   twist_covariance_diagonal: [0.0, 0.0, 0.0, 0.0, 0.0, 0.0]
   position_feedback: true
   open_loop: true
   enable_odom_tf: true

   # Command handling
   cmd_vel_timeout: 0.5
   publish_limited_velocity: false
   velocity_rolling_window_size: 10
   publish_rate: 50.0

   # Velocity limits
   linear.x.has_velocity_limits: false
   linear.x.has_acceleration_limits: false
   linear.x.has_jerk_limits: false
   linear.x.max_velocity: 0.0
   linear.x.min_velocity: 0.0
   linear.x.max_acceleration: 0.0
   linear.x.max_jerk: 0.0
   linear.x.min_jerk: 0.0
   linear.y.has_velocity_limits: false
   linear.y.has_acceleration_limits: false
   linear.y.has_jerk_limits: false
   linear.y.max_velocity: 0.0
   linear.y.min_velocity: 0.0
   linear.y.max_acceleration: 0.0
   linear.y.max_jerk: 0.0
   linear.y.min_jerk: 0.0
   angular.z.has_velocity_limits: false
   angular.z.has_acceleration_limits: false
   angular.z.has_jerk_limits: false
   angular.z.max_velocity: 0.0
   angular.z.min_velocity: 0.0
   angular.z.max_acceleration: 0.0
   angular.z.min_acceleration: 0.0
   angular.z.max_jerk: 0.0
   angular.z.min_jerk: 0.0

Save the file, and close it.

Create a new file inside the config/rosmaster_x3 directory called:

ros2_controllers_template.yaml

Add this code, and save the file.

This file will help us substitute a prefix should we desire.

Update CMakeLists.txt with the new config folder.

Update yahboom_rosmaster_desciption/launch/robot_state_publisher.py with the relevant part to handle the finding and replacing.

cd ~/ros2_ws/src/yahboom_rosmaster/yahboom_rosmaster_description/launch

Save the file, and close it.

Create the XACRO/URDF Files

Next, we need to add three essential XACRO/URDF files that bridge Gazebo simulation with ROS 2 Control. These files work alongside your controller configuration YAML file to create a complete control system.

gazebo_sim_ros2_control.urdf.xacro

Open a terminal window.

Type the following command:

cd ~/ros2_ws/src/yahboom_rosmaster/yahboom_rosmaster_description/urdf/
mkdir control

Create the file named:

gazebo_sim_ros2_control.urdf.xacro

Add this code.

Save the file, and close it.

rosmaster_x3_ros2_control.urdf.xacro:

Open a terminal window.

Type the following command:

cd ~/ros2_ws/src/yahboom_rosmaster/yahboom_rosmaster_description/urdf/control

Create the file named:

rosmaster_x3_ros2_control.urdf.xacro

Add this code.

Save the file, and close it.

velocity_control_plugin.urdf.xacro

One more file to add. Add this one. This plugin is used to send velocity commands to the robot.

<?xml version="1.0"?>
<robot xmlns:xacro="http://www.ros.org/wiki/xacro">
    <xacro:macro name="load_velocity_control_plugin" params="use_gazebo">
        <xacro:if value="${use_gazebo}">
            <gazebo>
                <plugin
                    filename="gz-sim-velocity-control-system"
                    name="gz::sim::systems::VelocityControl">
                    <topic>mecanum_drive_controller/cmd_vel</topic>
                    <initial_linear>0 0 0</initial_linear>
                    <initial_angular>0 0 0</initial_angular>
                </plugin>
            </gazebo>
        </xacro:if>
    </xacro:macro>
</robot>

Include the Files in rosmaster_x3.urdf.xacro

Next we need to include these files inside rosmaster_x3.urdf.xacro. 

cd ~/ros2_ws/src/yahboom_rosmaster/yahboom_rosmaster_description/urdf/robots/

Open the rosmaster_x3_urdf.xacro file.

Add this code at the end before the </robot> tag:

     <xacro:include filename="$(find yahboom_rosmaster_description)/urdf/control/gazebo_sim_ros2_control.urdf.xacro" />
      <xacro:load_gazebo_sim_ros2_control_plugin
        robot_name="$(arg robot_name)"
        use_gazebo="$(arg use_gazebo)"/>

      <xacro:include filename="$(find yahboom_rosmaster_description)/urdf/control/rosmaster_x3_ros2_control.urdf.xacro" />
      <xacro:yahboom_rosmaster_ros2_control
        prefix="$(arg prefix)"
        use_gazebo="$(arg use_gazebo)"/>

Save the file, and close it.

Create the Launch Files

Now let’s create the launch files.

load_ros2_controllers.launch.py

cd  ~/ros2_ws/src/yahboom_rosmaster/yahboom_rosmaster_bringup/
mkdir launch
cd launch

Add this code called load_ros2_controllers.launch.py:

#!/usr/bin/env python3
"""
Launch ROS 2 controllers for the mecanum wheel robot.

This script creates a launch description that starts the necessary controllers
for operating the mecanum wheel robot in a specific sequence.

Launched Controllers:
    1. Joint State Broadcaster: Publishes joint states to /joint_states
    2. Mecanum Drive Controller: Controls the robot's mecanum drive movements via ~/cmd_vel

:author: Addison Sears-Collins
:date: November 20, 2024
"""

from launch import LaunchDescription
import os
from pathlib import Path

from launch.actions import RegisterEventHandler, TimerAction
from launch.event_handlers import OnProcessExit
from launch_ros.actions import Node


def generate_launch_description():
    """Generate a launch description for sequentially starting robot controllers.

    The function creates a launch sequence that ensures controllers are started
    in the correct order.

    Returns:
        LaunchDescription: Launch description containing sequenced controller starts
    """

    # The controllers read their settings from this file. We hand it to each
    # spawner directly, because the controllers do not pick it up on their own.
    controllers_file = os.path.join(
        str(Path.home()),
        'ros2_ws/install/yahboom_rosmaster_description/share',
        'yahboom_rosmaster_description/config/rosmaster_x3/ros2_controllers.yaml')
    # Start mecanum drive controller
    start_mecanum_drive_controller_cmd = Node(
        package='controller_manager',
        executable='spawner',
        arguments=['mecanum_drive_controller', '--param-file', controllers_file],
        output='screen'
    )

    # Start joint state broadcaster
    start_joint_state_broadcaster_cmd = Node(
        package='controller_manager',
        executable='spawner',
        arguments=['joint_state_broadcaster', '--param-file', controllers_file],
        output='screen'
    )

    # Add delay to joint state broadcaster (if necessary)
    delayed_start = TimerAction(
        period=25.0,
        actions=[start_joint_state_broadcaster_cmd]
    )

    # Register event handler for sequencing
    load_joint_state_broadcaster_cmd = RegisterEventHandler(
        event_handler=OnProcessExit(
            target_action=start_joint_state_broadcaster_cmd,
            on_exit=[start_mecanum_drive_controller_cmd]))

    # Create and populate the launch description
    ld = LaunchDescription()

    # Add the actions to the launch description in sequence
    ld.add_action(delayed_start)
    ld.add_action(load_joint_state_broadcaster_cmd)

    return ld

Save the file, and close it.

Update CMakeLists.txt for the yahboom_rosmaster_bringup package to include the new launch folder. Make sure the block below, looks like this:

# Copy necessary files to designated locations in the project
install (
  DIRECTORY launch
  DESTINATION share/${PROJECT_NAME}
)

Create YAML File for ROS 2 Bridge

We now need to create a YAML file that bridges between ROS 2 and Gazebo topics. This file will specify how sensor data (camera info, point clouds, IMU data, and LIDAR data) should be translated between the Gazebo simulation environment and the ROS 2 ecosystem. The configuration ensures that simulated sensor data can be used by ROS 2 nodes for perception and planning tasks.

cd ~/ros2_ws/src/yahboom_rosmaster/yahboom_rosmaster_gazebo/
mkdir config

Update CMakeLists.txt with the new config folder.

# Copy necessary files to designated locations in the project
install (
  DIRECTORY config
  DESTINATION share/${PROJECT_NAME}
)

Create a file called ros_gz_bridge.yaml inside the config folder.

Add this code.

# RGBD Camera topics
- ros_topic_name: "cam_1/color/camera_info"
  gz_topic_name: "cam_1/camera_info"
  ros_type_name: "sensor_msgs/msg/CameraInfo"
  gz_type_name: "gz.msgs.CameraInfo"
  direction: GZ_TO_ROS
  lazy: true # Determines whether connections are created immediately at startup (when false) or only when data is actually requested by a subscriber (when true), helping to conserve system resources at the cost of potential initial delays in data flow.

- ros_topic_name: "cam_1/depth/color/points"
  gz_topic_name: "cam_1/points"
  ros_type_name: "sensor_msgs/msg/PointCloud2"
  gz_type_name: "gz.msgs.PointCloudPacked"
  direction: GZ_TO_ROS
  lazy: true

  # LIDAR configuration
- ros_topic_name: "scan"
  gz_topic_name: "scan"
  ros_type_name: "sensor_msgs/msg/LaserScan"
  gz_type_name: "gz.msgs.LaserScan"
  direction: GZ_TO_ROS
  lazy: false

# IMU configuration
- ros_topic_name: "imu/data"
  gz_topic_name: "imu/data"
  ros_type_name: "sensor_msgs/msg/Imu"
  gz_type_name: "gz.msgs.IMU"
  direction: GZ_TO_ROS
  lazy: false

# Sending velocity commands from ROS 2 to Gazebo
- ros_topic_name: "mecanum_drive_controller/cmd_vel"
  gz_topic_name: "mecanum_drive_controller/cmd_vel"
  ros_type_name: "geometry_msgs/msg/TwistStamped"
  gz_type_name: "gz.msgs.Twist"
  direction: ROS_TO_GZ
  lazy: false

Save the file, and close it.

Create an RViz configuration file.

cd ~/ros2_ws/src/yahboom_rosmaster/yahboom_rosmaster_gazebo/
mkdir rviz

Add this file to the rviz folder: yahboom_rosmaster_gazebo_sim.rviz.

Update CMakeLists.txt

Go to the CMakeLists.txt.

cd ~/ros2_ws/src/yahboom_rosmaster/yahboom_rosmaster_gazebo/

Make sure it has this block of code:

# Copy necessary files to designated locations in the project
install (
  DIRECTORY launch models worlds rviz
  DESTINATION share/${PROJECT_NAME}
)
gedit CMakeLists.txt

Save the file, and close it.

yahboom_rosmaster.gazebo.launch.py

cd ~/ros2_ws/src/yahboom_rosmaster/yahboom_rosmaster_gazebo/launch

Create a new file called yahboom_rosmaster.gazebo.launch.py.

Add this code.

Save the file, and close it.

Create a Bash Script for Quick Launching

Create a bash script to launch multiple launch files:

cd  ~/ros2_ws/src/yahboom_rosmaster/yahboom_rosmaster_bringup/
mkdir scripts
Add a bash file called: rosmaster_x3_gazebo.sh.

Add this code.

Save the file, and close it.

Make it executable.

sudo chmod +x rosmaster_x3_gazebo.sh

I will add an alias for quick launch:

echo "alias x3='bash ~/ros2_ws/src/yahboom_rosmaster/yahboom_rosmaster_bringup/scripts/rosmaster_x3_gazebo.sh'" >> ~/.bashrc && source ~/.bashrc

Make sure to update CMakeLists.txt for the yahboom_rosmaster_bringup folder.

Build the Workspace

Now let’s build the package. Open a terminal window, and type:

build

Launch Everything and Move the Robot

Now let’s launch everything.

Open a terminal window, and type the following command:

x3

or

bash ~/ros2_ws/src/yahboom_rosmaster/yahboom_rosmaster_bringup/scripts/rosmaster_x3_gazebo.sh

To change the default camera view in Gazebo, we will need to use the /gui/move_to/pose service (found via gz service -l):

gz service -s /gui/move_to/pose --reqtype gz.msgs.GUICamera --reptype gz.msgs.Boolean --timeout 2000 --req "pose: {position: {x: 0.0, y: -2.0, z: 2.0} orientation: {x: -0.2706, y: 0.2706, z: 0.6533, w: 0.6533}}"

I added this command directly to the bash startup script.

Be patient. It can take up to 60 seconds to load everything.

9-gazebo-rviz-simulation-twin

To move the robot, type this:

ros2 topic pub /mecanum_drive_controller/cmd_vel geometry_msgs/msg/TwistStamped "{header: {stamp: {sec: $(date +%s), nanosec: 0}, frame_id: ''}, twist: {linear: {x: 0.0, y: 0.1, z: 0.0}, angular: {x: 0.0, y: 0.0, z: 0.0}}}"

Press CTRL + C.

Now stop the robot:

ros2 topic pub /mecanum_drive_controller/cmd_vel geometry_msgs/msg/TwistStamped "{header: {stamp: {sec: $(date +%s), nanosec: 0}, frame_id: ''}, twist: {linear: {x: 0.0, y: 0.0, z: 0.0}, angular: {x: 0.0, y: 0.0, z: 0.0}}}"

Here is the output using the empty.world file.

8-mecanum-wheel-robot-gazebo-ros2-simulation

To see a list of active topics, type:

ros2 topic list
10-ros2-topics

To see a list of active topics, type:

gz topic -l
11-gz-topics

To see the options, you can type:

gz topic --help

See the active controllers:

ros2 control list_controllers
12-active-controllers

To get more information, type:

ros2 control list_controllers -v
13-list-controllers

Let’s see the information coming across some of the ROS 2 topics.

ros2 topic echo /mecanum_drive_controller/cmd_vel displays the velocity commands sent to the robot, telling it how fast and in which direction to move.

ros2 topic echo /joint_states shows the current positions (in radians) and velocities (in radians per second) of the robot’s wheels.

ros2 topic echo/mecanum_drive_controller/odom provides information about the robot’s estimated position, orientation, linear, and angular velocity based on wheel rotation data.

ros2 topic echo /imu/data outputs readings from the robot’s inertial measurement unit (IMU), which includes data about angular velocity and linear acceleration.

ros2 topic echo /scan displays data from the robot’s laser scanner or LiDAR, providing information about the distances to obstacles in the environment.

You can see the /scan data, if you go to RViz, and click the Add button in the Displays panel on the left.

14-click-add

Click the “By topic” tab, and scroll down to LaserScan. Click on that, and click OK to add it.

15-click-scan

You can see the LIDAR scan data.

16-scans

Here is what things look like when launching the robot in pick_and_place_demo.world. You can see how the scans match with the objects in the environment.

17-scans

To see the frequency of publishing, type:

ros2 topic hz /scan

To get information about this topic, type:

ros2 topic info /scan

I also recommend checking out /cam_1/color/image_raw in RViz to see if the camera transformation for the cam_1_depth_optical_frame is oriented correctly. Compare Gazebo (on the left) to what the camera is actually seeing in ROS 2 (on the right).

17-color-image-raw

Click the “By topic” tab.

Click /cam_1 -> /depth -> /color -> /points -> PointCloud2 so you can see the point cloud in RViz.

While the point cloud data shows perfectly fine in my robotic arm applications with Gazebo and RViz, I had big time rendering issues when trying to get it to display in RViz. You can see these issues in the image below. I suspect it is related to the amount of memory on my virtual machine given all the sensor data that is flowing through from Gazebo to ROS 2.

18-rendering-issues-point-cloud-gazebo

If you want to move the robot forward, type this:

forward-motion
ros2 topic pub /mecanum_drive_controller/cmd_vel geometry_msgs/msg/TwistStamped "{
  header: {
    stamp: {sec: `date +%s`, nanosec: 0},
    frame_id: ''
  },
  twist: {
    linear: {
      x: 0.05,
      y: 0.0,
      z: 0.0
    },
    angular: {
      x: 0.0,
      y: 0.0,
      z: 0.0
    }
  }
}"

If you want to move the robot backward, type this:

backward_motion

ros2 topic pub /mecanum_drive_controller/cmd_vel geometry_msgs/msg/TwistStamped "{
  header: {
    stamp: {sec: `date +%s`, nanosec: 0},
    frame_id: ''
  },
  twist: {
    linear: {
      x: -0.05,
      y: 0.0,
      z: 0.0
    },
    angular: {
      x: 0.0,
      y: 0.0,
      z: 0.0
    }
  }
}"

If you want to move the robot to the left, type this:

left-motion
ros2 topic pub /mecanum_drive_controller/cmd_vel geometry_msgs/msg/TwistStamped "{
  header: {
    stamp: {sec: `date +%s`, nanosec: 0},
    frame_id: ''
  },
  twist: {
    linear: {
      x: 0.0,
      y: 0.05,
      z: 0.0
    },
    angular: {
      x: 0.0,
      y: 0.0,
      z: 0.0
    }
  }
}"

If you want to move the robot to the right, type this:

right-motion
ros2 topic pub /mecanum_drive_controller/cmd_vel geometry_msgs/msg/TwistStamped "{
  header: {
    stamp: {sec: `date +%s`, nanosec: 0},
    frame_id: ''
  },
  twist: {
    linear: {
      x: 0.0,
      y: -0.05,
      z: 0.0
    },
    angular: {
      x: 0.0,
      y: 0.0,
      z: 0.0
    }
  }
}"

If you want to rotate the robot in place clockwise, type this:

clockwise-negative-rotation-in-place
ros2 topic pub /mecanum_drive_controller/cmd_vel geometry_msgs/msg/TwistStamped "{
  header: {
    stamp: {sec: `date +%s`, nanosec: 0},
    frame_id: ''
  },
  twist: {
    linear: {
      x: 0.0,
      y: 0.0,
      z: 0.0
    },
    angular: {
      x: 0.0,
      y: 0.0,
      z: -0.4
    }
  }
}"

Counter-clockwise:

counter-clockwise-positive-rotation-in-place
ros2 topic pub /mecanum_drive_controller/cmd_vel geometry_msgs/msg/TwistStamped "{
  header: {
    stamp: {sec: `date +%s`, nanosec: 0},
    frame_id: ''
  },
  twist: {
    linear: {
      x: 0.0,
      y: 0.0,
      z: 0.0
    },
    angular: {
      x: 0.0,
      y: 0.0,
      z: 0.4
    }
  }
}"

Diagonal forward-left:

front-left-diagonal
ros2 topic pub /mecanum_drive_controller/cmd_vel geometry_msgs/msg/TwistStamped "{
  header: {
    stamp: {sec: `date +%s`, nanosec: 0},
    frame_id: ''
  },
  twist: {
    linear: {
      x: 0.05,
      y: 0.05,
      z: 0.0
    },
    angular: {
      x: 0.0,
      y: 0.0,
      z: 0.0
    }
  }
}"

Diagonal forward-right:

front-right-diagonal
ros2 topic pub /mecanum_drive_controller/cmd_vel geometry_msgs/msg/TwistStamped "{
  header: {
    stamp: {sec: `date +%s`, nanosec: 0},
    frame_id: ''
  },
  twist: {
    linear: {
      x: 0.05,
      y: -0.05,
      z: 0.0
    },
    angular: {
      x: 0.0,
      y: 0.0,
      z: 0.0
    }
  }
}"

Diagonal backward left:

back-left-diagonal
ros2 topic pub /mecanum_drive_controller/cmd_vel geometry_msgs/msg/TwistStamped "{
  header: {
    stamp: {sec: `date +%s`, nanosec: 0},
    frame_id: ''
  },
  twist: {
    linear: {
      x: -0.05,
      y: 0.05,
      z: 0.0
    },
    angular: {
      x: 0.0,
      y: 0.0,
      z: 0.0
    }
  }
}"

Diagonal backward-right:

back-right-diagonal
ros2 topic pub /mecanum_drive_controller/cmd_vel geometry_msgs/msg/TwistStamped "{
  header: {
    stamp: {sec: `date +%s`, nanosec: 0},
    frame_id: ''
  },
  twist: {
    linear: {
      x: -0.05,
      y: -0.05,
      z: 0.0
    },
    angular: {
      x: 0.0,
      y: 0.0,
      z: 0.0
    }
  }
}"

Press CTRL + C to close everything out.

Control the Robot with Code

Let’s create a ROS 2 node that can make the robot move repeatedly in a square pattern. 

Let’s start by creating a program.

cd ~/ros2_ws/src/yahboom_rosmaster/yahboom_rosmaster_system_tests/src

Add a file called square_mecanum_controller.cpp.

/**
 * @file square_mecanum_controller.cpp
 * @brief Controls a mecanum wheeled robot to move in a square pattern
 *
 * This program creates a ROS 2 node that publishes velocity commands to make a
 * mecanum wheeled robot move in a square pattern. It takes advantage of the
 * omnidirectional capabilities of mecanum wheels to move in straight lines
 * along both X and Y axes.
 *
 * Publishing Topics:
 *     /mecanum_drive_controller/cmd_vel (geometry_msgs/TwistStamped):
 *         Velocity commands for the robot's motion
 *
 * @author Addison Sears-Collins
 * @date August 26, 2026
 */

#include <chrono>
#include <functional>
#include <memory>
#include "rclcpp/rclcpp.hpp"
#include "geometry_msgs/msg/twist_stamped.hpp"

using namespace std::chrono_literals;

class SquareController : public rclcpp::Node
{
public:
    SquareController() : Node("square_controller")
    {
        // Create publisher for velocity commands
        publisher_ = this->create_publisher<geometry_msgs::msg::TwistStamped>(
            "/mecanum_drive_controller/cmd_vel", 10);

        // Create timer that calls our control function every 200ms
        timer_ = this->create_wall_timer(
            200ms, std::bind(&SquareController::timer_callback, this));

        // Initialize variables
        current_side_ = 0;  // Which side of square we're on (0-3)
        elapsed_time_ = 0.0;  // Time spent on current side
        robot_speed_ = 0.2;  // Speed in meters/second
        side_length_ = 2.0;  // Length of each side in meters
        time_per_side_ = side_length_ / robot_speed_;  // Time to complete one side
    }

    // Send stop command when node is shut down
    ~SquareController()
    {
        stop_robot();
    }

    // Function to stop the robot
    void stop_robot()
    {
        auto msg = geometry_msgs::msg::TwistStamped();
        msg.header.stamp = this->now();
        publisher_->publish(msg);  // All velocities default to 0
    }

private:
    void timer_callback()
    {
        // Create velocity command message
        auto msg = geometry_msgs::msg::TwistStamped();
        msg.header.stamp = this->now();

        // Set velocity based on which side of the square we're on
        switch (current_side_) {
            case 0:  // Moving forward (positive X)
                msg.twist.linear.x = robot_speed_;
                break;
            case 1:  // Moving left (positive Y)
                msg.twist.linear.y = robot_speed_;
                break;
            case 2:  // Moving backward (negative X)
                msg.twist.linear.x = -robot_speed_;
                break;
            case 3:  // Moving right (negative Y)
                msg.twist.linear.y = -robot_speed_;
                break;
        }

        // Publish the velocity command
        publisher_->publish(msg);

        // Update time tracking
        elapsed_time_ += 0.2;  // 200ms in seconds

        // Check if we've completed the current side
        if (elapsed_time_ >= time_per_side_) {
            elapsed_time_ = 0.0;
            current_side_ = (current_side_ + 1) % 4;  // Move to next side (0-3)
        }
    }

    // Class member variables
    rclcpp::TimerBase::SharedPtr timer_;
    rclcpp::Publisher<geometry_msgs::msg::TwistStamped>::SharedPtr publisher_;
    int current_side_;
    double elapsed_time_;
    double side_length_;
    double robot_speed_;
    double time_per_side_;
};

int main(int argc, char * argv[])
{
    rclcpp::init(argc, argv);
    auto node = std::make_shared<SquareController>();
    rclcpp::spin(node);
    rclcpp::shutdown();
    return 0;
}

Update your CMakeLists.txt file and package.xml file.

build

Launch your robot in Gazebo.

x3

Now run your node:

ros2 run yahboom_rosmaster_system_tests square_mecanum_controller

Your robot will move in a pattern that resembles a square.

That’s it! You made it to the end! Congratulations!

Keep building!