How to Install ROS Noetic Ninjemys on Ubuntu Linux

In this post, we will install ROS Noetic Ninjemys. As of the date of this tutorial, ROS Noetic Ninjemys is the latest ROS distribution that has long term support. It will be supported until May 2025.

You Will Need

In order to complete this tutorial, you will need:

Directions

The official steps for installing ROS are at this link at ROS.org, but I will walk you through the process below so that you can see what each step should look like.

Select Noetic Ninjemys on this page.

Next, select your platform. I am using Ubuntu, so I will click on the Ubuntu option.

1-land-on-this-pageJPG

Now we need to configure our repositories to allow “restricted”, “universe,” and “multiverse.

Click the 9 white dots at the bottom left of your screen.

2-click-the-9-white-dotsJPG

Search for Software & Updates. Then click on it.

3-search-for-software-and-updatesJPG

Make sure main, universe, restricted, and multiverse are all checked. Then click Close.

4-all-checkedJPG

Now open up a new terminal window, and type (or copy and paste) the following command:

sudo sh -c 'echo "deb http://packages.ros.org/ros/ubuntu $(lsb_release -sc) main" > /etc/apt/sources.list.d/ros-latest.list'
5-type-the-following-commandJPG

The command above sets your computer up to accept software from packages.ros.org. 

Now we need to set up the secure keys so that our system accepts what we are going to download. 

Type or copy & paste the following command.

sudo apt-key adv --keyserver 'hkp://keyserver.ubuntu.com:80' --recv-key C1CF6E31E6BADE8868B172B4F42ED6FBAB17C654

Now, update the package list. This command makes sure you have the most recent list of software packages that can be installed in your Linux system.

sudo apt update

Now do a full desktop install of ROS. The command below installs all the software, tools, algorithms, and robot simulators for ROS.

sudo apt install ros-noetic-desktop-full

After you type the command and press Enter, press Y and hit Enter when asked if you want to continue. It will take a while to download all this stuff, so feel free to take a break while ROS downloads to your system.

6-press-y-to-continueJPG

Set up the environment variables. These variables are necessary in order for ROS to work.

Type the following commands, one right after the other. We are using Bash, so this is what we type:

echo "source /opt/ros/noetic/setup.bash" >> ~/.bashrc
source ~/.bashrc

Check that the environment variables are properly set up. Type the following command:

printenv | grep ROS

Here is what you should see:

7-what-you-should-seeJPG

Let’s also check our .bashrc file to see if the “source /opt/ros/noetic/setup.bash” line was added to it successfully.

gedit .bashrc

There it is at the bottom of the .bashrc file.

8-there-it-isJPG

Now, let’s create a ROS workspace.

A workspace is a folder that contains other folders that store related pieces of ROS code.

The official name for workspaces in ROS is catkin workspaces. The word ‘catkin’ comes from the tail-shaped flower cluster found on willow trees (see photo below) — a reference to Willow Garage, the original developers of ROS. 

All the ROS software packages that you create need to reside inside a catkin workspace. The name of this catkin workspace can be anything, but by convention, it is typically called catkin_ws.

Open a new terminal window, and type the following commands, one right after the other.

First create the workspace.

mkdir -p ~/catkin_ws/src

Move inside the workspace.

cd ~/catkin_ws/

Build the workspace.

catkin_make

You should now have a build, devel, and src folder. Type this command to see those:

dir
9-build-devel-srcJPG

Now, source the new setup.*sh file. This is a file that makes sure your workspace is recognized in your ROS environment.

source devel/setup.bash

Let’s add this code to the .bashrc file so that we don’t have to run it everytime we open a new terminal window.

echo "source ~/catkin_ws/devel/setup.bash" >> ~/.bashrc

We can check to see if that was set up properly by typing this command:

echo $ROS_PACKAGE_PATH
10-setup-properlyJPG

Finally, let’s launch a program to do a final check everything is set up properly. We will launch a simulation of a turtle.

Open a new terminal window, and type this command:

roscore

Open a new terminal tab, and type this command:

rosrun turtlesim turtlesim_node

Here is what you should see:

11-check-the-installationJPG

Congratulations. You have installed ROS!

From here, you can go check out the basics of ROS Noetic Ninjemys. If you’re already familar with ROS, it is often helpful to go through these tutorials to refresh the basics.

Keep building!

How to Create a ROS Package

In this tutorial, we’ll learn how to create a ROS package. Software in ROS is organized into packages. Each package might contain a mixture of code (e.g. ROS nodes), data, libraries, images, documentation, etc. Every program you write in ROS will need to be inside a package.

gifts_packages_made_loop_1
Each ROS package is designed to produce some functionality. ROS packages promote code reuse.

ROS packages promote software reuse. The goal of a ROS package is to be large enough to provide a specific useful functionality, but not so large and complicated that nobody wants to reuse it for their own project.

ROS packages are organized as follows:

  • launch folder: Contains launch files
  • src folder: Contains the source code (C++, Python)
  • CMakeLists.txt: List of cmake rules for compilation
  • package.xml: Package information and dependencies

Here is the official ROS tutorial on how to create a ROS package. I will walk you through this process below.

Directions

Here is the syntax for creating a ROS package. Do not run this piece of code.

catkin_create_pkg <package_name> [depend1] [depend2] [depend3]

package_name is the name of the package you want to make, and depend1, depend2, depend3, etc., are the names of other ROS packages that your package depends on.

Now, open a new terminal window, and move to the source directory of the workspace you created. If you don’t already have a workspace set up, check out this tutorial.

cd ~/catkin_ws/src

Create a ROS package named ‘hello_world’ inside the src folder of the catkin workspace (i.e. catkin_ws). This package will have three dependencies (i.e. libraries the package depends on in order for the code inside the package to run properly): roscpp (the ROS library for C++), rospy (the ROS library for Python), and std_msgs (common data types that have been predefined in ROS … “standard messages”).

catkin_create_pkg hello_world std_msgs rospy roscpp
6-create-a-package

Type dir , and you will see that we now have a package named hello_world inside the source folder of the workspace. 

Change to the hello_world package.

cd hello_world

Note, we could have also used the ROS command to move to the package.

roscd hello_world

Type:

dir
7-inside-src-folder

You can see that we have four files:

CMakeLists.txt: This text file contains the commands to compile the programs that you write in ROS. It also has the commands to convert your source code and other files into an executable (i.e. the code that your computer can run).

include: Contains package header files. You might remember when we wrote header files in the C++ tutorial…well this folder is where your header files would be stored.

src: This folder will contain the C++ source code. If you are doing a project in Python, you can create a new folder named scripts that will contain Python code. To create this new folder type:

mkdir scripts
8-make-directory-scripts

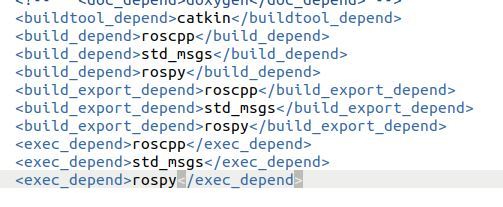
package.xml: This is an Extensible Markup Language (XML) file. An XML file is a text file written in a language (called XML) that is easy to read by both humans and computers. An XML file does not do anything other than store information in a structured way. 

Our package.xml file contains information about the hello_world package. You can see what is inside it by typing:

gedit package.xml
9-package-xml-file

That’s it! You’re all done.

Note that if you ever want to go straight to a package without typing the full path, ROS has a command to enable you to do that. In the terminal window, type the following:

 roscd <package_name>

For example, if we want to go straight to the hello_world package, we would open a new terminal window and type the following command:

roscd hello_world

Compiling a Package in ROS

When you create a new package in ROS, you need to compile it in order for it to be able to run. The command to compile a package in ROS is as follows:

catkin_make

The command above will compile all the stuff inside the src folder of the package.

You must be inside your catkin_ws directory in order for the catkin_make command to work. If you are outside the catkin_ws directory, catkin_make won’t work.

To get to your catkin_ws directory, you can type this command anywhere inside your terminal:

roscd
cd ..

Then to compile all the packages inside the catkin workspace, you type:

catkin_make

If you just want to compile specific packages (in cases where your project is really big), you type this command:

catkin_make --only-pkg-with-deps

For example, if you have a package named hello_world, you can compile just that package:

catkin_make --only-pkg-with-deps hello_world

How to Launch the TurtleBot3 Simulation With ROS

In this tutorial, we will launch a virtual robot called TurtleBot3. TurtleBot3 is a low-cost, personal robot kit with open-source software. You can read more about TurtleBot here at the ROS website.

The official instructions for launching the TurtleBot3 simulation are at this link, but we’ll walk through everything below.

Below is a demo of what you will create in this tutorial. You will get experience with SLAM (Simultaneous localization and mapping) and autonomous navigation.

turtlebot3-simulation

TurtleBot3 is designed to run using just ROS and Ubuntu. It is a popular robot for research and educational purposes.

48-turtlebotsJPG

Table of Contents

Directions

I’m assuming you have ROS installed and are using Linux. If you don’t have ROS installed, install ROS now.

Let’s install the TurtleBot3 simulator now.

Open a terminal window and install the dependent packages. Enter the following commands, one right after the other:

cd ~/catkin_ws/src/
git clone https://github.com/ROBOTIS-GIT/turtlebot3_msgs.git
git clone https://github.com/ROBOTIS-GIT/turtlebot3.git
cd ~/catkin_ws && catkin_make

TurtleBot3 has three models, Burger, Waffle, and Waffle Pi, so you have to set which model you want to use before you launch TurtleBot3. Type this command to open the bashrc file to add this setting:

gedit ~/.bashrc

Add this line at the bottom of the file:

export TURTLEBOT3_MODEL=burger
49-update-bash-settingsJPG

Save the file and close it.

Now reload .bashrc so that you do not have to log out and log back in.

source ~/.bashrc

Now, we need to download the TurtleBot3 simulation files.

cd ~/catkin_ws/src/
git clone https://github.com/ROBOTIS-GIT/turtlebot3_simulations.git
50-turtlebot-simulationsJPG
cd ~/catkin_ws && catkin_make
51-run-catkin-makeJPG

Return to Table of Contents

Simulate TurtleBot3 Using RViz

Now that we have the TurtleBot3 simulator installed, let’s launch the virtual robot using RViz. Type this command in your terminal window:

roslaunch turtlebot3_fake turtlebot3_fake.launch

If you want to move TurtleBot3 around the screen, open a new terminal window, and type the following command (everything on one line in the terminal):

roslaunch turtlebot3_teleop turtlebot3_teleop_key.launch

roslaunch is the command in ROS that enables us to launch a program. The syntax is as follows:

roslaunch <name_of_package> <name_of_launch_file>

The first parameter is the name of the package. The second parameter is the name of the launch file that is inside the package.

What is a Package?

ROS packages are the way software is organized in ROS. They are the smallest thing you can build in ROS.

A package is a directory that contains all of the files, programs, libraries, and datasets needed to provide some useful functionality. ROS packages promote software reuse. Every program that you write in ROS will need to be inside a package.

The goal of a ROS package is to be large enough to be useful but not so large and complicated that nobody wants to reuse it for their own project.

ROS packages are organized as follows:

  • launch folder: Contains launch files
  • src folder: Contains the source code (C++, Python)
  • CMakeLists.txt: List of cmake rules for compilation
  • package.xml: Package information and dependencies

To go straight to a ROS package from a terminal window, the syntax is as follows:

roscd <name_of_package>

For example, to go to the turtlebot3_teleop package, type in a new terminal window:

roscd turtlebot3_teleop

If you type the following command, you can see what is inside there:

ls
showdat-2

What is a Launch File?

From within the turtlebot3_teleop package, move inside the launch file.

cd launch

Let’s take a look inside it.

gedit turtlebot3_teleop_key.launch
launch_file

All launch files start off with the <launch> tag and end with the </launch> tag. Inside these tags, you have the <node> tag that contains the following parameters:

  1. pkg=”package_name”: This is the name of the package that has the code we want ROS to execute.
  2. type=”python_file_name.py”: This is the name of the program we’d like to execute.
  3. name=”node_name”: This is the name of the ROS node we want to launch our program.
  4. output=”type_of_output”: Where you will print the output of the program.

Continuing On…

OK, now that we know what packages are, let’s continue on.

Click the terminal window and use the keys below to control the movement of your TurtleBot (e.g. press W key to move forward, X key to move backward and S to stop).

52-move-turtlebot-aroundJPG
52-turtlebot-rvizJPG
53-move-turtlebotJPG

And remember, use the keyboard to move the robot around.

54-how-to-control-turtlebotJPG

Press CTRL+C in all terminal windows.

Return to Table of Contents

Simulate TurtleBot3 Using Gazebo

Now let’s use Gazebo to do the TurtleBot3 simulation.

First, let’s launch TurtleBot3 in an empty environment. Type this command (everything goes on one line):

roslaunch turtlebot3_gazebo turtlebot3_empty_world.launch

Wait for Gazebo to load. It could take a while. Here is what your screen should look like:

55-gazebo-simulationJPG

Press CTRL+C and close out all windows.

Return to Table of Contents

How to Change the Simulation Environment for TurtleBot3

Let’s look at our TurtleBot3 in a different environment. This environment is often used for testing SLAM and navigation algorithms. Simultaneous localization and mapping (SLAM) concerns the problem of a robot building or updating a map of an unknown environment while simultaneously keeping track its location in that environment.

In a new terminal window type:

roslaunch turtlebot3_gazebo turtlebot3_world.launch
56-gazebo-slam-navigation-viewJPG
57-the-burgerJPG

Press CTRL+C and close out all windows.

We can also simulate TurtleBot3 inside a house. Type this command and wait a few minutes for the environment to load.

roslaunch turtlebot3_gazebo turtlebot3_house.launch
58-turtlebot-in-a-houseJPG

To move the TurtleBot with your keyboard, use this command in another terminal tab:

roslaunch turtlebot3_teleop turtlebot3_teleop_key.launch

Press CTRL+C and close out all windows.

Return to Table of Contents

Autonomous Navigation and Obstacle Avoidance With TurtleBot3

Now let’s implement obstacle avoidance for the TurtleBot3 robot. The goal is to have TurtleBot3 autonomously navigate around a room and avoid colliding into objects.

Open a new terminal and type:

roslaunch turtlebot3_gazebo turtlebot3_world.launch

In another terminal window type:

roslaunch turtlebot3_gazebo turtlebot3_simulation.launch

You should see TurtleBot3 autonomously moving about the world and avoiding obstacles along the way.

59-autonomous-navigation-robotJPG

We can open RViz to visualize the LaserScan topic while TurtleBot3 is moving about in the world. In a new terminal tab type:

roslaunch turtlebot3_gazebo turtlebot3_gazebo_rviz.launch
60-open-rviz-visualize-laserscanJPG

Press CTRL+C and close out all windows.

Return to Table of Contents

Simulating SLAM With TurtleBot3

Let’s take a look at how we can simulate SLAM with TurtleBot3. As a refresher, Simultaneous localization and mapping (SLAM) concerns the problem of a robot building or updating a map of an unknown environment while simultaneously keeping track its location in that environment.

Install the SLAM module in a new terminal window.

sudo apt install ros-melodic-slam-gmapping

Start Gazebo in a new terminal window.

roslaunch turtlebot3_gazebo turtlebot3_world.launch

Start SLAM in a new terminal tab.

roslaunch turtlebot3_slam turtlebot3_slam.launch slam_methods:=gmapping

Start autonomous navigation in a new terminal tab:

roslaunch turtlebot3_gazebo turtlebot3_simulation.launch

Watch the robot create a map of the environment as it autonomously moves from place to place!

61-slam-using-turtlebot3JPG
62-slam-2-using-turtlebot3JPG
62-slam-3-using-turtlebot3JPG

And that is all there is to it.

When you’ve had enough, press CTRL+C and close out all windows.

Return to Table of Contents

That’s it for TurtleBot3. In case you want to try other commands and learn more, check out the official TurtleBot3 tutorials.

If you’re tired of working with ROS using a simulated robot, check out this tutorial on how to build a real, physical autonomous, obstacle-avoiding wheeled robot from scratch using ROS. 

Keep building!