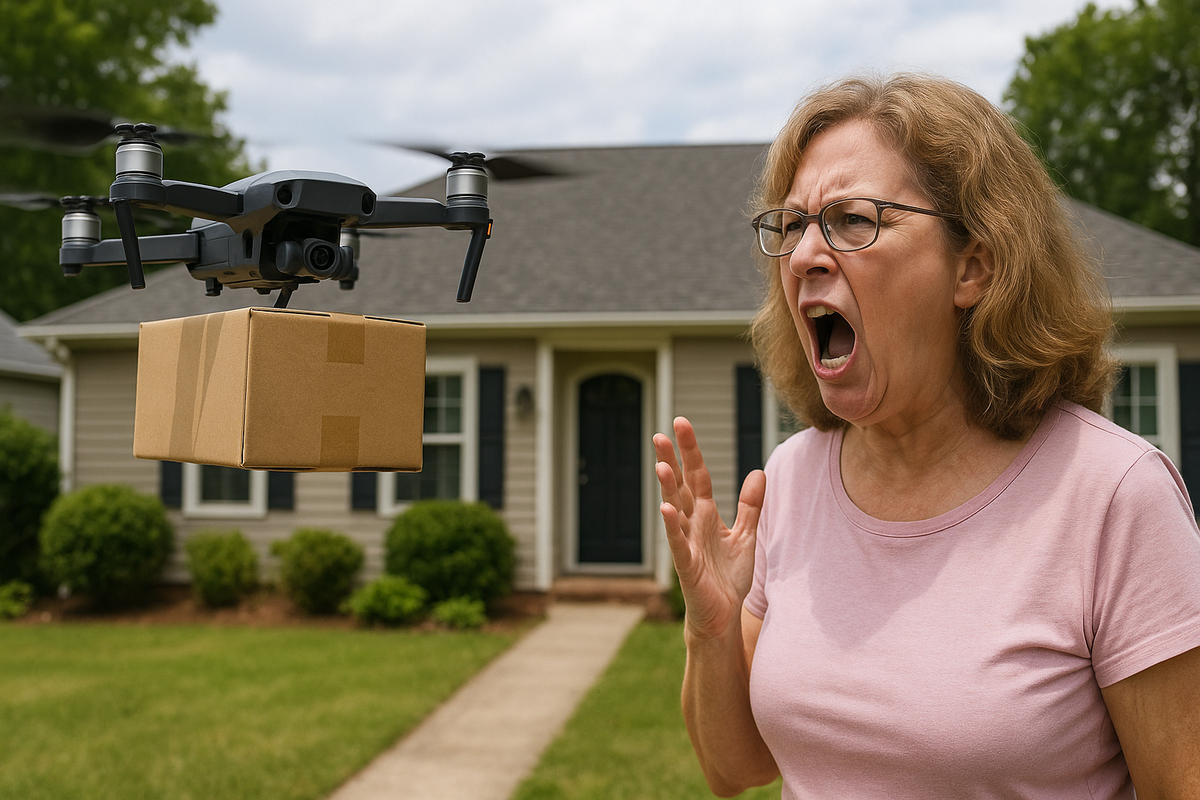
The Secret to Tech Startup Success: Speed and Simplicity

Summary

Winning technology companies become winners and remain winners by satisfying human desires with greater SPEED and/or SIMPLICITY than those who came before them. Those who keep that in mind will profit immensely. Those who lose sight of that will have problems.

If you are running a tech startup, remember that to win over the long haul, you must satisfy human desires with greater speed and/or simplicity than current market leaders. The easiest way to do that is to take a human desire…one that has been around for a long time…and make it more easily attainable by using technology to remove steps from what people are currently doing to satisfy that desire.

Entrepreneurs are professional step removers.

Bottom Line: Help people get what they want faster and/or more simply, and profit immensely.

Introduction

In the realm of technology and innovation, Ev Williams, a co-founder of Twitter and Medium, has articulated a compelling formula for achieving wealth and success: eliminate unnecessary steps in everyday tasks. This principle of simplifying processes to their most efficient forms is not just a strategy but a philosophy that has propelled companies like Uber, Google, and Amazon to unprecedented heights of success and influence. These tech giants have mastered the art of providing unparalleled convenience and ease, essentially by adhering to two fundamental tenets: speed and cognitive ease. By understanding and harnessing the power of these elements, they’ve managed to tap into long-standing human desires, making them more accessible through modern technology.

This blog post aims to delve deep into the concept that Williams highlighted, exploring how the simplicity and speed in technology can serve as a golden ticket to startup success. By examining the trajectories of Uber, Google, and Amazon as illustrative examples, we will uncover the underlying principles that any tech startup can adopt to achieve similar success. Additionally, we will offer actionable insights and strategies for integrating these principles into the fabric of emerging technology ventures.

The Human Desire for Convenience

The quest for convenience is as old as humanity itself. From the invention of the wheel to the creation of the internet, each technological breakthrough has been driven by a desire to make life easier, more efficient, and more enjoyable.

In the pre-digital age, innovations were primarily focused on physical labor and time reduction. However, as we transitioned into the digital era, the focus shifted towards cognitive ease and speed of access.

This shift is rooted in our inherent desire for instant gratification—a trait that has been significantly amplified by the internet and mobile technology. Today, we live in a world where the expectation is not just for things to be easier, but for them to be instantaneously accessible. The success stories of tech giants like Uber, Google, and Amazon are a testament to this evolution. By identifying and eliminating friction points in everyday activities, these companies have not only satisfied but exceeded the modern consumer’s expectations for convenience.

The Philosophy of Simplification

Humans are wired to seek convenience and efficiency. This innate desire has been the driving force behind many technological advancements throughout history. In the digital age, this pursuit has taken on a new dimension, with simplicity and speed becoming paramount in product design and service delivery. The psychological underpinning of this trend is straightforward: the less effort the brain has to make to achieve a desired outcome, the more appealing that pathway becomes. Simplification, therefore, is not just a design principle but a strategic approach to capturing and retaining user interest and loyalty.

Case Studies

Uber

Uber transformed the transportation industry by removing the friction involved in hailing a taxi. By introducing a simple app that connects drivers with passengers, Uber made it possible to secure a ride with just a few taps on a smartphone. This convenience, coupled with transparent pricing and payment, epitomizes the power of removing unnecessary steps to meet a fundamental human need: getting from point A to B efficiently.

Google

Google’s mission to organize the world’s information and make it universally accessible and useful is a testament to the power of simplicity. With a clean interface and a sophisticated algorithm, Google has made it incredibly easy for users to find information on the internet quickly. This focus on speed and ease of use has made Google the go-to search engine for billions of people worldwide.

Amazon

Amazon has revolutionized the retail industry by making online shopping as easy and convenient as possible. From one-click purchases to same-day delivery options, Amazon has continually focused on reducing the barriers to online shopping, fulfilling the human desire for immediate gratification and hassle-free transactions.

Practical Steps for Startups

For startups looking to replicate the success of giants like Uber, Google, and Amazon, the key lies in identifying common activities or pain points that can be simplified. This involves a deep understanding of the target audience and a commitment to designing with the user experience in mind. Continuous improvement based on user feedback is also crucial, as it helps refine the product or service to better meet the needs of the market.

Challenges and Considerations

While simplicity and speed are powerful drivers of success, they are not without their challenges. Startups must carefully balance the quest for simplicity with the need to provide a comprehensive and functional product. Over-simplification can lead to a loss of valuable features or fail to meet users’ needs effectively.

Conclusion

The secret to tech startup success lies in understanding and applying the principle of removing unnecessary steps to make common activities faster and easier. By focusing on speed and simplicity, startups can create products and services that resonate deeply with users, fulfilling their desires in the most efficient way possible. As the tech landscape continues to evolve, the startups that prioritize the user’s ease and convenience will be the ones that stand out and succeed in the crowded marketplace.

How to Create a URDF File of the UR3e Robotic Arm – ROS 2

In this tutorial, I will show you how to create a URDF file (Unified Robot Description Format) file of the UR3e robotic arm, the smallest collaborative robotic arm made by Universal Robots.

ur3e-robot-1

Companies like Universal Robots have excellent ROS 2 support and make regular updates to their GitHub. Universal Robots are the market leaders for collaborative robotic arms.

We will visualize the model we will create in RViz, a 3D visualization tool for ROS 2.

At the end of the UR3e robotic arm, we will add a gripper. Specifically, we will attach the Robotiq 2F-85 adaptive gripper.

Prerequisites

  • (Optional) You have completed this tutorial in which I build a URDF file from scratch for the myCobot 280 by Elephant Robotics.

Useful Links

Here is my GitHub repository for this robotic arm. All the files we will create in this tutorial are also stored there.

Below are some helpful reference links in case you want to learn more about this robotic arm.

Install the ur_description Package

The first thing we need to do is to install their package named ur_description.

sudo apt-get update
sudo apt-get install ros-${ROS_DISTRO}-ur-description

Try the quick launch to see the UR3e robotic arm in RViz.

ros2 launch ur_description view_ur.launch.py ur_type:=ur3e
1-ur3e-robotic-arm-rviz

Let’s check out the UR5e robotic arm.

ros2 launch ur_description view_ur.launch.py ur_type:=ur5e
2-ur5e-robotic-arm-rviz

Install the robotiq-description Package for ROS 2

Let’s install the Robotiq gripper packages for ROS 2.

sudo apt install ros-$ROS_DISTRO-robotiq-description
cd ~/ros2_ws/

Try the quick launch to see the 2F-85 adaptive gripper in RViz.

ros2 launch robotiq_description view_gripper.launch.py
3-robotiq-gripper

Create a Package

Create a new package called ur_robotiq.

In this package, we will combine a UR robotic arms (specifically UR3e) made by Universal Robots with a 2F-85 adaptive gripper made by Robotiq.

Open a new terminal window, and create a new folder named ur_robotiq.

cd ~/ros2_ws/src
mkdir ur_robotiq
cd ur_robotiq

Now create the package where we will store our URDF file.

ros2 pkg create --build-type ament_cmake --license BSD-3-Clause ur_robotiq_description
cd ur_robotiq_description
mkdir urdf
gedit package.xml

Make your package.xml file look like this:

<?xml version="1.0"?>
<?xml-model href="http://download.ros.org/schema/package_format3.xsd" schematypens="http://www.w3.org/2001/XMLSchema"?>
<package format="3">
  <name>ur_robotiq_description</name>
  <version>0.0.0</version>
  <description>Combines URxe robotic arms made by Universal Robots with a Robotiq gripper.</description>
  <maintainer email="automaticaddison@todo.todo">Addison Sears-Collins</maintainer>
  <license>BSD-3-Clause</license>

  <buildtool_depend>ament_cmake</buildtool_depend>

  <exec_depend>robotiq_description</exec_depend>
  <exec_depend>ur_description</exec_depend>

  <test_depend>ament_lint_auto</test_depend>
  <test_depend>ament_lint_common</test_depend>

  <export>
    <build_type>ament_cmake</build_type>
  </export>
</package>
gedit CMakeLists.txt

Make sure CMakeLists.txt looks like this:

cmake_minimum_required(VERSION 3.8)
project(ur_robotiq_description)

# Check if the compiler being used is GNU's C++ compiler (g++) or Clang.
# Add compiler flags for all targets that will be defined later in the 
# CMakeLists file. These flags enable extra warnings to help catch
# potential issues in the code.
# Add options to the compilation process
if(CMAKE_COMPILER_IS_GNUCXX OR CMAKE_CXX_COMPILER_ID MATCHES "Clang")
  add_compile_options(-Wall -Wextra -Wpedantic)
endif()

# Locate and configure packages required by the project.
find_package(ament_cmake REQUIRED)
find_package(robotiq_description REQUIRED)
find_package(ur_description REQUIRED)

# Copy necessary files to designated locations in the project
install (
  DIRECTORY urdf
  DESTINATION share/${PROJECT_NAME}
)

# Automates the process of setting up linting for the package, which
# is the process of running tools that analyze the code for potential
# errors, style issues, and other discrepancies that do not adhere to
# specified coding standards or best practices.
if(BUILD_TESTING)
  find_package(ament_lint_auto REQUIRED)
  # the following line skips the linter which checks for copyrights
  # comment the line when a copyright and license is added to all source files
  set(ament_cmake_copyright_FOUND TRUE)
  # the following line skips cpplint (only works in a git repo)
  # comment the line when this package is in a git repo and when
  # a copyright and license is added to all source files
  set(ament_cmake_cpplint_FOUND TRUE)
  ament_lint_auto_find_test_dependencies()
endif()

ament_package()

Create a metapackage.

cd  ~/ros2_ws/src/ur_robotiq/

I discuss the purpose of a metapackage in this post.

ros2 pkg create --build-type ament_cmake --license BSD-3-Clause ur_robotiq
cd ur_robotiq
rm -rf src/ include/
gedit package.xml

Make your package.xml file look like this:

<?xml version="1.0"?>
<?xml-model href="http://download.ros.org/schema/package_format3.xsd" schematypens="http://www.w3.org/2001/XMLSchema"?>
<package format="3">
  <name>ur_robotiq</name>
  <version>0.0.0</version>
  <description>Combines URxe robotic arms made by Universal Robots with a Robotiq gripper (metapackage).</description>
  <maintainer email="automaticaddison@todo.todo">Addison Sears-Collins</maintainer>
  <license>BSD-3-Clause</license>

  <buildtool_depend>ament_cmake</buildtool_depend>

  <exec_depend>ur_robotiq_description</exec_depend>

  <test_depend>ament_lint_auto</test_depend>
  <test_depend>ament_lint_common</test_depend>

  <export>
    <build_type>ament_cmake</build_type>
  </export>
</package>
gedit CMakeLists.txt

Make sure CMakeLists.txt looks like this:

cmake_minimum_required(VERSION 3.8)
project(ur_robotiq)

if(CMAKE_COMPILER_IS_GNUCXX OR CMAKE_CXX_COMPILER_ID MATCHES "Clang")
  add_compile_options(-Wall -Wextra -Wpedantic)
endif()

# find dependencies
find_package(ament_cmake REQUIRED)
# uncomment the following section in order to fill in
# further dependencies manually.
# find_package(<dependency> REQUIRED)

if(BUILD_TESTING)
  find_package(ament_lint_auto REQUIRED)
  # the following line skips the linter which checks for copyrights
  # comment the line when a copyright and license is added to all source files
  set(ament_cmake_copyright_FOUND TRUE)
  # the following line skips cpplint (only works in a git repo)
  # comment the line when this package is in a git repo and when
  # a copyright and license is added to all source files
  set(ament_cmake_cpplint_FOUND TRUE)
  ament_lint_auto_find_test_dependencies()
endif()

ament_package()

Add this README.md:

gedit README.md

I also recommend adding placeholder README.md files to the ur_robotiq folder as well as the ur_robotiq_description folder.

Now let’s build our new package:

cd ~/ros2_ws

Run this command to install any missing dependencies for your package.

rosdep install --from-paths src --ignore-src -r -y 

Now build the package.

colcon build 

Let’s see if our new package is recognized by ROS 2.

Either open a new terminal window or source the bashrc file like this:

source ~/.bashrc
ros2 pkg list

You can see the newly created package right there at the top.

Create the URDF Files

Create a new urdf folder.

mkdir -p ~/ros2_ws/src/ur_robotiq/ur_robotiq_description/urdf/
cd ur_robotiq

(if you are using Visual Studio Code, type the following…otherwise just create the XACRO file below)

code . 

Create new files inside the ~/ros2_ws/src/ur_robotiq/ur_robotiq_description/urdf/ folder called:

Now let’s build our new package:

cd ~/ros2_ws
colcon build 
source ~/.bashrc

Visualize the URDF Files

Let’s see the URDF files in RViz first.

All of this is a single command below.

ros2 launch urdf_tutorial display.launch.py model:=/home/ubuntu/ros2_ws/src/ur_robotiq/ur_robotiq_description/urdf/ur3e_urdf.xacro

Under Global Options on the upper left panel of RViz, change the Fixed Frame from base_link to world.

By convention, the red axis is the x-axis, the green axis in the y-axis, and the blue axis is the z-axis.

4-visualize-ur3e

You can use the Joint State Publisher GUI pop-up window to move the links around.

Open a new terminal window, and type the following command.

cd ~/Downloads/
ros2 run tf2_tools view_frames

To see the coordinate frames, type:

evince your_file_name.pdf

To close RViz, press CTRL + C.

Now let’s see the Robotiq 2F-85 adaptive gripper.

Make sure this line is set to true in robotiq_2f_85_urdf.xacro.

    <!-- If visualizing just the gripper with no arm, set the true, otherwise, set to false -->
    <xacro:property name="gripper_only" value="true"/>
cd ~/ros2_ws
colcon build 
source ~/.bashrc
ros2 launch urdf_tutorial display.launch.py model:=/home/ubuntu/ros2_ws/src/ur_robotiq/ur_robotiq_description/urdf/robotiq_2f_85_urdf.xacro

Under Global Options on the upper left panel of RViz, change the Fixed Frame from base_link to world.

5-robotiq-gripper

Now let’s see the gripper attached to the robotic arm.

Make sure this line is set to false in robotiq_2f_85_urdf.xacro.

    <!-- If visualizing just the gripper with no arm, set the true, otherwise, set to false -->
    <xacro:property name="gripper_only" value="false"/>
cd ~/ros2_ws
colcon build 
source ~/.bashrc
ros2 launch urdf_tutorial display.launch.py model:=/home/ubuntu/ros2_ws/src/ur_robotiq/ur_robotiq_description/urdf/ur3e_robotiq_2f_85_urdf.xacro

Under Global Options on the upper left panel of RViz, change the Fixed Frame from base_link to world.

6-ur3e-arm-robotiq-2f-85-gripper

That’s it. Keep building!

How to Model a Robotic Arm With a URDF File – ROS 2

In this tutorial, I will show you how to model any robotic arm with a URDF (Unified Robot Description Format) file and then visualize that are using RViz, a 3D visualization tool for ROS 2.

The official tutorial for creating a URDF file is here on the ROS 2 website; but that tutorial only deals with a fictitious robot.

It is far more helpful to show you how to create a URDF file for a real-world robot, like the ones you will work with at your job or at school…like this one below, for example…the myCobot 280 by Elephant Robotics.

1-directions-mycobot-280-for-arduino

Within ROS 2, defining the URDF file of your robotic arm is important because it allows software tools to understand the robot’s structure, enabling tasks like simulation, motion planning, and sensor data interpretation. It’s like giving the robot a digital body that software can interact with.

I want you to get a lot of practice setting up different collaborative robotic arms. We will work with five popular brands.

  1. myCobot 280 for Arduino by Elephant Robotics
  2. UR3e by Universal Robots
  3. Gen3 Lite Robot by Kinova Robotics
  4. WidowX 250 Robot Arm 6DOF by Trossen Robotics
  5. A0509 by Doosan Robotics

I will walk through all the steps below for the myCobot 280. If you want to see how to build the URDF files for the other robotic arm models, click on any of the links above to go to that separate tutorial.

Prerequisites

Directions – myCobot 280 by Elephant Robotics

mycobot_280_for_arduino

I will now show you how to create the URDF file for the myCobot 280 by Elephant Robotics. Below are some helpful reference links in case you want to learn more about this robotic arm.

Here is my GitHub repository for this robotic arm. All the files we will create in this tutorial are also stored there.

Create a Package

The first step is to create a ROS 2 package to store all your files.

Open a new terminal window, and create a new folder named mycobot_ros2.

cd ~/ros2_ws/src
mkdir mycobot_ros2
cd mycobot_ros2

Now create the package where we will store our URDF file.

ros2 pkg create --build-type ament_cmake --license BSD-3-Clause mycobot_description

Create a metapackage.

I discuss the purpose of a metapackage in this post.

ros2 pkg create --build-type ament_cmake --license BSD-3-Clause mycobot_ros2
cd mycobot_ros2
rm -rf src/ include/
gedit package.xml

Make your package.xml file look like this:

<?xml version="1.0"?>
<?xml-model href="http://download.ros.org/schema/package_format3.xsd" schematypens="http://www.w3.org/2001/XMLSchema"?>
<package format="3">
  <name>mycobot_ros2</name>
  <version>0.0.0</version>
  <description>myCobot series robots by Elephant Robotics (metapackage).</description>
  <maintainer email="automaticaddison@todo.todo">Addison Sears-Collins</maintainer>
  <license>BSD-3-Clause</license>

  <buildtool_depend>ament_cmake</buildtool_depend>
  
  <exec_depend>mycobot_description</exec_depend>

  <test_depend>ament_lint_auto</test_depend>
  <test_depend>ament_lint_common</test_depend>

  <export>
    <build_type>ament_cmake</build_type>
  </export>
</package>

Add a README.md to describe what the package is about.

gedit README.md

I also recommend adding placeholder README.md files to the mycobot_ros2 folder as well as the mycobot_description folder.

Now let’s build our new package:

cd ~/ros2_ws
colcon build 

Let’s see if our new package is recognized by ROS 2.

Either open a new terminal window or source the bashrc file like this:

source ~/.bashrc
ros2 pkg list

You can see the newly created package right there at the top.

2-new-packages-recognized-ros2

Start the URDF File

Create a new urdf folder.

mkdir -p ~/ros2_ws/src/mycobot_ros2/mycobot_description/urdf/
cd mycobot_ros2

(if you are using Visual Studio Code, type the following…otherwise just create the XACRO file below)

code . 

Create a new file inside the ~/ros2_ws/src/mycobot_ros2/mycobot_description/urdf/ folder called:

mycobot_280_urdf.xacro

XACRO files are like blueprints for URDF files, using macros and variables to simplify complex robot descriptions.

Imagine XACRO as the architect drawing up plans, and URDF as the final, ready-to-use construction document. Both represent the robotic arm, but XACRO offers more flexibility and organization.

Before a ROS tool or component can use the information in a XACRO file, it must first be processed (translated) into a URDF file. This step allows for the dynamic generation of robot descriptions based on the specific configurations defined in the XACRO file.

Now let’s create the following folder:

mkdir -p ~/ros2_ws/src/mycobot_ros2/mycobot_description/meshes/mycobot_280/

Mesh files are used to visually represent the geometric shape of the robot parts in simulations and visualizations. These files are typically in formats such as STL (Stereo Lithography – .stl) or COLLADA (.dae).

Mesh files define the 3D shapes of components such as links, which are visualized in tools like RViz (ROS visualization tool) and Gazebo (a robot simulation environment).

Now go to the Downloads folder, and let’s download two packages from GitHub which contain the mesh files we need.

cd ~/Downloads/
git clone https://github.com/elephantrobotics/mycobot_ros.git
cd mycobot_ros/mycobot_description/urdf/280_arduino/
dir

Inside here you can see the mesh files (.dae) and the corresponding .png files.

sudo apt-get update
sudo apt-get upgrade
sudo apt-get install rename
rename 's/joint/link/' *.dae
rename 's/joint/link/' *.png
dir

Copy all the .dae and .png files inside this folder into ~/ros2_ws/src/mycobot_ros2/mycobot_description/meshes/mycobot_280/

cp *.dae *.png ~/ros2_ws/src/mycobot_ros2/mycobot_description/meshes/mycobot_280/
cd ..
cd mycobot
cp G_base.dae ~/ros2_ws/src/mycobot_ros2/mycobot_description/meshes/mycobot_280/base_link.dae
cp gripper_base.dae ~/ros2_ws/src/mycobot_ros2/mycobot_description/meshes/mycobot_280/
cp gripper_left1.dae ~/ros2_ws/src/mycobot_ros2/mycobot_description/meshes/mycobot_280/
cp gripper_left2.dae ~/ros2_ws/src/mycobot_ros2/mycobot_description/meshes/mycobot_280/
cp gripper_left3.dae ~/ros2_ws/src/mycobot_ros2/mycobot_description/meshes/mycobot_280/
cp gripper_right1.dae ~/ros2_ws/src/mycobot_ros2/mycobot_description/meshes/mycobot_280/
cp gripper_right2.dae ~/ros2_ws/src/mycobot_ros2/mycobot_description/meshes/mycobot_280/
cp gripper_right3.dae ~/ros2_ws/src/mycobot_ros2/mycobot_description/meshes/mycobot_280/

Now go to the link#.dae files in ~/ros2_ws/src/mycobot_ros2/mycobot_description/meshes/mycobot_280/

Open every link#.dae file. Everywhere it says joint#.png, change that to link#.png (e.g. joint1.png -> link1.png). 

Save the files.

Now let’s create our .xacro file for our myCobot 280 robotic arm.

cd  ~/ros2_ws/src/mycobot_ros2/mycobot_description/urdf/
sudo apt-get install gedit
gedit mycobot_280_urdf.xacro

Here is what the file should look like (you will be directed to the GitHub page for this file).

Now let’s configure the CMakeLists.txt for the mycobot_description package. Make sure it looks like this:

Be sure to add the meshes and urdf file of the package.

Build the package.

cd ~/ros2_ws/
colcon build
source ~/.bashrc

Visualize the URDF File

Let’s see the URDF file in RViz first.

sudo apt-get install ros-${ROS_DISTRO}-urdf-tutorial

All of this is a single command below.

ros2 launch urdf_tutorial display.launch.py model:=/home/ubuntu/ros2_ws/src/mycobot_ros2/mycobot_description/urdf/mycobot_280_urdf.xacro
7-urdf-mycobot280-in-rviz

By convention, the red axis is the x-axis, the green axis in the y-axis, and the blue axis is the z-axis.

5-mycobot_280_for_arduino_axes

You can use the Joint State Publisher GUI pop-up window to move the links around.

6-urdf-mycobot280-in-rviz

On the left panel under Displays, play around by checking and unchecking different options.

For example, under Robot Model, you can see how the mass is distributed for the robot arm by unchecking “Visual Enabled” and “Collision Enabled” and checking the “Mass” checkbox under “Mass Properties”.

9-mass-properties

You can also see what simulation engines will use to detect collisions when the robotic arm is command to go to a certain point.

10-collision-enabled

Uncheck “Visual Enabled” under Robot Model and check “Collision Enabled.”

Open a new terminal window, and type the following command.

ros2 run tf2_tools view_frames

To see the coordinate frames, type:

evince your_file_name.pdf
frames-my-cobot-280

To close RViz, press CTRL + C.

So we can quickly visualize our robot in the future, let’s add a bash command that will enable us to quickly see our URDF.

echo "alias elephant='ros2 launch urdf_tutorial display.launch.py model:=/home/ubuntu/ros2_ws/src/mycobot_ros2/mycobot_description/urdf/mycobot_280_urdf.xacro'" >> ~/.bashrc

To see it was added, type:

cat ~/.bashrc

I also have a bash alias called ‘build’ that will build your workspace when run. You can add this alias to the .bashrc file as follows:

echo "alias build='cd ~/ros2_ws && colcon build && source ~/.bashrc'" >> ~/.bashrc

Now source the .bashrc file.

source ~/.bashrc

Going forward, if you want to see your urdf, type this command in the terminal window:

elephant

Upload Your Work to GitHub (Optional)

At this stage, we have done a lot of work. You can create a GitHub repository to store your code to share it with the world.

That’s it!

Now that you’ve gained some experience building a URDF file from scratch, try building a URDF for other robotic arms. Follow the links at the beginning of this post for those tutorials.