
In this tutorial, we’ll explore how to implement inverse kinematics (IK) with clearance cost optimization using the MoveIt Task Constructor. We’ll create an application from scratch that demonstrates how to plan movements for a robotic arm while considering obstacle clearance. The output of your application will provide detailed insights into the planning process, including the number of solutions found and the performance of each stage.
Here is what your final output will look like (I am flipping back and forth between the two successfully found inverse kinematics solutions):
On a high level, your program will demonstrate a sophisticated approach to motion planning that does the following:
- Sets up a scene with the mycobot_280 robot and a spherical obstacle
- Defines a target pose for the robot’s gripper (end-effector)
- Uses the ComputeIK stage to find valid arm configurations reaching the target
- Applies a clearance cost term to favor solutions that keep the robot farther from obstacles
- Uses ROS 2 parameters to control the behavior of the clearance cost calculation
While OMPL and Pilz are motion planners that generate full trajectories, they rely on IK solutions like those computed in this code to determine feasible goal configurations for the robot. In a complete motion planning pipeline, this IK solver would typically be used to generate goal states, which OMPL or Pilz would then use to plan full, collision-free paths from the robot’s current position to the desired end-effector pose.
Real-World Use Cases
The code you will develop in this tutorial can serve as a foundation for various practical applications:
- Robotic Assembly in Cluttered Environments
- Generate arm configurations that avoid collisions with nearby parts or fixtures
- Optimize for paths that maintain maximum clearance from obstacles
- Bin Picking and Sorting
- Plan motions that safely navigate around the edges of bins and other items
- Minimize the risk of collisions in tight spaces
- Collaborative Robot Operations
- Ensure the robot maintains a safe distance from human work areas
- Dynamically adjust paths based on changing obstacle positions
- Quality Inspection Tasks
- Generate smooth, collision-free paths for sensors or cameras to inspect parts
- Optimize for viewpoints that balance clearance and inspection requirements
By the end of this tutorial, you’ll have a solid understanding of how to implement IK solutions with clearance cost optimization in your motion planning tasks. This approach will make your robotic applications more robust, efficient, and capable of operating safely in complex environments.
Let’s dive into the code and explore how to build this advanced motion planning application!
Prerequisites
- You have completed this tutorial.
All the code is here on my GitHub repository. Note that I am working with ROS 2 Iron, so the steps might be slightly different for other versions of ROS 2.
Create the Code
Open a new terminal window, and type:
cd ~/ros2_ws/src/mycobot_ros2/hello_moveit_task_constructor/src/gedit ik_clearance_cost.cppAdd this code.
/**
 * @file ik_clearance_cost.cpp
 * @brief Demonstrates using MoveIt Task Constructor for motion planning with collision avoidance.
 *
 * This program sets up a motion planning task for a mycobot_280 robot arm using MoveIt Task Constructor.
 * It creates a scene with an obstacle, computes inverse kinematics (IK) solutions, and plans a motion
 * while considering clearance from obstacles.
 *
 * @author Addison Sears-Collins
 * @date August 19, 2024
 */

#include <rclcpp/rclcpp.hpp>
#include <moveit/planning_scene/planning_scene.h>
#include <moveit/task_constructor/task.h>
#include <moveit/task_constructor/stages/fixed_state.h>
#include <moveit/task_constructor/stages/compute_ik.h>
#include <moveit/task_constructor/cost_terms.h>
#include "ik_clearance_cost_parameters.hpp"

// Use the moveit::task_constructor namespace for convenience
using namespace moveit::task_constructor;

/* ComputeIK(FixedState) */
int main(int argc, char** argv) {
  // Initialize ROS 2
  rclcpp::init(argc, argv);

  // Create a ROS 2 node
  auto node = rclcpp::Node::make_shared("ik_clearance_cost_demo");

  // Create a logger
  auto logger = node->get_logger();
  RCLCPP_INFO(logger, "Starting IK Clearance Cost Demo");

  // Start a separate thread to handle ROS 2 callbacks
  std::thread spinning_thread([node] { rclcpp::spin(node); });

  // Create a parameter listener for IK clearance cost parameters
  const auto param_listener = std::make_shared<ik_clearance_cost_demo::ParamListener>(node);
  const auto params = param_listener->get_params();
  RCLCPP_INFO(logger, "Parameters loaded: cumulative=%s, with_world=%s",
              params.cumulative ? "true" : "false",
              params.with_world ? "true" : "false");

  // Create a Task object to hold the planning stages
  Task t;
  t.stages()->setName("clearance IK");
  RCLCPP_INFO(logger, "Task created: %s", t.stages()->name().c_str());

  // Wait for 500 milliseconds to ensure ROS 2 is fully initialized
  rclcpp::sleep_for(std::chrono::milliseconds(500));

  // Load the robot model (mycobot_280)
  t.loadRobotModel(node);
  assert(t.getRobotModel()->getName() == "mycobot_280");
  RCLCPP_INFO(logger, "Robot model loaded: %s", t.getRobotModel()->getName().c_str());

  // Create a planning scene
  auto scene = std::make_shared<planning_scene::PlanningScene>(t.getRobotModel());
  RCLCPP_INFO(logger, "Planning scene created");

  // Set the robot to its default state
  auto& robot_state = scene->getCurrentStateNonConst();
  robot_state.setToDefaultValues();
  RCLCPP_INFO(logger, "Robot state set to default values");

  // Set the arm to its "ready" position
  [[maybe_unused]] bool found =
      robot_state.setToDefaultValues(robot_state.getJointModelGroup("arm"), "ready");
  assert(found);
  RCLCPP_INFO(logger, "Arm set to 'ready' position");

  // Create an obstacle in the scene
  moveit_msgs::msg::CollisionObject co;
  co.id = "obstacle";
  co.primitives.emplace_back();
  co.primitives[0].type = shape_msgs::msg::SolidPrimitive::SPHERE;
  co.primitives[0].dimensions.resize(1);
  co.primitives[0].dimensions[0] = 0.1;
  co.header.frame_id = t.getRobotModel()->getModelFrame();
  co.primitive_poses.emplace_back();
  co.primitive_poses[0].orientation.w = 1.0;
  co.primitive_poses[0].position.x = -0.183;
  co.primitive_poses[0].position.y = -0.14;
  co.primitive_poses[0].position.z = 0.15;
  scene->processCollisionObjectMsg(co);
  RCLCPP_INFO(logger, "Obstacle added to scene: sphere at position (%.2f, %.2f, %.2f) with radius %.2f",
              co.primitive_poses[0].position.x, co.primitive_poses[0].position.y,
              co.primitive_poses[0].position.z, co.primitives[0].dimensions[0]);

  // Create a FixedState stage to set the initial state
  auto initial = std::make_unique<stages::FixedState>();
  initial->setState(scene);
  initial->setIgnoreCollisions(true);
  RCLCPP_INFO(logger, "FixedState stage created");

  // Create a ComputeIK stage for inverse kinematics
  auto ik = std::make_unique<stages::ComputeIK>();
  ik->insert(std::move(initial));
  ik->setGroup("arm");

  // Set the target pose
  ik->setTargetPose(Eigen::Translation3d(-.183, 0.0175, .15) * Eigen::AngleAxisd(M_PI/4, Eigen::Vector3d::UnitX()));

  ik->setTimeout(1.0);
  ik->setMaxIKSolutions(100);

  // Set up the clearance cost term
  auto cl_cost{ std::make_unique<cost::Clearance>() };
  cl_cost->cumulative = params.cumulative;
  cl_cost->with_world = params.with_world;
  ik->setCostTerm(std::move(cl_cost));
  RCLCPP_INFO(logger, "Clearance cost term added to ComputeIK stage");

  // Add the ComputeIK stage to the task
  t.add(std::move(ik));
  RCLCPP_INFO(logger, "ComputeIK stage added to task");

  // Attempt to plan the task
  try {
    RCLCPP_INFO(logger, "Starting task planning");

    // Plan the task
    moveit::core::MoveItErrorCode error_code = t.plan(0);

    // Log the planning result
    if (error_code == moveit::core::MoveItErrorCode::SUCCESS) {
      RCLCPP_INFO(logger, "Task planning completed successfully");
      RCLCPP_INFO(logger, "Found %zu solutions", t.numSolutions());

      // Use printState to log the task state
      std::ostringstream state_stream;
      t.printState(state_stream);
      RCLCPP_INFO(logger, "Task state:\n%s", state_stream.str().c_str());

    } else {
      RCLCPP_ERROR(logger, "Task planning failed with error code: %d", error_code.val);

      // Use explainFailure to log the reason for failure
      std::ostringstream failure_stream;
      t.explainFailure(failure_stream);
      RCLCPP_ERROR(logger, "Failure explanation:\n%s", failure_stream.str().c_str());
    }

    // Log a simple summary of each stage
    RCLCPP_INFO(logger, "Stage summary:");
    for (size_t i = 0; i < t.stages()->numChildren(); ++i) {
      const auto* stage = t.stages()->operator[](i);
      RCLCPP_INFO(logger, "  %s: %zu solutions, %zu failures",
                  stage->name().c_str(), stage->solutions().size(), stage->failures().size());
    }

  } catch (const InitStageException& e) {
    RCLCPP_ERROR(logger, "InitStageException caught during task planning: %s", e.what());
  }

  RCLCPP_INFO(logger, "IK Clearance Cost Demo completed");

  // Wait for the spinning thread to finish
  spinning_thread.join();

  return 0;
}
Save the file, and close it.
Add the Parameters
Now let’s create a parameter file in the same directory as our source code.
gedit ik_clearance_cost_parameters.yamlAdd this code.
ik_clearance_cost_demo:
  cumulative:
    type: bool
    default_value: false
    read_only: true
  with_world:
    type: bool
    default_value: true
    read_only: true
The “cumulative” parameter determines how the robot measures its closeness to obstacles.
- When set to false, the robot only considers its single closest point to any obstacle.
- When set to true, it considers the distance of multiple points on the robot to obstacles, adding these distances together.
This “cumulative” approach provides a more thorough assessment of the robot’s overall proximity to obstacles, potentially leading to more cautious movements.
The “with_world” parameter determines what the robot considers as obstacles when planning its movements.
- When set to true, the robot takes into account all known objects in its environment – this could include tables, chairs, walls, or any other obstacles that have been mapped or sensed. It’s like the robot is aware of its entire surroundings.
- When set to false, the robot might only consider avoiding collisions with itself (self-collisions) or a specific subset of objects, ignoring the broader environment.
Save the file, and close it.
Build the Code
cd ~/ros2_ws/colcon buildsource ~/.bashrc
(OR source ~/ros2_ws/install/setup.bash if you haven’t set up your bashrc file to source your ROS distribution automatically with “source ~/ros2_ws/install/setup.bash”)Launch
Open two terminal windows, and run the following commands to launch our standard MoveIt 2 environment:
ros2 launch mycobot_gazebo mycobot_280_arduino_bringup_ros2_control_gazebo.launch.py use_rviz:=falseros2 launch hello_moveit_task_constructor demo.launch.pyNow run the demo:
ros2 launch hello_moveit_task_constructor run.launch.py exe:=ik_clearance_costHere is what you should see:

Understanding the Motion Planning Results
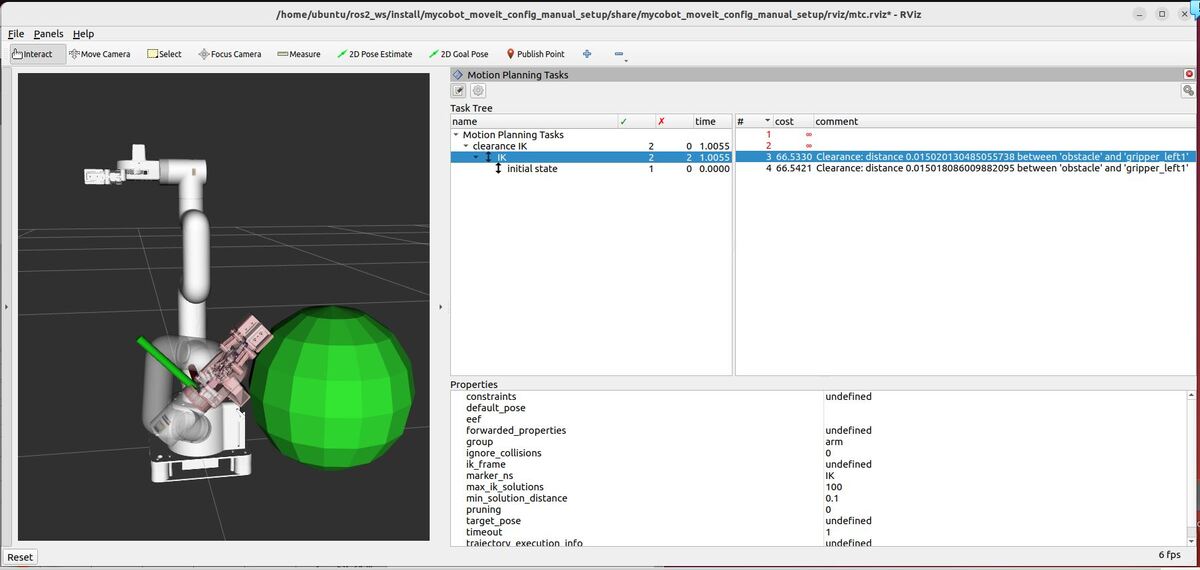
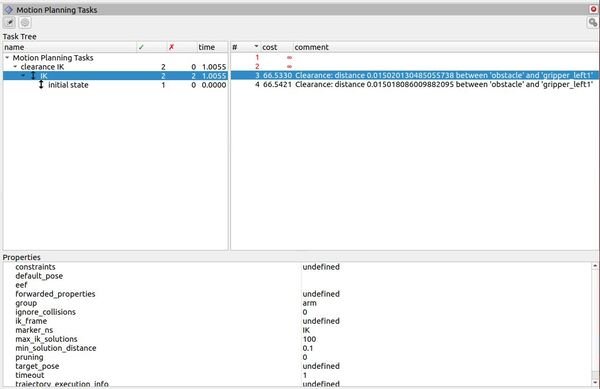
RViz – “Motion Planning Tasks” Panel
The “Motion Planning Tasks” panel in RViz displays the structure and outcomes of our IK clearance cost task. The panel shows a hierarchical view with “Motion Planning Tasks” at the root, followed by “clearance IK”.
Under “clearance IK“, two stages are visible:
- “IK”: This represents the ComputeIK stage where inverse kinematics solutions are generated.
- “initial state”: This corresponds to the FixedState stage that sets the initial robot configuration.
The second column shows green checkmarks and numbers indicating the quantity of successful solutions for each task component. The image reveals that 2 solutions were found for the overall “clearance IK” task, both originating from the “IK” stage.
The “time” column displays the computational time for each component. For the “IK” stage, we see a value of 1.0055 seconds, indicating the duration of the inverse kinematics calculations.
The “cost” column is particularly noteworthy in this context. For the successful IK solutions, we observe a cost value of 66.5330. This cost is directly related to the clearance cost term we incorporated into our ComputeIK stage.
The “comment” column provides additional context for the solutions. It displays the clearance distances between the obstacle and a specific robot part, “gripper_left1”. This information quantifies how the robot positions itself relative to the obstacle in the computed solutions.
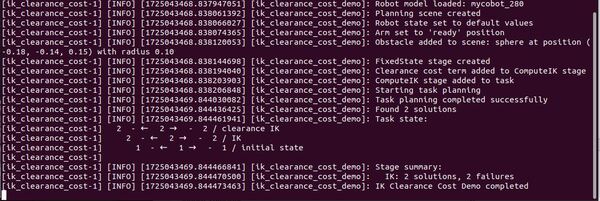
Terminal Window – Planning Results
Analyzing the terminal output of our IK clearance cost demo:
- The mycobot_280 robot model was loaded successfully.
- A planning scene was generated, and the robot was positioned in its ‘ready’ configuration.
- An obstacle, represented by a sphere, was introduced to the scene at coordinates (-0.18, -0.14, 0.15) with a 0.10 radius.
- The FixedState and ComputeIK stages were established and incorporated into the task.
- Task planning concluded successfully, yielding 2 solutions.
Analyzing the terminal output of our IK clearance cost demo, we see the following task structure:
This structure provides insights into the flow of solutions through our planning task:
- clearance IK (top level):
- 2 solutions were propagated backward
- 2 solutions were propagated forward
- 2 solutions were ultimately generated
- IK stage:
- 2 solutions were generated at this stage
- 2 solutions were propagated backward
- 2 solutions were propagated forward
- initial state:
- 1 solution was generated at this stage
- 1 solution was propagated backward
- 1 solution was propagated forward
This output demonstrates the bidirectional nature of the planning process in the MoveIt Task Constructor. The initial state provides a starting point, which is then used by the IK stage to generate solutions. These solutions are propagated both forward and backward through the planning pipeline.
The fact that we see two solutions at the IK stage indicates that our ComputeIK stage, incorporating the clearance cost term, successfully found two distinct inverse kinematics solutions that satisfied our constraints. These solutions maintained sufficient clearance from the obstacle while reaching the target pose.
The propagation of these two solutions both forward and backward means they were feasible within the context of both the initial state and the overall task requirements. This bidirectional flow helps ensure that the generated solutions are consistent and achievable given the robot’s starting configuration and the task’s goals.
By examining these results in conjunction with the RViz visualization, you can gain a comprehensive understanding of how the robot’s configuration changes to maintain clearance from the obstacle while achieving the desired pose of the gripper.
Detailed Code Walkthrough
Now for the C++ part. Let’s go through each piece of this code, step by step.
cd ~/ros2_ws/src/mycobot_ros2/hello_moveit_task_constructor/src/gedit ik_clearance_cost.cppFile Header and Includes
The code begins with a comprehensive comment block outlining the file’s purpose: demonstrating motion planning with collision avoidance using the MoveIt Task Constructor. It describes the program’s functionality, which creates a scene with an obstacle and computes inverse kinematics (IK) solutions while considering clearance from obstacles.
The file includes necessary headers for ROS 2, MoveIt, and the Task Constructor library, establishing the foundation for our IK clearance cost demo.
Main Function
All the logic for this program is contained within the main function. Let’s break it down into its key components.
ROS 2 Initialization and Node Setup
The code initializes ROS 2 and creates a node named “ik_clearance_cost_demo”. It sets up a logger for informational output. This setup ensures proper communication within the ROS 2 ecosystem.
Parameter Handling
The code sets up a parameter listener to load and manage parameters for the IK clearance cost demo. It logs whether the clearance cost should be cumulative and whether it should consider the world.
Task Setup and Robot Model Loading
A Task object is created and named “clearance IK”. The robot model (“mycobot_280”) is loaded and verified. This step is important for accurate motion planning based on the specific robot’s characteristics.
Planning Scene Setup
The code creates a planning scene, sets the robot to its default state, and then sets the arm to its “ready” position.
Obstacle Creation
An obstacle (a sphere) is created and added to the planning scene. This obstacle will be considered during the IK calculations to ensure clearance.
FixedState Stage Setup
A FixedState stage is created to set the initial state of the robot. It uses the previously configured scene and ignores collisions at this stage.
ComputeIK Stage Setup
A ComputeIK stage is created for inverse kinematics calculations. It’s configured with the initial state, target group (“arm”), target pose, timeout, and maximum number of IK solutions to compute.
Clearance Cost Term Setup
A clearance cost term is created and added to the ComputeIK stage. This cost term will influence the IK solutions to maintain clearance from obstacles.
Task Planning and Execution
The code attempts to plan the task using the defined stages. It includes error handling for potential exceptions during planning, ensuring robustness in various scenarios.
Results Logging
The code logs the results of the planning process, including the number of solutions found, the task state, or failure explanations if the planning was unsuccessful.
Node Spinning
A separate thread is created for spinning the ROS 2 node. This allows the program to handle callbacks and events while performing its main tasks.
That’s it. Keep building!