
In this tutorial, we will install ROS 2 Jazzy.
By the end of this tutorial, you will be running your first ROS 2 programs.
If you prefer learning through video rather than text, check out the YouTube video below where I walk you through the entire process step by step. Otherwise, keep reading.
You Will Need
In order to complete this tutorial, you will need:
- A computer or virtual machine running Ubuntu 24.04. If you followed my previous tutorial, you already have that setup.
Set the Locale
The official steps for installing ROS are at this link at ROS.org, but let’s go through this entire process together.
Follow along with me click by click, keystroke by keystroke.
We will begin by installing ROS 2 Jazzy via Debian Packages. Debian packages are software files used to install programs and applications on Ubuntu.
Open a new terminal window.
Type this command inside a terminal window.
localeA locale is a set of variables that define the language, country, and character encoding settings. These settings are used by applications to determine how to display text, dates, times, and other information.
Now type the following command:
sudo apt update && sudo apt install locales“sudo apt update” updates the package index list. This list is a database of all the software packages available for your version of Ubuntu.
“sudo apt install locales” installs the locales package, which provides support for different languages and regions.
Now type the following commands into the terminal window to generate locale definition files. After each command, press Enter on your keyboard:
sudo locale-gen en_US en_US.UTF-8sudo update-locale LC_ALL=en_US.UTF-8 LANG=en_US.UTF-8export LANG=en_US.UTF-8In this case, these commands are generating locale definition files for the English (United States) locale and the English (United States) UTF-8 locale. The UTF-8 locale is a special locale that supports the UTF-8 character encoding, which is the standard encoding for most languages.
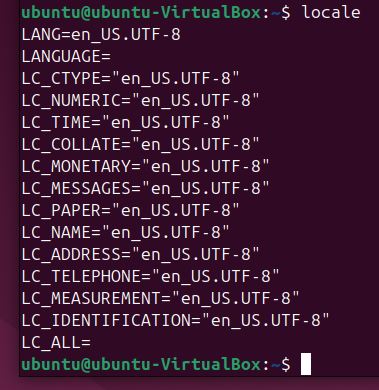
Now we need to verify the settings by typing:
localeHere is what you should see:
Enable the Required Repositories
Let’s add the ROS 2 apt repository to our system. APT stands for “Advanced Package Repository”. This repository provides a convenient way to install and manage ROS 2 packages without having to clone packages to your computer from GitHub and build them from that source code.
Open a terminal window, and type the following two commands:
sudo apt install software-properties-commonsudo add-apt-repository universePress Enter.
The software-properties-common package provides a number of tools for managing software sources on Ubuntu and Debian systems.
The universe repository is a software repository that contains a wide variety of software packages, including many that are not included in the default Ubuntu and Debian repositories.
Now we need to add the ROS 2 GPG key with apt. The ROS 2 GPG key makes sure the software packages you are installing are from a trusted source.
Type these two commands:
sudo apt update && sudo apt install curl -ysudo curl -sSL https://raw.githubusercontent.com/ros/rosdistro/master/ros.key -o /usr/share/keyrings/ros-archive-keyring.gpgAdd the repository to your sources list (copy and paste all of this below):
echo "deb [arch=$(dpkg --print-architecture) signed-by=/usr/share/keyrings/ros-archive-keyring.gpg] http://packages.ros.org/ros2/ubuntu $(. /etc/os-release && echo $UBUNTU_CODENAME) main" | sudo tee /etc/apt/sources.list.d/ros2.list > /dev/nullType the following command to install ROS 2 development tools.
sudo apt update && sudo apt install ros-dev-toolsUpgrade the packages on your system to make sure you have the newest versions.
sudo apt upgrade -yInstall ROS 2
Now for the fun part. Here is where we get to install ROS 2 Jazzy.
Open a terminal window, and type this command:
sudo apt install ros-jazzy-desktopSet Up the Environment Variables
Once jazzy has finished installing, you need to set up the important environment variables. Environment variables are settings that tell your computer how to find and use ROS 2 commands and packages.
Open a terminal window, and type this command:
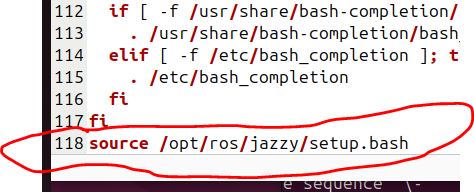
echo "source /opt/ros/jazzy/setup.bash" >> ~/.bashrcWhen you run this command, it appends the line source /opt/ros/jazzy/setup.bash to your ~/.bashrc file.
What does this do? Each time you open a new terminal window, you are starting what is called a bash session. The bash session needs to know what version of ROS 2 you are using.
By adding this line (echo “source /opt/ros/jazzy/setup.bash”) to your ~/.bashrc file, you ensure the necessary environment variables and paths for ROS 2 Jazzy are properly set up each time you open a new terminal window, allowing you to use ROS 2 commands and tools without having to manually run the setup.bash script every time.
For the changes to take effect, you now need to open a new terminal window, or you can type this command in the current terminal:
source ~/.bashrcYou can verify that line was added by typing:
sudo apt-get install gedit -ygedit ~/.bashrcClose the gedit window.
Check Your ROS 2 Version
Now let’s see what ROS 2 version we are using using:
printenv ROS_DISTROYou should see “jazzy”.
You can also type:
env | grep ROS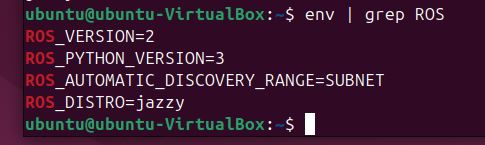
Finally, you can also type:
echo $ROS_DISTROSet up the system to manage ROS package dependencies.
sudo rosdep initrosdep updateInstall Gazebo and Other Useful Packages
Let’s install some other useful packages like pip (the Python package manager), Gazebo, a simulation software for robotics, and NumPy, a scientific computing library for Python.
sudo apt-get install python3 python3-pip -ysudo apt-get install ros-${ROS_DISTRO}-ros-gz -ysudo apt-get install python3-numpyTest Your Gazebo Installation
If you want to run an example Gazebo simulation world now, open a new terminal window, and type:
gz sim -v 4 shapes.sdfNow test your Gazebo installation again by typing the following command:
gz simYou should see this screen.

Click on the NAO Joint Control simulation, and click Run.
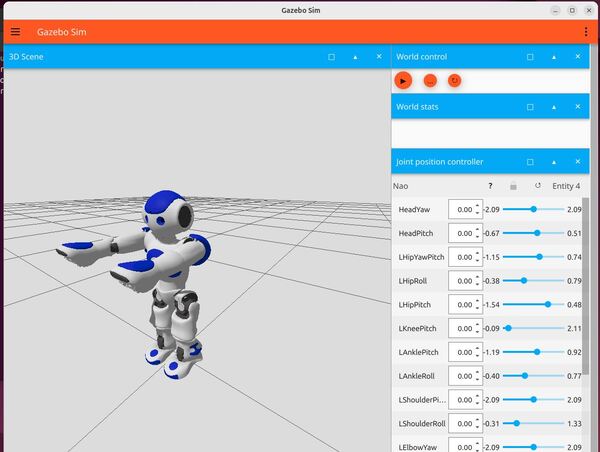
Close the simulation by typing CTRL + C in the terminal window.
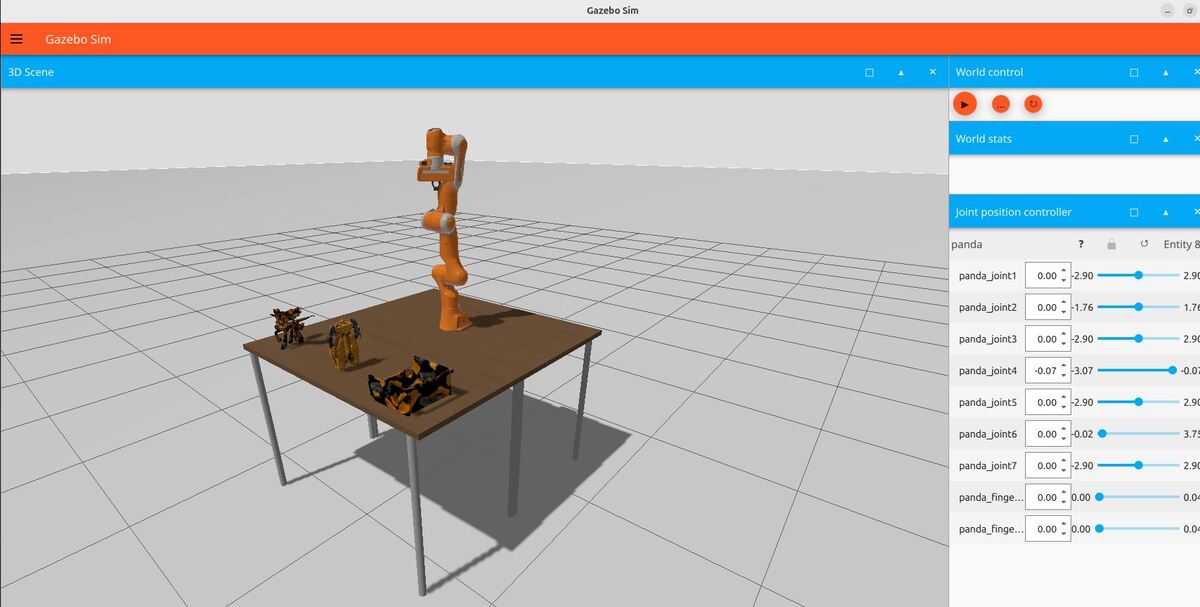
Now try the Panda Joint Control World.
gz simClick on the Panda Joint Control World simulation, and click Run. It might take up to 60 seconds to load. Just be patient and don’t quit Gazebo if asked.
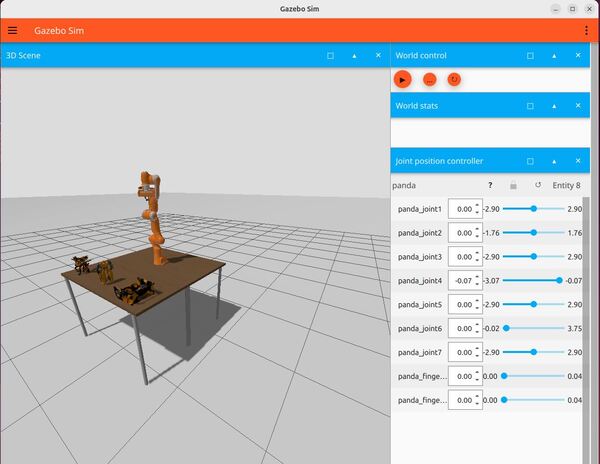
Close the simulation by typing CTRL + C in the terminal window.
Now run another example:
gz sim shapes.sdf -v 4Close the simulation by typing CTRL + C in the terminal window.
Now let’s run the same shapes example using a ros2 command (source: official Gazebo ROS 2 GitHub repository):
ros2 launch ros_gz_sim gz_sim.launch.py gz_args:="shapes.sdf"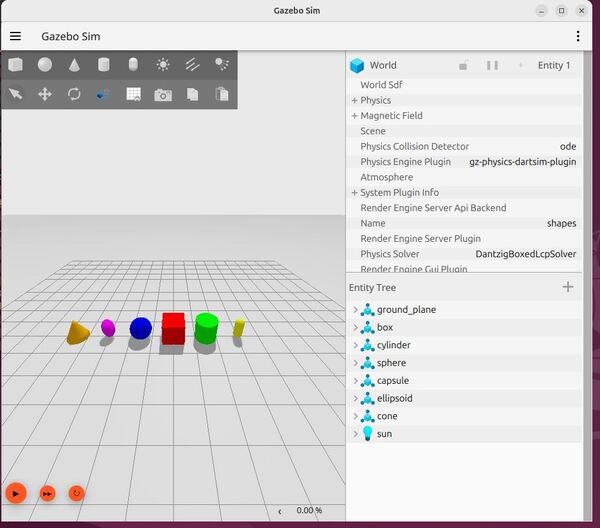
Close the simulation by typing CTRL + C in the terminal window.
Test Your ROS 2 Installation
Now that we have tested Gazebo, let’s test our ROS 2 installation by running some sample programs.
Open a terminal window, and type:
ros2 run demo_nodes_cpp talker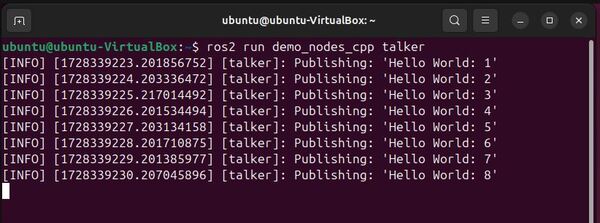
This command runs a pre-built program called “talker” that comes with ROS 2. The “talker” program publishes messages to the ROS 2 system in string format.
Open another terminal window, and type:
ros2 run demo_nodes_py listener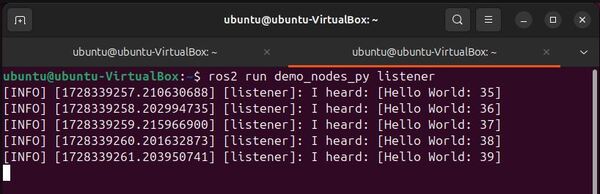
If your output looks similar to the images above, you have installed ROS 2 successfully.
To close these programs, press CTRL + C on your keyboard in both terminal windows.
So what did we just do here, and what do these two hello world programs we just ran have to do with real robots?
So imagine you’re building a robot that needs to navigate through a room. The “talker” program is like a sensor on the robot (e.g., a depth camera for example) that constantly sends out information about what it sees.
The “listener” program, on the other hand, receives the information that was published by the talker program. This listener program, in a real robot, could do something with that data like stop the wheels if an obstacle is detected by the camera.
The talker program is what we call in ROS 2, a publisher. The listener program is called a subscriber. Remember those two terms. Those are the two most important terms in all of ROS 2.
A ROS 2 publisher sends data, and a subscriber receives data.
In future tutorials, we will create our own publishers and subscribers for actual robots.
Publishers and subscribers are the main way programs exchange information with each other inside a robot.
So, again, just remember this…publishers are programs that send data to other programs, and subscribers are programs that receive data from other programs. All these programs are usually written in either Python or C++.
Collectively, publishers and subscribers in ROS 2 are called nodes. You just saw how to run a publisher node named talker and a subscriber node named listener.
The term node is the third most important term in all of ROS 2. So remember it because you will be using that term again and again over the course of your work with ROS 2.
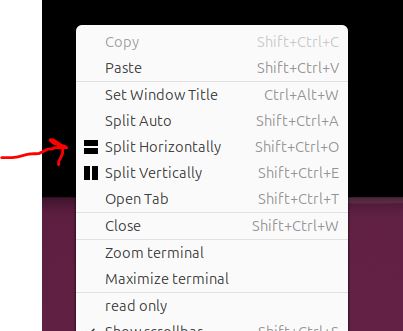
To close out this tutorial, let me show you a cool program that enables you to show multiple terminal windows in a single window.
The program is called terminator.
Open a terminal window, and type:
sudo apt-get install terminator -yNow type:
terminatorRight-click on the screen, and click “Split Horizontally”.
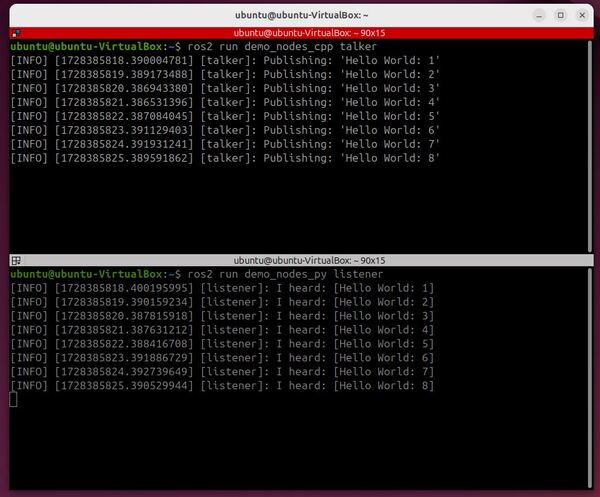
On the top panel, type:
ros2 run demo_nodes_cpp talkerOn the bottom panel, type:
ros2 run demo_nodes_py listenerNow, press Enter in both terminals.
Here is what you should get:
Press CTRL + C in both terminal windows to close everything.
That’s it! Keep building! I’ll see you in the next tutorial.